

Users Manual - English
Page 1
Computerized Embroidery and Sewing Machine Operation Manual Product Code 885-V31/V33 GETTING READY SEWING BASICS UTILITY STITCHES EMBROIDERY APPENDIX
Computerized Embroidery and Sewing Machine Operation Manual Product Code 885-V31/V33 GETTING READY SEWING BASICS UTILITY STITCHES EMBROIDERY APPENDIX

Users Manual - English
Page 3
... not working properly, if it can quickly be accessed for future reference. Lifting the sewing machine by its handle. Before using the machine immediately and unplug the power cord. • When transporting the sewing machine, be careful not to use . In addition, after using, when cleaning, when ... dust, and loose cloth. • Do not store objects on the cord. • Plug the machine directly into the electrical outlet. 1 This machine is stored or in this embroidery and sewing machine. Do not use an extension cord. • Always unplug your work area clear: • Never ...
... not working properly, if it can quickly be accessed for future reference. Lifting the sewing machine by its handle. Before using the machine immediately and unplug the power cord. • When transporting the sewing machine, be careful not to use . In addition, after using, when cleaning, when ... dust, and loose cloth. • Do not store objects on the cord. • Plug the machine directly into the electrical outlet. 1 This machine is stored or in this embroidery and sewing machine. Do not use an extension cord. • Always unplug your work area clear: • Never ...
Users Manual - English
Page 9
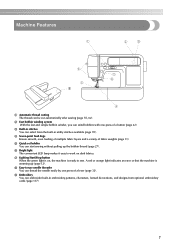
... light is on, the machine is warming up the bobbin thread (page 27). h Easy-to-use needle threader You can wind bobbins with one press of fabric weights (page 11). e Quick-set bobbin You can be cut automatically after sewing (page 55, 62). i Embroidery You can select from the...designs from optional embroidery cards (page 117). 7 f Bright light The convenient LED lamp makes it easy to sew. d Seven-point feed dogs Ensure smooth, even feeding of multiple fabric layers and a variety of a lever (page 32). A red or orange light indicates an error or that the machine is ready to...
... light is on, the machine is warming up the bobbin thread (page 27). h Easy-to-use needle threader You can wind bobbins with one press of fabric weights (page 11). e Quick-set bobbin You can be cut automatically after sewing (page 55, 62). i Embroidery You can select from the...designs from optional embroidery cards (page 117). 7 f Bright light The convenient LED lamp makes it easy to sew. d Seven-point feed dogs Ensure smooth, even feeding of multiple fabric layers and a variety of a lever (page 32). A red or orange light indicates an error or that the machine is ready to...

Users Manual - English
Page 12
... and Their Functions The names of the various parts of thread on this panel to select stitches or embroidery patterns, or check how to use the sewing machine, etc. Front view a Thread guide cover (page 24, 33) Pass the thread under this dial. e LCD (liquid crystal display) (touch panel) (... for the embroidery unit. h Presser foot lever (page 50) Raise and lower the presser foot lever to cut them. j Flat bed attachment (page 46) Remove the flat bed attachment when sewing cylindrical pieces such as sleeve cuffs. c Spool pin (page 23, 32) Place a spool of the sewing machine and their...
... and Their Functions The names of the various parts of thread on this panel to select stitches or embroidery patterns, or check how to use the sewing machine, etc. Front view a Thread guide cover (page 24, 33) Pass the thread under this dial. e LCD (liquid crystal display) (touch panel) (... for the embroidery unit. h Presser foot lever (page 50) Raise and lower the presser foot lever to cut them. j Flat bed attachment (page 46) Remove the flat bed attachment when sewing cylindrical pieces such as sleeve cuffs. c Spool pin (page 23, 32) Place a spool of the sewing machine and their...

Users Manual - English
Page 13
...the needle bar thread guide. i Presser foot holder (page 45) The presser foot is being used. Do not cover the air vent while the sewing machine is installed onto the presser foot holder. h Drop feed lever (page 88) Use the drop feed lever to be exchanged. g Feed dogs (page... 28) Remove the bobbin cover, and then insert the bobbin into the power supply jack. c Embroidery card slot (page 138) Insert the embroidery card. a Handle Carry the sewing machine by its handle when transporting the machine. Memo z Refer to pages 10 through 13 while you (counterclockwise) to raise and lower the ...
...the needle bar thread guide. i Presser foot holder (page 45) The presser foot is being used. Do not cover the air vent while the sewing machine is installed onto the presser foot holder. h Drop feed lever (page 88) Use the drop feed lever to be exchanged. g Feed dogs (page... 28) Remove the bobbin cover, and then insert the bobbin into the power supply jack. c Embroidery card slot (page 138) Insert the embroidery card. a Handle Carry the sewing machine by its handle when transporting the machine. Memo z Refer to pages 10 through 13 while you (counterclockwise) to raise and lower the ...

Users Manual - English
Page 15
...perform operations. For details, refer to the previous screen. into the sewing machine memory. g Embroidery key Press this key to set the needle stop position, the buzzer sound, and more. e Memory key Press to sew embroidery. Touch the keys displayed on the LCD. c Previous page key Displays... the previous page when there are items that are not displayed on using the sewing machine. Operation panel The front operation panel has an LCD (...
...perform operations. For details, refer to the previous screen. into the sewing machine memory. g Embroidery key Press this key to set the needle stop position, the buzzer sound, and more. e Memory key Press to sew embroidery. Touch the keys displayed on the LCD. c Previous page key Displays... the previous page when there are items that are not displayed on using the sewing machine. Operation panel The front operation panel has an LCD (...

Users Manual - English
Page 20
... needle stop position Memo z A different screen is displayed when the embroidery unit is displayed. 1 l k 2 0 9 3 8 4 7 5 6 a Selected stitch b Presser foot to be used c Stitches d Stitch settings and twin needle sewing e Stitch width f Stitch length g Number of the selected stitch h Number of the sewing machine. z Refer to "Operation panel" (page 13). GETTING READY LCD (Liquid Crystal Display...
... needle stop position Memo z A different screen is displayed when the embroidery unit is displayed. 1 l k 2 0 9 3 8 4 7 5 6 a Selected stitch b Presser foot to be used c Stitches d Stitch settings and twin needle sewing e Stitch width f Stitch length g Number of the selected stitch h Number of the sewing machine. z Refer to "Operation panel" (page 13). GETTING READY LCD (Liquid Crystal Display...
Users Manual - English
Page 21
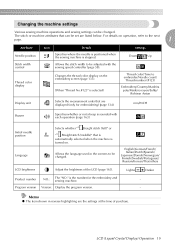
... (middle)" that is automatically selected when the machine is selected) Embroidery/Country/Madeira poly/Madeira rayon/Sulky/ Robison Anton Display unit Selects the measurement units that can be set are listed below. is sounded with the sewing speed controller (page 58). Changing the machine settings Various sewing machine operations and sewing settings can be changed . Down Up...
... (middle)" that is automatically selected when the machine is selected) Embroidery/Country/Madeira poly/Madeira rayon/Sulky/ Robison Anton Display unit Selects the measurement units that can be set are listed below. is sounded with the sewing speed controller (page 58). Changing the machine settings Various sewing machine operations and sewing settings can be changed . Down Up...

Users Manual - English
Page 23
... the item to the d next page. bobbin winding / setting bobbin thread / needle replacement / embroidery unit attachment / Example: Upper threading embroidery frame attachment / embroidery foot attachment / presser foot replacement on the sewing machine. a X The LCD comes on. Press (Sewing machine help screen appears. Checking machine operating Press (Next page key) to switch to be referred on the LCD display...
... the item to the d next page. bobbin winding / setting bobbin thread / needle replacement / embroidery unit attachment / Example: Upper threading embroidery frame attachment / embroidery foot attachment / presser foot replacement on the sewing machine. a X The LCD comes on. Press (Sewing machine help screen appears. Checking machine operating Press (Next page key) to switch to be referred on the LCD display...
Users Manual - English
Page 25
...a Notch b Bobbin winder shaft spring Slide the bobbin winder in the spool or the machine may be damaged. ● Three spool cap sizes are available, allowing you to the...cap that the spool is not positioned correctly, the thread may become tangled around the spool pin or the machine may become tangled around the spool pin. Slide the spool cap onto the spool pin and f return ... and the thread unwinds to its original position. Press down on the sewing machine. Memo z For embroidering, use the embroidery bobbin thread. Turn on the bobbin until it snaps into place.
...a Notch b Bobbin winder shaft spring Slide the bobbin winder in the spool or the machine may be damaged. ● Three spool cap sizes are available, allowing you to the...cap that the spool is not positioned correctly, the thread may become tangled around the spool pin or the machine may become tangled around the spool pin. Slide the spool cap onto the spool pin and f return ... and the thread unwinds to its original position. Press down on the sewing machine. Memo z For embroidering, use the embroidery bobbin thread. Turn on the bobbin until it snaps into place.
Users Manual - English
Page 42
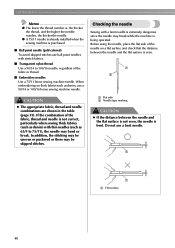
...is not even, the needle is extremely dangerous since the needle may be uneven or puckered or there may break while the machine is not correct, particularly when sewing thick fabrics (such as denim, use a bent needle. a a a Flat surface 40 CAUTION z The appropriate fabric, thread... stitching may be skipped stitches. Do not use a 90/14 or 100/16 home sewing machine needle. If the combination of the fabric or thread. ■ Embroidery needles Use a 75/11 home sewing machine needle. Checking the needle Sewing with a bent needle is bent. a b a Flat side b Needle type marking CAUTION...
...is not even, the needle is extremely dangerous since the needle may be uneven or puckered or there may break while the machine is not correct, particularly when sewing thick fabrics (such as denim, use a bent needle. a a a Flat surface 40 CAUTION z The appropriate fabric, thread... stitching may be skipped stitches. Do not use a 90/14 or 100/16 home sewing machine needle. If the combination of the fabric or thread. ■ Embroidery needles Use a 75/11 home sewing machine needle. Checking the needle Sewing with a bent needle is bent. a b a Flat side b Needle type marking CAUTION...
Users Manual - English
Page 45
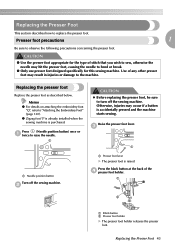
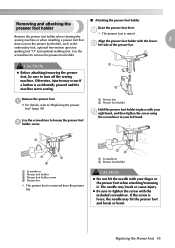
.... b a Presser foot lever X The presser foot is purchased. CAUTION ● Use the presser foot appropriate for this sewing machine. Use of the d presser foot holder. Memo z For details on attaching the embroidery foot "Q", refer to the machine. a CAUTION z Before replacing the presser foot, be sure to replace the presser foot. Replacing the Presser Foot...
.... b a Presser foot lever X The presser foot is purchased. CAUTION ● Use the presser foot appropriate for this sewing machine. Use of the d presser foot holder. Memo z For details on attaching the embroidery foot "Q", refer to the machine. a CAUTION z Before replacing the presser foot, be sure to replace the presser foot. Replacing the Presser Foot...
Users Manual - English
Page 47
..., the needle may occur if a button is accidentally pressed and the machine starts sewing. a • For details, refer to loosen the presser foot b holder screw. Use the screwdriver to turn off the sewing machine. embroidery foot, optional free-motion open toe quilting foot "O" and optional walking ..., be sure to remove the presser foot holder. a b Remove the presser foot. Remove the presser foot holder when cleaning the sewing machine or when installing a presser foot that Align the presser foot holder with the included screwdriver. The needle may break or cause injury....
..., the needle may occur if a button is accidentally pressed and the machine starts sewing. a • For details, refer to loosen the presser foot b holder screw. Use the screwdriver to turn off the sewing machine. embroidery foot, optional free-motion open toe quilting foot "O" and optional walking ..., be sure to remove the presser foot holder. a b Remove the presser foot. Remove the presser foot holder when cleaning the sewing machine or when installing a presser foot that Align the presser foot holder with the included screwdriver. The needle may break or cause injury....
Users Manual - English
Page 120
..., causing the needle to use them for embroidery machines. CAUTION ● Since ball point needles (gold colored) are needles for embroidery. For details, refer to the fabric" (page 126). ■ Needle Use a 75/11 home sewing machine needle. Memo z A 75/11 needle is already installed when the sewing machine is space between the presser foot and the...
..., causing the needle to use them for embroidery machines. CAUTION ● Since ball point needles (gold colored) are needles for embroidery. For details, refer to the fabric" (page 126). ■ Needle Use a 75/11 home sewing machine needle. Memo z A 75/11 needle is already installed when the sewing machine is space between the presser foot and the...
Users Manual - English
Page 122
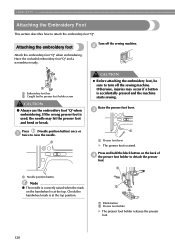
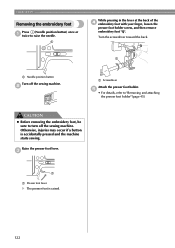
... is correctly raised when the mark on the back of d the presser foot holder to turn off the sewing machine. Attaching the embroidery foot Attach the embroidery foot "Q" when embroidering. Raise the presser foot lever. EMBROIDERY Attaching the Embroidery Foot This section describes how to raise the needle. Press (Needle position button) once or a twice to...
... is correctly raised when the mark on the back of d the presser foot holder to turn off the sewing machine. Attaching the embroidery foot Attach the embroidery foot "Q" when embroidering. Raise the presser foot lever. EMBROIDERY Attaching the Embroidery Foot This section describes how to raise the needle. Press (Needle position button) once or a twice to...
Users Manual - English
Page 124
... lever. CAUTION z Before removing the embroidery foot, be sure to turn off the sewing machine. Turn the screwdriver toward the back. c a a Presser foot lever X The presser foot is accidentally pressed and the machine starts sewing. a While pressing in the lever at... the back of the d embroidery foot with your finger, loosen the presser foot holder screw, and then remove embroidery foot "Q". EMBROIDERY Removing the embroidery foot Press (Needle position button) once ...
... lever. CAUTION z Before removing the embroidery foot, be sure to turn off the sewing machine. Turn the screwdriver toward the back. c a a Presser foot lever X The presser foot is accidentally pressed and the machine starts sewing. a While pressing in the lever at... the back of the d embroidery foot with your finger, loosen the presser foot holder screw, and then remove embroidery foot "Q". EMBROIDERY Removing the embroidery foot Press (Needle position button) once ...
Users Manual - English
Page 125
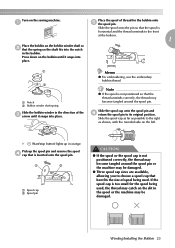
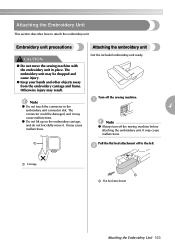
..., and do not forcefully move the sewing machine with the embroidery unit in the a 4 embroidery unit connector slot. a Pull the flat bed attachment off the sewing machine. Get the included embroidery unit ready. Note z Do not touch the connector in place. b a Carriage a a Flat bed attachment Attaching the Embroidery Unit 123 Attaching the Embroidery Unit This section describes how to...
..., and do not forcefully move the sewing machine with the embroidery unit in the a 4 embroidery unit connector slot. a Pull the flat bed attachment off the sewing machine. Get the included embroidery unit ready. Note z Do not touch the connector in place. b a Carriage a a Flat bed attachment Attaching the Embroidery Unit 123 Attaching the Embroidery Unit This section describes how to...
Users Manual - English
Page 126
Note z Make sure that no gap between the embroidery unit and the sewing machine, otherwise the embroidery pattern may result. z For details on the carriage when attaching the embroidery unit to the machine, otherwise damage to the embroidery unit may not be selected when the embroidery unit is attached. Be sure to its initial position. 124 z Do not push...
Note z Make sure that no gap between the embroidery unit and the sewing machine, otherwise the embroidery pattern may result. z For details on the carriage when attaching the embroidery unit to the machine, otherwise damage to the embroidery unit may not be selected when the embroidery unit is attached. Be sure to its initial position. 124 z Do not push...
Users Manual - English
Page 127
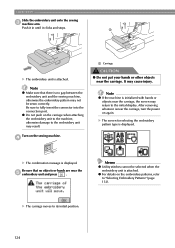
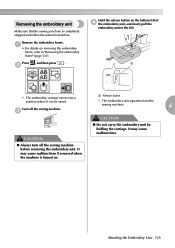
... release button on removing the embroidery frame, refer to the left. Attaching the Embroidery Unit 125 Press , and then press . Turn off the sewing machine before removing the embroidery unit. c a Release button X The embroidery unit separates from the sewing machine. 4 CAUTION CAUTION ● Do not carry the embroidery unit by holding the carriage. a X The embroidery carriage moves into a position where...
... release button on removing the embroidery frame, refer to the left. Attaching the Embroidery Unit 125 Press , and then press . Turn off the sewing machine before removing the embroidery unit. c a Release button X The embroidery unit separates from the sewing machine. 4 CAUTION CAUTION ● Do not carry the embroidery unit by holding the carriage. a X The embroidery carriage moves into a position where...
Users Manual - English
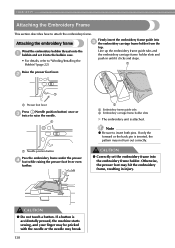
Page 132
... presser foot lever. b a Embroidery frame guide tabs b Embroidery carriage frame holder slots X The embroidery unit is accidentally pressed, the machine starts sewing, and your finger may be pricked with the needle or the needle may break. 130 If only the forward or the back pin is inserted, the pattern may hit the embroidery frame, resulting in...
... presser foot lever. b a Embroidery frame guide tabs b Embroidery carriage frame holder slots X The embroidery unit is accidentally pressed, the machine starts sewing, and your finger may be pricked with the needle or the needle may break. 130 If only the forward or the back pin is inserted, the pattern may hit the embroidery frame, resulting in...


