
Brother International SE 350 Support Question
Brother International SE 350 Support Question
Find answers below for this question about Brother International SE 350 - Compact Sewing & Embroidery Combo Machine.Need a Brother International SE 350 manual? We have 2 online manuals for this item!
Question posted by wgbecker on October 6th, 2012
Embroidery Unit
My SE350 does not recognize when I attach the embroidery unit
Current Answers
Related Brother International SE 350 Manual Pages
Users Manual - English - Page 1

Computerized Embroidery and Sewing Machine
Operation Manual
Product Code 885-V31/V33
GETTING READY SEWING BASICS UTILITY STITCHES EMBROIDERY APPENDIX
Users Manual - English - Page 3

...", and then study this embroidery and sewing machine.
Return the machine to persons.
2 Always unplug the machine from the electrical outlet when removing...machine or result in the machine falling, which could cause injuries. • When lifting the sewing machine, be accessed for examination, repair, electrical or mechanical adjustment. • While the machine is spilled on the unit...
Users Manual - English - Page 9
... threader You can wind bobbins with one press of a button (page 22).
i Embroidery You can select from the built-in embroidery patterns, characters, framed decorations, and designs from optional embroidery cards (page 117).
7
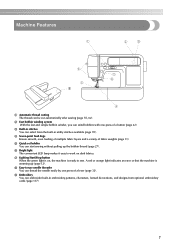
Machine Features
9
a Automatic thread cutting The thread can start sewing without pulling up (page 12).
g Lighting Start/Stop button When the green...
Users Manual - English - Page 12

... descriptions to learn the names of the machine parts.
g Embroidery unit connector slot (page 123) Plug in the LCD.
h Presser foot lever (page 50) Raise and lower the presser foot lever to raise and lower the presser foot .
c Spool pin (page 23, 32) Place a spool of the sewing machine and their functions are described below...
Users Manual - English - Page 13

... the air vent while the sewing machine is installed onto the presser ...embroidery card.
g Power supply jack (page 17) Insert the plug on the end of the foot controller cable into the bobbin case.
Needle and presser foot section
Right-side/rear view
a Buttonhole lever (page 86) Lower the buttonhole lever when sewing buttonholes and bar tacks. Attach the appropriate presser foot for sewing...
Users Manual - English - Page 15

...there are items that are not displayed on using the sewing machine. g Embroidery key Press this key to sew embroidery.
i Sewing machine help on the LCD. a LCD (liquid crystal display...bobbin winding / setting bobbin thread / needle replacement / embroidery unit attachment / embroidery frame attachment / embroidery foot attachment / presser foot replacement.
13
Operation panel
The front ...
Users Manual - English - Page 20

... to be used c Stitches d Stitch settings and twin needle sewing e Stitch width f Stitch length g Number of the selected stitch h Number of the sewing machine.
When you touch the LCD screen according to the message displayed... reverse/reinforcement l Single/twin needle sewing and needle stop
position
Memo
z A different screen is displayed when the embroidery unit is turned on, the LCD comes...
Users Manual - English - Page 21
... needle is positioned when the sewing machine is the number for embroidering) (page 134). Initial needle position
Language
Selects whether "1 Straight stitch (left)" or "3 Straight stitch (middle)" that is automatically selected when the machine is selected)
Embroidery/Country/Madeira poly/Madeira rayon/Sulky/ Robison Anton
Display unit
Selects the measurement units that can be adjusted...
Users Manual - English - Page 23

...) to return to the item
1
selection screen. bobbin winding / setting bobbin thread / needle replacement / embroidery unit attachment /
Example: Upper threading
embroidery frame attachment / embroidery foot attachment / presser foot replacement on
b the display panel. Press
(Sewing machine help screen appears. X The initial stitch screen appears again. LCD (Liquid Crystal Display) Operation...
Users Manual - English - Page 25
... cap is not positioned correctly, the thread may become tangled around the spool pin or the machine may be damaged.
●
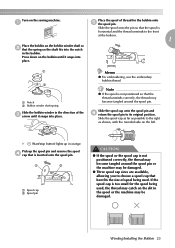
Winding/Installing the Bobbin 23
X (Start/stop button) lights ...embroidery bobbin thread.
Slide the spool cap onto the spool pin and f return the spool pin to the front at the bottom.
1
Place the bobbin on the sewing machine. Pick up in the spool or the machine...
Users Manual - English - Page 120
... table where the sewing machine is enough bobbin thread. If embroidery is low, the thread may become tangled. z When replacing the needle, refer to raise the needle.
For the bobbin thread, use (Needle position button) to "Replacing the needle" (page 41). To check the fabric thickness, attach the embroidery frame to the embroidery unit, and use the...
Users Manual - English - Page 125
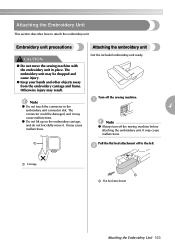
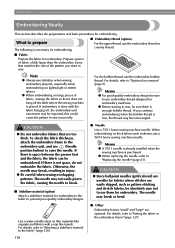
...injury may cause malfunctions. Get the included embroidery unit ready. Turn off to attach the embroidery unit. a
Pull the flat bed attachment off the sewing machine.
Note
z Always turn off the sewing machine before attaching the embroidery unit. The embroidery unit may cause
malfunctions. Embroidery unit precautions
Attaching the embroidery unit
CAUTION
● Do not move it may...
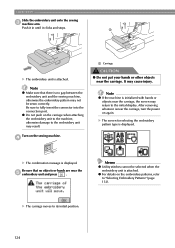
Users Manual - English - Page 126
... 132).
Note
z If the machine is attached.
X The confirmation message is attached. z For details on the carriage when attaching the embroidery unit to the machine, otherwise damage to its initial position.
124
Push it in until it clicks and stops. Note
z Make sure that no gap between the embroidery unit and the sewing machine, otherwise the embroidery pattern may return to the...
Users Manual - English - Page 127
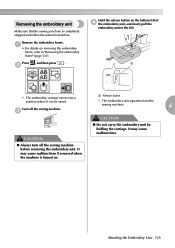
Attaching the Embroidery Unit 125 Turn off the sewing machine before removing the embroidery unit. Remove the embroidery frame. Press , and then press
. b
Hold the release button on . It may cause malfunctions if removed when the machine is completely stopped and follow the instructions below.
It may cause malfunctions.
● Always turn off the sewing machine. a
• For ...
Users Manual - English - Page 132
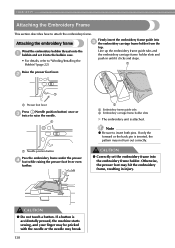
... frame holder from the
top. CAUTION
● Do not touch a button. Firmly insert the embroidery frame guide into the bobbin case.
• For details, refer to attach the embroidery frame.
If a button is accidentally pressed, the machine starts sewing, and your finger may be pricked with the needle or the needle may not turn out...
Users Manual - English - Page 151

... pressed continuously, it returns to increase
j the needle count. Press
(Forward one color) to move the sewing machine.
Press
. Note
z Always detach the embroidery unit when you have changed the embroidery size and/or layout before turning off the machine, make the same setting changes again before the total number of the color you want to...
Users Manual - English - Page 154
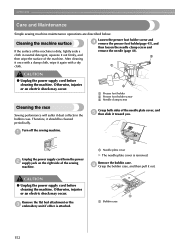
... needle plate cover, and e then slide it should be cleaned periodically. Therefore, it toward you. CAUTION
● Unplug the power supply cord before cleaning the machine. Cleaning the machine surface
If the surface of the sewing
machine.
Remove the flat bed attachment or the c embroidery unit if either is removed. APPENDIX
Care and Maintenance
Simple...
Users Manual - English - Page 160
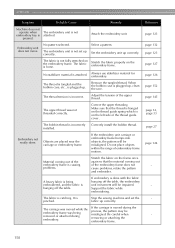
... the embroidery frame was not threaded correctly. No stabilizer material is not set the fabric up correctly.
Correct the upper threading.
Set the embroidery unit up correctly. The upper thread was being embroidered, and the fabric is hanging off the table, the embroidery unit movement will be misaligned. installed. The embroidery unit is attached.
Stop the sewing machine and...
Users Manual - English - Page 163
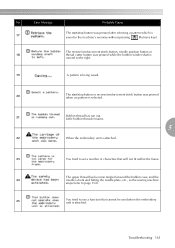
... the bobbin case, and the
24
needle is bent and hitting the needle plate, etc., so the sewing machine
stops (refer to page 154).
25
You tried to set a number of characters that cannot be used when the embroidery unit is attached.
23
You tried to use a function that will not fit within the frame.
Users Manual - English - Page 167
... 103
embroidery frame removal 131
basic sewing 48
embroidery key 13
basting stitch 78
embroidery pattern selection 132
beep 163
embroidery pattern types 132
blind hem stitch 80
embroidery sets 9
bobbin 22
embroidery sheet 128
bobbin case removal 152
embroidery threads 118
bobbin clip 9 bobbin cover 11
embroidery unit connector slot 10 embroidery unit installation...
Similar Questions

I Need To Purchase The Embroidery Arm Is It Available?
(Posted by srogers198 2 years ago)

When I Choose An Embroidery Pattern It Will Not Give Me The Colors For Each Part
I can't get colors for embroidery designs.
I can't get colors for embroidery designs.
(Posted by syarber 9 years ago)

Need An Instruction Manual For A Brother Embroifery &sewing Machine Se-350 Enthu
(Posted by Anonymous-147250 9 years ago)
Brother Emboridery & Sewing Machine Se 400
Please help me... i only received this machine a week now, first it work well then it start making a...
Please help me... i only received this machine a week now, first it work well then it start making a...
(Posted by natashap4 11 years ago)

Is There An Attachable Quilting Table For This Machine
(Posted by BGrahn58 13 years ago)