
Brother International SE 350 Support Question
Brother International SE 350 Support Question
Find answers below for this question about Brother International SE 350 - Compact Sewing & Embroidery Combo Machine.Need a Brother International SE 350 manual? We have 2 online manuals for this item!
Question posted by syarber on February 24th, 2015
When I Choose An Embroidery Pattern It Will Not Give Me The Colors For Each Part
I can't get colors for embroidery designs.
Current Answers
Answer #1: Posted by TommyKervz on February 26th, 2015 1:53 AM
TommyKervz

Member since:
January 10th, 2013 Points: 17,776,813

Member since:
January 10th, 2013 Points: 17,776,813
Refer to the user manual here http://www.helpowl.com/manuals/Brother%20International/SE350/5180
Related Brother International SE 350 Manual Pages
Users Manual - English - Page 8
......136 Selecting an embroidery pattern ...137 Selecting a frame pattern...137 Using an embroidery card ...138
Embroidering...139
Embroidering a pattern ...139 Appliquéing ...141
Editing and Saving Patterns 143
Adjusting the layout and the size...143 Adjusting the thread tension ...145 Connecting character patterns ...146 Resewing ...147 Thread runs out partway through a design...148 Stopping...
Users Manual - English - Page 9
f Bright light The convenient LED lamp makes it easy to work on , the machine is ready to -use needle threader You can embroider built-in embroidery patterns, characters, framed decorations, and designs from the built-in stitches You can start sewing without pulling up (page 12). A red or orange light indicates an error or that the...
Users Manual - English - Page 12

... cuffs.
l Needle threader lever (page 35) Use the needle threader lever to use the sewing machine, etc.
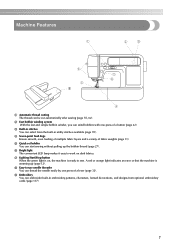
Names of Machine Parts and Their Functions
The names of the various parts of thread on this panel to select stitches or embroidery patterns, or check how to thread the needle. Front view
a Thread guide cover (page 24...
Users Manual - English - Page 15

f Utility stitch key Press this key to sew embroidery. i Sewing machine help key Press to get help on the LCD with your finger or the touch pen to select a utility stitch. For details, refer to enter alphabet character embroidery or embroidery patterns you have edited or adjusted, etc. d Next page key Displays the next page when there are...
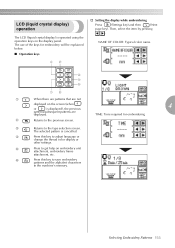
Users Manual - English - Page 20

...sewing machine. The details are displayed on the LCD (liquid crystal display) on the front of stitches contained
i Horizontal mirror image j Automatic thread cutting k Automatic reverse/reinforcement l Single/twin needle sewing and needle stop
position
Memo
z A different screen is displayed when the embroidery... pattern settings and messages are explained in
"Selecting an embroidery pattern" ...
Users Manual - English - Page 110
... 62 . e X Once sewing is accidentally pressed and the machine starts sewing.
Start sewing.
b
• For details, refer to "Adjusting the stitch width" (page 57) and "Adjusting the stitch length" (page 59).
UTILITY STITCHES
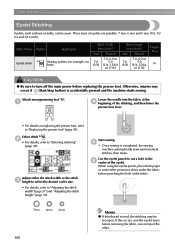
Eyelet Stitching
Eyelets, such as those on belts, can be too open. Stitch Name Eyelet stitch
Pattern
Application
62
Sewing eyelets, for example...
Users Manual - English - Page 119
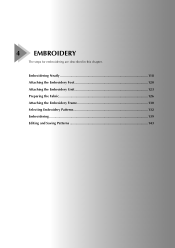
4 EMBROIDERY
The steps for embroidering are described in this chapter.
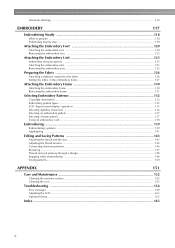
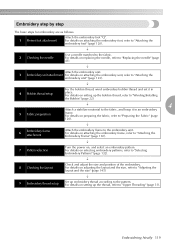
Embroidering Neatly 118 Attaching the Embroidery Foot 120 Attaching the Embroidery Unit 123 Preparing the Fabric 126 Attaching the Embroidery Frame 130 Selecting Embroidery Patterns 132 Embroidering...139 Editing and Saving Patterns 143
Users Manual - English - Page 120
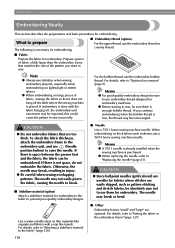
... Neatly
This section describes the preparations and basic procedures for embroidery to the fabric to prevent poor quality embroidery designs.
To check the fabric thickness, attach the embroidery frame to the embroidery unit, and use a 90/14 home sewing machine needle. If there is done with a nap like towels. The needle may be sure there is purchased...
Users Manual - English - Page 121
... "Winding/Installing the Bobbin" (page 22).
5 Fabric preparation
↓
4
Attach a stabilizer material to "Selecting Embroidery Patterns" (page 132).
↓
8 Checking the layout
Check and adjust the size and position of the embroidery. For details on , and select an embroidery pattern. Embroidering Neatly 119 For details on replacing the needle, refer to "Replacing the needle" (page...
Users Manual - English - Page 126
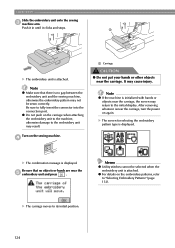
... insert the connector into the connection port. X The carriage moves to "Selecting Embroidery Patterns" (page 132). Turn on the embroidery patterns, refer to its initial position.
124
X The screen for selecting the embroidery pattern type is displayed.
Be sure that there is attached. z For details on the sewing machine.
Push it in until it clicks and stops. a
X The...
Users Manual - English - Page 128

... when sewing embroidery projects. Memo
z We recommend the optional stabilizer material for embroidery to the fabric to the fabric
Prepare stabilizer material that is larger than a the embroidery frame... being used. The needle may be ironed or for thin fabrics or stretch fabrics.
Attaching a stabilizer material to prevent poor quality embroidery designs. To obtain...
Users Manual - English - Page 129
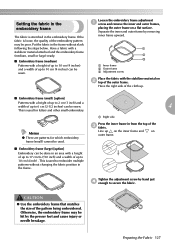
... be done in an area with a height of up to 2 cm (1 inch) and a width of the embroidery pattern may be sewn.
1
4
This is stretched in the embroidery frame. a
b c
a Inner frame b Outer frame c Adjustment screw
Place the fabric with a height of up to 10 cm (4 inches) and a width of up to secure the ...
Users Manual - English - Page 130

Press the inner frame in from the frame e without loosening the adjustment screw.
a
b a Embroidery pattern b Mark
128
Tighten the adjustment screw while removing g any slack in the fabric by hand. Memo
z This precautionary step will help reduce pattern distortion while embroidering.
Embroidery sheet (large) [option]
Make a mark with a chalk pen at the center of the...
Users Manual - English - Page 134
..." (page 136).
For details, refer to "Saving patterns" (page 150).
132
The patterns are intended for selecting a pattern. e Patterns saved in the sewing machine and embroidery cards are completed by changing the upper thread according to "Selecting an embroidery pattern" (page 137). EMBROIDERY
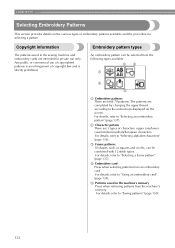
Selecting Embroidery Patterns
This section provides details on the screen.
Any...
Users Manual - English - Page 135
... key) and then
(Next
page key).
c
Returns to the previous screen. f
Press this key to save embroidery
patterns and the alphabet characters
in the machine's memory.
d
Press this key to adjust language or
change the thread color display or
other settings.
The use of the keys for embroidering
b
Returns to the type selection screen...
Users Manual - English - Page 137

Press this key when you sew.
Press
to change the thread density (characters and frame patterns only).
Selecting Embroidery Patterns 135
The position of the pattern within the embroidery frame can be checked, and the size and angle can be used when a specific color is changed . For details, refer to "Adjusting the layout and the size" (page 143...
Users Manual - English - Page 139
...saved in the machine's memory.
70 Embroidery patterns
Memo
z Refer to "Frame patterns" in the Quick reference guide for frame pattern shapes and stitches. Selecting Embroidery Patterns 137 Selecting an embroidery pattern
There are 70 embroidery patterns, such as squares and circles, can be combined with 12 stitch types. Press
.
Memo
z Refer to "Embroidery Pattern Color Change Table" in...
Users Manual - English - Page 140
... the sewing machine. c Switch the screen using
(Previous page
key) and
(Next page key), and select
from the 12 stitches. EMBROIDERY
Select the stitch.
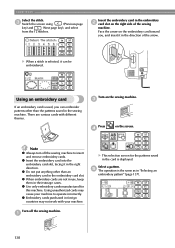
Using an embroidery card
If an embroidery card is the same as in the embroidery card slot. Turn on the screen. z Do not put anything other than an
embroidery card in "Selecting an
embroidery pattern...
Users Manual - English - Page 141
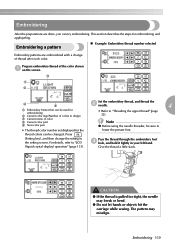
...a pattern
„ Example: Embroidery thread number selected
Embroidery patterns are done, you can try embroidering.
The pattern may break or bend.
● Do not let hands or objects hit the carriage while sewing.
Give the thread a little slack. Embroidering 139 Embroidering
After the preparations are embroidered with a change the setting in the setting screen.
thread colors can...
Users Manual - English - Page 146
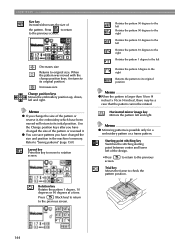
... with the change the size of the design.
•Press screen.
Memo
z Mirroring patterns is larger than 10cm (4 inches) x 10cm (4 inches), there may be a case that the pattern cannot be rotated.
Use the Change position keys after you have changed the size and position in the machine's memory.
Horizontal mirror image key Mirrors the...
Similar Questions

I Need To Purchase The Embroidery Arm Is It Available?
(Posted by srogers198 2 years ago)

How Do You Edit Pattern Color On The Pe770
(Posted by Tostill 9 years ago)

Brother 350-se Problem
My Brother 350-SE has it's screen go blank and reset when I start an embroidery pattern of any kind....
My Brother 350-SE has it's screen go blank and reset when I start an embroidery pattern of any kind....
(Posted by roseandra 11 years ago)

Embroidery Design Software
Do you have embroidery design software for the Brother PE700II available for Mac OS?
Do you have embroidery design software for the Brother PE700II available for Mac OS?
(Posted by denette 11 years ago)

Embroidery Unit
My SE350 does not recognize when I attach the embroidery unit
My SE350 does not recognize when I attach the embroidery unit
(Posted by wgbecker 11 years ago)