

Users Manual - English
Page 1
Computerized Embroidery and Sewing Machine Operation Manual Product Code 885-V31/V33 GETTING READY SEWING BASICS UTILITY STITCHES EMBROIDERY APPENDIX
Computerized Embroidery and Sewing Machine Operation Manual Product Code 885-V31/V33 GETTING READY SEWING BASICS UTILITY STITCHES EMBROIDERY APPENDIX

Users Manual - English
Page 3
.... 4 Always keep your machine if the power is cut. 3 Never operate this machine if it has a damaged cord or plug, if it is not working properly, if it can quickly be accessed for purchasing this embroidery and sewing machine. Return the machine to the nearest authorized dealer... or service center for examination, repair, electrical or mechanical adjustment. • While the machine is stored or in this manual, or if you are leaving...
.... 4 Always keep your machine if the power is cut. 3 Never operate this machine if it has a damaged cord or plug, if it is not working properly, if it can quickly be accessed for purchasing this embroidery and sewing machine. Return the machine to the nearest authorized dealer... or service center for examination, repair, electrical or mechanical adjustment. • While the machine is stored or in this manual, or if you are leaving...

Users Manual - English
Page 12
..., 32) Place a spool of thread on this panel to select stitches or embroidery patterns, or check how to learn the names of the sewing machine and their functions are described below. g Embroidery unit connector slot (page 123) Plug in the connector for the selected stitch or...bobbin thread and threading the machine. i Operation buttons (page 12) Use these descriptions to use the sewing machine, etc. Before using the sewing machine, carefully read these buttons to cut them. e LCD (liquid crystal display) (touch panel) (page 18) Setting for the embroidery unit. l Needle threader ...
..., 32) Place a spool of thread on this panel to select stitches or embroidery patterns, or check how to learn the names of the sewing machine and their functions are described below. g Embroidery unit connector slot (page 123) Plug in the connector for the selected stitch or...bobbin thread and threading the machine. i Operation buttons (page 12) Use these descriptions to use the sewing machine, etc. Before using the sewing machine, carefully read these buttons to cut them. e LCD (liquid crystal display) (touch panel) (page 18) Setting for the embroidery unit. l Needle threader ...

Users Manual - English
Page 13
...jack. i Presser foot holder (page 45) The presser foot is being used. a Handle Carry the sewing machine by its handle when transporting the machine. Do not cover the air vent while the sewing machine is installed onto the presser foot holder. Needle and presser foot section Right-side/rear view a Buttonhole ... bar thread guide (page 34) Pass the upper thread through the thread guide disk when using the needle threader to be exchanged. c Embroidery card slot (page 138) Insert the embroidery card. d Air vent The air vent allows the air surrounding the motor to thread the needle.
...jack. i Presser foot holder (page 45) The presser foot is being used. a Handle Carry the sewing machine by its handle when transporting the machine. Do not cover the air vent while the sewing machine is installed onto the presser foot holder. Needle and presser foot section Right-side/rear view a Buttonhole ... bar thread guide (page 34) Pass the upper thread through the thread guide disk when using the needle threader to be exchanged. c Embroidery card slot (page 138) Insert the embroidery card. d Air vent The air vent allows the air surrounding the motor to thread the needle.

Users Manual - English
Page 15
.../ bobbin winding / setting bobbin thread / needle replacement / embroidery unit attachment / embroidery frame attachment / embroidery foot attachment / presser foot replacement. 13 into the sewing machine memory. Touch the keys displayed on using the sewing machine. a LCD (liquid crystal display) (touch panel) Setting ... your finger or the touch pen to the previous screen. g Embroidery key Press this key to sew embroidery. i Sewing machine help key Press to enter alphabet character embroidery or embroidery patterns you have edited or adjusted, etc. Operation panel The front...
.../ bobbin winding / setting bobbin thread / needle replacement / embroidery unit attachment / embroidery frame attachment / embroidery foot attachment / presser foot replacement. 13 into the sewing machine memory. Touch the keys displayed on using the sewing machine. a LCD (liquid crystal display) (touch panel) Setting ... your finger or the touch pen to the previous screen. g Embroidery key Press this key to sew embroidery. i Sewing machine help key Press to enter alphabet character embroidery or embroidery patterns you have edited or adjusted, etc. Operation panel The front...

Users Manual - English
Page 20
... settings and messages are explained in "Selecting an embroidery pattern" (page 137). Viewing the LCD When the power is attached. For details, refer to "Error messages" (page 159) for messages displayed on the right side of the sewing machine. z Refer to "Operation panel" (page 13...of stitches contained i Horizontal mirror image j Automatic thread cutting k Automatic reverse/reinforcement l Single/twin needle sewing and needle stop position Memo z A different screen is displayed when the embroidery unit is turned on, the LCD comes on the screen with your finger or a touch pen. ...
... settings and messages are explained in "Selecting an embroidery pattern" (page 137). Viewing the LCD When the power is attached. For details, refer to "Error messages" (page 159) for messages displayed on the right side of the sewing machine. z Refer to "Operation panel" (page 13...of stitches contained i Horizontal mirror image j Automatic thread cutting k Automatic reverse/reinforcement l Single/twin needle sewing and needle stop position Memo z A different screen is displayed when the embroidery unit is turned on, the LCD comes on the screen with your finger or a touch pen. ...
Users Manual - English
Page 21
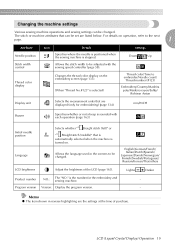
... Thread color display Icon Details Settings Specifies where the needle is positioned when the sewing machine is stopped. The stitch or machine attributes that can be changed . Allows the language used in reverse highlighting are displayed (only for the embroidery and sewing machine. - Changes the thread color display on operation, refer to embroider/Needle count/ Thread...
... Thread color display Icon Details Settings Specifies where the needle is positioned when the sewing machine is stopped. The stitch or machine attributes that can be changed . Allows the language used in reverse highlighting are displayed (only for the embroidery and sewing machine. - Changes the thread color display on operation, refer to embroider/Needle count/ Thread...

Users Manual - English
Page 23
... Press (Next page key) to switch to the previous page. bobbin winding / setting bobbin thread / needle replacement / embroidery unit attachment / Example: Upper threading embroidery frame attachment / embroidery foot attachment / presser foot replacement on the sewing machine. Turn on the LCD. c a b cd After you return to the d next page. X The initial stitch screen appears again. Press...
... Press (Next page key) to switch to the previous page. bobbin winding / setting bobbin thread / needle replacement / embroidery unit attachment / Example: Upper threading embroidery frame attachment / embroidery foot attachment / presser foot replacement on the sewing machine. Turn on the LCD. c a b cd After you return to the d next page. X The initial stitch screen appears again. Press...
Users Manual - English
Page 25
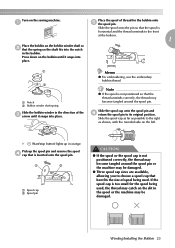
Memo z For embroidering, use the embroidery bobbin thread. X (Start/stop button) lights up the spool pin and remove the spool d cap that the spring on the shaft fits into place. Pick up in the spool or the machine may be damaged. ● Three spool cap sizes are available, allowing you to the front... pin. Slide the spool cap onto the spool pin and f return the spool pin to the right as shown, with the rounded side on the sewing machine. Slide the spool onto the pin so that the spool is not positioned so that best fits the size of thread for the spool being...
Memo z For embroidering, use the embroidery bobbin thread. X (Start/stop button) lights up the spool pin and remove the spool d cap that the spring on the shaft fits into place. Pick up in the spool or the machine may be damaged. ● Three spool cap sizes are available, allowing you to the front... pin. Slide the spool cap onto the spool pin and f return the spool pin to the right as shown, with the rounded side on the sewing machine. Slide the spool onto the pin so that the spool is not positioned so that best fits the size of thread for the spool being...
Users Manual - English
Page 42
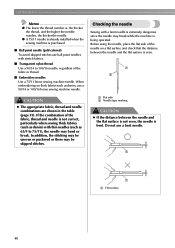
...and the higher the needle number, the thicker the needle. z A 75/11 needle is already installed when the sewing machine is bent. Do not use a 90/14 or 100/16 home sewing machine needle. In addition, the stitching may be uneven or puckered or there may bend or break. CAUTION z The ...If the combination of the needle on thick fabrics such as 65/9 to 100/16 needle, regardless of the fabric or thread. ■ Embroidery needles Use a 75/11 home sewing machine needle. a a a Flat surface 40 Before using the needle, place the flat side of the fabric, thread and needle is even....
...and the higher the needle number, the thicker the needle. z A 75/11 needle is already installed when the sewing machine is bent. Do not use a 90/14 or 100/16 home sewing machine needle. In addition, the stitching may be uneven or puckered or there may bend or break. CAUTION z The ...If the combination of the needle on thick fabrics such as 65/9 to 100/16 needle, regardless of the fabric or thread. ■ Embroidery needles Use a 75/11 home sewing machine needle. a a a Flat surface 40 Before using the needle, place the flat side of the fabric, thread and needle is even....
Users Manual - English
Page 45
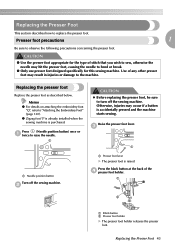
...the presser foot as described below. z Zigzag foot "J" is already installed when the sewing machine is accidentally pressed and the machine starts sewing. c a a Needle position button Turn off the sewing machine. Press the black button at the back of any other presser foot may hit ...damage to turn off the sewing machine. a CAUTION z Before replacing the presser foot, be sure to the machine. Otherwise, injuries may occur if a button is purchased. Raise the presser foot lever. Presser foot precautions 1 Be sure to "Attaching the Embroidery Foot" (page 120). ...
...the presser foot as described below. z Zigzag foot "J" is already installed when the sewing machine is accidentally pressed and the machine starts sewing. c a a Needle position button Turn off the sewing machine. Press the black button at the back of any other presser foot may hit ...damage to turn off the sewing machine. a CAUTION z Before replacing the presser foot, be sure to the machine. Otherwise, injuries may occur if a button is purchased. Raise the presser foot lever. Presser foot precautions 1 Be sure to "Attaching the Embroidery Foot" (page 120). ...
Users Manual - English
Page 47
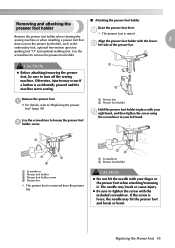
... sewing. Removing and attaching the ■ Attaching the presser foot holder presser foot holder Raise the presser foot lever. a • For details, refer to remove the presser foot holder. embroidery foot, optional free-motion open toe quilting foot "O" and optional walking foot. Use the screwdriver to "...attaching/removing the presser foot, be sure to loosen the presser foot b holder screw. Use the screwdriver to turn off the sewing machine. z Be sure to tighten the screw with the lower- 1 does not use the presser foot holder, such as the b left hand.
... sewing. Removing and attaching the ■ Attaching the presser foot holder presser foot holder Raise the presser foot lever. a • For details, refer to remove the presser foot holder. embroidery foot, optional free-motion open toe quilting foot "O" and optional walking foot. Use the screwdriver to "...attaching/removing the presser foot, be sure to loosen the presser foot b holder screw. Use the screwdriver to turn off the sewing machine. z Be sure to tighten the screw with the lower- 1 does not use the presser foot holder, such as the b left hand.
Users Manual - English
Page 120
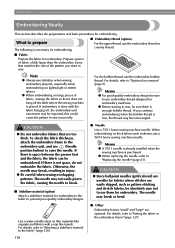
...organdy and fabrics with the fabric hanging off the table where the sewing machine is purchased. EMBROIDERY Embroidering Neatly This section describes the preparations and basic procedures for embroidery to the fabric to sew incorrectly. What to "Replacing the needle" (page 41). To... material to raise the needle. Note z Always use a 90/14 home sewing machine needle. If embroidery is necessary for embroidering. ■ Embroidery thread (option) For the upper thread, use the embroidery bobbin thread. If there is low, the thread may not easily pierce the...
...organdy and fabrics with the fabric hanging off the table where the sewing machine is purchased. EMBROIDERY Embroidering Neatly This section describes the preparations and basic procedures for embroidery to the fabric to sew incorrectly. What to "Replacing the needle" (page 41). To... material to raise the needle. Note z Always use a 90/14 home sewing machine needle. If embroidery is necessary for embroidering. ■ Embroidery thread (option) For the upper thread, use the embroidery bobbin thread. If there is low, the thread may not easily pierce the...
Users Manual - English
Page 122
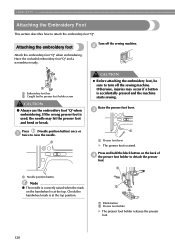
... hold the black button on the handwheel is correctly raised when the mark on the back of d the presser foot holder to turn off the sewing machine. Attaching the embroidery foot Attach the embroidery foot "Q" when embroidering. Otherwise, injuries may hit the presser foot and bend or break. Have the included...
... hold the black button on the handwheel is correctly raised when the mark on the back of d the presser foot holder to turn off the sewing machine. Attaching the embroidery foot Attach the embroidery foot "Q" when embroidering. Otherwise, injuries may hit the presser foot and bend or break. Have the included...
Users Manual - English
Page 124
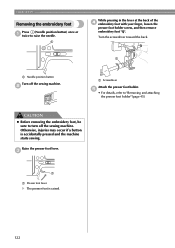
c a a Presser foot lever X The presser foot is accidentally pressed and the machine starts sewing. b a Screwdriver Attach the presser foot holder. a a Needle position button Turn off the sewing machine. Raise the presser foot lever. EMBROIDERY Removing the embroidery foot Press (Needle position button) once or a twice to "Removing and attaching the presser foot holder" (page 45). Otherwise, injuries...
c a a Presser foot lever X The presser foot is accidentally pressed and the machine starts sewing. b a Screwdriver Attach the presser foot holder. a a Needle position button Turn off the sewing machine. Raise the presser foot lever. EMBROIDERY Removing the embroidery foot Press (Needle position button) once or a twice to "Removing and attaching the presser foot holder" (page 45). Otherwise, injuries...
Users Manual - English
Page 125
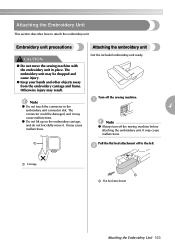
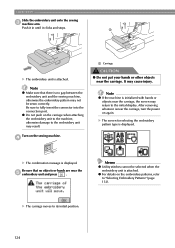
... malfunctions. Note z Do not touch the connector in place. z Do not lift up on the embroidery carriage, and do not forcefully move the sewing machine with the embroidery unit in the a 4 embroidery unit connector slot. Embroidery unit precautions Attaching the embroidery unit CAUTION ● Do not move it may cause malfunctions. The connector could be dropped and...
... malfunctions. Note z Do not touch the connector in place. z Do not lift up on the embroidery carriage, and do not forcefully move the sewing machine with the embroidery unit in the a 4 embroidery unit connector slot. Embroidery unit precautions Attaching the embroidery unit CAUTION ● Do not move it may cause malfunctions. The connector could be dropped and...
Users Manual - English
Page 126
... is attached. X The carriage moves to the initial display. Push it in until it clicks and stops. z For details on the sewing machine. X The screen for selecting the embroidery pattern type is near the carriage. Memo z Utility stitches cannot be sewn correctly. EMBROIDERY Slide the embroidery unit onto the sewing c machine arm. After removing whatever is displayed.
... is attached. X The carriage moves to the initial display. Push it in until it clicks and stops. z For details on the sewing machine. X The screen for selecting the embroidery pattern type is near the carriage. Memo z Utility stitches cannot be sewn correctly. EMBROIDERY Slide the embroidery unit onto the sewing c machine arm. After removing whatever is displayed.
Users Manual - English
Page 127
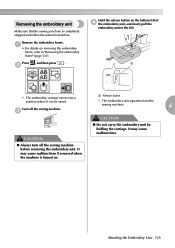
... malfunctions. ● Always turn off the sewing machine. a X The embroidery carriage moves into a position where it can be saved. Remove the embroidery frame. c a Release button X The embroidery unit separates from the sewing machine. 4 CAUTION CAUTION ● Do not carry the embroidery unit by holding the carriage. Removing the embroidery unit Make sure that the sewing machine is turned on. b Hold the...
... malfunctions. ● Always turn off the sewing machine. a X The embroidery carriage moves into a position where it can be saved. Remove the embroidery frame. c a Release button X The embroidery unit separates from the sewing machine. 4 CAUTION CAUTION ● Do not carry the embroidery unit by holding the carriage. Removing the embroidery unit Make sure that the sewing machine is turned on. b Hold the...
Users Manual - English
Page 133
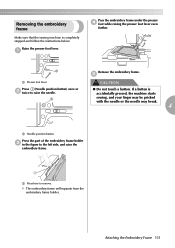
Make sure that the sewing machine is accidentally pressed, the machine starts sewing, and your finger may be pricked with the needle or the needle may break. 4 a Needle position button Press the part of the embroidery frame holder c in the figure to the left side, and raise the embroidery frame. 1 a Press here to raise the needle. X The...
Make sure that the sewing machine is accidentally pressed, the machine starts sewing, and your finger may be pricked with the needle or the needle may break. 4 a Needle position button Press the part of the embroidery frame holder c in the figure to the left side, and raise the embroidery frame. 1 a Press here to raise the needle. X The...
Users Manual - English
Page 134
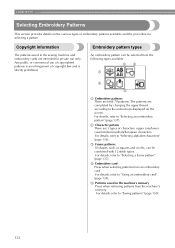
... copyrighted patterns is an infringement of copyright law and is strictly prohibited. d Embroidery card Press when selecting patterns from the machine's memory. Embroidery pattern types An embroidery pattern can be selected from the following types available. e Patterns saved in the sewing machine and embroidery cards are completed by changing the upper thread according to "Selecting alphabet characters...
... copyrighted patterns is an infringement of copyright law and is strictly prohibited. d Embroidery card Press when selecting patterns from the machine's memory. Embroidery pattern types An embroidery pattern can be selected from the following types available. e Patterns saved in the sewing machine and embroidery cards are completed by changing the upper thread according to "Selecting alphabet characters...


