
Operation Manual
Page 1
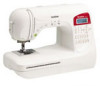
GETTING READY SEWING BASICS Read when additional information is required. UTILITY STITCHES APPENDIX Sewing Machine Product Code: 885-S61 Operation Manual Read before use.
GETTING READY SEWING BASICS Read when additional information is required. UTILITY STITCHES APPENDIX Sewing Machine Product Code: 885-S61 Operation Manual Read before use.
Operation Manual
Page 2
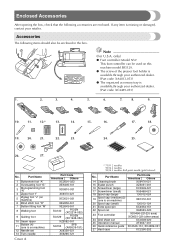
... 15 Eyelet punch 16 Screwdriver (large) 17 Screwdriver (small) 18 Spool cap (large) 19 Spool cap (medium)(2) (one is on this machine model SB3129. ● The screw of the presser foot holder is available through your authorized dealer. (Part code: XA4813-051) ● The organized accessory tray .... Enclosed Accessories After opening the box, check that the following items should also be used on machine) 12 Needle set 25 Operation manual 26 Quick reference guide 27 Hard case Part Code Americas Others X59476-021 XZ5051-001 XC8349-021 X55468-021 130012-024 XE1372-001 130013...
... 15 Eyelet punch 16 Screwdriver (large) 17 Screwdriver (small) 18 Spool cap (large) 19 Spool cap (medium)(2) (one is on this machine model SB3129. ● The screw of the presser foot holder is available through your authorized dealer. (Part code: XA4813-051) ● The organized accessory tray .... Enclosed Accessories After opening the box, check that the following items should also be used on machine) 12 Needle set 25 Operation manual 26 Quick reference guide 27 Hard case Part Code Americas Others X59476-021 XZ5051-001 XC8349-021 X55468-021 130012-024 XE1372-001 130013...
Operation Manual
Page 8
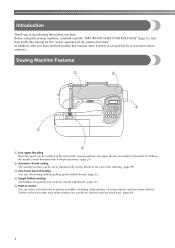
In addition, after you for purchasing this manual for future reference. Twelve of the most often used utility stitches can quickly be wound with the stitch keys. (page 68) 2 In addition, the needle ... Machine Features 1 4 5 2 3 1 Easy upper threading Since the spool can be installed at the end of the various functions. Introduction Thank you have finished reading this manual, store it where it can quickly be threaded.
In addition, after you for purchasing this manual for future reference. Twelve of the most often used utility stitches can quickly be wound with the stitch keys. (page 68) 2 In addition, the needle ... Machine Features 1 4 5 2 3 1 Easy upper threading Since the spool can be installed at the end of the various functions. Introduction Thank you have finished reading this manual, store it where it can quickly be threaded.
Operation Manual
Page 9
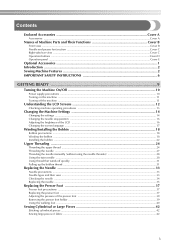
... precautions ...18 Winding the bobbin ...18 Installing the bobbin ...22 Upper Threading ...24 Threading the upper thread ...24 Threading the needle ...27 Threading the needle manually (without using the needle threader 28 Using the twin needle ...28 Using thread that winds off quickly ...31 Pulling up the bobbin thread ...31 Replacing...
... precautions ...18 Winding the bobbin ...18 Installing the bobbin ...22 Upper Threading ...24 Threading the upper thread ...24 Threading the needle ...27 Threading the needle manually (without using the needle threader 28 Using the twin needle ...28 Using thread that winds off quickly ...31 Pulling up the bobbin thread ...31 Replacing...
Operation Manual
Page 12
...rating label. Return the machine to the nearest authorized dealer or service center for use in the country of purchase only. 4 Never operate this manual, or if you are not sure what kind of electric shock: 1 Always unplug the machine from the electrical outlet when making any adjustments mentioned... in the instruction manual: • To unplug the machine, switch the machine to the symbol "O" position to turn it off, then grasp the plug and pull it...
...rating label. Return the machine to the nearest authorized dealer or service center for use in the country of purchase only. 4 Never operate this manual, or if you are not sure what kind of electric shock: 1 Always unplug the machine from the electrical outlet when making any adjustments mentioned... in the instruction manual: • To unplug the machine, switch the machine to the symbol "O" position to turn it off, then grasp the plug and pull it...
Operation Manual
Page 13
...; Never drop or insert any object into any opening. • Do not operate where aerosol (spray) products are being used . • Always consult the operation manual when replacing or installing any air openings blocked. Do not use extension cords. otherwise, the machine, power cord or garment being administered. • Do not...
...; Never drop or insert any object into any opening. • Do not operate where aerosol (spray) products are being used . • Always consult the operation manual when replacing or installing any air openings blocked. Do not use extension cords. otherwise, the machine, power cord or garment being administered. • Do not...

Operation Manual
Page 14
...by the manufacturer as contained in the back of this manual. The contents of this manual and specifications of the operation manual to inspect and adjust the machine yourself. For additional product information, visit our web site at www.brother.com SAVE THESE INSTRUCTIONS This machine is intended for ... concerning use plugs with the fuse cover omitted. • If the available electrical outlet is not suitable for the plug supplied with this manual. This appliance is not intended for household use a fuse approved by ASTA to obtain the correct lead. 8 If the problem persists, ...
...by the manufacturer as contained in the back of this manual. The contents of this manual and specifications of the operation manual to inspect and adjust the machine yourself. For additional product information, visit our web site at www.brother.com SAVE THESE INSTRUCTIONS This machine is intended for ... concerning use plugs with the fuse cover omitted. • If the available electrical outlet is not suitable for the plug supplied with this manual. This appliance is not intended for household use a fuse approved by ASTA to obtain the correct lead. 8 If the problem persists, ...

Operation Manual
Page 19
... machine. 6 press (OK key). 1 X The initial stitch screen appears again. Press (sewing machine help screen appears. To 5 return to the corresponding page in this Operation Manual. 3 4 1 Replacing the presser foot 2 Threading the upper thread 3 Winding the bobbin 4 Installing the bobbin Press (OK key). 4 X The first screen describing the procedure for the...
... machine. 6 press (OK key). 1 X The initial stitch screen appears again. Press (sewing machine help screen appears. To 5 return to the corresponding page in this Operation Manual. 3 4 1 Replacing the presser foot 2 Threading the upper thread 3 Winding the bobbin 4 Installing the bobbin Press (OK key). 4 X The first screen describing the procedure for the...

Operation Manual
Page 33
... threader lever X The thread is finished. Make sure that the upper threading and the lower threading are finished, you are ready to "Threading the needle manually (without using the needle threader)" on the left , then pass the thread through 100/16. ● The needle threader cannot be used with the wing...
... threader lever X The thread is finished. Make sure that the upper threading and the lower threading are finished, you are ready to "Threading the needle manually (without using the needle threader)" on the left , then pass the thread through 100/16. ● The needle threader cannot be used with the wing...
Operation Manual
Page 34
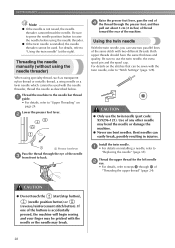
For details, refer to "Upper Threading" on page 24. Threading the needle manually (without using the needle threader) When using the needle threader. ● If the twin needle is accidentally pressed, the machine will begin sewing and your ...
For details, refer to "Upper Threading" on page 24. Threading the needle manually (without using the needle threader) When using the needle threader. ● If the twin needle is accidentally pressed, the machine will begin sewing and your ...

Operation Manual
Page 35
Manually thread the left side was threaded. 1 1 • The needle threader cannot be used with the twin needle. Thread the upper thread in the same way ..., the sewing machine may be damaged. Insert the extra spool pin onto the bobbin 4 winder shaft. Pass the thread through the 8 needle bar thread hook, manually thread the right needle. If the needle threader is used with the 3 upper thread.
Manually thread the left side was threaded. 1 1 • The needle threader cannot be used with the twin needle. Thread the upper thread in the same way ..., the sewing machine may be damaged. Insert the extra spool pin onto the bobbin 4 winder shaft. Pass the thread through the 8 needle bar thread hook, manually thread the right needle. If the needle threader is used with the 3 upper thread.

Operation Manual
Page 46
... foot. Note ● When sewing with the screwdriver, otherwise the needle may bend or break. ■ Attaching the walking foot Note ● Thread the needle manually when using the walking foot, or only attach the walking foot after threading the needle using the needle threader. GETTING READY Using the walking foot...
... foot. Note ● When sewing with the screwdriver, otherwise the needle may bend or break. ■ Attaching the walking foot Note ● Thread the needle manually when using the walking foot, or only attach the walking foot after threading the needle using the needle threader. GETTING READY Using the walking foot...

Operation Manual
Page 59
... so that the threads will be set so that the threads are cut automatically, refer to "Automatically cutting the thread" (page 59). ■ Using the manual thread cutter When sewing with nylon or metallic threads, or other special threads, use the thread cutter on the 2 side of two ways. ■ Using...
... so that the threads will be set so that the threads are cut automatically, refer to "Automatically cutting the thread" (page 59). ■ Using the manual thread cutter When sewing with nylon or metallic threads, or other special threads, use the thread cutter on the 2 side of two ways. ■ Using...

Operation Manual
Page 76
... hits the presser foot, the needle may bend or break. 1 1 Guide 70 Stitch Name Pattern Stitch Key Application Stitch Width [mm (inch.)] Auto Manual Stitch Length [mm (inch.)] Auto Manual Presser Foot 11 Preventing fraying in medium 3.5 2.5-5.0 2.0 1.0-4.0 weight and thin fabrics (1/8) (3/32-3/16) (1/16) (1/16-3/16) Overcasting 12 stitch 13 Preventing fraying...
... hits the presser foot, the needle may bend or break. 1 1 Guide 70 Stitch Name Pattern Stitch Key Application Stitch Width [mm (inch.)] Auto Manual Stitch Length [mm (inch.)] Auto Manual Presser Foot 11 Preventing fraying in medium 3.5 2.5-5.0 2.0 1.0-4.0 weight and thin fabrics (1/8) (3/32-3/16) (1/16) (1/16-3/16) Overcasting 12 stitch 13 Preventing fraying...

Operation Manual
Page 77
...-1/4) (1/16) (1/64-3/16) 5.0 1.5-7.0 1.0 0.2-4.0 J 3 zigzag stitch (3/16) (1/16-1/4) (1/16) (1/64-3/16) 14 - Stitch Name Pattern Stitch Key Application Stitch Width [mm (inch.)] Auto Manual Stitch Length [mm (inch.)] Auto Manual Presser Foot Zigzag stitch (center 7 needle position) Preventing fraying (center baseline/reverse stitching) 3.5 0.0-7.0 1.4 0.0-4.0 (1/8) (0-1/4) (1/16) (0-3/16) Zigzag stitch 8 (right needle position) Preventing fraying (right...
...-1/4) (1/16) (1/64-3/16) 5.0 1.5-7.0 1.0 0.2-4.0 J 3 zigzag stitch (3/16) (1/16-1/4) (1/16) (1/64-3/16) 14 - Stitch Name Pattern Stitch Key Application Stitch Width [mm (inch.)] Auto Manual Stitch Length [mm (inch.)] Auto Manual Presser Foot Zigzag stitch (center 7 needle position) Preventing fraying (center baseline/reverse stitching) 3.5 0.0-7.0 1.4 0.0-4.0 (1/8) (0-1/4) (1/16) (0-3/16) Zigzag stitch 8 (right needle position) Preventing fraying (right...

Operation Manual
Page 78
Stitch Name Pattern Application Stitch Width [mm (inch.)] Auto Manual Stitch Length [mm (inch.)] Auto Manual Presser Foot 63 Sewing straight stitches while cutting 0.0 0.0-2.5 2.5 0.2-5.0 the fabric (0) (0-3/32) (3/32) (1/64-3/16) 64 Sewing zigzag stitches while cutting 3.5 3.5-5.0 1.4 0.0-4.0 the...16) 67 Preventing fraying in presser foot holder 2 Pin X The side cutter is attached. 72 Lower the presser foot lever, and then 2 manually thread the needle. • The needle threader cannot be finished while the edge of the side cutter 4 onto the needle clamp screw. 1 Remove...
Stitch Name Pattern Application Stitch Width [mm (inch.)] Auto Manual Stitch Length [mm (inch.)] Auto Manual Presser Foot 63 Sewing straight stitches while cutting 0.0 0.0-2.5 2.5 0.2-5.0 the fabric (0) (0-3/32) (3/32) (1/64-3/16) 64 Sewing zigzag stitches while cutting 3.5 3.5-5.0 1.4 0.0-4.0 the...16) 67 Preventing fraying in presser foot holder 2 Pin X The side cutter is attached. 72 Lower the presser foot lever, and then 2 manually thread the needle. • The needle threader cannot be finished while the edge of the side cutter 4 onto the needle clamp screw. 1 Remove...

Operation Manual
Page 80
... refer to "Replacing the presser foot" (page 37). Stitch Name Pattern Stitch Key Application Stitch Width [mm (inch.)] Auto Manual Basting 6 stitch - Attach zigzag foot "J". 1 J Basic stitching Baste or pin together the fabric pieces. 1 Attach zigzag...beginning of 5 mm (3/16 inch). baseline/reverse stitching) Triple 4 stretch stitch Reinforcing seams and sewing 0.0 0.0-7.0 stretch fabrics (0) (0-1/4) Stitch Length [mm (inch.)] Auto Manual Presser Foot - - 2.5 0.2-5.0 (3/32) (1/64-3/16) 2.5 0.2-5.0 (3/32) (1/64-3/16) J 2.5 0.2-5.0 (3/32) (1/64-3/16) 2.5 1.5-4.0 (3/32) (1/...
... refer to "Replacing the presser foot" (page 37). Stitch Name Pattern Stitch Key Application Stitch Width [mm (inch.)] Auto Manual Basting 6 stitch - Attach zigzag foot "J". 1 J Basic stitching Baste or pin together the fabric pieces. 1 Attach zigzag...beginning of 5 mm (3/16 inch). baseline/reverse stitching) Triple 4 stretch stitch Reinforcing seams and sewing 0.0 0.0-7.0 stretch fabrics (0) (0-1/4) Stitch Length [mm (inch.)] Auto Manual Presser Foot - - 2.5 0.2-5.0 (3/32) (1/64-3/16) 2.5 0.2-5.0 (3/32) (1/64-3/16) J 2.5 0.2-5.0 (3/32) (1/64-3/16) 2.5 1.5-4.0 (3/32) (1/...

Operation Manual
Page 82
... the guide of hem 3 Guide 76 Position the fabric with a blind hem. Stitch Name Pattern Stitch Key Application Stitch Width [mm (inch.)] Auto Manual Stitch Length [mm (inch.)] Auto Manual Presser Foot 17 Blind hem stitch 18 Blind hem stitching on mediumweight fabrics 0.0 (0) 3← - 3→ 2.0 (1/16) 1.0-3.5 (1/16-1/8) R Blind hem stitching on stretch...
... the guide of hem 3 Guide 76 Position the fabric with a blind hem. Stitch Name Pattern Stitch Key Application Stitch Width [mm (inch.)] Auto Manual Stitch Length [mm (inch.)] Auto Manual Presser Foot 17 Blind hem stitch 18 Blind hem stitching on mediumweight fabrics 0.0 (0) 3← - 3→ 2.0 (1/16) 1.0-3.5 (1/16-1/8) R Blind hem stitching on stretch...

Operation Manual
Page 84
...) 46 Buttonhole stitch 47 - mediumweight and thick fabrics 7.0 3.0-7.0 0.5 0.3-1.0 (1/4) (1/8-1/4) (1/32) (1/64-1/16) 51 - Stitch Name Pattern Stitch Key Application Stitch Width [mm (inch.)] Auto Manual Stitch Length [mm (inch.)] Auto Manual Presser Foot 42 Horizontal buttonholes on 5.0 3.0-5.0 0.4 0.2-1.0 both ends for sewing on . M 78 Horizontal buttonhole for stretch fabrics 6.0 3.0-6.0 (15/64) (1/8-15/64) 1.5 (1/16...
...) 46 Buttonhole stitch 47 - mediumweight and thick fabrics 7.0 3.0-7.0 0.5 0.3-1.0 (1/4) (1/8-1/4) (1/32) (1/64-1/16) 51 - Stitch Name Pattern Stitch Key Application Stitch Width [mm (inch.)] Auto Manual Stitch Length [mm (inch.)] Auto Manual Presser Foot 42 Horizontal buttonholes on 5.0 3.0-5.0 0.4 0.2-1.0 both ends for sewing on . M 78 Horizontal buttonhole for stretch fabrics 6.0 3.0-6.0 (15/64) (1/8-15/64) 1.5 (1/16...

Operation Manual
Page 91
Stitch Name Pattern Stitch Key Application Stitch Width [mm (inch.)] Auto Manual Stitch Length [mm (inch.)] Auto Manual Presser Foot Straight stitch (center 3 needle position) Attaching zippers Sewing concealed seams and - Zipper Insertion 85 Inserting a centered zipper Press open the seam allowance from ...
Stitch Name Pattern Stitch Key Application Stitch Width [mm (inch.)] Auto Manual Stitch Length [mm (inch.)] Auto Manual Presser Foot Straight stitch (center 3 needle position) Attaching zippers Sewing concealed seams and - Zipper Insertion 85 Inserting a centered zipper Press open the seam allowance from ...


