
Instruction Manual - English
Page 45
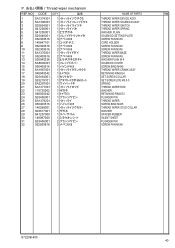
... RETAINING RING E3 PLUNGER PIN THREAD WIPER SCREW BIND M4X5 THREAD WIPER STUD COLLAR WASHER SPACER RUBBER SILENT SHEET PLUNGER PIN SCREW PAN M5X8 S7220B-405 4400
... RETAINING RING E3 PLUNGER PIN THREAD WIPER SCREW BIND M4X5 THREAD WIPER STUD COLLAR WASHER SPACER RUBBER SILENT SHEET PLUNGER PIN SCREW PAN M5X8 S7220B-405 4400

Instruction Manual - English
Page 60
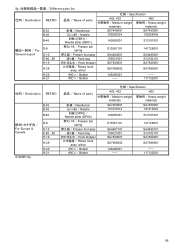
... Hook stopper Rotary hook assy, w/box Bobbin Bobbin SA7449001 100265034 143855001 S13561101 SA4484001 159521001 SA7830001 SA7686002 146290001 ��� -405 Heavy-weight materials SA7450001 100265042 S13101001 141728001 SA4489001 S13102101 SA7829001 SA7688001 ��� 117132001 B-35 B-36 B-46 D-8 D-10... 100265034 143855001 S13561101 SA4484001 159521001 SA7830001 SA7686002 146290001 ��� -405 Heavy-weight materials SA7450001 100265042 S13101001 141728001 SA4489001 S13102101 SA7829001 SA7688001 ��� 117132001
... Hook stopper Rotary hook assy, w/box Bobbin Bobbin SA7449001 100265034 143855001 S13561101 SA4484001 159521001 SA7830001 SA7686002 146290001 ��� -405 Heavy-weight materials SA7450001 100265042 S13101001 141728001 SA4489001 S13102101 SA7829001 SA7688001 ��� 117132001 B-35 B-36 B-46 D-8 D-10... 100265034 143855001 S13561101 SA4484001 159521001 SA7830001 SA7686002 146290001 ��� -405 Heavy-weight materials SA7450001 100265042 S13101001 141728001 SA4489001 S13102101 SA7829001 SA7688001 ��� 117132001
Instruction Manual - English
Page 61
Specification -403, 433 -405 Medium-weight Heavy-weight B-35 B-36 B-46 D-8 D-10 E-90, -89 H-19 H-28 H-20 H-21 �� � Needle bar Needle �� (DBX1)�� ... Presser foot assy Feed dog Hook stopper Rotary hook assy, w/box Bobbin Bobbin SA7450001 107415014 143855001 S13561101 SA4487101 159521001 SA7830001 SA7686002 146290001 ��� -405 Heavy-weight materials SA7450001 107415022 S13101001 141728001 SA4490101 S13102101 SA7829001 SA7688001 ��� 117132001 �� 56
Specification -403, 433 -405 Medium-weight Heavy-weight B-35 B-36 B-46 D-8 D-10 E-90, -89 H-19 H-28 H-20 H-21 �� � Needle bar Needle �� (DBX1)�� ... Presser foot assy Feed dog Hook stopper Rotary hook assy, w/box Bobbin Bobbin SA7450001 107415014 143855001 S13561101 SA4487101 159521001 SA7830001 SA7686002 146290001 ��� -405 Heavy-weight materials SA7450001 107415022 S13101001 141728001 SA4490101 S13102101 SA7829001 SA7688001 ��� 117132001 �� 56
Instruction Manual - English
Page 9
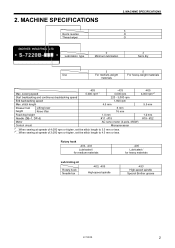
... sewing at speeds of 3,000 rpm or higher, set the stitch length to 4.5 mm or less. -405 4,000 rpm*2 5.5 mm 1.2 mm #19 - #22 Rotary hook -403, -433 Lubricated / for medium materials -405 Lubricated / for heavy materials Lubricating oil Rotary hook Needle bar -403, -405 High-speed spindle -433 High-speed spindle Special Brother grease S-7220B 2
... sewing at speeds of 3,000 rpm or higher, set the stitch length to 4.5 mm or less. -405 4,000 rpm*2 5.5 mm 1.2 mm #19 - #22 Rotary hook -403, -433 Lubricated / for medium materials -405 Lubricated / for heavy materials Lubricating oil Rotary hook Needle bar -403, -405 High-speed spindle -433 High-speed spindle Special Brother grease S-7220B 2
Instruction Manual - English
Page 50
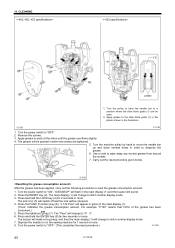
... grease has been consumed.) 5. Press and hold the LOCK key (4) for 1 second or more. 8. Apply grease to "OFF". (This completes the reset procedure.) 2139M 43 S-7220B Turn the power switch to a position where the slide block guide (1) can be seen. 2. The lock icon (5) will switch off and the lock will change...
... grease has been consumed.) 5. Press and hold the LOCK key (4) for 1 second or more. 8. Apply grease to "OFF". (This completes the reset procedure.) 2139M 43 S-7220B Turn the power switch to a position where the slide block guide (1) can be seen. 2. The lock icon (5) will switch off and the lock will change...

Instruction Manual - English
Page 52
... reset operation is displayed in when the screws are tightened. 5. Turn the pulley to raise the needle bar to OFF. (This will be locked.) 45 S-7220B Apply grease to each of the stitch number display to wipe away any excess grease from around the screws. 7. Carry out the reset procedure given...
... reset operation is displayed in when the screws are tightened. 5. Turn the pulley to raise the needle bar to OFF. (This will be locked.) 45 S-7220B Apply grease to each of the stitch number display to wipe away any excess grease from around the screws. 7. Carry out the reset procedure given...
Instruction Manual - English
Page 56
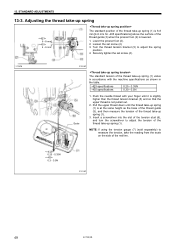
... upper thread is at the same height as shown in accordance with your finger until the thread take -up spring (1) varies in the table. -4[]3 specifications -405 specifications 0.25 - 0.35N 0.30 - 0.5N Scale 1. Adjusting the thread take-up spring 6 - 8 mm 4 - 6 mm The standard position of ...slot of the tension stud (6), and turn the screwdriver to adjust the tension of the red line. 0.25 - 0.35N 0.3 - 0.5N 3761M 49 S-7220B NOTE: If using the tension gauge (7) (sold separately) to adjust the spring position. 4. Turn the thread tension bracket (5) to measure the tension, ...
... upper thread is at the same height as shown in accordance with your finger until the thread take -up spring (1) varies in the table. -4[]3 specifications -405 specifications 0.25 - 0.35N 0.30 - 0.5N Scale 1. Adjusting the thread take-up spring 6 - 8 mm 4 - 6 mm The standard position of ...slot of the tension stud (6), and turn the screwdriver to adjust the tension of the red line. 0.25 - 0.35N 0.3 - 0.5N 3761M 49 S-7220B NOTE: If using the tension gauge (7) (sold separately) to adjust the spring position. 4. Turn the thread tension bracket (5) to measure the tension, ...
Instruction Manual - English
Page 58
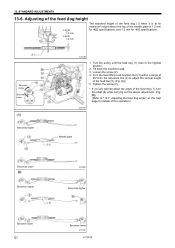
... the machine head. 3. Adjusting the feed dog angle" on the next page for details of the needle plate is 1.0 mm for -4[]3 specifications, and 1.2 mm for -405 specifications. Tighten the screw (2). * If you are worried about the angle of the feed bar (5). (Fig. [A]) 5. Turn the pulley until the feed dog (1) rises to... the above the top of this operation.) 3765M Becomes higher Needle plate Becomes lower Becomes higher 3766M Becomes higher Becomes lower 51 Becomes lower 3767M S-7220B Becomes higher Becomes lower 3764M 1. 13.
... the machine head. 3. Adjusting the feed dog angle" on the next page for details of the needle plate is 1.0 mm for -4[]3 specifications, and 1.2 mm for -405 specifications. Tighten the screw (2). * If you are worried about the angle of the feed bar (5). (Fig. [A]) 5. Turn the pulley until the feed dog (1) rises to... the above the top of this operation.) 3765M Becomes higher Needle plate Becomes lower Becomes higher 3766M Becomes higher Becomes lower 51 Becomes lower 3767M S-7220B Becomes higher Becomes lower 3764M 1. 13.

Instruction Manual - English
Page 61
... set screws (5), and then turn the vertical cam (3) sligtly to the maximum setting. 2. If the timing is completed, securely tighten the two screws (5). (Standard) 3774M S-7220B 54 Set the stitch length dial to adjust the timing. There is a gap of approximately 4 mm between the tip of the needle and the top...
... set screws (5), and then turn the vertical cam (3) sligtly to the maximum setting. 2. If the timing is completed, securely tighten the two screws (5). (Standard) 3774M S-7220B 54 Set the stitch length dial to adjust the timing. There is a gap of approximately 4 mm between the tip of the needle and the top...

Instruction Manual - English
Page 62
... A to the bottom edge of the accessory timing gauge (2). 5. There should be 0.4 - 0.7 mm for -4[]3 models, and 0.6 - 1.1 mm for -405 specifications) from its lowest position until the distance from needle plate mounting surface A to the bottom edge of the needle bar (1) is enough to allow... height of surface C on the side of the needle bar (1) is turned forward to raise the needle bar (1) 1.8 mm (2.2 mm for -405 models. 3778M S-7220B Stitch length dial 0 setting. ... Loosen two of the accessory timing gauge (2). (At this time. 6. Securely tighten the three set screws (9) ...
... A to the bottom edge of the accessory timing gauge (2). 5. There should be 0.4 - 0.7 mm for -4[]3 models, and 0.6 - 1.1 mm for -405 specifications) from its lowest position until the distance from needle plate mounting surface A to the bottom edge of the needle bar (1) is enough to allow... height of surface C on the side of the needle bar (1) is turned forward to raise the needle bar (1) 1.8 mm (2.2 mm for -405 models. 3778M S-7220B Stitch length dial 0 setting. ... Loosen two of the accessory timing gauge (2). (At this time. 6. Securely tighten the three set screws (9) ...

