
Brother International DB2-B791 Support Question
Brother International DB2-B791 Support Question
Find answers below for this question about Brother International DB2-B791.Need a Brother International DB2-B791 manual? We have 1 online manual for this item!
Question posted by STARLINER on April 17th, 2015
Is There A Separate Manual For The Db2-b791-405?
The person who posted this question about this Brother International product did not include a detailed explanation. Please use the "Request More Information" button to the right if more details would help you to answer this question.
Current Answers
Related Brother International DB2-B791 Manual Pages
Service Manual - Page 1

SERVICE MANUAL FOR
DB2-B791 DB2-B7910
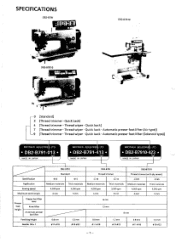
HIGH SPEED SINGLE NEEDLE NEEDLE FEED LOCK STITCH MACHINE WITH AUTOMATIC THREAD TRIMMER
OM
gm
"MUM
41/1. MO San SINS
Service Manual - Page 2

...Lubrication
3
2. Pressure on materials
3
3. Needle
4
4. Thread tension
5
7. Sewing speed setting
6
8. Feed regulation mechanism
12
4. Thread wiper (subclasses -400,...mechanism
11
3. Thread trimmer mechanism
15
6. Threading
4
5. Feed lock mechanism
11
2. Machine covers
20
2. Thread trimmer mechanism
22
6. Stitch length
5
6. Feed mechanism
23 ...
Service Manual - Page 3

...
31
3. Synchronizer adjustment
35
7. Feed mechanism weight check (B7910)
39
12. Photo-cell and reflection sensor replacement (37910)
46
4. Sensor position adjustment (B7910)
41
14. Machine covers
30
ADJUSTMENT
31
1. Fixed knife and movable knife removal
36
8. Rotary hook mechanism
28
4. Forward and reverse feed stitch length
34
6. ASSEMBLY
24
1.
Service Manual - Page 4
... presser foot lifter (Solenoid type)]
BROTHER INDUSTRIE LTD.
• DB2-B791-013 •
MADE IN JAPAN
BROTHER INDUSTRI4 LTD.
• DB2-B791-413 •
MADE IN JAPAN
Inv i-I
BROTHER INDUSTRIE LTD
• DB2-B7910-423 •
MADE IN JAPAN
Specification Application Sewing speed Maximum stitch length
i DB2-8791
Standard
-013
-015
Medium materials Thick materials
4,500 spm...
Service Manual - Page 5

... cover is pushed.
•Il ooh
(1) After tilting the machine head until it stops, hang the belt 0 on both the motor pulley and the machine pulley.
(2) By loosening the screw • and the two... nuts 6, adjust the position of the table • . Knee lifter bell crank stopper
3. Machine head
CD
•
•
•
•
•
0
Put the head hinges 0 into the...
Service Manual - Page 6

...removing the face plate, adjust oil absorption by turning the oil regulating valve ©.
(5) After tilting the machine head until it stops, adjust oil absorption by removing the oil cover screw 0.
(3) Wipe off any contamination... nut 0 before adjustment.
-3-
OPERATION
1. Pressure on a material during sewing must be as weak as possible, but strong enough that the material does not slip.
Service Manual - Page 9

... in the correction stitching mode (215 spm) if the actuator is pressed while the machine is stopped. it decreases when the control @ is turned clockwise (HIGH); Sewing speed increases when the speed control @ is turned counterclockwise (LOW).
The sewing speed varies from 215 spm to ON.
7. The indicator @ goes on. Sensor sensitivity setting...
Service Manual - Page 10

... the presser foot and press INPUT key 0.
(9) Press the MARGIN key O. Its indicator goes on . CORRECTION
1 +
o AUTO
_
10 sLow
i START
TACK STITCHES
00 0
1.
Material edge sewing
(5) Set the margin-to the end of the body) under the presser foot and press the PLY SENSOR key 0. The programmed pattern can now be...
Service Manual - Page 11

... the material (thin part of the body) under the presser foot and press the PLY SENSOR key 0. Flap sewing
(1) Press the SET START key 0.
OF STITCH key 0. (Seams a to b and c to d)
...attaching
---- --- Its indicator blinks,
then goes on .
(3) Set a name tag (thick part of the machine at each stop of the body) under the presser
foot and press the PLY SENSOR key 0. Its indicator goes...
Service Manual - Page 21
...and the needle bar bracket guide 0.
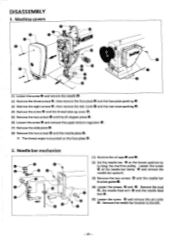
(4) Loosen the screws ® and 0. DISASSEMBLY 1. Remove the needle bar bracket to the left.
- 20 - Machine covers
•
s
-6(
•
•
(1) Loosen the screw 0 and remove the needle @. (2) Remove the three screws 0, then remove the ...
0
(1) Remove the oil caps and .
(2) Set the needle bar 0 at the lowest position by turning the machine pulley.
Service Manual - Page 22

... guideO and the presser spring 0.
(4) Loosen the screw CI and remove the presser bar
from the presser bar guide bracket 0.
Rotary hook mechanism
(1) Tilt the machine head until it stops.
(2) Remove the screwO and the bobbin case holder position bracket 0.
(3) Loosen the three screws rotary hook assembly O. 3. and remove the
- 21...
Service Manual - Page 25

... lifting rock shaft crank O with the screw 0. (11) Minimize the feed per stroke and turn the machine pulley.
®. (14) Adjust the feed dog so that it is not loose.
0 (8) Put the... block of the needle plate by loosening the screw O. (13) Maximize the feed per stroke, and turn the machine pulley. (12) Adjust the feed dog @ to lubricate the horizontal feed bracket arm 0 and feed lifting crank ...
Service Manual - Page 28

...
© to the top of the side faces between the thread trimming clutch and the slide block is 0.6-0.8 mm. Thread trimming clutch position
Turn the machine pulley until the needle bar is relayed
es-
eat (Tighten the screw approximately 40 kg/cm.)
2. Forward feed direction
(g)
When the thread is lifted to...
Service Manual - Page 29
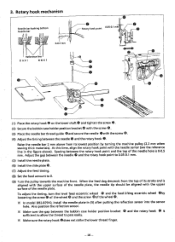
...feed lifting eccentric wheel ®by turning the machine pulley (2.2 mm when sewing thick materials). Raise the needle bar 2 mm above ). X In model DB2-B7910, install the needle plate in the figure... the rotary hook @ is sufficient to allow the thread to 0. (9) Turn the pulley towards the machine front. e (2) Secure the bobbin case holder position bracket with the screw ®.
(3) Place the...
Service Manual - Page 31

... cover 0 and the rear cover packing 6/with the eight screws 0 . (6) Secure the face plate ®and the face plate packing 0 with the two screws ED. Machine covers
0
O
• •
a0
o
(1) Secure the needle plate 0 with the three screws O.
- 30 - 6.
Service Manual - Page 32

... bar @ with surface A of the needle bar oil rejector cover @ by turning the machine pulley slowly.
Adjust the gap between the top edge of the needle bar oil rejector cover... lowest position
DBX1
Surface A Reference line 0
Surface A Reference line
DAX1
'V
2mm
Slowly turn the machine pulley to 0-0.05 mm. Then firmly tighten the screw O.
')K Always perform the rotary hook lubrication...
Service Manual - Page 33

Feed timing
For medium materials
For thick materials 5 mm
L
(1) Turn the machine pulley Otoward the machine front until the feed dog 10 descends and the tips of the feed dog 0 align with the tips of the feed dog (and the upper ...
Service Manual - Page 35

...;
• •
Cross section Chamfering Chamfering Washer
O
Snap ring
Forward and reverse feed stitch length are adjusted together. (1) Set the feed regulating dial 0 to mark 3. (2) Sew 11 stitches forward and reverse at the inching speed (215 spm). (3) Adjust as follows when the forward and reverse feed stitch lengths are different.
1) Remove...
Service Manual - Page 43

...
(1) The distance is indicated when PROGRAMME key No.1 is pressed, while indicators No.1, 2, 6 and 7 are off (normal sewing mode).
(2) At this adjustment. The distance is measured when the feed amount is changed.
The machine does not stop at a material edge without this time, the number can be changed using the [ + ], [0.5] or [-] keys...
Service Manual - Page 53

... high,
thread removed by thread take -up needle stop position.
Adjust pretension.
5
/ Replace with tester
Adjust tension release.
Needle thread escapes at up height at sewing
start. mechanism does
not function.
Refer
to
motor
adjustment manual. z Adjust operating
time.
- 56 -
Similar Questions

Manual In Portuguese Brother Sewing Machine Pc6500
How can I get this manual in portuguese of Brazil?
How can I get this manual in portuguese of Brazil?
(Posted by rosana33 9 years ago)

Where Is A Parts Guide Or Service Manual For Brother Jx2517 Sewing Machine?
the inside of my brother JX2517 sewing machine broke. Its a plastic piece,gear, at end by the needle...
the inside of my brother JX2517 sewing machine broke. Its a plastic piece,gear, at end by the needle...
(Posted by Discogypsy 9 years ago)

Where Can I Find An Instructional Manual Or Brother Xr1300 Sewing Machine To Buy
(Posted by calverts50 10 years ago)
I Want To Print Out The Manual For Brother Xl2600i Sewing Machine.i Can't Downlo
(Posted by karhpa 11 years ago)
