
Software Users Manual - English
Page 2
...Manual Structure ...4 Symbols Used in this Manual 4 Creating Labels (For Windows 5 Label Creation Overview 5 From Label Creation to Printing 5 How to Use P-touch Editor 7 Starting P-touch Editor 7 Creating an Address Label 9 Printing a Label ...10 Saving a Label ...11 Opening a Label File 11 Creating Different ...How to Use P-touch Transfer Manager & P-touch Library 39 Starting up P-touch Transfer Manager 39 Transferring label templates from the PC to the printer 41 Backing up label templates 44 Changing printer settings from the PC 45 Starting up the P-touch Library 46 Searching...
...Manual Structure ...4 Symbols Used in this Manual 4 Creating Labels (For Windows 5 Label Creation Overview 5 From Label Creation to Printing 5 How to Use P-touch Editor 7 Starting P-touch Editor 7 Creating an Address Label 9 Printing a Label ...10 Saving a Label ...11 Opening a Label File 11 Creating Different ...How to Use P-touch Transfer Manager & P-touch Library 39 Starting up P-touch Transfer Manager 39 Transferring label templates from the PC to the printer 41 Backing up label templates 44 Changing printer settings from the PC 45 Starting up the P-touch Library 46 Searching...
Software Users Manual - English
Page 10
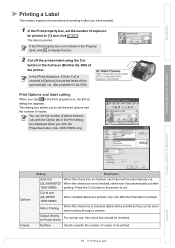
...the printer to be printed. 10 Printing a Label Appendix The label is not checked, labels won't be seen Mirror Printing when looking through a window. ...Printer Driver Number Used to specify the number of copies to cut . (QL-550/650TD/ When this check box is printed. Introduction Printing a Label This section explains the procedure for QL-500) Print Options and label cutting When you click the Properties button. (QL-1050/1050N only) Creating Labels (For Windows... or the Cut lever (Brother QL-500) of the printer. Output directly For normal use, this check box is checked in ...
...the printer to be printed. 10 Printing a Label Appendix The label is not checked, labels won't be seen Mirror Printing when looking through a window. ...Printer Driver Number Used to specify the number of copies to cut . (QL-550/650TD/ When this check box is printed. Introduction Printing a Label This section explains the procedure for QL-500) Print Options and label cutting When you click the Properties button. (QL-1050/1050N only) Creating Labels (For Windows... or the Cut lever (Brother QL-500) of the printer. Output directly For normal use, this check box is checked in ...
Software Users Manual - English
Page 12
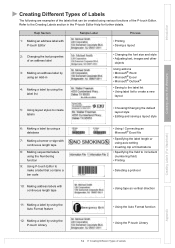
...6: Making a label by using the P-touch Library • Using the Auto Format function • Using the P-touch Library Creating Labels (For Macintosh) Appendix 12 Creating Different Types of the P-touch Editor. Introduction Creating Labels (For Windows) Creating Different Types of Labels The following... • Specifying the field to increment (numbering field) • Printing • Selecting a protocol 10: Making address labels with continuous length tape • Using tape as vertical direction 11: Making a label by using the Auto Format feature 12: Making a label by using a ...
...6: Making a label by using the P-touch Library • Using the Auto Format function • Using the P-touch Library Creating Labels (For Macintosh) Appendix 12 Creating Different Types of the P-touch Editor. Introduction Creating Labels (For Windows) Creating Different Types of Labels The following... • Specifying the field to increment (numbering field) • Printing • Selecting a protocol 10: Making address labels with continuous length tape • Using tape as vertical direction 11: Making a label by using the Auto Format feature 12: Making a label by using a ...

Software Users Manual - English
Page 21
... appears. 11 Select the layout style you have created is not displayed, click on the layout work area once now saved. Creating Labels (For Windows) Creating Labels (For Macintosh) 9 From the [Save As] type pull down, select [Layout Style Template]. The layout style you want to... box appears. 8 Move to the folder in which you have created, and click . You need to apply the created layout style. 10 With the Label List/Database window displayed, click [Format]-[Apply Layout Style]. Introduction 7 Click [File]-[Save As]. Enter the [File name] and click . The label list...
... appears. 11 Select the layout style you have created is not displayed, click on the layout work area once now saved. Creating Labels (For Windows) Creating Labels (For Macintosh) 9 From the [Save As] type pull down, select [Layout Style Template]. The layout style you want to... box appears. 8 Move to the folder in which you have created, and click . You need to apply the created layout style. 10 With the Label List/Database window displayed, click [Format]-[Apply Layout Style]. Introduction 7 Click [File]-[Save As]. Enter the [File name] and click . The label list...

Software Users Manual - English
Page 22
... records designated by the range specified in the Print properties. Creating Labels (For Macintosh) Appendix 22 Creating Labels Efficiently Introduction Creating Labels (For Windows) Printing labels from the Label List 1 Click in the From and To boxes. 4 Click . Prints the record currently displayed. The [... the Print Options. The labels are printed. • When you select any record in the database or label list and click on page 10. 3 In [Print Range], specify the records to be printed instantly. • Selecting records while holding down the [Ctrl] key allows...
... records designated by the range specified in the Print properties. Creating Labels (For Macintosh) Appendix 22 Creating Labels Efficiently Introduction Creating Labels (For Windows) Printing labels from the Label List 1 Click in the From and To boxes. 4 Click . Prints the record currently displayed. The [... the Print Options. The labels are printed. • When you select any record in the database or label list and click on page 10. 3 In [Print Range], specify the records to be printed instantly. • Selecting records while holding down the [Ctrl] key allows...
Software Users Manual - English
Page 25
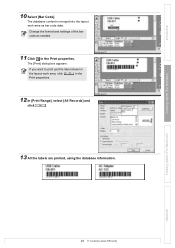
Introduction Creating Labels (For Windows) 10 Select [Bar Code]. The database content is merged into the layout work area, click in the Print properties. Creating Labels (For Macintosh) Appendix 25 Creating Labels Efficiently The [Print] dialog box appears. Change the format and settings of the bar code as bar code data. If you want to print just the label shown in the layout work area as needed. 11 Click in the Print properties. 12 In [Print Range], select [All Records] and click . 13 All the labels are printed, using the database information.
Introduction Creating Labels (For Windows) 10 Select [Bar Code]. The database content is merged into the layout work area, click in the Print properties. Creating Labels (For Macintosh) Appendix 25 Creating Labels Efficiently The [Print] dialog box appears. Change the format and settings of the bar code as bar code data. If you want to print just the label shown in the layout work area as needed. 11 Click in the Print properties. 12 In [Print Range], select [All Records] and click . 13 All the labels are printed, using the database information.

Software Users Manual - English
Page 43
Creating Labels (For Windows) 3 Select the number for specifying where to save the message file in the message file. Only 1 message file can be sent to create or edit. Introduction Creating and transferring a new message (QL-650TD only) 1 Select the QL-650TD Configurations folder or any folder under...that the PC and the printer are correctly connected with a USB cable and that the printer power is displayed for the message to 1 unit of 10 messages can be stored in the PC. The transfer confirmation message is displayed. A maximum of QL-650TD, so to correct a ...
Creating Labels (For Windows) 3 Select the number for specifying where to save the message file in the message file. Only 1 message file can be sent to create or edit. Introduction Creating and transferring a new message (QL-650TD only) 1 Select the QL-650TD Configurations folder or any folder under...that the PC and the printer are correctly connected with a USB cable and that the printer power is displayed for the message to 1 unit of 10 messages can be stored in the PC. The transfer confirmation message is displayed. A maximum of QL-650TD, so to correct a ...
Software Users Manual - English
Page 53
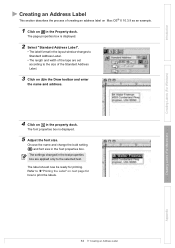
...Label". • The label format in the Property dock. The label should now be ready for how to print the labels. Introduction Creating Labels (For Windows) Creating an Address Label This section describes the process of the Standard Address Label. 3 Click on in the Draw toolbar and enter the name and... Address Label. • The length and width of the tape are applied only to the size of creating an address label on Mac OS® X 10.3.9 as an example. 1 Click on next page for printing. The page properties box is displayed. 5 Adjust the font size. The settings changed in the...
...Label". • The label format in the Property dock. The label should now be ready for how to print the labels. Introduction Creating Labels (For Windows) Creating an Address Label This section describes the process of the Standard Address Label. 3 Click on in the Draw toolbar and enter the name and... Address Label. • The length and width of the tape are applied only to the size of creating an address label on Mac OS® X 10.3.9 as an example. 1 Click on next page for printing. The page properties box is displayed. 5 Adjust the font size. The settings changed in the...

Software Users Manual - English
Page 67
... for the OS installed. *2 PS-9000 does not support Mac. Creating Labels (For Windows) Creating Labels (For Macintosh) Appendix 67 Operating Environment OS 10.4.4-10.4.7(Intel)*2 Windows® Interface Macintosh® Hard Drive Windows® Macintosh® USB port (USB Spec. 1.1 USB port (USB Spec. 1.1...2.0 protocol) Over 70 MB of available space *4 Over 100 MB of the options. Introduction Operating Environment Items Brother QL-500/550 Specifications Brother QL-650TD Brother QL-1050 Windows® Windows® 2000 Professional/XP *1 OS Macintosh® Mac OS...
... for the OS installed. *2 PS-9000 does not support Mac. Creating Labels (For Windows) Creating Labels (For Macintosh) Appendix 67 Operating Environment OS 10.4.4-10.4.7(Intel)*2 Windows® Interface Macintosh® Hard Drive Windows® Macintosh® USB port (USB Spec. 1.1 USB port (USB Spec. 1.1...2.0 protocol) Over 70 MB of available space *4 Over 100 MB of the options. Introduction Operating Environment Items Brother QL-500/550 Specifications Brother QL-650TD Brother QL-1050 Windows® Windows® 2000 Professional/XP *1 OS Macintosh® Mac OS...

Users Manual - English and Spanish
Page 21
...Cut OK 9/12 Cancel Auto Cut ON After completing the setup, press OK to your PC For Macintosh For Windows Maintenance and Troubleshooting After printing, it goes to Print OK Printing... Cancel 1 Printing... List Print Cancel All ...16" to Time Display mode Menu Copies OK OK 4/12 OK to Print? 21 Introduction Before using the printer Using only this printer (No PC) „Menu Selection mode The LCD displays in this mode when editing the template and ... Display mode STEP 2 STEP 3 STEP 4 Connecting to Time Display mode Menu 10/12 OK Language Cancel Language English -
...Cut OK 9/12 Cancel Auto Cut ON After completing the setup, press OK to your PC For Macintosh For Windows Maintenance and Troubleshooting After printing, it goes to Print OK Printing... Cancel 1 Printing... List Print Cancel All ...16" to Time Display mode Menu Copies OK OK 4/12 OK to Print? 21 Introduction Before using the printer Using only this printer (No PC) „Menu Selection mode The LCD displays in this mode when editing the template and ... Display mode STEP 2 STEP 3 STEP 4 Connecting to Time Display mode Menu 10/12 OK Language Cancel Language English -

Users Manual - English and Spanish
Page 27
... the language: Menu 10" in page 38 • Î"Setting the unit: Menu 11" in page 29. For details, refer to your PC For Macintosh For Windows STEP 4 Maintenance and Troubleshooting The language is determined and then unit setting screen is operated in this printer" in page 38... STEP 3 Using only this printer (No PC) Connecting to Î"STEP 2 Creating and printing a...
... the language: Menu 10" in page 38 • Î"Setting the unit: Menu 11" in page 29. For details, refer to your PC For Macintosh For Windows STEP 4 Maintenance and Troubleshooting The language is determined and then unit setting screen is operated in this printer" in page 38... STEP 3 Using only this printer (No PC) Connecting to Î"STEP 2 Creating and printing a...

Users Manual - English and Spanish
Page 29
...Setting the clock: Menu 7 Setting Daylight Saving Time: Menu 8 Cutting the roll automatically when printing: Menu 9 Setting the language: Menu 10 Setting the unit of measure (inch or mm): Menu 11 Adjusting the contrast of LCD: Menu 12 Locking the Menu button Concerning the downloaded...to your convenience. 29 Introduction Before using the printer Using only this printer (No PC) 2 STEP STEP 1 Creating and printing a label using only this printer This printer has eight built-in templates for your PC For Macintosh For Windows Maintenance and Troubleshooting You may select from these ...
...Setting the clock: Menu 7 Setting Daylight Saving Time: Menu 8 Cutting the roll automatically when printing: Menu 9 Setting the language: Menu 10 Setting the unit of measure (inch or mm): Menu 11 Adjusting the contrast of LCD: Menu 12 Locking the Menu button Concerning the downloaded...to your convenience. 29 Introduction Before using the printer Using only this printer (No PC) 2 STEP STEP 1 Creating and printing a label using only this printer This printer has eight built-in templates for your PC For Macintosh For Windows Maintenance and Troubleshooting You may select from these ...

Users Manual - English and Spanish
Page 35
...and press OK button. STEP 3 Menu 5/12 Numbering Connecting to your PC For Macintosh For Windows 3 Select the first value (000 to Print? 3 STEP Printing labels with label numbers: ...button. STEP 4 4 Select number of times, and the screen returns to 999) by 10 unit. Maintenance and Troubleshooting 35 Introduction Specifying the number (quantity) of labels are printed, and...button ( / ) and press OK button. Menu Copies STEP 4/12 1 Before using the printer Using only this printer (No PC) 3 Select the number (1 to Time Display mode. Initial Value 010 When holding...
...and press OK button. STEP 3 Menu 5/12 Numbering Connecting to your PC For Macintosh For Windows 3 Select the first value (000 to Print? 3 STEP Printing labels with label numbers: ...button. STEP 4 4 Select number of times, and the screen returns to 999) by 10 unit. Maintenance and Troubleshooting 35 Introduction Specifying the number (quantity) of labels are printed, and...button ( / ) and press OK button. Menu Copies STEP 4/12 1 Before using the printer Using only this printer (No PC) 3 Select the number (1 to Time Display mode. Initial Value 010 When holding...

Users Manual - English and Spanish
Page 45
...)". Power cord slot STEP 3 USB port USB cable Power cord 10 Connect the USB cable to the USB port of Microsoft®... that time, connect the printer directly to the next step. Add-In settings screen is displayed. For details on the power. Driver Setup (Brother P-touch) screen is displayed in ...the set the Add-In, and click [Next]. STEP 2 9 When the message "Connect P-touch, and then turn on Add-In setting, refer to your PC For Macintosh For Windows Maintenance and Troubleshooting is displayed. When the PC recognizes the printer...
...)". Power cord slot STEP 3 USB port USB cable Power cord 10 Connect the USB cable to the USB port of Microsoft®... that time, connect the printer directly to the next step. Add-In settings screen is displayed. For details on the power. Driver Setup (Brother P-touch) screen is displayed in ...the set the Add-In, and click [Next]. STEP 2 9 When the message "Connect P-touch, and then turn on Add-In setting, refer to your PC For Macintosh For Windows Maintenance and Troubleshooting is displayed. When the PC recognizes the printer...

Users Manual - English and Spanish
Page 47
...Clip Art Illustrations which can be allocated to the label. STEP 1 1. These are contents used for P-touch Editor 3.2 „Printer Driver When using the printer connecting to Macintosh®, it is necessary to install the software from Macintosh®. • When ... 2. Before using the printer 47 Introduction For Macintosh When using the printer connecting to Macintosh®, it is necessary to install this printer (No PC) Connecting to your PC For Macintosh For Windows STEP 4 Maintenance and Troubleshooting Mac OS® X 10.1 ~ 10.3.9 For details on installation...
...Clip Art Illustrations which can be allocated to the label. STEP 1 1. These are contents used for P-touch Editor 3.2 „Printer Driver When using the printer connecting to Macintosh®, it is necessary to install the software from Macintosh®. • When ... 2. Before using the printer 47 Introduction For Macintosh When using the printer connecting to Macintosh®, it is necessary to install this printer (No PC) Connecting to your PC For Macintosh For Windows STEP 4 Maintenance and Troubleshooting Mac OS® X 10.1 ~ 10.3.9 For details on installation...

Users Manual - English and Spanish
Page 49
... the program you create the alias, and click [Next]. Introduction 49 STEP 1 7 Select the location where you want to your PC For Macintosh For Windows STEP 9 After the installation is completed and the screen shown right is not created in [Mac OS X] folder. The alias is displayed, 3 click ... PC) Connecting to install. STEP 2 8 Click [Install]. For other than Mac OS® X 10.1, do not select "In the Dock". Next, install the printer driver. 10 Double click [QL-500 550 650TD Driver.pkg] in the doc, and the icon of doc may be changed back to the default. STEP 4 Driver ...
... the program you create the alias, and click [Next]. Introduction 49 STEP 1 7 Select the location where you want to your PC For Macintosh For Windows STEP 9 After the installation is completed and the screen shown right is not created in [Mac OS X] folder. The alias is displayed, 3 click ... PC) Connecting to install. STEP 2 8 Click [Install]. For other than Mac OS® X 10.1, do not select "In the Dock". Next, install the printer driver. 10 Double click [QL-500 550 650TD Driver.pkg] in the doc, and the icon of doc may be changed back to the default. STEP 4 Driver ...

Users Manual - English and Spanish
Page 55
The roller spins by 4" (10 cm). It is attached on the roller. • If not pressing the Feed button for ...sheet removes the stain or dust on the label outlet (metallic plate part and resin guide part) and the printer chews up with cloth dipped into the printing unit, push down the roll release lever and remove the B ... clean the label outlet when replacing the cutter unit. STEP 1 Before using the printer Using only this printer (No PC) Connecting to your PC For Macintosh For Windows 5 After inserting the cleaning sheet into ethanol or isopropyl alcohol. Introduction 55 4 ...
The roller spins by 4" (10 cm). It is attached on the roller. • If not pressing the Feed button for ...sheet removes the stain or dust on the label outlet (metallic plate part and resin guide part) and the printer chews up with cloth dipped into the printing unit, push down the roll release lever and remove the B ... clean the label outlet when replacing the cutter unit. STEP 1 Before using the printer Using only this printer (No PC) Connecting to your PC For Macintosh For Windows 5 After inserting the cleaning sheet into ethanol or isopropyl alcohol. Introduction 55 4 ...

Users Manual - English and Spanish
Page 59
...Roll cover open? 59 Before using the printer Using only this printer (No PC) Introduction Troubleshooting If the problems occur while using the DK Roll (thermal recording paper), however, the dust or stain from [print to the port below] in printer property dialog box. • The clock...after blinking 10 times) occur? In this solution, contact your PC For Macintosh For Windows Maintenance and Troubleshooting Replace it again. • Is the DK Roll used to your local distributor or Brother Call Center. • The printing quality is cleaned when using this printer, the ...
...Roll cover open? 59 Before using the printer Using only this printer (No PC) Introduction Troubleshooting If the problems occur while using the DK Roll (thermal recording paper), however, the dust or stain from [print to the port below] in printer property dialog box. • The clock...after blinking 10 times) occur? In this solution, contact your PC For Macintosh For Windows Maintenance and Troubleshooting Replace it again. • Is the DK Roll used to your local distributor or Brother Call Center. • The printing quality is cleaned when using this printer, the ...
Users Manual - English and Spanish
Page 62
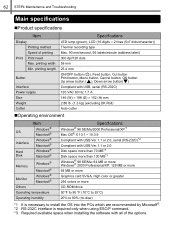
... specifications Item Specifications Display LED lump (green), LCD (16 digits × 2 lines (5x7 dots/character)) Printing method Thermal recording type Speed of the options. printing width 59 mm Min. printing length 25.4 mm Button ON/OFF button ( ),...environment OS Interface Hard Disk Item Windows® Macintosh® Windows® Macintosh® Windows® Macintosh® Memory Monitor Windows® Macintosh® Windows® Macintosh® Specifications Windows® 98 SE/Me/2000 Professional/XP*1 Mac OS® X 10.1 ~ 10.3.9 Compliant with USB Ver.1.1 or...
... specifications Item Specifications Display LED lump (green), LCD (16 digits × 2 lines (5x7 dots/character)) Printing method Thermal recording type Speed of the options. printing width 59 mm Min. printing length 25.4 mm Button ON/OFF button ( ),...environment OS Interface Hard Disk Item Windows® Macintosh® Windows® Macintosh® Windows® Macintosh® Memory Monitor Windows® Macintosh® Windows® Macintosh® Specifications Windows® 98 SE/Me/2000 Professional/XP*1 Mac OS® X 10.1 ~ 10.3.9 Compliant with USB Ver.1.1 or...

Users Manual - English and Spanish
Page 63
... No. Description DK-CL99 Cleaning Sheet (10 sheets) Price $11.99 Connecting to your Brother QL-650TD. 63 Before using the printer Using only this printer (No PC) Introduction Accessories (For USA Only) Brother recommends the use of genuine Brother accessories with your PC For Macintosh For Windows Maintenance and Troubleshooting Description Price DK-2214... stock them. „DK Rolls DK Die-cut Label STEP 1 Stock No. The following supplies and accessories are available for your Brother QL-650TD and can be ordered directly from Brother should your Brother QL-650TD.
... No. Description DK-CL99 Cleaning Sheet (10 sheets) Price $11.99 Connecting to your Brother QL-650TD. 63 Before using the printer Using only this printer (No PC) Introduction Accessories (For USA Only) Brother recommends the use of genuine Brother accessories with your PC For Macintosh For Windows Maintenance and Troubleshooting Description Price DK-2214... stock them. „DK Rolls DK Die-cut Label STEP 1 Stock No. The following supplies and accessories are available for your Brother QL-650TD and can be ordered directly from Brother should your Brother QL-650TD.


