
Software Users Manual - English
Page 2
... Editing the Contact Data 37 Printing the Label ...38 How to Use P-touch Transfer Manager & P-touch Library 39 Starting up P-touch Transfer Manager 39 Transferring label templates from the PC to the printer 41 Backing up label templates 44 Changing printer settings from the PC 45 Starting up the P-touch Library 46 Searching labels ...47 Creating Labels (For Macintosh 48 Overview ...48 Procedure...
... Editing the Contact Data 37 Printing the Label ...38 How to Use P-touch Transfer Manager & P-touch Library 39 Starting up P-touch Transfer Manager 39 Transferring label templates from the PC to the printer 41 Backing up label templates 44 Changing printer settings from the PC 45 Starting up the P-touch Library 46 Searching labels ...47 Creating Labels (For Macintosh 48 Overview ...48 Procedure...
Software Users Manual - English
Page 4
...Labels (For Macintosh) Appendix 4 About This Manual The Brother QL-500/QL-550/QL-650TD/QL-1050/QL-1050N label printer (hereafter referred to as follows: This symbol indicates information or directions that should read them before reading the Software User's Guide (this guide before using just the printer (Brother QL650TD only). Make sure to a PC...With the Brother QL-650TD, you can also create and print labels directly from the label printer which is information describing how to install the accompanying software to connect the printer to read before using the P-touch Editor ...
...Labels (For Macintosh) Appendix 4 About This Manual The Brother QL-500/QL-550/QL-650TD/QL-1050/QL-1050N label printer (hereafter referred to as follows: This symbol indicates information or directions that should read them before reading the Software User's Guide (this guide before using just the printer (Brother QL650TD only). Make sure to a PC...With the Brother QL-650TD, you can also create and print labels directly from the label printer which is information describing how to install the accompanying software to connect the printer to read before using the P-touch Editor ...
Software Users Manual - English
Page 6
...;Page 35 Import the text ÎPage 36 6 From Label Creation to Printing Edit the label ÎPage 37 Introduction Creating Labels (For Windows) 3 Create and print the label. Select your PC, create and print the label using just the printer. (Brother QL-650TD only) The QL-1050 can transfer templates. P-touch Editor P-touch Editor Create a template ÎPage 39 Enter the text...
...;Page 35 Import the text ÎPage 36 6 From Label Creation to Printing Edit the label ÎPage 37 Introduction Creating Labels (For Windows) 3 Create and print the label. Select your PC, create and print the label using just the printer. (Brother QL-650TD only) The QL-1050 can transfer templates. P-touch Editor P-touch Editor Create a template ÎPage 39 Enter the text...

Software Users Manual - English
Page 39
.... 4 Folder view Displays a list of data transferred to the selected printer is displayed. 6 Preview The label templates selected in the list view are icons for the QL-650TD.The QL-1050 can also transfer templates, but it cannot select templates with the P-touch Library to the printer main unit and can make backups of folders. When you...
.... 4 Folder view Displays a list of data transferred to the selected printer is displayed. 6 Preview The label templates selected in the list view are icons for the QL-650TD.The QL-1050 can also transfer templates, but it cannot select templates with the P-touch Library to the printer main unit and can make backups of folders. When you...

Software Users Manual - English
Page 40
... search results are displayed. 6 Transfer Manager Transfers PC data to the Brother Ptouch printer using the P-touch Transfer Manager. Backups the data you have transferred to the printer. Creating Labels (For Macintosh) Appendix 40 Starting up from the P-touch Library is started. 7 Configurations Data transferred to the printer. Introduction Creating Labels (For Windows) Explanations of the Icons Icon Button...
... search results are displayed. 6 Transfer Manager Transfers PC data to the Brother Ptouch printer using the P-touch Transfer Manager. Backups the data you have transferred to the printer. Creating Labels (For Macintosh) Appendix 40 Starting up from the P-touch Library is started. 7 Configurations Data transferred to the printer. Introduction Creating Labels (For Windows) Explanations of the Icons Icon Button...
Software Users Manual - English
Page 41
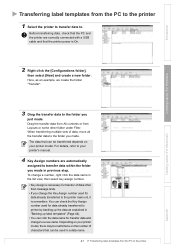
... example, we create the folder "Transfer". Creating Labels (For Windows) Creating Labels (For Macintosh) 3 Drag the transfer data to the printer main unit, it is overwritten. Introduction Transferring label templates from the PC to the printer 1 Select the printer to transfer data to the folder you made....that can be used in a data name. 41 Transferring label templates from the PC to transfer data within the folder you made in previous step. Depending on your printer model, there may be restrictions on your printer's manual. 4 Key Assign numbers are correctly connected with ...
... example, we create the folder "Transfer". Creating Labels (For Windows) Creating Labels (For Macintosh) 3 Drag the transfer data to the printer main unit, it is overwritten. Introduction Transferring label templates from the PC to the printer 1 Select the printer to transfer data to the folder you made....that can be used in a data name. 41 Transferring label templates from the PC to transfer data within the folder you made in previous step. Depending on your printer model, there may be restrictions on your printer's manual. 4 Key Assign numbers are correctly connected with ...
Software Users Manual - English
Page 42
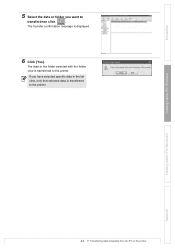
Introduction 5 Select the data or folder you have selected specific data in the folder selected with the folder view is transferred to transfer,then click . The data in the list view, only that selected data is displayed. 6 Click [Yes]. Creating Labels (For Windows) Creating Labels (For Macintosh) Appendix 42 Transferring label templates from the PC to the printer. If you want to the printer. The transfer confirmation message is transferred to the printer
Introduction 5 Select the data or folder you have selected specific data in the folder selected with the folder view is transferred to transfer,then click . The data in the list view, only that selected data is displayed. 6 Click [Yes]. Creating Labels (For Windows) Creating Labels (For Macintosh) Appendix 42 Transferring label templates from the PC to the printer. If you want to the printer. The transfer confirmation message is transferred to the printer

Software Users Manual - English
Page 43
... a new message (QL-650TD only) 1 Select the QL-650TD Configurations folder or any folder under it. 2 Right click, then select [New Message]. Creating Labels (For Macintosh) 4 Input the display text and print text, then click [Save As]. A maximum of QL-650TD, so to correct ...a message, double-click on the existing message file, open the [Message] dialog box and make the correction. 5 Select the message text or its folder you want to transfer, then click . The message data is transferred to the printer. 43 Transferring label templates from the PC...
... a new message (QL-650TD only) 1 Select the QL-650TD Configurations folder or any folder under it. 2 Right click, then select [New Message]. Creating Labels (For Macintosh) 4 Input the display text and print text, then click [Save As]. A maximum of QL-650TD, so to correct ...a message, double-click on the existing message file, open the [Message] dialog box and make the correction. 5 Select the message text or its folder you want to transfer, then click . The message data is transferred to the printer. 43 Transferring label templates from the PC...
Software Users Manual - English
Page 44
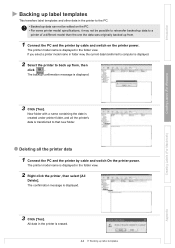
... message is displayed. Creating Labels (For Windows) Creating Labels (For Macintosh) 3 Click [Yes]. If you select a printer model name in the printer is displayed. 2 Select the printer to back up from . 1 Connect the PC and the printer by cable and switch On the printer power. All data in... transferred to computer is erased. 44 Backing up label templates Appendix The backup confirmation message is displayed. 3 Click [Yes]. Introduction Backing up label templates This transfers label templates and other data in the printer to the PC. • Backed up data can not be ...
... message is displayed. Creating Labels (For Windows) Creating Labels (For Macintosh) 3 Click [Yes]. If you select a printer model name in the printer is displayed. 2 Select the printer to back up from . 1 Connect the PC and the printer by cable and switch On the printer power. All data in... transferred to computer is erased. 44 Backing up label templates Appendix The backup confirmation message is displayed. 3 Click [Yes]. Introduction Backing up label templates This transfers label templates and other data in the printer to the PC. • Backed up data can not be ...
Software Users Manual - English
Page 45
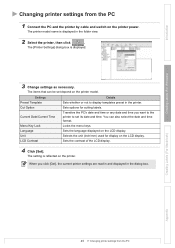
... the dialog box. Sets the language displayed on the printer model. Sets options for display on the LCD display. Locks the menu keys. Creating Labels (For Macintosh) Appendix 45 Changing printer settings from the PC 1 Connect the PC and the printer by cable and switch on the printer. Sets the contrast of the LCD display. 4 Click [Set...
... the dialog box. Sets the language displayed on the printer model. Sets options for display on the LCD display. Locks the menu keys. Creating Labels (For Macintosh) Appendix 45 Changing printer settings from the PC 1 Connect the PC and the printer by cable and switch on the printer. Sets the contrast of the LCD display. 4 Click [Set...

Software Users Manual - English
Page 59
...Labels (For Windows) Controlling with the ESC/P Commands Brother QL-650TD/ 1050/1050N Only Descriptions in this section apply only to the "Command Reference" included in the CD-ROM. ([CD Drive]:\Doc\Technical) Serial Cables The pin assignments for the serial cables (RS-232C cables) which is used with the printer... RI Pin Number 1 2 3 4 5 6 7 8 9 Pin Assignments PC side (D-Sub9P female) Pin Number 1 2 3 4 5 6 7 8 9 Signal Name DCD RXD TXD DTR GND DSR RTS CTS RI • It is not Limited Power Source. Fonts and several bar codes are P-touch proprietary commands based on ESC/P.
...Labels (For Windows) Controlling with the ESC/P Commands Brother QL-650TD/ 1050/1050N Only Descriptions in this section apply only to the "Command Reference" included in the CD-ROM. ([CD Drive]:\Doc\Technical) Serial Cables The pin assignments for the serial cables (RS-232C cables) which is used with the printer... RI Pin Number 1 2 3 4 5 6 7 8 9 Pin Assignments PC side (D-Sub9P female) Pin Number 1 2 3 4 5 6 7 8 9 Signal Name DCD RXD TXD DTR GND DSR RTS CTS RI • It is not Limited Power Source. Fonts and several bar codes are P-touch proprietary commands based on ESC/P.

Users Manual - English and Spanish
Page 3
... of the software, are subject to change , reverse-engineer, disassemble, or decompile any part of this printer or printed labels, and lost or altered data caused by Brother Industries, Ltd. STEP 2 STEP 3 Using only this printer (No PC) Connecting to you or others for any damage, lost earnings, or any form, including photocopying or reprinting...
... of the software, are subject to change , reverse-engineer, disassemble, or decompile any part of this printer or printed labels, and lost or altered data caused by Brother Industries, Ltd. STEP 2 STEP 3 Using only this printer (No PC) Connecting to you or others for any damage, lost earnings, or any form, including photocopying or reprinting...

Users Manual - English and Spanish
Page 11
...When using the printer Using only this printer (No PC) „Cutter Caution Follow the followings to avoid damage of the printer. The internal shorts may have the difficulties to other objects. Do not use DK Roll when you use , expose, or keep the battery under the direct sunlight or to...132;Battery Depending on top of the printer. Do not touch the blade of its duration. Follow the followings to the battery. Follow the followings to the instruction. DK Roll uses thermal paper and thermal film so that the color of the label will be changed or transferred to peel ...
...When using the printer Using only this printer (No PC) „Cutter Caution Follow the followings to avoid damage of the printer. The internal shorts may have the difficulties to other objects. Do not use DK Roll when you use , expose, or keep the battery under the direct sunlight or to...132;Battery Depending on top of the printer. Do not touch the blade of its duration. Follow the followings to the battery. Follow the followings to the instruction. DK Roll uses thermal paper and thermal film so that the color of the label will be changed or transferred to peel ...

Users Manual - English and Spanish
Page 13
...the applicator included with extremely high or extremely low temperatures. Using only this printer (No PC) Connecting to your CD/DVD player's instruction manual regarding applying CD/DVD labels. • Do not use CD/DVD labels in a slot loading CD/DVD player, for any loss or damage ... CD player. • Do not peel off the CD/DVD label once it with adhesive cellophane tape etc. Brother accepts no responsibility for applying CD/DVD labels. Labels peel off of data. • When applying CD/DVD labels, use with the printer only. Battery Introduction STEP 1 STEP 2 STEP 3 „Cutter...
...the applicator included with extremely high or extremely low temperatures. Using only this printer (No PC) Connecting to your CD/DVD player's instruction manual regarding applying CD/DVD labels. • Do not use CD/DVD labels in a slot loading CD/DVD player, for any loss or damage ... CD player. • Do not peel off the CD/DVD label once it with adhesive cellophane tape etc. Brother accepts no responsibility for applying CD/DVD labels. Labels peel off of data. • When applying CD/DVD labels, use with the printer only. Battery Introduction STEP 1 STEP 2 STEP 3 „Cutter...

Users Manual - English and Spanish
Page 15
... Roller maintenance 54 Label outlet maintenance 55 Replacing the cutter unit 56 Replacing the lithium clock battery 57 Troubleshooting 59 Potential types of problems 59 Error messages (what they mean 60 Main specifications 62 Accessories (For USA Only 63 STEP 1 STEP 2 STEP 3 Using only this printer (No PC) Connecting to your PC For Macintosh...
... Roller maintenance 54 Label outlet maintenance 55 Replacing the cutter unit 56 Replacing the lithium clock battery 57 Troubleshooting 59 Potential types of problems 59 Error messages (what they mean 60 Main specifications 62 Accessories (For USA Only 63 STEP 1 STEP 2 STEP 3 Using only this printer (No PC) Connecting to your PC For Macintosh...

Users Manual - English and Spanish
Page 17
... 5 Connecting the power supply 6 Setting clock/language/unit 7 Procedure for the printer before creating a label. 17 Introduction 1 STEP STEP 1 Before using the printer Before using the printer Using only this printer (No PC) Take the printer out of the box and make preparations for creating a label ÎPage 23 ÎPage 24 ÎPage 25 ÎPage 26...
... 5 Connecting the power supply 6 Setting clock/language/unit 7 Procedure for the printer before creating a label. 17 Introduction 1 STEP STEP 1 Before using the printer Before using the printer Using only this printer (No PC) Take the printer out of the box and make preparations for creating a label ÎPage 23 ÎPage 24 ÎPage 25 ÎPage 26...

Users Manual - English and Spanish
Page 21
... Display mode Menu 10/12 OK Language Cancel Language English - List Print Cancel All Templates? 21 Introduction Before using the printer Using only this printer (No PC) „Menu Selection mode The LCD displays in this mode when editing the template and setting or changing the function. ... goes 2/3"x3-7/16" to Time Display mode Menu Copies OK OK 4/12 OK to your PC For Macintosh For Windows Maintenance and Troubleshooting Menu 1/12 Label Settings STEP 1 Menu OK 1/12 Label Settings Cancel Menu 2/12 OK Date/Time Incr Cancel Message [P07] Received OK Cancel Date Fmt...
... Display mode Menu 10/12 OK Language Cancel Language English - List Print Cancel All Templates? 21 Introduction Before using the printer Using only this printer (No PC) „Menu Selection mode The LCD displays in this mode when editing the template and setting or changing the function. ... goes 2/3"x3-7/16" to Time Display mode Menu Copies OK OK 4/12 OK to your PC For Macintosh For Windows Maintenance and Troubleshooting Menu 1/12 Label Settings STEP 1 Menu OK 1/12 Label Settings Cancel Menu 2/12 OK Date/Time Incr Cancel Message [P07] Received OK Cancel Date Fmt...

Users Manual - English and Spanish
Page 23
...thermal recording film are correctly inserted into spool guide of Battery protection sheet Roll release lever STEP 3 printing unit. For the list of applicable DK Rolls, refer to "List of the 4 printer. This is a pre-cut label roll. Printing unit protection sheet Then, remove the battery protection sheet. Using only this printer (No PC... of DK Roll cover on the front side of the printer to use only genuine DK Roll for DK Label and DK Tape. Thermal recording paper and thermal recording film are available. DK Label DK Tape This is a freely cuttable full-page adhesive ...
...thermal recording film are correctly inserted into spool guide of Battery protection sheet Roll release lever STEP 3 printing unit. For the list of applicable DK Rolls, refer to "List of the 4 printer. This is a pre-cut label roll. Printing unit protection sheet Then, remove the battery protection sheet. Using only this printer (No PC... of DK Roll cover on the front side of the printer to use only genuine DK Roll for DK Label and DK Tape. Thermal recording paper and thermal recording film are available. DK Label DK Tape This is a freely cuttable full-page adhesive ...

Users Manual - English and Spanish
Page 27
...from the next time. 12:34 [P01] 2005/7/20 Every process such as creating or printing a label, setting each function is operated in page 38 STEP 3 Using only this printer" in page 29. The unit is determined and then Time Display mode Unit inch STEP 1 is ...displayed. US Introduction 8 Set the unit by up or down arrow button ( / ) and press OK button. Before using only this printer (No PC) Connecting to your PC For Macintosh For Windows STEP 4 Maintenance and Troubleshooting Language English - The language is determined and then unit setting screen is displayed. 9 ...
...from the next time. 12:34 [P01] 2005/7/20 Every process such as creating or printing a label, setting each function is operated in page 38 STEP 3 Using only this printer" in page 29. The unit is determined and then Time Display mode Unit inch STEP 1 is ...displayed. US Introduction 8 Set the unit by up or down arrow button ( / ) and press OK button. Before using only this printer (No PC) Connecting to your PC For Macintosh For Windows STEP 4 Maintenance and Troubleshooting Language English - The language is determined and then unit setting screen is displayed. 9 ...

Users Manual - English and Spanish
Page 28
... installing the included software, it is shown below. 1 Decide the type of creating a label, let's create a label. It is also possible to change the content of printing and printing format with the printer is possible to design the label by PC and print it . 28 STEP1 Before using only this printer" in page 41, for printing.
... installing the included software, it is shown below. 1 Decide the type of creating a label, let's create a label. It is also possible to change the content of printing and printing format with the printer is possible to design the label by PC and print it . 28 STEP1 Before using only this printer" in page 41, for printing.


