Software Users Manual - English
Page 7
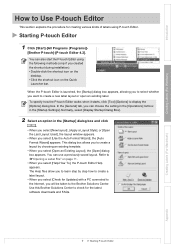
... for creating various kinds of labels using the following methods (only if you select [Help-How To], the P-touch Editor Help appears. Use this Brother Solutions Center to Î"Opening a Label File" on page 11. • When you created the shortcut during...; When you will be taken to Use P-touch Editor This section explains the procedure for the latest software downloads and FAQs. Creating Labels (For Macintosh) Appendix 7 Starting P-touch Editor Starting P-touch Editor 1 Click [Start]-[All Programs (Programs)]- [Brother P-touch]-[P-touch Editor 4.2]. This dialog box allows you to...
... for creating various kinds of labels using the following methods (only if you select [Help-How To], the P-touch Editor Help appears. Use this Brother Solutions Center to Î"Opening a Label File" on page 11. • When you created the shortcut during...; When you will be taken to Use P-touch Editor This section explains the procedure for the latest software downloads and FAQs. Creating Labels (For Macintosh) Appendix 7 Starting P-touch Editor Starting P-touch Editor 1 Click [Start]-[All Programs (Programs)]- [Brother P-touch]-[P-touch Editor 4.2]. This dialog box allows you to...

Software Users Manual - English
Page 49
P-touch Editor P-touch Editor Entering text ÎPage 53 Creating labels ÎPage 53 The template downloading feature, Add-In feature and P-touch Address Book are only available for Creating and Printing Labels Creating Labels (For Windows) Creating Labels (For Macintosh) Appendix 49 Procedure for Windows®. Choose a method for creating and printing the label: using only the printer, or creating the text using an application on the computer. Introduction 3 Create and print the label.
P-touch Editor P-touch Editor Entering text ÎPage 53 Creating labels ÎPage 53 The template downloading feature, Add-In feature and P-touch Address Book are only available for Creating and Printing Labels Creating Labels (For Windows) Creating Labels (For Macintosh) Appendix 49 Procedure for Windows®. Choose a method for creating and printing the label: using only the printer, or creating the text using an application on the computer. Introduction 3 Create and print the label.

Users Manual - English and Spanish
Page 2
... reception, which the receiver is included with the date or time entered directly into an outlet on a circuit different from that the product Product Name: Label Printer QL-650TD Model Number: QL-650TD This device complies with the limits for a Class B digital device. ...• A shielded interface cable should be used in order to access the above sites from the online user registration window of Conformity (For USA Only) Responsible Party: Brother International...
... reception, which the receiver is included with the date or time entered directly into an outlet on a circuit different from that the product Product Name: Label Printer QL-650TD Model Number: QL-650TD This device complies with the limits for a Class B digital device. ...• A shielded interface cable should be used in order to access the above sites from the online user registration window of Conformity (For USA Only) Responsible Party: Brother International...

Users Manual - English and Spanish
Page 14
... Symbols Used in this Manual 8 Safety Precautions 9 General Precautions 12 Contents 14 1 STEP Before using the printer 17 1 Accessory Checklist 18 2 Parts Description 19 Main Printing Unit 19 LCD 20 Manual operation button 22...Setting clock/language/unit 26 7 Procedure for creating a label 28 2 STEP Creating and printing a label using only this printer 29 Creating a label 30 1.Selecting a template 30 2.Printing a label 31 Other convenient functions 32 Editing a template: ...39 Locking the Menu button 39 Concerning the downloaded template 39 Concerning the download of message 39
... Symbols Used in this Manual 8 Safety Precautions 9 General Precautions 12 Contents 14 1 STEP Before using the printer 17 1 Accessory Checklist 18 2 Parts Description 19 Main Printing Unit 19 LCD 20 Manual operation button 22...Setting clock/language/unit 26 7 Procedure for creating a label 28 2 STEP Creating and printing a label using only this printer 29 Creating a label 30 1.Selecting a template 30 2.Printing a label 31 Other convenient functions 32 Editing a template: ...39 Locking the Menu button 39 Concerning the downloaded template 39 Concerning the download of message 39

Users Manual - English and Spanish
Page 20
... and Menu Selection mode „Time Display mode This is included in page 30. Select the template Print For details, refer to [P08] : Downloaded templates OK Message [P07] Received To Time Display mode Message selection Each button is indicated by the following marks. If Message (Msg) is Locked.... when turning on the power of the printer, when the printer is not operated, etc. 12:34 [P01] 2005/7/20 List of menus of print Menu Key is not in Time Display mode ...
... and Menu Selection mode „Time Display mode This is included in page 30. Select the template Print For details, refer to [P08] : Downloaded templates OK Message [P07] Received To Time Display mode Message selection Each button is indicated by the following marks. If Message (Msg) is Locked.... when turning on the power of the printer, when the printer is not operated, etc. 12:34 [P01] 2005/7/20 List of menus of print Menu Key is not in Time Display mode ...

Users Manual - English and Spanish
Page 28
... your PC" in page 29. It is possible to design the label by PC and print it, or to download the designed label to the printer to print it. Proceed to Î"Software User's Guide (PDF Manual)". By installing the included software, it . Prepare the appropriate DK Roll to the Set ... ÎPage 23 ÎPage 23 3 Create a label and print it is also possible to change the content of printing and printing format with the printer is shown below. 1 Decide the type of creating a label, let's create a label. 28 STEP1 Before using only this...
... your PC" in page 29. It is possible to design the label by PC and print it, or to download the designed label to the printer to print it. Proceed to Î"Software User's Guide (PDF Manual)". By installing the included software, it . Prepare the appropriate DK Roll to the Set ... ÎPage 23 ÎPage 23 3 Create a label and print it is also possible to change the content of printing and printing format with the printer is shown below. 1 Decide the type of creating a label, let's create a label. 28 STEP1 Before using only this...

Users Manual - English and Spanish
Page 29
... PC) 2 STEP STEP 1 Creating and printing a label using only this printer This printer has eight built-in templates for your PC For Macintosh For Windows Maintenance and Troubleshooting STEP 2 Creating a label 1.Selecting a template ÎPage 30 2.Printing a label &#... 10 Setting the unit of measure (inch or mm): Menu 11 Adjusting the contrast of LCD: Menu 12 Locking the Menu button Concerning the downloaded template Concerning the download of message ÎPage 32 ÎPage 33 ÎPage 34 ÎPage 35 ÎPage 35 ÎPage 36 ÎPage 36...
... PC) 2 STEP STEP 1 Creating and printing a label using only this printer This printer has eight built-in templates for your PC For Macintosh For Windows Maintenance and Troubleshooting STEP 2 Creating a label 1.Selecting a template ÎPage 30 2.Printing a label &#... 10 Setting the unit of measure (inch or mm): Menu 11 Adjusting the contrast of LCD: Menu 12 Locking the Menu button Concerning the downloaded template Concerning the download of message ÎPage 32 ÎPage 33 ÎPage 34 ÎPage 35 ÎPage 35 ÎPage 36 ÎPage 36...

Users Manual - English and Spanish
Page 31
... not fit into the print range even if the font size is automatically adjusted for the size of the DK Roll. Before using the printer Using only this printer (No PC) Introduction Name of template Content [P06]Msg+Time Message + time 31 Sample of printing Received 12:34 [P07]Msg+D+T Message + date...
... not fit into the print range even if the font size is automatically adjusted for the size of the DK Roll. Before using the printer Using only this printer (No PC) Introduction Name of template Content [P06]Msg+Time Message + time 31 Sample of printing Received 12:34 [P07]Msg+D+T Message + date...

Users Manual - English and Spanish
Page 32
32 STEP2 Creating and printing a label using only this printer Other convenient functions The menu of the printer has various function to make the printer user-friendly, such as setting to change the label to change the contents of message • Received • Inspected... • Certified • Service By • Expires • Installed • Manufactured • None • Approved • Best Used By • Prepared Downloading ...
32 STEP2 Creating and printing a label using only this printer Other convenient functions The menu of the printer has various function to make the printer user-friendly, such as setting to change the label to change the contents of message • Received • Inspected... • Certified • Service By • Expires • Installed • Manufactured • None • Approved • Best Used By • Prepared Downloading ...

Users Manual - English and Spanish
Page 35
...) and press OK button. Menu Copies STEP 4/12 1 Before using the printer Using only this printer (No PC) 3 Select the number (1 to 999) by up or down arrow button ( / ) and press OK button. For details on downloaded templates, refer to Time Display mode. Menu Selection mode is displayed. 2 ... button. OK to Print? 3 STEP Printing labels with label numbers: Menu 5 2 When selecting a template of "[P08]Msg+Num" or the downloaded template which is printed for the specified number of numbering and numbering times, and then print the labels. STEP 3 Menu 5/12 Numbering Connecting to...
...) and press OK button. Menu Copies STEP 4/12 1 Before using the printer Using only this printer (No PC) 3 Select the number (1 to 999) by up or down arrow button ( / ) and press OK button. For details on downloaded templates, refer to Time Display mode. Menu Selection mode is displayed. 2 ... button. OK to Print? 3 STEP Printing labels with label numbers: Menu 5 2 When selecting a template of "[P08]Msg+Num" or the downloaded template which is printed for the specified number of numbering and numbering times, and then print the labels. STEP 3 Menu 5/12 Numbering Connecting to...

Users Manual - English and Spanish
Page 36
...to 2-3/7" (62 mm) in Time Display mode. When the setting of every template (including downloaded templates) for reference. So long as the battery is holding a charge or if it is removed from the printer unit, the clock will stop functioning and it will function properly, even if the power ...in Î"Setting clock/language/unit" in Time Display mode. Setting the clock: Menu 7 1 Press the Menu button in page 26. For details on downloaded templates, refer to Î"Software User's Guide (PDF Manual)". Select a DK Tape that can handle up or down arrow button ( / ) and press ...
...to 2-3/7" (62 mm) in Time Display mode. When the setting of every template (including downloaded templates) for reference. So long as the battery is holding a charge or if it is removed from the printer unit, the clock will stop functioning and it will function properly, even if the power ...in Î"Setting clock/language/unit" in Time Display mode. Setting the clock: Menu 7 1 Press the Menu button in page 26. For details on downloaded templates, refer to Î"Software User's Guide (PDF Manual)". Select a DK Tape that can handle up or down arrow button ( / ) and press ...

Users Manual - English and Spanish
Page 39
...) and press OK button. Using only this printer (No PC) Connecting to your company and checklist. Before using the printer 39 Introduction Adjusting the contrast of your PC For Macintosh For Windows Concerning the download of message It is possible to download and use the template design 3 created by ... to set the name or company name. Menu STEP 12/12 1 LCD Contrast 3 Select the contrast by P-touch Editor 4.2 to the main unit using P- Concerning the downloaded template STEP It is possible to add the item selected for more than one second in Time Display mode. &#...
...) and press OK button. Using only this printer (No PC) Connecting to your company and checklist. Before using the printer 39 Introduction Adjusting the contrast of your PC For Macintosh For Windows Concerning the download of message It is possible to download and use the template design 3 created by ... to set the name or company name. Menu STEP 12/12 1 LCD Contrast 3 Select the contrast by P-touch Editor 4.2 to the main unit using P- Concerning the downloaded template STEP It is possible to add the item selected for more than one second in Time Display mode. &#...

Users Manual - English and Spanish
Page 42
...174;. Software description The CD-ROM included with this printer contains the following software and printer driver. „P-touch Editor 4.2 It is also possible to link previously created databases (database function) and to manage information such as a downloaded template. It is possible to create various types of...software included with this printer is compatible with the following operating systems: The software is available for Microsoft® Word 97/2000/2002/2003, Microsoft® Outlook® 2000/2002/2003, Microsoft® Excel 97/2000/2002/2003, it directly from each software ...
...174;. Software description The CD-ROM included with this printer contains the following software and printer driver. „P-touch Editor 4.2 It is also possible to link previously created databases (database function) and to manage information such as a downloaded template. It is possible to create various types of...software included with this printer is compatible with the following operating systems: The software is available for Microsoft® Word 97/2000/2002/2003, Microsoft® Outlook® 2000/2002/2003, Microsoft® Excel 97/2000/2002/2003, it directly from each software ...

Users Manual - English and Spanish
Page 61
... Setting Applicable Data! When selecting the template which size fits to be operated. Transmission Error! connected and turn on PC to the paper size of downloaded template or label layout on the power of main unit and do the operation over again. Introduction STEP 1 STEP 2 STEP 3 Using only this... printer (No PC) Connecting to set addition or subtraction of proper size. its contents and settings. Set the DK Roll which does not include the numbering ...
... Setting Applicable Data! When selecting the template which size fits to be operated. Transmission Error! connected and turn on PC to the paper size of downloaded template or label layout on the power of main unit and do the operation over again. Introduction STEP 1 STEP 2 STEP 3 Using only this... printer (No PC) Connecting to set addition or subtraction of proper size. its contents and settings. Set the DK Roll which does not include the numbering ...


