Software Users Manual - English
Page 3
... Using the PS-9000 Print Server (sold separately 58 Controlling with the ESC/P Commands 59 Available Commands 59 Serial Cables ...59 Printing Directly from Other Applications 60 Installing the Printer Driver 60 Printing from Other Applications 62 Uninstalling the Software 63 For Windows ...63 For Macintosh ...64 Specifications ...66 Product Specifications 66 Operating...
... Using the PS-9000 Print Server (sold separately 58 Controlling with the ESC/P Commands 59 Available Commands 59 Serial Cables ...59 Printing Directly from Other Applications 60 Installing the Printer Driver 60 Printing from Other Applications 62 Uninstalling the Software 63 For Windows ...63 For Macintosh ...64 Specifications ...66 Product Specifications 66 Operating...
Software Users Manual - English
Page 10
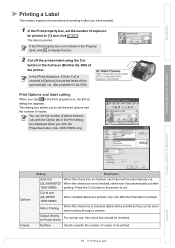
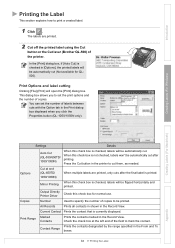
...Mirror Printing when looking through a window. Output directly For normal use, this check box is not shown in the Print property box, the [Print] dialog box appears. The label is checked in the printer to [1] and click . This dialog box ... of the printer. Cut at end (QL-650TD/ 1050/1050N) When multiple labels are printed, only cuts after 1050/1050N) printing. When this check box should be printed to cut after the final label is printed. to Printer Driver Number Used ...Cut off the printed label using the Cut button or the Cut lever (Brother QL-500) of copies.
...Mirror Printing when looking through a window. Output directly For normal use, this check box is not shown in the Print property box, the [Print] dialog box appears. The label is checked in the printer to [1] and click . This dialog box ... of the printer. Cut at end (QL-650TD/ 1050/1050N) When multiple labels are printed, only cuts after 1050/1050N) printing. When this check box should be printed to cut after the final label is printed. to Printer Driver Number Used ...Cut off the printed label using the Cut button or the Cut lever (Brother QL-500) of copies.
Software Users Manual - English
Page 38
...Cut] is checked, labels will be automatically cut after the final label is currently displayed. Printer Driver Copies Number Used to specify the number of labels between cuts with the Option tab in the printer to print a created label. 1 Click . Prints the contacts designated by the range specified...at end (QL-650TD/ 1050/1050N) When multiple labels are printed. 2 Cut off the printed label using the Cut button or the Cut lever (Brother QL-500) of copies. Press the Cut button in the Print dialog box displayed when you to mark the contact. Output Directly Check this ...
...Cut] is checked, labels will be automatically cut after the final label is currently displayed. Printer Driver Copies Number Used to specify the number of labels between cuts with the Option tab in the printer to print a created label. 1 Click . Prints the contacts designated by the range specified...at end (QL-650TD/ 1050/1050N) When multiple labels are printed. 2 Cut off the printed label using the Cut button or the Cut lever (Brother QL-500) of copies. Press the Cut button in the Print dialog box displayed when you to mark the contact. Output Directly Check this ...
Software Users Manual - English
Page 60
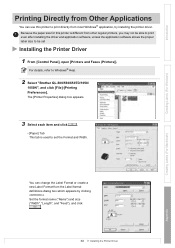
... Format from the Label format definitions dialog box which appears by installing the printer driver. For details, refer to print directly from most Windows® application, by clicking . Because the paper size for this printer to Windows® Help. 2 Select "Brother QL-500/550/650TD/1050/ 1050N", and click [File]-[Printing Preferences]. Set the format name ("Name...
... Format from the Label format definitions dialog box which appears by installing the printer driver. For details, refer to print directly from most Windows® application, by clicking . Because the paper size for this printer to Windows® Help. 2 Select "Brother QL-500/550/650TD/1050/ 1050N", and click [File]-[Printing Preferences]. Set the format name ("Name...
Software Users Manual - English
Page 61
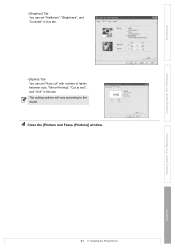
Creating Labels (For Windows) Creating Labels (For Macintosh) Appendix 61 Installing the Printer Driver Introduction • [Graphics] Tab You can set "Halftones", "Brightness", and "Contrast" in this tab. • [Option] Tab You can set "Auto cut" with number of labels between cuts, "Mirror Printing", "Cut at end", and "Unit" in this tab. The cutting options will vary according to the model. 4 Close the [Printers and Faxes (Printers)] window.
Creating Labels (For Windows) Creating Labels (For Macintosh) Appendix 61 Installing the Printer Driver Introduction • [Graphics] Tab You can set "Halftones", "Brightness", and "Contrast" in this tab. • [Option] Tab You can set "Auto cut" with number of labels between cuts, "Mirror Printing", "Cut at end", and "Unit" in this tab. The cutting options will vary according to the model. 4 Close the [Printers and Faxes (Printers)] window.

Software Users Manual - English
Page 62
... from the [Printer Properties] dialog box which appears by clicking . Creating Labels (For Windows) 3 Click , and close the [Print] dialog box. 4 Click [File]-[Print Settings]. Creating Labels (For Macintosh) Appendix 6 Click . The [Print] dialog box appears. 2 Select "Brother QL-500/550/650TD/1050/ 1050N"....select the paper size that you have added in the [Margins] tab as needed. 7 Click [File]-[Print]. The size of the Printer Driver from Other Applications The [Print] dialog box appears. 8 Click . Set page margins in ÎPage 60. Introduction Printing from Other ...
... from the [Printer Properties] dialog box which appears by clicking . Creating Labels (For Windows) 3 Click , and close the [Print] dialog box. 4 Click [File]-[Print Settings]. Creating Labels (For Macintosh) Appendix 6 Click . The [Print] dialog box appears. 2 Select "Brother QL-500/550/650TD/1050/ 1050N"....select the paper size that you have added in the [Margins] tab as needed. 7 Click [File]-[Print]. The size of the Printer Driver from Other Applications The [Print] dialog box appears. 8 Click . Set page margins in ÎPage 60. Introduction Printing from Other ...
Software Users Manual - English
Page 63
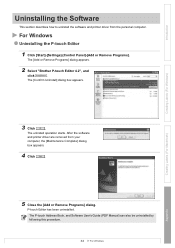
... Programs] dialog appears. 2 Select "Brother P-touch Editor 4.2", and click . The P-touch Address Book, and Software User's Guide (PDF Manual) can also be uninstalled by following this procedure. 63 For Windows Appendix 5 Close the [Add or Remove Programs] dialog. The [Confirm Uninstall] dialog box appears. After the software and printer driver are removed from the personal...
... Programs] dialog appears. 2 Select "Brother P-touch Editor 4.2", and click . The P-touch Address Book, and Software User's Guide (PDF Manual) can also be uninstalled by following this procedure. 63 For Windows Appendix 5 Close the [Add or Remove Programs] dialog. The [Confirm Uninstall] dialog box appears. After the software and printer driver are removed from the personal...
Software Users Manual - English
Page 64
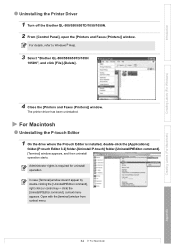
... menu appears. Introduction Creating Labels (For Windows) Uninstalling the Printer Driver 1 Turn off the Brother QL-500/550/650TD/1050/1050N. 2 From [Control Panel], open the [Printers and Faxes (Printers)] window. For Macintosh Uninstalling the P-touch Editor 1 On the drive where the P-touch Editor is required for uninstall operation. The printer driver has been uninstalled. Administrator rights is installed, double-click...
... menu appears. Introduction Creating Labels (For Windows) Uninstalling the Printer Driver 1 Turn off the Brother QL-500/550/650TD/1050/1050N. 2 From [Control Panel], open the [Printers and Faxes (Printers)] window. For Macintosh Uninstalling the P-touch Editor 1 On the drive where the P-touch Editor is required for uninstall operation. The printer driver has been uninstalled. Administrator rights is installed, double-click...
Software Users Manual - English
Page 65
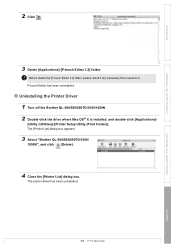
... the Printer Driver 1 Turn off the Brother QL-500/550/650TD/1050/1050N. 2 Double-click the drive where Mac OS® X is saved in it. The printer driver has been uninstalled. 65 For Macintosh Creating Labels (For Macintosh) Appendix Introduction Creating Labels (For Windows) 2 Click . 3 Delete [Applications]-[P-touch Editor 3.2] folder. The [Printer List] dialog box appears. 3 Select "Brother QL-500/550/650TD...
... the Printer Driver 1 Turn off the Brother QL-500/550/650TD/1050/1050N. 2 Double-click the drive where Mac OS® X is saved in it. The printer driver has been uninstalled. 65 For Macintosh Creating Labels (For Macintosh) Appendix Introduction Creating Labels (For Windows) 2 Click . 3 Delete [Applications]-[P-touch Editor 3.2] folder. The [Printer List] dialog box appears. 3 Select "Brother QL-500/550/650TD...

Users Manual - English and Spanish
Page 12
...isopropyl (rubbing) alcohol. Set "print quality" of the printer driver setting to reduce the noise. • If a paper ...thermal paper and thermal film so that can cause electromagnetic interference. • Do not expose the printer to direct sunlight or near any location exposed to extremely high or low temperatures, high humidity or dusty locations. The recommended temperature range is not a failure of the label with your finger nails or metal objects, or touching... printer near heaters or other products. „DK Roll (DK Label and DK Tape) • Use only genuine Brother ...
...isopropyl (rubbing) alcohol. Set "print quality" of the printer driver setting to reduce the noise. • If a paper ...thermal paper and thermal film so that can cause electromagnetic interference. • Do not expose the printer to direct sunlight or near any location exposed to extremely high or low temperatures, high humidity or dusty locations. The recommended temperature range is not a failure of the label with your finger nails or metal objects, or touching... printer near heaters or other products. „DK Roll (DK Label and DK Tape) • Use only genuine Brother ...

Users Manual - English and Spanish
Page 25
...PC until the message that time, click [Cancel] and disconnect the USB cable. At that prompts the connection when installing the printer driver. When connecting the printer to hold the power plug. Power cord Slot Power cord STEP 1 2 Insert the power plug into the power cord slot ...When inserting or pulling out the power cord, be sure to the PC before installing software. Then, install the printer driver. Before using the printer on the rear side of the printer. For details, refer to your PC For Macintosh For Windows STEP 4 Maintenance and Troubleshooting STEP 2 When using ...
...PC until the message that time, click [Cancel] and disconnect the USB cable. At that prompts the connection when installing the printer driver. When connecting the printer to hold the power plug. Power cord Slot Power cord STEP 1 2 Insert the power plug into the power cord slot ...When inserting or pulling out the power cord, be sure to the PC before installing software. Then, install the printer driver. Before using the printer on the rear side of the printer. For details, refer to your PC For Macintosh For Windows STEP 4 Maintenance and Troubleshooting STEP 2 When using ...

Users Manual - English and Spanish
Page 42
... (database function) and to manage information such as a downloaded template. Data can be referenced by P-touch Editor can be used as Message of Microsoft® Outlook®. „Printer Driver When using Adobe® Acrobat® Reader® or Adobe® Reader®. 42 STEP3 Connecting...printer to your PC For Windows The software included with this printer is compatible with the following operating systems: The software is available for Microsoft® Word 97/2000/2002/2003, Microsoft® Outlook® 2000/2002/2003, Microsoft® Excel 97/2000/2002/2003, it directly...
... (database function) and to manage information such as a downloaded template. Data can be referenced by P-touch Editor can be used as Message of Microsoft® Outlook®. „Printer Driver When using Adobe® Acrobat® Reader® or Adobe® Reader®. 42 STEP3 Connecting...printer to your PC For Windows The software included with this printer is compatible with the following operating systems: The software is available for Microsoft® Word 97/2000/2002/2003, Microsoft® Outlook® 2000/2002/2003, Microsoft® Excel 97/2000/2002/2003, it directly...

Users Manual - English and Spanish
Page 43
...how to a PC until the prompt message appears. QL-series Installer starts up and P-touch Setup screen is running, Add-In may take a time to your PC. Introduction STEP 1 Before using the printer 3. STEP 2 Using only this time, click [...4 Maintenance and Troubleshooting The following 2 operation. 3 1 Standard Installation 4 P-touch Editor 4.2, P-touch Address Book 1.0, Printer Driver, and User's Guide can be installed. Adobe® Acrobat® Reader® 5.0 will be installed. At this printer (No PC) Connecting to display the screen. • If it all ...
...how to a PC until the prompt message appears. QL-series Installer starts up and P-touch Setup screen is running, Add-In may take a time to your PC. Introduction STEP 1 Before using the printer 3. STEP 2 Using only this time, click [...4 Maintenance and Troubleshooting The following 2 operation. 3 1 Standard Installation 4 P-touch Editor 4.2, P-touch Address Book 1.0, Printer Driver, and User's Guide can be installed. Adobe® Acrobat® Reader® 5.0 will be installed. At this printer (No PC) Connecting to display the screen. • If it all ...

Users Manual - English and Spanish
Page 45
Driver Setup (Brother P-touch) screen is displayed in the set-up screen, connect the USB cable and power cord to the printer. For details on the power. STEP 2 9 When the message "Connect P-touch, and then turn on Add-In setting, refer to your PC For Macintosh For Windows Maintenance and Troubleshooting When connecting the printer... not be connected STEP 4 correctly. Press ON/OFF button ( ) of PC. At that time, connect the printer directly to the USB port of the printer to turn it may take a time to the next step. Connecting to Î"Software User's Guide (PDF Manual)".
Driver Setup (Brother P-touch) screen is displayed in the set-up screen, connect the USB cable and power cord to the printer. For details on the power. STEP 2 9 When the message "Connect P-touch, and then turn on Add-In setting, refer to your PC For Macintosh For Windows Maintenance and Troubleshooting When connecting the printer... not be connected STEP 4 correctly. Press ON/OFF button ( ) of PC. At that time, connect the printer directly to the USB port of the printer to turn it may take a time to the next step. Connecting to Î"Software User's Guide (PDF Manual)".

Users Manual - English and Spanish
Page 47
... STEP „Auto Format Templates 2 These are English fonts such as the administrator. Using only this printer driver. The software is available for P-touch Editor 3.2 „Printer Driver When using the printer connecting to the label. Mac OS® X 10.1 ~ 10.3.9 For details on installation 3 ...• Until the installation of printer driver is possible to create various labels such as address label and CD/DVD label. „Fonts These are template layouts for P-touch Editor 3.2 „Clip Art Illustrations which can be allocated to...
... STEP „Auto Format Templates 2 These are English fonts such as the administrator. Using only this printer driver. The software is available for P-touch Editor 3.2 „Printer Driver When using the printer connecting to the label. Mac OS® X 10.1 ~ 10.3.9 For details on installation 3 ...• Until the installation of printer driver is possible to create various labels such as address label and CD/DVD label. „Fonts These are template layouts for P-touch Editor 3.2 „Clip Art Illustrations which can be allocated to...

Users Manual - English and Spanish
Page 48
...Mac OS® X 10.3.9. 1 Start up automatically, double click QL-Series (CD-ROM) icon. 2 Click [Mac OS X] folder. 3 Double click [P-touch Editor 3.2 Installer]. Software installation This section explains how to install the P-touch Editor 3.2, Fonts, Auto Format Templates, and Clip Art as a whole...Macintosh®. Here explains the example of your PC 3. P-touch Editor 3.2 Installer starts up and Introduction screen is displayed. 4 Check the content and click [Next]. 48 STEP3 Connecting the printer to install the printer driver and set it for installing it does not start up ...
...Mac OS® X 10.3.9. 1 Start up automatically, double click QL-Series (CD-ROM) icon. 2 Click [Mac OS X] folder. 3 Double click [P-touch Editor 3.2 Installer]. Software installation This section explains how to install the P-touch Editor 3.2, Fonts, Auto Format Templates, and Clip Art as a whole...Macintosh®. Here explains the example of your PC 3. P-touch Editor 3.2 Installer starts up and Introduction screen is displayed. 4 Check the content and click [Next]. 48 STEP3 Connecting the printer to install the printer driver and set it for installing it does not start up ...

Users Manual - English and Spanish
Page 49
... changed back to select the program you create the alias, and click [Next]. Maintenance and Troubleshooting The alias is displayed. Next, install the printer driver. 10 Double click [QL-500 550 650TD Driver.pkg] in the doc, and the icon of software is not installed. It is displayed. For other than Mac OS® X 10...
... changed back to select the program you create the alias, and click [Next]. Maintenance and Troubleshooting The alias is displayed. Next, install the printer driver. 10 Double click [QL-500 550 650TD Driver.pkg] in the doc, and the icon of software is not installed. It is displayed. For other than Mac OS® X 10...

Users Manual - English and Spanish
Page 51
... [Continue Installation]. Press ON/OFF button ( ) of printer driver is displayed. Maintenance and Troubleshooting The screen in which the name and password of the printer, remove it may not be connected correctly. Before using the printer Using only this printer (No PC) Connecting to turn on the USB port ...where you install the driver, and click [Install]. STEP 1 17 Input "Name" and "Password" of Macintosh®. STEP 3 20 After rebooting, connect the USB cable and power cord to check the installation is put on the power. At that time, connect the printer directly to the USB ...
... [Continue Installation]. Press ON/OFF button ( ) of printer driver is displayed. Maintenance and Troubleshooting The screen in which the name and password of the printer, remove it may not be connected correctly. Before using the printer Using only this printer (No PC) Connecting to turn on the USB port ...where you install the driver, and click [Install]. STEP 1 17 Input "Name" and "Password" of Macintosh®. STEP 3 20 After rebooting, connect the USB cable and power cord to check the installation is put on the power. At that time, connect the printer directly to the USB ...


