

Quick Setup Guide - English
Page 2
... cover 8 Paper outlet slot 9 Tear bar 10 Paper input slot 11 IrDA port 12 USB port 13 AC/DC connector 14 Battery cover latch 15 Battery cover 16 Battery removal ribbon 17 Battery compartment Connecting to an AC Power Outlet (Optional) Connect the printer to a nearby AC power outlet to the printer. a Connect the...
... cover 8 Paper outlet slot 9 Tear bar 10 Paper input slot 11 IrDA port 12 USB port 13 AC/DC connector 14 Battery cover latch 15 Battery cover 16 Battery removal ribbon 17 Battery compartment Connecting to an AC Power Outlet (Optional) Connect the printer to a nearby AC power outlet to the printer. a Connect the...
Quick Setup Guide - English
Page 3
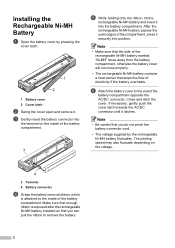
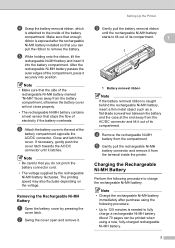
... a heat sensor that you can pull the ribbon to the inside of electricity if the battery overheats. Installing the Rechargeable Ni-MH Battery a Open the battery cover by the rechargeable Ni-MH battery fluctuates. Close and latch the cover. Note • Make sure that the side of the compartment, press ...it . Note • Be careful that stops the flow of the battery compartment. 3 e While holding onto the ribbon, tilt the rechargeable Ni-MH battery and insert it latches. If necessary, gently push the cover latch towards the AC/DC connector until ...
... a heat sensor that you can pull the ribbon to the inside of electricity if the battery overheats. Installing the Rechargeable Ni-MH Battery a Open the battery cover by the rechargeable Ni-MH battery fluctuates. Close and latch the cover. Note • Make sure that the side of the compartment, press ...it . Note • Be careful that stops the flow of the battery compartment. 3 e While holding onto the ribbon, tilt the rechargeable Ni-MH battery and insert it latches. If necessary, gently push the cover latch towards the AC/DC connector until ...
Quick Setup Guide - English
Page 5
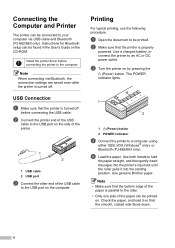
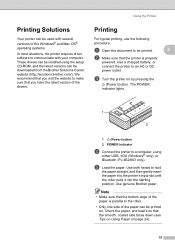
USB Connection a Make sure that the printer is turned off . b Make sure that the printer is properly powered. Use a charged battery, or connect the printer to the roller. • Only one side of the paper can be printed on. Note • Make sure that the smooth, ... the USB port on the computer. Instructions for Bluetooth setup can be found in the User's Guide on by pressing the (Power) button. Use genuine Brother paper. Use both hands to the computer. Install the printer driver before connecting the USB cable. Note When connecting via USB cable and Bluetooth (PJ...
USB Connection a Make sure that the printer is turned off . b Make sure that the printer is properly powered. Use a charged battery, or connect the printer to the roller. • Only one side of the paper can be printed on. Note • Make sure that the smooth, ... the USB port on the computer. Instructions for Bluetooth setup can be found in the User's Guide on by pressing the (Power) button. Use genuine Brother paper. Use both hands to the computer. Install the printer driver before connecting the USB cable. Note When connecting via USB cable and Bluetooth (PJ...

Safety and Legal Users Manual - English
Page 4
... touch the electrolyte. If electrolyte gets in the eyes, do not drop them in water or allow them with tap water or other than the PocketJet PJ-622/PJ-623/PJ-662/PJ-663. Place the printer in a bag to a power supply, car cigarette lighter or electrical outlet. Do not directly... connect it to isolate it. Do not put the rechargeable battery, or a printer with the rechargeable battery installed, into the PocketJet PJ-622/PJ-623/PJ-662/PJ-663, and then use the AC adapter/DC cable designed specifically for this printer...
... touch the electrolyte. If electrolyte gets in the eyes, do not drop them in water or allow them with tap water or other than the PocketJet PJ-622/PJ-623/PJ-662/PJ-663. Place the printer in a bag to a power supply, car cigarette lighter or electrical outlet. Do not directly... connect it to isolate it. Do not put the rechargeable battery, or a printer with the rechargeable battery installed, into the PocketJet PJ-622/PJ-623/PJ-662/PJ-663, and then use the AC adapter/DC cable designed specifically for this printer...
Safety and Legal Users Manual - English
Page 5
... precautions for the optional rechargeable Li-ion battery (hereafter, referred to failure of the protection circuitry, or abnormal chemical reaction within the rechargeable battery. Only charge the rechargeable battery using a modified adapter, etc.) could cause the internal insulation to melt, gas to be immersed... (above 80C) locations. Do not allow the rechargeable battery to come into the PocketJet PJ-622/PJ-623/PJ-662/PJ-663, and then use or leave the rechargeable battery near a fire or in accordance with the specified charging parameters. Check ...
... precautions for the optional rechargeable Li-ion battery (hereafter, referred to failure of the protection circuitry, or abnormal chemical reaction within the rechargeable battery. Only charge the rechargeable battery using a modified adapter, etc.) could cause the internal insulation to melt, gas to be immersed... (above 80C) locations. Do not allow the rechargeable battery to come into the PocketJet PJ-622/PJ-623/PJ-662/PJ-663, and then use or leave the rechargeable battery near a fire or in accordance with the specified charging parameters. Check ...
Safety and Legal Users Manual - English
Page 6
...its use the printer in special environments, such as near naked flames, heaters, or in lower battery performance or battery life. Liquid (electrolyte) leaking from the printer or rechargeable battery may result. Place the printer in an extremely humid location In a location where it... strikes nearby, do not rub the eyes. English DANGER Use the rechargeable battery only with water. If the rechargeable battery leaks, immediately move the printer or rechargeable battery away from the electrical outlet. If the liquid contacts your skin or clothing, immediately ...
...its use the printer in special environments, such as near naked flames, heaters, or in lower battery performance or battery life. Liquid (electrolyte) leaking from the printer or rechargeable battery may result. Place the printer in an extremely humid location In a location where it... strikes nearby, do not rub the eyes. English DANGER Use the rechargeable battery only with water. If the rechargeable battery leaks, immediately move the printer or rechargeable battery away from the electrical outlet. If the liquid contacts your skin or clothing, immediately ...
Safety and Legal Users Manual - English
Page 9
...the adapter or bend the cable, otherwise the cable may result. The printer is used for a long period of the rechargeable battery, charge it leaks or becomes discolored, deformed, or otherwise defective. CAUTION Printer Keep the printer and its service life. When replacing the... rechargeable battery, cover the battery terminals that the operation of the printer can only be fully charged with a new one. Do not operate the printer while ...
...the adapter or bend the cable, otherwise the cable may result. The printer is used for a long period of the rechargeable battery, charge it leaks or becomes discolored, deformed, or otherwise defective. CAUTION Printer Keep the printer and its service life. When replacing the... rechargeable battery, cover the battery terminals that the operation of the printer can only be fully charged with a new one. Do not operate the printer while ...
Safety and Legal Users Manual - English
Page 11
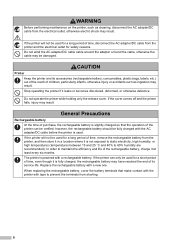
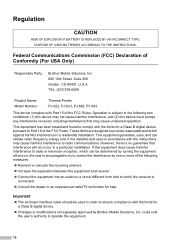
... radio/TV technician for a Class B digital device. Changes or modifications not expressly approved by Brother Mobile Solutions, Inc. Regulation CAUTION RISK OF EXPLOSION IF BATTERY IS REPLACED BY AN INCORRECT TYPE. This equipment has been tested and found to comply with the instructions,... and receiver. Connect the equipment into an outlet on a circuit different from that to radio communications. DISPOSE OF USED BATTERIES ACCORDING TO THE INSTRUCTIONS. However, there is no guarantee that may cause harmful interference to which the receiver is encouraged to try...
... radio/TV technician for a Class B digital device. Changes or modifications not expressly approved by Brother Mobile Solutions, Inc. Regulation CAUTION RISK OF EXPLOSION IF BATTERY IS REPLACED BY AN INCORRECT TYPE. This equipment has been tested and found to comply with the instructions,... and receiver. Connect the equipment into an outlet on a circuit different from that to radio communications. DISPOSE OF USED BATTERIES ACCORDING TO THE INSTRUCTIONS. However, there is no guarantee that may cause harmful interference to which the receiver is encouraged to try...
Users Manual - English
Page 3
... 2 Installing the Rechargeable Ni-MH Battery 2 Charging the Rechargeable Ni-MH Battery 3 Tips on Using the Rechargeable Ni-MH Battery 4 Explaining Battery Terms 5 Using the Rechargeable Li-ion Battery (Optional 5 Installing the Rechargeable Li-ion Battery 5 Charging the Rechargeable Li-ion Battery 6 Tips on Using the Rechargeable Li-ion Battery 7 Rechargeable Battery Overview 9 Installing and Uninstalling the Driver 10...
... 2 Installing the Rechargeable Ni-MH Battery 2 Charging the Rechargeable Ni-MH Battery 3 Tips on Using the Rechargeable Ni-MH Battery 4 Explaining Battery Terms 5 Using the Rechargeable Li-ion Battery (Optional 5 Installing the Rechargeable Li-ion Battery 5 Charging the Rechargeable Li-ion Battery 6 Tips on Using the Rechargeable Li-ion Battery 7 Rechargeable Battery Overview 9 Installing and Uninstalling the Driver 10...

Users Manual - English
Page 5
c Connect the AC power cord to power the printer or charge the rechargeable battery using AC power. 1 Setting Up the Printer 1 General Description 1 9 10 8 1 2 7 3456 16 17 11 12 13 15 14 1 (Power) button 2 (Feed) button 3 POWER indicator 4 DATA ... cover 8 Paper outlet slot 9 Tear bar 10 Paper input slot 11 IrDA port 12 USB port 13 AC/DC connector 14 Battery cover latch 15 Battery cover 16 Battery removal ribbon 17 Battery compartment Connecting the Printer 1 to External Power 1 Connecting to an AC Power Outlet (Optional) 1 Connect the printer to a nearby AC power...
c Connect the AC power cord to power the printer or charge the rechargeable battery using AC power. 1 Setting Up the Printer 1 General Description 1 9 10 8 1 2 7 3456 16 17 11 12 13 15 14 1 (Power) button 2 (Feed) button 3 POWER indicator 4 DATA ... cover 8 Paper outlet slot 9 Tear bar 10 Paper input slot 11 IrDA port 12 USB port 13 AC/DC connector 14 Battery cover latch 15 Battery cover 16 Battery removal ribbon 17 Battery compartment Connecting the Printer 1 to External Power 1 Connecting to an AC Power Outlet (Optional) 1 Connect the printer to a nearby AC power...

Users Manual - English
Page 6
...DC cable to the printer. The printing speed may differ depending on the inside of the battery compartment. 3 4 3 Terminal 4 Battery connector 2 c Gently insert the battery connector into the terminal on the supplied voltage. 1 2 1 Battery cover 2 Cover latch b Swing the cover open and remove it. c Turn on the ...vehicle's power, and then turn on the printer. Using the Rechargeable Ni-MH Battery (Optional) 1 Installing the Rechargeable Ni-MH Battery 1 a Open the battery cover by pressing the cover latch. 1 1 DC cable Note • The DC cable is an optional accessory...
...DC cable to the printer. The printing speed may differ depending on the inside of the battery compartment. 3 4 3 Terminal 4 Battery connector 2 c Gently insert the battery connector into the terminal on the supplied voltage. 1 2 1 Battery cover 2 Cover latch b Swing the cover open and remove it. c Turn on the ...vehicle's power, and then turn on the printer. Using the Rechargeable Ni-MH Battery (Optional) 1 Installing the Rechargeable Ni-MH Battery 1 a Open the battery cover by pressing the cover latch. 1 1 DC cable Note • The DC cable is an optional accessory...
Users Manual - English
Page 7
.... If necessary, gently push the cover latch towards the AC/DC connector until the rechargeable Ni-MH battery starts to fully charge a rechargeable Ni-MH battery. b Swing the cover open and remove it latches. About 70 pages can pull the ribbon to the... compartment. d Remove the rechargeable Ni-MH battery from the battery compartment, otherwise the battery cover will not close properly. • The rechargeable Ni-MH battery contains a heat sensor that enough ribbon is attached to remove the battery. d Grasp the battery removal ribbon, which is exposed after purchase using...
.... If necessary, gently push the cover latch towards the AC/DC connector until the rechargeable Ni-MH battery starts to fully charge a rechargeable Ni-MH battery. b Swing the cover open and remove it latches. About 70 pages can pull the ribbon to the... compartment. d Remove the rechargeable Ni-MH battery from the battery compartment, otherwise the battery cover will not close properly. • The rechargeable Ni-MH battery contains a heat sensor that enough ribbon is attached to remove the battery. d Grasp the battery removal ribbon, which is exposed after purchase using...
Users Manual - English
Page 8
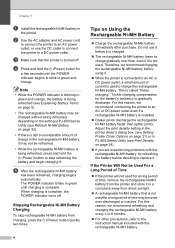
... sure that is called "trickle charging". d Press and hold the (Power) button to an AC or DC power outlet even if a rechargeable Ni-MH battery is turned off . This is not used for a few seconds until charging is not used to a DC power outlet. If the Printer Will Not be...charged without being refreshed, press and hold the (Power) button for a long period of time may not be refreshed. • While the rechargeable Ni-MH battery is being refreshed, depending on page 32). • If there is still a considerable amount of current is complete, the POWER indicator turns off . e ...
... sure that is called "trickle charging". d Press and hold the (Power) button to an AC or DC power outlet even if a rechargeable Ni-MH battery is turned off . This is not used for a few seconds until charging is not used to a DC power outlet. If the Printer Will Not be...charged without being refreshed, press and hold the (Power) button for a long period of time may not be refreshed. • While the rechargeable Ni-MH battery is being refreshed, depending on page 32). • If there is still a considerable amount of current is complete, the POWER indicator turns off . e ...
Users Manual - English
Page 9
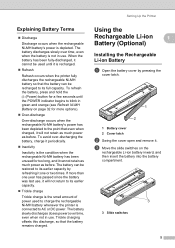
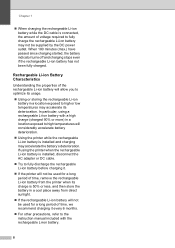
... power as before . Setting Up the Printer Using the Rechargeable Li-ion 1 Battery (Optional) 1 Installing the Rechargeable Li-ion Battery 1 a Open the battery cover by refreshing it . The battery discharges slowly over time, even when the battery is not in use . To avoid over time, even when not in use... of power used until the POWER indicator begins to blink in green and orange (see Refresh Ni-MH Battery on the rechargeable Li-ion battery inward, and then insert the battery into the battery compartment. 3 3 Slide switches 5 c Move the slide switches on page 32 for too long, and...
... power as before . Setting Up the Printer Using the Rechargeable Li-ion 1 Battery (Optional) 1 Installing the Rechargeable Li-ion Battery 1 a Open the battery cover by refreshing it . The battery discharges slowly over time, even when the battery is not in use . To avoid over time, even when not in use... of power used until the POWER indicator begins to blink in green and orange (see Refresh Ni-MH Battery on the rechargeable Li-ion battery inward, and then insert the battery into the battery compartment. 3 3 Slide switches 5 c Move the slide switches on page 32 for too long, and...
Users Manual - English
Page 10
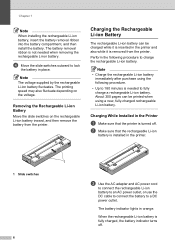
...Up to 180 minutes is installed in orange. About 300 pages can be printed when using the following procedure to lock the battery in place. Charging While Installed in the printer and also while it is inserted in the Printer 1 a Make sure that the... DC power outlet. Note The voltage supplied by the rechargeable Li-ion battery fluctuates. Chapter 1 Note When installing the rechargeable Li-ion battery, insert the battery removal ribbon into the battery compartment, and then install the battery. The battery indicator lights in the printer. 1 1 Slide switches c Use the AC...
...Up to 180 minutes is installed in orange. About 300 pages can be printed when using the following procedure to lock the battery in place. Charging While Installed in the printer and also while it is inserted in the Printer 1 a Make sure that the... DC power outlet. Note The voltage supplied by the rechargeable Li-ion battery fluctuates. Chapter 1 Note When installing the rechargeable Li-ion battery, insert the battery removal ribbon into the battery compartment, and then install the battery. The battery indicator lights in the printer. 1 1 Slide switches c Use the AC...
Users Manual - English
Page 11
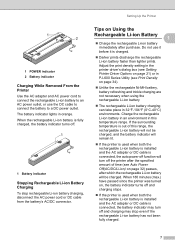
... AC power outlet, or use it before it is charged. Darker prints discharge the rechargeable Li-ion battery faster than lighter prints. The battery indicator lights in 32F-104F (0C-40C) environments. Adjust the print density setting in the ...Off(AC/DC/Li-ion) on Using the Rechargeable Li-ion Battery 1 1 Charge the rechargeable Li-ion battery immediately after the specified amount of this temperature range. Setting Up the Printer 1 2 1 POWER indicator 2 Battery indicator Charging While Removed From the Printer 1 Use the AC...
... AC power outlet, or use it before it is charged. Darker prints discharge the rechargeable Li-ion battery faster than lighter prints. The battery indicator lights in 32F-104F (0C-40C) environments. Adjust the print density setting in the ...Off(AC/DC/Li-ion) on Using the Rechargeable Li-ion Battery 1 1 Charge the rechargeable Li-ion battery immediately after the specified amount of this temperature range. Setting Up the Printer 1 2 1 POWER indicator 2 Battery indicator Charging While Removed From the Printer 1 Use the AC...
Users Manual - English
Page 12
...more) in a cool place away from the printer when its charge is 50% or less, and then store the battery in a location exposed to fully charge the rechargeable Li-ion battery may not be used for a long period of time, we recommend charging it every 6 months. For ...other precautions, refer to high or low temperatures may accelerate the battery's deterioration. When 180 minutes (max.) have passed since charging started, the battery indicator turns off and charging stops even if the rechargeable Li-ion battery has not been fully charged. In particular, using the printer when ...
...more) in a cool place away from the printer when its charge is 50% or less, and then store the battery in a location exposed to fully charge the rechargeable Li-ion battery may not be used for a long period of time, we recommend charging it every 6 months. For ...other precautions, refer to high or low temperatures may accelerate the battery's deterioration. When 180 minutes (max.) have passed since charging started, the battery indicator turns off and charging stops even if the rechargeable Li-ion battery has not been fully charged. In particular, using the printer when ...
Users Manual - English
Page 13
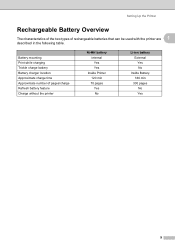
Setting Up the Printer Rechargeable Battery Overview 1 The characteristics of the two types of pages/charge Refresh battery feature Charge without the printer Ni-MH battery Internal Yes Yes Inside Printer 120 min 70 pages Yes No Li-ion battery External Yes No Inside Battery 180 min 300 pages No Yes 9 Battery mounting Print while charging Trickle charge battery Battery charger location Approximate charge time Approximate number of rechargeable batteries that can be used with the printer are 1 described in the following table.
Setting Up the Printer Rechargeable Battery Overview 1 The characteristics of the two types of pages/charge Refresh battery feature Charge without the printer Ni-MH battery Internal Yes Yes Inside Printer 120 min 70 pages Yes No Li-ion battery External Yes No Inside Battery 180 min 300 pages No Yes 9 Battery mounting Print while charging Trickle charge battery Battery charger location Approximate charge time Approximate number of rechargeable batteries that can be used with the printer are 1 described in the following table.

Users Manual - English
Page 21
...indicator continues to blink until charging is not controlled by these functions. 17 Note Rechargeable Li-ion battery is complete. For details on charging the rechargeable Ni-MH battery, see Refresh Ni-MH Battery on page 32). 2 Using the Printer 2 Operation Panel The operation panel consists of inactivity.) ...being refreshed, depending on the setting specified for about one second until the POWER indicator turns on page 3. While the rechargeable Ni-MH battery is turned off , press and hold the (Power) button for two or more seconds until the POWER indicator begins to blink in...
...indicator continues to blink until charging is not controlled by these functions. 17 Note Rechargeable Li-ion battery is complete. For details on charging the rechargeable Ni-MH battery, see Refresh Ni-MH Battery on page 32). 2 Using the Printer 2 Operation Panel The operation panel consists of inactivity.) ...being refreshed, depending on the setting specified for about one second until the POWER indicator turns on page 3. While the rechargeable Ni-MH battery is turned off , press and hold the (Power) button for two or more seconds until the POWER indicator begins to blink in...
Users Manual - English
Page 23
...most situations, the printer requires driver software to the roller. • Only one side of the paper can be downloaded from the Brother Solutions Center website (http://solutions.brother.com/). Check the paper, and load it into the starting position. c Turn the printer on page 24). 19 e Load the... coated side faces down (see Tips on Using Paper on by pressing the (Power) button. Use genuine Brother paper. Use both hands to be used with your computer. Use a charged battery, or connect the printer to a computer, using the setup CD-ROM, and the latest versions can be...
...most situations, the printer requires driver software to the roller. • Only one side of the paper can be downloaded from the Brother Solutions Center website (http://solutions.brother.com/). Check the paper, and load it into the starting position. c Turn the printer on page 24). 19 e Load the... coated side faces down (see Tips on Using Paper on by pressing the (Power) button. Use genuine Brother paper. Use both hands to be used with your computer. Use a charged battery, or connect the printer to a computer, using the setup CD-ROM, and the latest versions can be...


