
Users Manual - English
Page 3
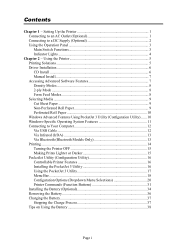
...Advanced Software Features 7 Density Modes 8 2-ply Mode ...8 Form Feed Modes 8 Selecting Media ...9 Cut Sheet Paper 9 Non-Perforated Roll Paper 9 Perforated Roll Paper 10 Windows Advanced Features Using PocketJet 3 Utility (Configuration Utility) ...... 10 Windows-Specific Operating System Features 11 Connecting to a... the Printer OFF 15 Making Prints Lighter or Darker 15 PocketJet Utility (Configuration Utility 16 Controllable Printer Features 16 Installing the PocketJet 3 Utility 16 Using the PocketJet 3 Utility 17 Menu Bar...18 Configuration Options ...
...Advanced Software Features 7 Density Modes 8 2-ply Mode ...8 Form Feed Modes 8 Selecting Media ...9 Cut Sheet Paper 9 Non-Perforated Roll Paper 9 Perforated Roll Paper 10 Windows Advanced Features Using PocketJet 3 Utility (Configuration Utility) ...... 10 Windows-Specific Operating System Features 11 Connecting to a... the Printer OFF 15 Making Prints Lighter or Darker 15 PocketJet Utility (Configuration Utility 16 Controllable Printer Features 16 Installing the PocketJet 3 Utility 16 Using the PocketJet 3 Utility 17 Menu Bar...18 Configuration Options ...

Users Manual - English
Page 4
Tips on Using Paper 39 Inserting Paper...39 Use Brother Genuine Thermal paper 40 Usage and Handling Instructions 40 Clearing a Paper Jam 41 Method 1 ...41 Method 2 ...41 Chapter 4 - Character Set Tables 62 Page ii Maintaining the Printer 43 Cleaning ...5 - Reference 49 Indicator Lights...49 Indicator Light Table 49 Indicator Light Warnings 50 Self-Test Feature 52 Chapter 6 - Troubleshooting 53 Overview ...53 Paper Problems ...54 Printed Image Problems 54 Pages Don't Print 57 Pages Are Partially Printed 57 Chapter 7 - Technical Information 58 Specifications...58 ...
Tips on Using Paper 39 Inserting Paper...39 Use Brother Genuine Thermal paper 40 Usage and Handling Instructions 40 Clearing a Paper Jam 41 Method 1 ...41 Method 2 ...41 Chapter 4 - Character Set Tables 62 Page ii Maintaining the Printer 43 Cleaning ...5 - Reference 49 Indicator Lights...49 Indicator Light Table 49 Indicator Light Warnings 50 Self-Test Feature 52 Chapter 6 - Troubleshooting 53 Overview ...53 Paper Problems ...54 Printed Image Problems 54 Pages Don't Print 57 Pages Are Partially Printed 57 Chapter 7 - Technical Information 58 Specifications...58 ...

Users Manual - English
Page 7
... mode). In this mode you may initiate self test printing (See Chapter 5) or head cleaning (See Chapter 4). Page 3 Manual Form Feed: With power ON and paper inserted, press and hold it down for two or more seconds until the POWER indicator begins to blink until the DATA LED turns red. Using.... In order to assure that printing is complete before permitting a form feed, manual form feeds cannot be held down for 1-1/2 seconds to feed (or eject) paper. Power OFF: Push twice quickly.
... mode). In this mode you may initiate self test printing (See Chapter 5) or head cleaning (See Chapter 4). Page 3 Manual Form Feed: With power ON and paper inserted, press and hold it down for two or more seconds until the POWER indicator begins to blink until the DATA LED turns red. Using.... In order to assure that printing is complete before permitting a form feed, manual form feeds cannot be held down for 1-1/2 seconds to feed (or eject) paper. Power OFF: Push twice quickly.
Users Manual - English
Page 12
... prints that are darker (and print slower) than the density mode set how the printer ejects paper by setting the number of lines to your printer model ("Brother PJ-523", "Brother PJ-562" or "Brother PJ-563"). The top margin actually defines the total top and bottom margin between pages... feeds at the end of a job to 10 as selected by the application has no paper feed at the end of a job. The bottom margin as listed above , "Brother PJ-522" should be temporarily changed using the "Print Setup" from your application. As above . The following options. • Fixed Page ...
... prints that are darker (and print slower) than the density mode set how the printer ejects paper by setting the number of lines to your printer model ("Brother PJ-523", "Brother PJ-562" or "Brother PJ-563"). The top margin actually defines the total top and bottom margin between pages... feeds at the end of a job to 10 as selected by the application has no paper feed at the end of a job. The bottom margin as listed above , "Brother PJ-522" should be temporarily changed using the "Print Setup" from your application. As above . The following options. • Fixed Page ...
Users Manual - English
Page 13
...Top/Bottom margins within your application software are set the Paper Type to the amount of the No Feed Mode Extra Feed to "Roll". On a PocketJet 3, this mode except to a position outside the printer. Select "Infinite Paper Size". 3. C. Set the value of lines per page.... For example, 200 lines equal 1 inch. Select the appropriate paper size (Letter, A4, or Legal). 3. Variable ...
...Top/Bottom margins within your application software are set the Paper Type to the amount of the No Feed Mode Extra Feed to "Roll". On a PocketJet 3, this mode except to a position outside the printer. Select "Infinite Paper Size". 3. C. Set the value of lines per page.... For example, 200 lines equal 1 inch. Select the appropriate paper size (Letter, A4, or Legal). 3. Variable ...
Users Manual - English
Page 14
..." for Windows Vista / XP / 2000 Professional for any paper size including custom sizes. Perforated Roll Paper 1. This modifies the printable area for Paper Source on pages 22 and 23. Windows Advanced Features Using PocketJet 3 Utility (Configuration Utility) Auto-On Auto-Off Pre-feed These... features can be displayed before EVERY printed page, including the first one of Auto-On, Auto-Off, and Prefeed on the "Paper" tab within the printer properties ...
..." for Windows Vista / XP / 2000 Professional for any paper size including custom sizes. Perforated Roll Paper 1. This modifies the printable area for Paper Source on pages 22 and 23. Windows Advanced Features Using PocketJet 3 Utility (Configuration Utility) Auto-On Auto-Off Pre-feed These... features can be displayed before EVERY printed page, including the first one of Auto-On, Auto-Off, and Prefeed on the "Paper" tab within the printer properties ...

Users Manual - English
Page 15
...Select Cut Sheet, Roll, or Perforated Roll. On the Forms Page, create a form for use with custom paper size. Page 11 This modifies the printable area of all paper sizes (Letter, Legal, A4, and Custom). 2) Using Custom Forms a. All forms created within these speci...fications will be displayed as paper size options. Windows-Specific Operating System Features Windows Vista Notes: 1) The "Roll Paper Pause" feature is not available in Vista. 2) This system supports both 32-bit and 64-bit...
...Select Cut Sheet, Roll, or Perforated Roll. On the Forms Page, create a form for use with custom paper size. Page 11 This modifies the printable area of all paper sizes (Letter, Legal, A4, and Custom). 2) Using Custom Forms a. All forms created within these speci...fications will be displayed as paper size options. Windows-Specific Operating System Features Windows Vista Notes: 1) The "Roll Paper Pause" feature is not available in Vista. 2) This system supports both 32-bit and 64-bit...
Users Manual - English
Page 18
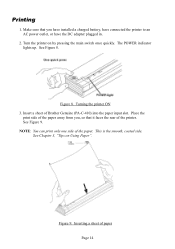
Turn the printer on Using Paper". Insert a sheet of the paper. NOTE: You can print only one side of Brother Genuine (PA-C-410) into the paper input slot. Inserting a sheet of the printer. Printing 1. Place the print side of the paper away from you have installed a charged battery, have connected the...the DC adapter plugged in. 2. This is the smooth, coated side. Figure 9. Make sure that you , so that it faces the rear of paper Page 14 The POWER indicator lights up. See Figure 9. See Figure 8. See Chapter 3, "Tips on by pressing the main switch once quickly. Figure ...
Turn the printer on Using Paper". Insert a sheet of the paper. NOTE: You can print only one side of Brother Genuine (PA-C-410) into the paper input slot. Inserting a sheet of the printer. Printing 1. Place the print side of the paper away from you have installed a charged battery, have connected the...the DC adapter plugged in. 2. This is the smooth, coated side. Figure 9. Make sure that you , so that it faces the rear of paper Page 14 The POWER indicator lights up. See Figure 9. See Figure 8. See Chapter 3, "Tips on by pressing the main switch once quickly. Figure ...

Users Manual - English
Page 19
...), the printer has received insufficient data to indicate that can make prints lighter or darker by using the PocketJet 3 Utility. If you are not using a driver, you have inserted paper into the input slot and the green DATA light stays on page 7. The green DATA indicator light blinks to print...
...), the printer has received insufficient data to indicate that can make prints lighter or darker by using the PocketJet 3 Utility. If you are not using a driver, you have inserted paper into the input slot and the green DATA light stays on page 7. The green DATA indicator light blinks to print...
Users Manual - English
Page 24
... be set automatically by the user. In non-text mode, they will be sending simple text data to the printer and does not have a Brother-supplied driver available. Paper Size: Page 20 If using text mode, the following options should be set by a Windows driver. In most cases relevant only where the...
... be set automatically by the user. In non-text mode, they will be sending simple text data to the printer and does not have a Brother-supplied driver available. Paper Size: Page 20 If using text mode, the following options should be set by a Windows driver. In most cases relevant only where the...
Users Manual - English
Page 25
...about 0.27", and a bottom margin of the printing. For standard paper sizes, this character set is printed. meaning that what you will use more important, adjusting the setting for each printed page. For the PocketJet 3 and PocketJet 3 Plus, this setting determines default margins and expected length for ...lightest print will print only the characters contained in turn provides for the PocketJet. Raster Graphics is determined automatically by the data stream sent from the host device to read if the font or other...
...about 0.27", and a bottom margin of the printing. For standard paper sizes, this character set is printed. meaning that what you will use more important, adjusting the setting for each printed page. For the PocketJet 3 and PocketJet 3 Plus, this setting determines default margins and expected length for ...lightest print will print only the characters contained in turn provides for the PocketJet. Raster Graphics is determined automatically by the data stream sent from the host device to read if the font or other...
Users Manual - English
Page 26
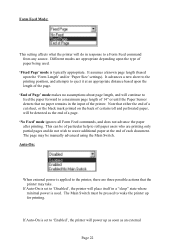
... black mark printed on the back of the printer. If Auto-On is set to 'Disabled', the printer will be of particular help to roll paper users who are three possible actions that the printer may be pressed to wake the printer up as soon as the end of each document... Auto-On is set to eject it at the end of a page. 'No Feed' mode ignores all Form Feed commands, and does not advance the paper after printing. The Main Switch must be manually advanced using the Main Switch. It advances a new sheet to the printing position, and attempts to 'Enabled...
... black mark printed on the back of the printer. If Auto-On is set to 'Disabled', the printer will be of particular help to roll paper users who are three possible actions that the printer may be pressed to wake the printer up as soon as the end of each document... Auto-On is set to eject it at the end of a page. 'No Feed' mode ignores all Form Feed commands, and does not advance the paper after printing. The Main Switch must be manually advanced using the Main Switch. It advances a new sheet to the printing position, and attempts to 'Enabled...
Users Manual - English
Page 27
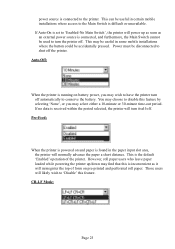
... period. power source is connected, and furthermore, the Main Switch cannot be accidentally pressed. Pre-Feed: When the printer is powered on and paper is received within the period selected, the printer will misregister the top of the printer. CR-LF Mode: Page 23 If no data is ...may wish to conserve the battery. This can be disconnected to the Main Switch is running on pre-printed and perforated roll paper. However, roll paper users who leave paper loaded while powering the printer up as soon as it will turn off . Power must be useful in certain mobile installations ...
... period. power source is connected, and furthermore, the Main Switch cannot be accidentally pressed. Pre-Feed: When the printer is powered on and paper is received within the period selected, the printer will misregister the top of the printer. CR-LF Mode: Page 23 If no data is ...may wish to conserve the battery. This can be disconnected to the Main Switch is running on pre-printed and perforated roll paper. However, roll paper users who leave paper loaded while powering the printer up as soon as it will turn off . Power must be useful in certain mobile installations ...

Users Manual - English
Page 29
..., the application will determine that will feed properly through the printer. If using the 'Inches' method for setting "custom" form length, the physical height of paper that 57 lines could be printed in inches and displayed accordingly. The maximum setting is set to 6 lines per inch, you switch from 'Lines' to...
..., the application will determine that will feed properly through the printer. If using the 'Inches' method for setting "custom" form length, the physical height of paper that 57 lines could be printed in inches and displayed accordingly. The maximum setting is set to 6 lines per inch, you switch from 'Lines' to...

Users Manual - English
Page 31
... 'Proportional', 10 characters per inch pitch is set to 12 characters per inch, and you wish to '9', there will assume you set by selecting 'Use Paper Size' which will be a 3/4" (9 x 1/12") right margin established. Left Margin: This setting can modify the left margin when the 'Custom' 'Page Size' is set a number...
... 'Proportional', 10 characters per inch pitch is set to 12 characters per inch, and you wish to '9', there will assume you set by selecting 'Use Paper Size' which will be a 3/4" (9 x 1/12") right margin established. Left Margin: This setting can modify the left margin when the 'Custom' 'Page Size' is set a number...

Users Manual - English
Page 32
... current character pitch as 1/5"are 0.12" tall, when printing documents that cause the printable page width (the space left on the page by selecting 'Use Paper Size' which will be a 3/4" (9 x 1/12") left margin to '9', there will assume you wish to 'Proportional', 10 characters per inch pitch is set a number of columns...
... current character pitch as 1/5"are 0.12" tall, when printing documents that cause the printable page width (the space left on the page by selecting 'Use Paper Size' which will be a 3/4" (9 x 1/12") left margin to '9', there will assume you wish to 'Proportional', 10 characters per inch pitch is set a number of columns...

Users Manual - English
Page 43
... while you insert it into the starting position, then let go . Use both hands to the feed roller. 2. Pull the paper out, close the cover, and reinsert paper. • If the printer does start to be printed and then reprint that page if necessary. See Figures 15 and 16, pages 41 and... into the printer's input slot until the roller pulls it into the starting position, you will go . Tips on Using Paper Inserting Paper 1. Page 39 Make sure the bottom edge of the paper is skewed after the printer pulls it into the printer before you start the print job, you can correct the...
... while you insert it into the starting position, then let go . Use both hands to the feed roller. 2. Pull the paper out, close the cover, and reinsert paper. • If the printer does start to be printed and then reprint that page if necessary. See Figures 15 and 16, pages 41 and... into the printer's input slot until the roller pulls it into the starting position, you will go . Tips on Using Paper Inserting Paper 1. Page 39 Make sure the bottom edge of the paper is skewed after the printer pulls it into the printer before you start the print job, you can correct the...

Users Manual - English
Page 44
... the PocketJet printer family. If you use a solvent-based marker, it into the printer. • When storing paper, avoid high temperatures and humidity. • Avoid prolonged exposure to loading it may darken the paper. See "Form Feed Modes", page 8 and "Non-Perforated Roll Paper", page 9 and "Perforated Roll Paper", page 10. Use Brother Genuine Thermal paper Brother guarantees...
... the PocketJet printer family. If you use a solvent-based marker, it into the printer. • When storing paper, avoid high temperatures and humidity. • Avoid prolonged exposure to loading it may darken the paper. See "Form Feed Modes", page 8 and "Non-Perforated Roll Paper", page 9 and "Perforated Roll Paper", page 10. Use Brother Genuine Thermal paper Brother guarantees...

Users Manual - English
Page 45
Gently open the release cover as far back as it will start and move slowly for a few seconds, then move the jammed paper out of the printer, use Method 2 below. The drive motor will go. This can be repeated as many times as you hold the green Main Power switch. Clearing a Paper Jam Method 1 Press and hold the switch down. Method 2 1. Figure 15. Opening the release cover Page 41 If this does not move faster as long as necessary. See Figure 15.
Gently open the release cover as far back as it will start and move slowly for a few seconds, then move the jammed paper out of the printer, use Method 2 below. The drive motor will go. This can be repeated as many times as you hold the green Main Power switch. Clearing a Paper Jam Method 1 Press and hold the switch down. Method 2 1. Figure 15. Opening the release cover Page 41 If this does not move faster as long as necessary. See Figure 15.

Users Manual - English
Page 46
Pulling in the printer and restart the job. Figure 16. Close the release cover. 4. Gently pull the paper out of the printer 3. See Figure 16. Pulling jammed paper out of the printer. Page 42 Reinsert a new sheet of paper in either direction is acceptable. 2.
Pulling in the printer and restart the job. Figure 16. Close the release cover. 4. Gently pull the paper out of the printer 3. See Figure 16. Pulling jammed paper out of the printer. Page 42 Reinsert a new sheet of paper in either direction is acceptable. 2.


