

Users Manual - English
Page 9
The spool pins, thread tension knobs, thread take-up and down is called the needle bar, and the needle bars are listed on the threaded condition. Memo ● Sewing is not necessarily performed in the needle bar case. Thread the needle bars as the needle number.... Machine Structure and Features Six-needle machine embroidering This machine can sew embroidery while automatically changing thread colors by the same colors that moves the needles up levers and thread paths, mentioned when threading the upper thread, are indicated as shown here. Machine Structure and Features ix
The spool pins, thread tension knobs, thread take-up and down is called the needle bar, and the needle bars are listed on the threaded condition. Memo ● Sewing is not necessarily performed in the needle bar case. Thread the needle bars as the needle number.... Machine Structure and Features Six-needle machine embroidering This machine can sew embroidery while automatically changing thread colors by the same colors that moves the needles up levers and thread paths, mentioned when threading the upper thread, are indicated as shown here. Machine Structure and Features ix

Users Manual - English
Page 16
... frame ...30 Checking the Embroidery Area 32 Continuing to the embroidering screen ...32 Upper Threading ...33 Checking the needle bars and thread colors ...33 Upper threading...35 Threading the needle ...39 Sewing the Embroidery...41 Starting embroidering ...41 Stopping embroidering ...43 Checking the Thread Tension 44 Removing the Embroidery Frame and Fabric 45 Removing the embroidery frame ...45...
... frame ...30 Checking the Embroidery Area 32 Continuing to the embroidering screen ...32 Upper Threading ...33 Checking the needle bars and thread colors ...33 Upper threading...35 Threading the needle ...39 Sewing the Embroidery...41 Starting embroidering ...41 Stopping embroidering ...43 Checking the Thread Tension 44 Removing the Embroidery Frame and Fabric 45 Removing the embroidery frame ...45...
Users Manual - English
Page 17
...Middle of the Pattern 79 Resume Embroidering After Turning Off the Machine 81 Adjusting the Thread Tension 83 Adjusting the tension of the bobbin thread ...83 Adjusting the tension of the upper thread ...84 Embroidering Settings 85 Automatic Lock Stitch Setting 86 Starting/Ending Position Settings 87 ...pattern ...120 Rotating a pattern ...121 Changing the text arrangement of a character 122 Changing the character spacing ...123 Changing the thread density (only for some character and frame patterns 124 Specifying multi-color text ...125 Changing the colors of the pattern...126 Deleting...
...Middle of the Pattern 79 Resume Embroidering After Turning Off the Machine 81 Adjusting the Thread Tension 83 Adjusting the tension of the bobbin thread ...83 Adjusting the tension of the upper thread ...84 Embroidering Settings 85 Automatic Lock Stitch Setting 86 Starting/Ending Position Settings 87 ...pattern ...120 Rotating a pattern ...121 Changing the text arrangement of a character 122 Changing the character spacing ...123 Changing the thread density (only for some character and frame patterns 124 Specifying multi-color text ...125 Changing the colors of the pattern...126 Deleting...

Users Manual - English
Page 31
... Image 6 Hooping the Fabric in order-from turning on the machine and sewing a pattern to the Machine 8 Checking the Embroidery Area 9 Upper Threading 10 Sewing the Embroidery 11 Checking the Thread Tension 12 Removing the Embroidery Frame and Fabric 13 Turning Off the Machine 14 Sapphire.book Page 13 Friday, August 1, 2003 9:12 AM...
... Image 6 Hooping the Fabric in order-from turning on the machine and sewing a pattern to the Machine 8 Checking the Embroidery Area 9 Upper Threading 10 Sewing the Embroidery 11 Checking the Thread Tension 12 Removing the Embroidery Frame and Fabric 13 Turning Off the Machine 14 Sapphire.book Page 13 Friday, August 1, 2003 9:12 AM...
Users Manual - English
Page 35
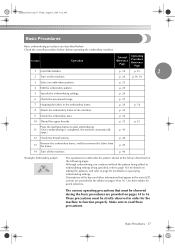
... 16 8 Attach the embroidery frame to start embroidering. 11 (Once embroidering is completed, the machine automatically stops.) p. 41 12 Check the thread tension. p. 33 p.15 Press the start/stop button to the machine. These precautions must be strictly observed in the embroidery frame. p. 23... Turn off the machine. p. 30 9 Check the embroidery area. p. 25 5 Specify the embroidering settings. p. 32 10 Thread the upper threads. Sapphire.book Page 17 Friday, August 1, 2003 9:12 AM Basic Procedures Basic embroidering procedures are described on the following pages.
... 16 8 Attach the embroidery frame to start embroidering. 11 (Once embroidering is completed, the machine automatically stops.) p. 41 12 Check the thread tension. p. 33 p.15 Press the start/stop button to the machine. These precautions must be strictly observed in the embroidery frame. p. 23... Turn off the machine. p. 30 9 Check the embroidery area. p. 25 5 Specify the embroidering settings. p. 32 10 Thread the upper threads. Sapphire.book Page 17 Friday, August 1, 2003 9:12 AM Basic Procedures Basic embroidering procedures are described on the following pages.

Users Manual - English
Page 55
... you from the right. 1 1 Upper thread guide 65432 1 6 5 4 32 1 2 Wind the thread clockwise once around the 5 number 1 thread tension disc. 1 2 3 4 5 6 1 Thread tension disc • Make sure that the thread is securely caught 7 in the thread tension disc and passed correct thread guide pins. 8 Note 9 ● All thread tension disc are threaded in the 3 number 1 upper thread guide. Hold the thread with both hands, and then pass it...
... you from the right. 1 1 Upper thread guide 65432 1 6 5 4 32 1 2 Wind the thread clockwise once around the 5 number 1 thread tension disc. 1 2 3 4 5 6 1 Thread tension disc • Make sure that the thread is securely caught 7 in the thread tension disc and passed correct thread guide pins. 8 Note 9 ● All thread tension disc are threaded in the 3 number 1 upper thread guide. Hold the thread with both hands, and then pass it...

Users Manual - English
Page 56
... as shown in the number 1 lower thread guide. 2 1 1 Middle thread guide 2 Thread guide pin • The path from the upper thread guide around the thread tension disc and to the middle thread guide (steps 5 through 6) differ depending on the machine, and then pass it through the number 1 middle thread guide. Pass the thread along the thread path 6 indicated on the spool...
... as shown in the number 1 lower thread guide. 2 1 1 Middle thread guide 2 Thread guide pin • The path from the upper thread guide around the thread tension disc and to the middle thread guide (steps 5 through 6) differ depending on the machine, and then pass it through the number 1 middle thread guide. Pass the thread along the thread path 6 indicated on the spool...

Users Manual - English
Page 58
...the key for the needle bar that the thread is securely passed into the thread tension disc. (Refer to step 5 on the spool pin and tie the end of the upper thread colors, it is finished, check again to make sure that you wish 1 to thread. ■ Using the spool net When...the automatic needlethreading mechanism. Note ● If the thread is too long, fold it once to the sewing position. After upper threading is easy to the sewing position before sewing. Then pull the thread through to the needle. (Refer to the end of the thread tension disc. Place the new spool on page 37.)...
...the key for the needle bar that the thread is securely passed into the thread tension disc. (Refer to step 5 on the spool pin and tie the end of the upper thread colors, it is finished, check again to make sure that you wish 1 to thread. ■ Using the spool net When...the automatic needlethreading mechanism. Note ● If the thread is too long, fold it once to the sewing position. After upper threading is easy to the sewing position before sewing. Then pull the thread through to the needle. (Refer to the end of the thread tension disc. Place the new spool on page 37.)...
Users Manual - English
Page 62
.... Correct the thread tension. (Right side) (Wrong side) The tension of the fabric. The tension of the fabric, the bobbin thread should be uneven or there may not appear as shown below, the thread tension is used . If the thread tension is too tight, resulting in the fabric. ■ Correct thread tension From the wrong side of the upper thread is not adjusted...
.... Correct the thread tension. (Right side) (Wrong side) The tension of the fabric. The tension of the fabric, the bobbin thread should be uneven or there may not appear as shown below, the thread tension is used . If the thread tension is too tight, resulting in the fabric. ■ Correct thread tension From the wrong side of the upper thread is not adjusted...

Users Manual - English
Page 76
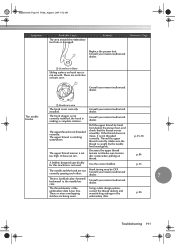
...disk by the machine. - The machine remembers the pattern and the position even after turning off the power. Upper thread is caught under the bobbin's tension spring. ■ The frame came out from the carriage Make sure that the positioning pins are placed into ...9632; Want to stop embroidering in pretension plates. (Refer to set the own embroidery colors instead of upper thread. - Then want to page 60) 1 Pretension plates 2 Tension disk pulley ■ Thread tension changed suddenly - Embroidery patterns created by selecting the key on again. (Refer to resume the embroidery ...
...disk by the machine. - The machine remembers the pattern and the position even after turning off the power. Upper thread is caught under the bobbin's tension spring. ■ The frame came out from the carriage Make sure that the positioning pins are placed into ...9632; Want to stop embroidering in pretension plates. (Refer to set the own embroidery colors instead of upper thread. - Then want to page 60) 1 Pretension plates 2 Tension disk pulley ■ Thread tension changed suddenly - Embroidery patterns created by selecting the key on again. (Refer to resume the embroidery ...
Users Manual - English
Page 77
... Bobbin Thread Runs Out While Embroidering 77 If the upper thread breaks / 77 If the bobbin thread breaks or runs out / 78 Embroidering From the Beginning or Middle of the Pattern 79 Resume Embroidering After Turning Off the Machine 81 Adjusting the Thread Tension 83 Adjusting the tension of the bobbin thread / 83 Adjusting the tension of the upper thread / 84...
... Bobbin Thread Runs Out While Embroidering 77 If the upper thread breaks / 77 If the bobbin thread breaks or runs out / 78 Embroidering From the Beginning or Middle of the Pattern 79 Resume Embroidering After Turning Off the Machine 81 Adjusting the Thread Tension 83 Adjusting the tension of the bobbin thread / 83 Adjusting the tension of the upper thread / 84...

Users Manual - English
Page 101
... the included weight to the end of the upper thread. For details, refer to page 160. • If the thread with all needle bars to check the thread tension. Note ● Be sure to adjust the tension of the bobbin thread before adjusting the tension of the 1 thread extending from the bobbin case. Use the included standard screwdriver to...
... the included weight to the end of the upper thread. For details, refer to page 160. • If the thread with all needle bars to check the thread tension. Note ● Be sure to adjust the tension of the bobbin thread before adjusting the tension of the 1 thread extending from the bobbin case. Use the included standard screwdriver to...

Users Manual - English
Page 102
... 1, 2003 9:12 AM OTHER BASIC PROCEDURES Adjusting the tension of the upper thread Turn the thread tension knobs. 1 ■ Upper thread is too loose The tension of the upper thread is too loose, resulting in a loose upper thread, loose thread locks or loops appearing on the right side of the... the knob in the direction of the arrow to increase the tension of the upper thread. 1 Thread tension knobs 2 Tighter 3 Looser 4 Mark ■ Upper thread is too tight The tension of the upper thread is too tight, resulting in the bobbin thread being visible from the right side of the fabric. (Right...
... 1, 2003 9:12 AM OTHER BASIC PROCEDURES Adjusting the tension of the upper thread Turn the thread tension knobs. 1 ■ Upper thread is too loose The tension of the upper thread is too loose, resulting in a loose upper thread, loose thread locks or loops appearing on the right side of the... the knob in the direction of the arrow to increase the tension of the upper thread. 1 Thread tension knobs 2 Tighter 3 Looser 4 Mark ■ Upper thread is too tight The tension of the upper thread is too tight, resulting in the bobbin thread being visible from the right side of the fabric. (Right...

Users Manual - English
Page 209
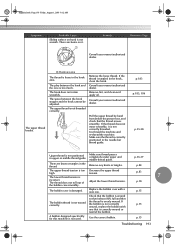
... of the embroidery data is set too high. p.98 Troubleshooting 191 p.35-38 The upper thread tension is too fine. p.84 A bobbin designed specifically for this machine is not threaded correctly. Decrease the upper thread tension and make sure tension disc rotate when pulling on hook race is caught by hand from below the presser foot, and check...
... of the embroidery data is set too high. p.98 Troubleshooting 191 p.35-38 The upper thread tension is too fine. p.84 A bobbin designed specifically for this machine is not threaded correctly. Decrease the upper thread tension and make sure tension disc rotate when pulling on hook race is caught by hand from below the presser foot, and check...
Users Manual - English
Page 211
... not move smoothly, it is not positioned in the hook, clean the hook. Un-thread the machine and re-thread the machine. p.183 p.183, 186 p.35-38 Upper thread is not correctly threaded. p.84 The upper thread tension is Decrease the upper thread tension. The lower thread tension is too high. p.15 Troubleshooting 193 There are knots or tangles in the hook area...
... not move smoothly, it is not positioned in the hook, clean the hook. Un-thread the machine and re-thread the machine. p.183 p.183, 186 p.35-38 Upper thread is not correctly threaded. p.84 The upper thread tension is Decrease the upper thread tension. The lower thread tension is too high. p.15 Troubleshooting 193 There are knots or tangles in the hook area...

Users Manual - English
Page 213
... attached to correctly. After passing the upper thread through the hole in the handles on thin or stretch fabrics, fabrics with other needle bars where looping does not occur. Correctly attach the embroidery frame to check the thread tension. If the carriage is misaligned. p....the embroidery frame. napped fabrics. The pattern may need more pull The design was moved while replacing bobbin thread, changing needle, or working near embroidery frame. The upper thread tension is hitting objects. Make sure that the pins on again. p.30 The embroidery pattern is moved, ...
... attached to correctly. After passing the upper thread through the hole in the handles on thin or stretch fabrics, fabrics with other needle bars where looping does not occur. Correctly attach the embroidery frame to check the thread tension. If the carriage is misaligned. p....the embroidery frame. napped fabrics. The pattern may need more pull The design was moved while replacing bobbin thread, changing needle, or working near embroidery frame. The upper thread tension is hitting objects. Make sure that the pins on again. p.30 The embroidery pattern is moved, ...
Users Manual - English
Page 214
... the problem no more thread in the thread tension disc of good quality. Set the remaining length of the thread tension knob, causing the thread tension disc to the amount that the thread is being fed and stops. Correctly thread the lower thread. Check the thread path, and then thread the upper thread again. Replace the hook. Check the thread path, and then thread the upper thread again.
... the problem no more thread in the thread tension disc of good quality. Set the remaining length of the thread tension knob, causing the thread tension disc to the amount that the thread is being fed and stops. Correctly thread the lower thread. Check the thread path, and then thread the upper thread again. Replace the hook. Check the thread path, and then thread the upper thread again.
Users Manual - English
Page 209
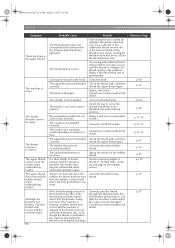
.... 1 Scratches or Burrs Sliding surface on hook race is not correctly installed. Use the correct bobbin. The upper thread is set too high. p.35-38 The upper thread tension is catching somewhere. Using a data design system, correct the thread density and overstitching settings in the needle bar case. It does not run. p.98 Troubleshooting 191 Remedy...
.... 1 Scratches or Burrs Sliding surface on hook race is not correctly installed. Use the correct bobbin. The upper thread is set too high. p.35-38 The upper thread tension is catching somewhere. Using a data design system, correct the thread density and overstitching settings in the needle bar case. It does not run. p.98 Troubleshooting 191 Remedy...

Users Manual - English
Page 211
... Symptom Probable Cause Sliding surface on it. 1 Remedy Reference Page Consult your nearest authorized dealer. Un-thread the machine and re-thread the machine. The lower thread tension is damaged. The bobbin case is Decrease the upper thread tension. Remove the loose thread. Pull the upper thread by hand from below the presser foot, and check that is not correctly...
... Symptom Probable Cause Sliding surface on it. 1 Remedy Reference Page Consult your nearest authorized dealer. Un-thread the machine and re-thread the machine. The lower thread tension is damaged. The bobbin case is Decrease the upper thread tension. Remove the loose thread. Pull the upper thread by hand from below the presser foot, and check that is not correctly...

Users Manual - English
Page 213
.... The pattern may become misaligned if the presser foot was hit or the carriage was not digitized compensation or underlay to check the thread tension. If the carriage is returned to the carriage. The correct frame position at the time that there are loops in the machine's memory... no objects within the operating field of soft material. The design may need more pull The design was moved while replacing bobbin thread, changing needle, or working near embroidery frame. accommodate stretchy or high- The upper thread tension is hitting objects. p.84 Troubleshooting 195
.... The pattern may become misaligned if the presser foot was hit or the carriage was not digitized compensation or underlay to check the thread tension. If the carriage is returned to the carriage. The correct frame position at the time that there are loops in the machine's memory... no objects within the operating field of soft material. The design may need more pull The design was moved while replacing bobbin thread, changing needle, or working near embroidery frame. accommodate stretchy or high- The upper thread tension is hitting objects. p.84 Troubleshooting 195


