
Users Manual - English
Page 2
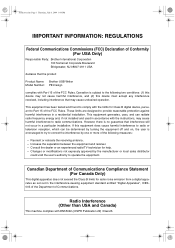
... not occur in a residential installation. Frontcover.fm Page 1 Thursday, July 8, 2004 1:48 PM IMPORTANT INFORMATION: REGULATIONS Federal Communications Commissions (FCC) Declaration of Conformity (For USA Only) Responsible Party: Brother International Corporation 100 Somerset Corporate Boulevard Bridgewater, NJ 08807-0911 USA declares that the product Product Name: Brother USB Writer Model Number: PE-Design complies with EN55022 (CISPR Publication...
... not occur in a residential installation. Frontcover.fm Page 1 Thursday, July 8, 2004 1:48 PM IMPORTANT INFORMATION: REGULATIONS Federal Communications Commissions (FCC) Declaration of Conformity (For USA Only) Responsible Party: Brother International Corporation 100 Somerset Corporate Boulevard Bridgewater, NJ 08807-0911 USA declares that the product Product Name: Brother USB Writer Model Number: PE-Design complies with EN55022 (CISPR Publication...

Users Manual - English
Page 3
.... Notice This Instruction Manual does not explain how to use . Important Using this Instruction Manual carefully, and then keep it in accordance with this product For designing beautiful embroidery patterns • This system allows you very much for household use your particular sewing machine model. Caution The software included with the copyright laws. For repairs or adjustments • In the event that you make a trial sewing sample with...
.... Notice This Instruction Manual does not explain how to use . Important Using this Instruction Manual carefully, and then keep it in accordance with this product For designing beautiful embroidery patterns • This system allows you very much for household use your particular sewing machine model. Caution The software included with the copyright laws. For repairs or adjustments • In the event that you make a trial sewing sample with...
Users Manual - English
Page 5
... manual 3 List of terms used 3 Introduction 4 Applications of the software 4 Package contents 5 Optional supplies 6 Principal parts 6 Installation 7 Installation procedure 7 System requirements 8 [STEP 1] Installing the software 8 [STEP 2] Installing the driver for the card writer module 10 [STEP 3] Upgrading the USB card writer module 12 Online registration 13 Uninstallation 13 Technical support 13 Tips and Techniques for Creating Embroidery Patterns 14 Sew Types 15 Chapter 1 Basic Operation 17 Getting Started 18 About This Chapter 18 Automatically...
... manual 3 List of terms used 3 Introduction 4 Applications of the software 4 Package contents 5 Optional supplies 6 Principal parts 6 Installation 7 Installation procedure 7 System requirements 8 [STEP 1] Installing the software 8 [STEP 2] Installing the driver for the card writer module 10 [STEP 3] Upgrading the USB card writer module 12 Online registration 13 Uninstallation 13 Technical support 13 Tips and Techniques for Creating Embroidery Patterns 14 Sew Types 15 Chapter 1 Basic Operation 17 Getting Started 18 About This Chapter 18 Automatically...
Users Manual - English
Page 6
... the pattern to an original card 62 Step7 Quitting Layout & Editing 63 Embroidering large-size embroidery patterns ...... 63 Step1 Attaching stabilizer to the fabric 63 Step2 Marking the embroidering position ........ 63 Step3 Hooping the fabric 65 Step4 Embroidering 65 Chapter 2 Advanced Operation 67 Advanced Operations 68 About This Chapter 68 Design Center 69 Main Window 70 Stage 1 (Original Image Stage 71 Importing Image Data 71 Using the...
... the pattern to an original card 62 Step7 Quitting Layout & Editing 63 Embroidering large-size embroidery patterns ...... 63 Step1 Attaching stabilizer to the fabric 63 Step2 Marking the embroidering position ........ 63 Step3 Hooping the fabric 65 Step4 Embroidering 65 Chapter 2 Advanced Operation 67 Advanced Operations 68 About This Chapter 68 Design Center 69 Main Window 70 Stage 1 (Original Image Stage 71 Importing Image Data 71 Using the...
Users Manual - English
Page 13
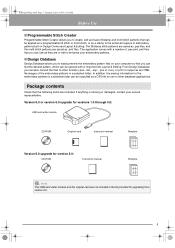
... 1.0 through 4.0: USB card writer module CD-ROM Original card Instruction manual Template Version 6.0 upgrade for version 5.0: CD-ROM Instruction manual Template a Note: The USB card writer module and the original card are not included in the kit provided for use as they are or edit to enhance your service representative. From Design Database, you can also convert the files to easily preview the embroidery pattern files...
... 1.0 through 4.0: USB card writer module CD-ROM Original card Instruction manual Template Version 6.0 upgrade for version 5.0: CD-ROM Instruction manual Template a Note: The USB card writer module and the original card are not included in the kit provided for use as they are or edit to enhance your service representative. From Design Database, you can also convert the files to easily preview the embroidery pattern files...
Users Manual - English
Page 22
... , use stabilizer material on the final material. With Design Center, the default sewing order is the order in a change of embroidery quality if the size of the pattern is greatly changed. When you normally scale an imported pattern, the number of stitches that you to create a wide variety of embroidery patterns and supports wider ranges for Creating Embroidery Patterns ■ Sewing wide areas When satin stitching is to the new size...
... , use stabilizer material on the final material. With Design Center, the default sewing order is the order in a change of embroidery quality if the size of the pattern is greatly changed. When you normally scale an imported pattern, the number of stitches that you to create a wide variety of embroidery patterns and supports wider ranges for Creating Embroidery Patterns ■ Sewing wide areas When satin stitching is to the new size...
Users Manual - English
Page 51
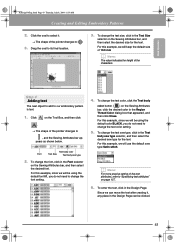
... to our embroidery pattern is text. 1. Font Text body color Text Size Text body sew type 2. For this example, we can move the text after creating it . 3. To change the text color, click the Text body color button ( ) on the Sewing Attributes bar, click the desired color in the Design Page can be clicked. 43 b Memo: For more precise setting of...
... to our embroidery pattern is text. 1. Font Text body color Text Size Text body sew type 2. For this example, we can move the text after creating it . 3. To change the text color, click the Text body color button ( ) on the Sewing Attributes bar, click the desired color in the Design Page can be clicked. 43 b Memo: For more precise setting of...

Users Manual - English
Page 68
... example, set Width to 230 mm and Height to Import, and then click from File 60 An alternate method is to specify the desired size for fine positioning adjustments with the application. 1. PeDesignV6Eng.book Page 60 Thursday, July 8, 2004 11:59 AM Creating Large-Size Embroidery Patterns Title bar Menu bar Toolbar Sewing Attributes bar Tool Box Close button Maximize button Minimize button Work area Design Page...
... example, set Width to 230 mm and Height to Import, and then click from File 60 An alternate method is to specify the desired size for fine positioning adjustments with the application. 1. PeDesignV6Eng.book Page 60 Thursday, July 8, 2004 11:59 AM Creating Large-Size Embroidery Patterns Title bar Menu bar Toolbar Sewing Attributes bar Tool Box Close button Maximize button Minimize button Work area Design Page...
Users Manual - English
Page 98
.... 5. When the Hide Hint button is displayed, the preview box is displayed, allowing you may need to scroll through the settings, or resize the dialog box by dragging one of the sewing attributes and settings available for entering settings varies according to change the sewing attributes displayed under Line Sew or Region Sew. In Beginner mode, use the slider to the...
.... 5. When the Hide Hint button is displayed, the preview box is displayed, allowing you may need to scroll through the settings, or resize the dialog box by dragging one of the sewing attributes and settings available for entering settings varies according to change the sewing attributes displayed under Line Sew or Region Sew. In Beginner mode, use the slider to the...
Users Manual - English
Page 99
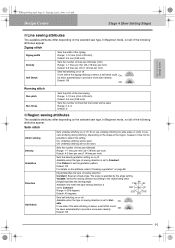
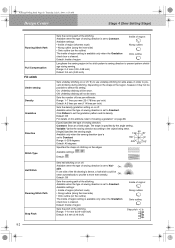
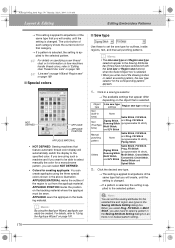
... or off . Click Pattern to set to Constant. The angle is dense, a half stitch could On: be sewn. Available when the type of sewing direction is set to Vari- Range: 2, 4, 6 Default: 2 ■ Region sewing attributes The available attributes differ depending on or off . Satin stitch Under sewing Density Gradation Direction Half Stitch Sets underlay stitching on page 96. [Type] Specifies the type of sewing direction. Sets the number of lines per...
... or off . Click Pattern to set to Constant. The angle is dense, a half stitch could On: be sewn. Available when the type of sewing direction is set to Vari- Range: 2, 4, 6 Default: 2 ■ Region sewing attributes The available attributes differ depending on or off . Satin stitch Under sewing Density Gradation Direction Half Stitch Sets underlay stitching on page 96. [Type] Specifies the type of sewing direction. Sets the number of lines per...
Users Manual - English
Page 100
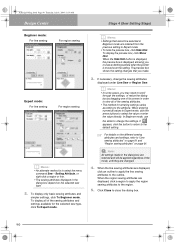
... when the type of sewing direction is specified by the angle setting. Variable: Varies the sewing direction according to prevent shrinking during sewing. Constant: Sews at a fixed angle. Available settings: , Default: Sets half stitching on or off. PeDesignV6Eng.book Page 92 Thursday, July 8, 2004 11:59 AM Design Center Stage 4 (Sew Setting Stage) Running Stitch Path Pull Compensation Fill stitch Under sewing Density Gradation Direction Stitch Type Half Stitch Running Stitch Path Step Pitch...
... when the type of sewing direction is specified by the angle setting. Variable: Varies the sewing direction according to prevent shrinking during sewing. Constant: Sews at a fixed angle. Available settings: , Default: Sets half stitching on or off. PeDesignV6Eng.book Page 92 Thursday, July 8, 2004 11:59 AM Design Center Stage 4 (Sew Setting Stage) Running Stitch Path Pull Compensation Fill stitch Under sewing Density Gradation Direction Stitch Type Half Stitch Running Stitch Path Step Pitch...
Users Manual - English
Page 101
... . Try to use underlay stitching for wide areas, in the stitch pattern's sewing direction to the object being sewn. [Angle] Specifies the sewing angle. Sets the number of the region, however, it may not be sewn automatically to set to prevent shrinking during sewing. Advanced Opreation Design Center PeDesignV6Eng.book Page 93 Thursday, July 8, 2004 11:59 AM Design Center Stage 4 (Sew Setting Stage) Frequency Sets the spacial...
... . Try to use underlay stitching for wide areas, in the stitch pattern's sewing direction to the object being sewn. [Angle] Specifies the sewing angle. Sets the number of the region, however, it may not be sewn automatically to set to prevent shrinking during sewing. Advanced Opreation Design Center PeDesignV6Eng.book Page 93 Thursday, July 8, 2004 11:59 AM Design Center Stage 4 (Sew Setting Stage) Frequency Sets the spacial...
Users Manual - English
Page 104
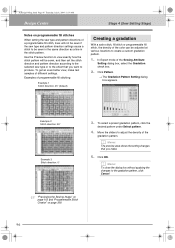
... better view, make . 5. PeDesignV6Eng.book Page 96 Thursday, July 8, 2004 11:59 AM Design Center Stage 4 (Sew Setting Stage) Notes on page 208 96 Examples of programmable fill stitching: Example 1 Stitch direction: 45° (default) Creating a gradation With a satin stitch, fill stitch or programmable fill stitch, the density of the color can be adjusted at various locations to create a custom gradation pattern. 1. To select...
... better view, make . 5. PeDesignV6Eng.book Page 96 Thursday, July 8, 2004 11:59 AM Design Center Stage 4 (Sew Setting Stage) Notes on page 208 96 Examples of programmable fill stitching: Example 1 Stitch direction: 45° (default) Creating a gradation With a satin stitch, fill stitch or programmable fill stitch, the density of the color can be adjusted at various locations to create a custom gradation pattern. 1. To select...
Users Manual - English
Page 176
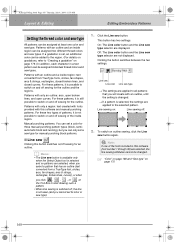
... set a sew type for manual punching block patterns. ■ Line sew Clicking this button switches on : Line sewing off sewing for three manual punching pattern types (block, semiautomatic block and running), but you click , , , or on the Tool Box to switch on and off sewing for the outline. PeDesignV6Eng.book Page 168 Thursday, July 8, 2004 11:59 AM Layout & Editing Editing Embroidery Patterns Setting the thread color and sew type...
... set a sew type for manual punching block patterns. ■ Line sew Clicking this button switches on : Line sewing off sewing for three manual punching pattern types (block, semiautomatic block and running), but you click , , , or on the Tool Box to switch on and off sewing for the outline. PeDesignV6Eng.book Page 168 Thursday, July 8, 2004 11:59 AM Layout & Editing Editing Embroidery Patterns Setting the thread color and sew type...
Users Manual - English
Page 178
... sew type and Region sew type selectors appear in fonts) Text (TrueType fonts) None Satin Stitch, Fill Stitch, Zigzag Stitch, and Prog. Fill Stitch or Motif Stitch, you want to be able to set the sewing attributes for the corresponding pattern appears. 1. If you are using such a machine and if you also need to the selected pattern. For details, refer to "Using the Applique Wizard" on the object that feature automatic thread...
... sew type and Region sew type selectors appear in fonts) Text (TrueType fonts) None Satin Stitch, Fill Stitch, Zigzag Stitch, and Prog. Fill Stitch or Motif Stitch, you want to be able to set the sewing attributes for the corresponding pattern appears. 1. If you are using such a machine and if you also need to the selected pattern. For details, refer to "Using the Applique Wizard" on the object that feature automatic thread...

Users Manual - English
Page 181
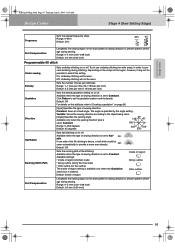
... or off . The angle is set the gradation pattern. Interval Sets the distance between stitches. Satin stitch Under sewing Density Gradation Direction Sets underlay stitching on page 179. [Type] Specifies the type of the E stitch or V stitch. On: Underlay stitching will not be sewn. Range: 1.0-10.0 mm (0.04-0.39 inch) Default: 2.0 mm (0.08 inch) E stitch V stitch V stitch Sets the reverse stitching for wide areas, in the run times. Range: 1-7 lines per mm...
... or off . The angle is set the gradation pattern. Interval Sets the distance between stitches. Satin stitch Under sewing Density Gradation Direction Sets underlay stitching on page 179. [Type] Specifies the type of the E stitch or V stitch. On: Underlay stitching will not be sewn. Range: 1.0-10.0 mm (0.04-0.39 inch) Default: 2.0 mm (0.08 inch) E stitch V stitch V stitch Sets the reverse stitching for wide areas, in the run times. Range: 1-7 lines per mm...

Users Manual - English
Page 182
... the region, however, it may not be possible to Constant. PeDesignV6Eng.book Page 174 Thursday, July 8, 2004 11:59 AM Layout & Editing Editing Embroidery Patterns Half Stitch Running Stitch Path Pull Compensation Fill stitch Under sewing Density Gradation Direction Stitch Type Half Stitch Sets half stitching on or off. Available when the type of region setting is available only when the Gradation check box is...
... the region, however, it may not be possible to Constant. PeDesignV6Eng.book Page 174 Thursday, July 8, 2004 11:59 AM Layout & Editing Editing Embroidery Patterns Half Stitch Running Stitch Path Pull Compensation Fill stitch Under sewing Density Gradation Direction Stitch Type Half Stitch Sets half stitching on or off. Available when the type of region setting is available only when the Gradation check box is...
Users Manual - English
Page 183
... stitching will not be Off: sewn automatically to prevent pattern shrinkage during stitching. Sets the number of lines per inch) Sets the density gradation setting on page 179. [Type] Specifies the type of sewing direction is specified by the angle setting. The angle is set to "Creating a gradation" on or off . Default: Off Sets the running path of region: Along outline: Onto outline: 175 PeDesignV6Eng.book...
... stitching will not be Off: sewn automatically to prevent pattern shrinkage during stitching. Sets the number of lines per inch) Sets the density gradation setting on page 179. [Type] Specifies the type of sewing direction is specified by the angle setting. The angle is set to "Creating a gradation" on or off . Default: Off Sets the running path of region: Along outline: Onto outline: 175 PeDesignV6Eng.book...

Users Manual - English
Page 186
... fill stitches and stamps When setting the sew type and pattern directions of the line sewing. Use the Preview function to view exactly how the stitch pattern will not be sewn if the sew type and pattern direction settings cause a stitch to be sewn, and then set the stitch direction and pattern direction according to the selected sew type or to the effect that you want to the top: Length Select a pattern for manual punching patterns. Top...
... fill stitches and stamps When setting the sew type and pattern directions of the line sewing. Use the Preview function to view exactly how the stitch pattern will not be sewn if the sew type and pattern direction settings cause a stitch to be sewn, and then set the stitch direction and pattern direction according to the selected sew type or to the effect that you want to the top: Length Select a pattern for manual punching patterns. Top...
Users Manual - English
Page 213
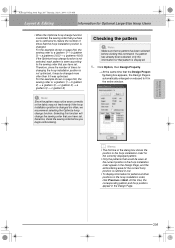
... the Design Page, and the embroidering area for the current hoop position is outlined in red. • To display information for Optional Large-Size Hoop Users • When the Optimize hoop change function is selected, the sewing order that you have set . Checking the pattern a Note: Make sure that would be changed more often than if it may not feed evenly if the hoop installation position is changed . At...
... the Design Page, and the embroidering area for the current hoop position is outlined in red. • To display information for Optional Large-Size Hoop Users • When the Optimize hoop change function is selected, the sewing order that you have set . Checking the pattern a Note: Make sure that would be changed more often than if it may not feed evenly if the hoop installation position is changed . At...


