
Users Manual - English and Spanish
Page 4
... or use extension cords. 4. Be sure to assure correct installation. Do not store your machine turns on the needle while sewing. Use only neutral soaps or detergents to inspect and adjust the machine yourself. Do not drop or hit the machine. 4. Do not touch the balance wheel, thread take-up, needle, or other hot...
... or use extension cords. 4. Be sure to assure correct installation. Do not store your machine turns on the needle while sewing. Use only neutral soaps or detergents to inspect and adjust the machine yourself. Do not drop or hit the machine. 4. Do not touch the balance wheel, thread take-up, needle, or other hot...
Users Manual - English and Spanish
Page 5
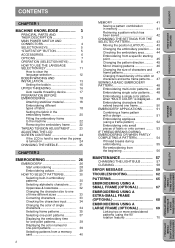
...material 18 Embroidering different types of fabric 18 Setting the fabric in the embroidery frame 20 Fitting the embroidery frame to the machine 22 Removing the embroidery frame ...... 22 THREAD TENSION ADJUSTMENT....... 23 ADJUSTING THE LCD SCREEN CONTRAST 24 If the LCD is hard... 46 Changing the size of characters and frame patterns 47 Changing thread density of the stitch on characters and some frame patterns ... 47 SEWING A BASIC EMBROIDERY PATTERN 48 Embroidering multi-color patterns ..... 48 Embroidering single color patterns ... 48 Embroidering a single color pattern when "MULTI...
...material 18 Embroidering different types of fabric 18 Setting the fabric in the embroidery frame 20 Fitting the embroidery frame to the machine 22 Removing the embroidery frame ...... 22 THREAD TENSION ADJUSTMENT....... 23 ADJUSTING THE LCD SCREEN CONTRAST 24 If the LCD is hard... 46 Changing the size of characters and frame patterns 47 Changing thread density of the stitch on characters and some frame patterns ... 47 SEWING A BASIC EMBROIDERY PATTERN 48 Embroidering multi-color patterns ..... 48 Embroidering single color patterns ... 48 Embroidering a single color pattern when "MULTI...
Users Manual - English and Spanish
Page 7
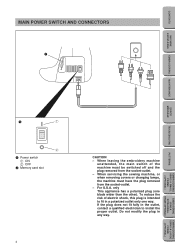
...fit fully in the outlet, contact a qualified electrician to fit in any way. When servicing the sewing machine, or when removing covers or changing lamps, the machine must be switched off and the plug removed from the socket-outlet. - To reduce the risk ...of the machine must have the plug removed from the socket-outlet. - For U.S.A. CONTENTS MACHINE KNOWLEDGE MAIN POWER SWITCH AND CONNECTORS 2 EMBROIDERING MAINTENANCE ERROR MESSAGE TROUBLESHOOTING PATTERNS EMBROIDERING USING A SMALL FRAME (...
...fit fully in the outlet, contact a qualified electrician to fit in any way. When servicing the sewing machine, or when removing covers or changing lamps, the machine must be switched off and the plug removed from the socket-outlet. - To reduce the risk ...of the machine must have the plug removed from the socket-outlet. - For U.S.A. CONTENTS MACHINE KNOWLEDGE MAIN POWER SWITCH AND CONNECTORS 2 EMBROIDERING MAINTENANCE ERROR MESSAGE TROUBLESHOOTING PATTERNS EMBROIDERING USING A SMALL FRAME (...

Users Manual - English and Spanish
Page 17
... the thread end, press the "START/STOP" button. Wind the thread a few times around the bobbin and press the "START/STOP" button again. The machine will stop at any time or when the bobbin has stopped moving and the motor is still running. 1 "START/STOP" button 7. Remove the bobbin and ...continue sewing. 8. It's a good idea to have several full bobbins on the shaft 2 Groove in the side of the bobbin after the machine stops. * It is full. Press the "START/STOP" button to right. * Match the groove of...
... the thread end, press the "START/STOP" button. Wind the thread a few times around the bobbin and press the "START/STOP" button again. The machine will stop at any time or when the bobbin has stopped moving and the motor is still running. 1 "START/STOP" button 7. Remove the bobbin and ...continue sewing. 8. It's a good idea to have several full bobbins on the shaft 2 Groove in the side of the bobbin after the machine stops. * It is full. Press the "START/STOP" button to right. * Match the groove of...
Users Manual - English and Spanish
Page 19
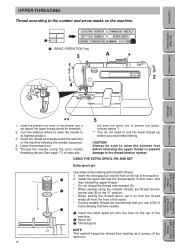
... with metallic thread. 1. Turn the balance wheel to raise the needle to the number and arrow marks on the top of the machine 2 Spool felt 3 Thread spool NOTE This method keeps the thread from the front of the spool. * If using the auto needle...thread up before removing the upper thread to prevent damage to raise the presser foot before you use a 90/14 home sewing machine needle. 1 Insert the extra spool pin into the hole on the machine. 1 1 "BASIC OPERATION" key 3 A * 1 2 4 EMBROIDERING MAINTENANCE ERROR MESSAGE TROUBLESHOOTING PATTERNS EMBROIDERING USING A SMALL...
... with metallic thread. 1. Turn the balance wheel to raise the needle to the number and arrow marks on the top of the machine 2 Spool felt 3 Thread spool NOTE This method keeps the thread from the front of the spool. * If using the auto needle...thread up before removing the upper thread to prevent damage to raise the presser foot before you use a 90/14 home sewing machine needle. 1 Insert the extra spool pin into the hole on the machine. 1 1 "BASIC OPERATION" key 3 A * 1 2 4 EMBROIDERING MAINTENANCE ERROR MESSAGE TROUBLESHOOTING PATTERNS EMBROIDERING USING A SMALL...
Users Manual - English and Spanish
Page 26
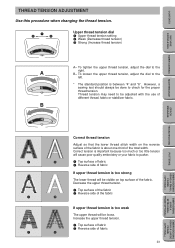
... visible on the reverse surface of the fabric is too strong The lower thread will be loose. CONTENTS MACHINE KNOWLEDGE EMBROIDERING MAINTENANCE THREAD TENSION ADJUSTMENT Use this procedure when changing the thread tension. However, a sewing test should always be adjusted with the use of fabric 23 EMBROIDERING USING A EXTRA-SMALL FRAME (OPTIONAL...
... visible on the reverse surface of the fabric is too strong The lower thread will be loose. CONTENTS MACHINE KNOWLEDGE EMBROIDERING MAINTENANCE THREAD TENSION ADJUSTMENT Use this procedure when changing the thread tension. However, a sewing test should always be adjusted with the use of fabric 23 EMBROIDERING USING A EXTRA-SMALL FRAME (OPTIONAL...
Users Manual - English and Spanish
Page 31
Lower the presser foot and press the "START/STOP" button to start the machine. 3. The machine will stop the machine and raise the presser foot again. After trimming, lower the presser foot and press the "START/STOP" button again to the ... (OPTIONAL) 28 After threading the needle, pass the thread from the top to start the machine. Trim off any excess thread at the edge of the thread. 2. CONTENTS MACHINE KNOWLEDGE EMBROIDERING MAINTENANCE Start embroidering 1. After sewing 5 - 6 stitches, stop sewing when it has completed all the stitching with the current thread color.
Lower the presser foot and press the "START/STOP" button to start the machine. 3. The machine will stop the machine and raise the presser foot again. After trimming, lower the presser foot and press the "START/STOP" button again to the ... (OPTIONAL) 28 After threading the needle, pass the thread from the top to start the machine. Trim off any excess thread at the edge of the thread. 2. CONTENTS MACHINE KNOWLEDGE EMBROIDERING MAINTENANCE Start embroidering 1. After sewing 5 - 6 stitches, stop sewing when it has completed all the stitching with the current thread color.
Users Manual - English and Spanish
Page 32
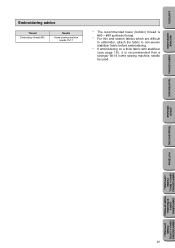
... Embroidering advice Thread Embroidery thread #50 Needle Home sewing machine needle 75/11 * The recommended lower (bobbin) thread is #60 - #90 synthetic thread. * For thin and stretch fabrics which are difficult ...-woven stabilizer fabric before embroidering. * If embroidering on a thick fabric with stabilizer (see page 18), it is recommended that a stronger 90/14 home sewing machine needle be used. EMBROIDERING MAINTENANCE ERROR MESSAGE TROUBLESHOOTING PATTERNS EMBROIDERING USING A SMALL FRAME (OPTIONAL) EMBROIDERING USING A EXTRA-SMALL FRAME (OPTIONAL) EMBROIDERING USING A LARGE...
... Embroidering advice Thread Embroidery thread #50 Needle Home sewing machine needle 75/11 * The recommended lower (bobbin) thread is #60 - #90 synthetic thread. * For thin and stretch fabrics which are difficult ...-woven stabilizer fabric before embroidering. * If embroidering on a thick fabric with stabilizer (see page 18), it is recommended that a stronger 90/14 home sewing machine needle be used. EMBROIDERING MAINTENANCE ERROR MESSAGE TROUBLESHOOTING PATTERNS EMBROIDERING USING A SMALL FRAME (OPTIONAL) EMBROIDERING USING A EXTRA-SMALL FRAME (OPTIONAL) EMBROIDERING USING A LARGE...
Users Manual - English and Spanish
Page 35
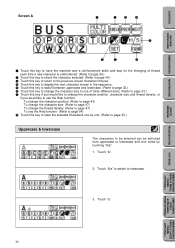
... function: (Refer to page 54) 8 Touch this key if you would like to use the Help function. Touch "a". CONTENTS MACHINE KNOWLEDGE EMBROIDERING MAINTENANCE ERROR MESSAGE Screen A 1 2 3 4 6 5 7 8 1 Touch this key to have the machine sew a reinforcement stitch and stop for the changing of thread each time a new character is embroidered. (Refer to page 34...
... function: (Refer to page 54) 8 Touch this key if you would like to use the Help function. Touch "a". CONTENTS MACHINE KNOWLEDGE EMBROIDERING MAINTENANCE ERROR MESSAGE Screen A 1 2 3 4 6 5 7 8 1 Touch this key to have the machine sew a reinforcement stitch and stop for the changing of thread each time a new character is embroidered. (Refer to page 34...
Users Manual - English and Spanish
Page 46
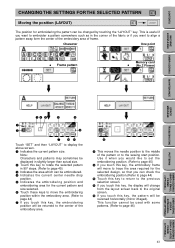
... FRAME (OPTIONAL) 34 5 6 8 1 2 9 7 0A Touch "SET" and then "LAYOUT" to page 46) 43 EMBROIDERING USING A EXTRA-SMALL FRAME (OPTIONAL) EMBROIDERING USING A LARGE FRAME (OPTIONAL) CONTENTS MACHINE KNOWLEDGE CHANGING THE SETTINGS FOR THE SELECTED PATTERN Moving the position (LAYOUT) The position for the current pattern and size selected. 6 Touch these keys to... embroidering position and embroidering area for embroidering the pattern can check the embroidering position.(Refer to page 44) 0 Touch this key to return to the sewing start position.
... FRAME (OPTIONAL) 34 5 6 8 1 2 9 7 0A Touch "SET" and then "LAYOUT" to page 46) 43 EMBROIDERING USING A EXTRA-SMALL FRAME (OPTIONAL) EMBROIDERING USING A LARGE FRAME (OPTIONAL) CONTENTS MACHINE KNOWLEDGE CHANGING THE SETTINGS FOR THE SELECTED PATTERN Moving the position (LAYOUT) The position for the current pattern and size selected. 6 Touch these keys to... embroidering position and embroidering area for embroidering the pattern can check the embroidering position.(Refer to page 44) 0 Touch this key to return to the sewing start position.
Users Manual - English and Spanish
Page 51
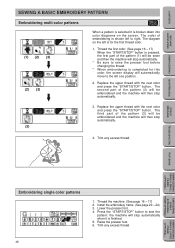
.... The order of the pattern (3) will be sewn and then the machine will stop automatically when it is broken down into color diagrams on the left to sew the pattern: the machine will then stop automatically. 3. Replace the upper thread with the next... color and press the "START/STOP" button. Press the "START/STOP" button to right. CONTENTS MACHINE KNOWLEDGE EMBROIDERING MAINTENANCE SEWING A BASIC EMBROIDERY PATTERN Embroidering multi-color patterns (1) (2) (3) (2) (3) When a pattern is selected it is finished. 5. Trim any excess...
.... The order of the pattern (3) will be sewn and then the machine will stop automatically when it is broken down into color diagrams on the left to sew the pattern: the machine will then stop automatically. 3. Replace the upper thread with the next... color and press the "START/STOP" button. Press the "START/STOP" button to right. CONTENTS MACHINE KNOWLEDGE EMBROIDERING MAINTENANCE SEWING A BASIC EMBROIDERY PATTERN Embroidering multi-color patterns (1) (2) (3) (2) (3) When a pattern is selected it is finished. 5. Trim any excess...

Users Manual - English and Spanish
Page 53
... all in large size 1. Input "ABC", then touch "SET" and then "LAYOUT". Input the remaining letters "DE", and then touch "START/CENTER" to "START". 2. CONTENTS MACHINE KNOWLEDGE EMBROIDERING MAINTENANCE ERROR MESSAGE TROUBLESHOOTING Embroidering characters that extend beyond than one frame * This function is re-framed with the finishing point and last... just inside the left edge of the frame. 1 Finishing position 3. After this, touch "START/ CENTER" to switch to select "START". 4. When embroidering has finished, the machine will sew the finishing position automatically.
... all in large size 1. Input "ABC", then touch "SET" and then "LAYOUT". Input the remaining letters "DE", and then touch "START/CENTER" to "START". 2. CONTENTS MACHINE KNOWLEDGE EMBROIDERING MAINTENANCE ERROR MESSAGE TROUBLESHOOTING Embroidering characters that extend beyond than one frame * This function is re-framed with the finishing point and last... just inside the left edge of the frame. 1 Finishing position 3. After this, touch "START/ CENTER" to switch to select "START". 4. When embroidering has finished, the machine will sew the finishing position automatically.

Users Manual - English and Spanish
Page 54
... it. A "+" mark is now ready to position them within the frame pattern. 2. After embroidering a frame pattern and the combined design, sew an extra frame pattern on the outside pattern. CONTENTS MACHINE KNOWLEDGE EMBROIDERING MAINTENANCE ERROR MESSAGE TROUBLESHOOTING EMBROIDERING APPLICATIONS Combining a frame pattern with a design 1. Using the "+" mark inside the frame pattern as...
... it. A "+" mark is now ready to position them within the frame pattern. 2. After embroidering a frame pattern and the combined design, sew an extra frame pattern on the outside pattern. CONTENTS MACHINE KNOWLEDGE EMBROIDERING MAINTENANCE ERROR MESSAGE TROUBLESHOOTING EMBROIDERING APPLICATIONS Combining a frame pattern with a design 1. Using the "+" mark inside the frame pattern as...

Users Manual - English and Spanish
Page 69
... embroidery pattern MACHINE KNOWLEDGE EMBROIDERING MAINTENANCE 1...001 2...800 3...900 1...704 2...800 3...900 1...205 2...339 3...900 1...339 2...205 3...900 1...339 2...800 3...900 1...205 2...001 3...900 1...001 2...800 3...900 1...205 2...800 3...900 1...307 2...019 3...900 Order of sewing Embroidery thread color...001 2...515 3...507 1...515 2...513 3...001 4...208 5...205 6...513 1...086 1...614 Patterns which are stored in the machine or memory cards are not to be used for home use . 66 EMBROIDERING USING A EXTRA-SMALL FRAME (OPTIONAL) EMBROIDERING USING A LARGE...
... embroidery pattern MACHINE KNOWLEDGE EMBROIDERING MAINTENANCE 1...001 2...800 3...900 1...704 2...800 3...900 1...205 2...339 3...900 1...339 2...205 3...900 1...339 2...800 3...900 1...205 2...001 3...900 1...001 2...800 3...900 1...205 2...800 3...900 1...307 2...019 3...900 Order of sewing Embroidery thread color...001 2...515 3...507 1...515 2...513 3...001 4...208 5...205 6...513 1...086 1...614 Patterns which are stored in the machine or memory cards are not to be used for home use . 66 EMBROIDERING USING A EXTRA-SMALL FRAME (OPTIONAL) EMBROIDERING USING A LARGE...


