
Accessory Catalog
Page 15
.... 3. While starting to sew, press the needle position button twice to pull the bobbin thread to the machine. 2. Attach the walking foot to the quilt top. 7. Sew. Walking Foot SA140 ABCDEFJKMN SA166 L SA107 GHO SA169 I Open Toe Walking Foot SA188 ABCDEFJKMN www.brother.com Use the...guide the fabric. 4. Lower the feed dogs. 2. Use the walking foot with the closed front for ULT series, PC-6500, PC-8200 and PC-8500 sewing machines. Brother Quilting Feet 27 Open Toe Quilting Foot Quilting Foot SA187 ABCDEFGHMNO SA129 ABCDEFGHMNO SA165 L Open Toe Quilting Foot The large ...
.... 3. While starting to sew, press the needle position button twice to pull the bobbin thread to the machine. 2. Attach the walking foot to the quilt top. 7. Sew. Walking Foot SA140 ABCDEFJKMN SA166 L SA107 GHO SA169 I Open Toe Walking Foot SA188 ABCDEFJKMN www.brother.com Use the...guide the fabric. 4. Lower the feed dogs. 2. Use the walking foot with the closed front for ULT series, PC-6500, PC-8200 and PC-8500 sewing machines. Brother Quilting Feet 27 Open Toe Quilting Foot Quilting Foot SA187 ABCDEFGHMNO SA129 ABCDEFGHMNO SA165 L Open Toe Quilting Foot The large ...
Users Manual - English
Page 5
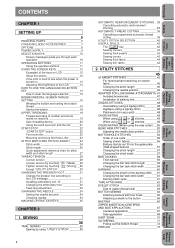
... 68 DART SEAM 70 GATHERING 71 Pulling out the bobbin thread 72 PINTUCK 73 Patterns (Memory Card) Patterns (Programmed in Machine) Sewing Chart Trouble shooting Error Maintenance Messages My Custom Stitch TM Retrieving Editing Embroidery Patterns Embroidering Characters and Decorative Stitches Utility...Sewing Setting Up UTILITY STITCHES 45 STRAIGHT STITCHES 45 For reinforcement stretching on machine 19 Auto-threading device 20 Using the extra spool pin and the net ______21 START/STOP 22 "START/STOP" button 22 Foot controller 22 Mounting and Using the Knee Lifter ...
... 68 DART SEAM 70 GATHERING 71 Pulling out the bobbin thread 72 PINTUCK 73 Patterns (Memory Card) Patterns (Programmed in Machine) Sewing Chart Trouble shooting Error Maintenance Messages My Custom Stitch TM Retrieving Editing Embroidery Patterns Embroidering Characters and Decorative Stitches Utility...Sewing Setting Up UTILITY STITCHES 45 STRAIGHT STITCHES 45 For reinforcement stretching on machine 19 Auto-threading device 20 Using the extra spool pin and the net ______21 START/STOP 22 "START/STOP" button 22 Foot controller 22 Mounting and Using the Knee Lifter ...
Users Manual - English
Page 6
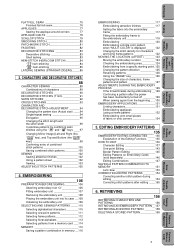
... MOVING THE LOCATION (LAYOUT) _______123 Moving the embroidery location _________124 Checking the embroidering area_________124 Embroidering from a specific starting point_125 Changing the pattern direction __________125 Reversing patterns 126 Using the "IMAGE" key 126 Changing the size of characters... momentarily turned off ________129 When sewing again from a memory card ___114 MEMORY 116 Saving a pattern combination in Machine) Sewing Chart Trouble shooting Error Maintenance Messages My Custom Stitch TM Retrieving Editing Embroidery Patterns Embroidering Characters and Decorative...
... MOVING THE LOCATION (LAYOUT) _______123 Moving the embroidery location _________124 Checking the embroidering area_________124 Embroidering from a specific starting point_125 Changing the pattern direction __________125 Reversing patterns 126 Using the "IMAGE" key 126 Changing the size of characters... momentarily turned off ________129 When sewing again from a memory card ___114 MEMORY 116 Saving a pattern combination in Machine) Sewing Chart Trouble shooting Error Maintenance Messages My Custom Stitch TM Retrieving Editing Embroidery Patterns Embroidering Characters and Decorative...
Users Manual - English
Page 14
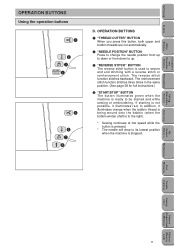
... Error Maintenance Messages Trouble shooting Sewing Chart Patterns (Programmed in the same position. (See page 38 for full instructions.) 4 "START/STOP" BUTTON The button illuminates green when the machine is used to be started and while sewing or embroidering. The reverse stitch function stitches backward. Setting Up Sewing Utility Stitches Characters and Decorative...
... Error Maintenance Messages Trouble shooting Sewing Chart Patterns (Programmed in the same position. (See page 38 for full instructions.) 4 "START/STOP" BUTTON The button illuminates green when the machine is used to be started and while sewing or embroidering. The reverse stitch function stitches backward. Setting Up Sewing Utility Stitches Characters and Decorative...
Users Manual - English
Page 15
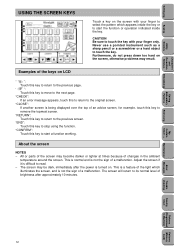
... this key to stop using the function. All or parts of the screen may become darker or lighter at times because of changes in Machine) Patterns (Memory Card) 12 "CLOSE": If another screen is being displayed over the top of an advice screen, for example, touch this...CONFIRM": Touch this key to the previous screen. CAUTION Be sure to touch the key with your finger only. The screen will return to start a function working. Setting Up Sewing Utility Stitches Characters and Decorative Stitches Embroidering Editing Embroidery Patterns USING THE SCREEN KEYS Touch a key on ...
... this key to stop using the function. All or parts of the screen may become darker or lighter at times because of changes in Machine) Patterns (Memory Card) 12 "CLOSE": If another screen is being displayed over the top of an advice screen, for example, touch this...CONFIRM": Touch this key to the previous screen. CAUTION Be sure to touch the key with your finger only. The screen will return to start a function working. Setting Up Sewing Utility Stitches Characters and Decorative Stitches Embroidering Editing Embroidery Patterns USING THE SCREEN KEYS Touch a key on ...
Users Manual - English
Page 16
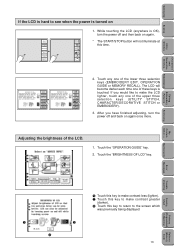
...Sewing Utility Stitches Characters and Decorative Stitches Embroidering If the LCD is hard to see when the power is turned on again. * The START/STOP button will become darker each time one of these keys is OK), turn the power off and then back on UTILITY STITCH CHARACTER ..., OPERATION GUIDE or MEMORY RECALL). Editing Embroidery Patterns Retrieving My Custom Stitch TM Error Maintenance Messages Trouble shooting Sewing Chart Patterns (Programmed in Machine) 1 Touch this key to make contrast less (lighter). 2 Touch this key to return to make the LCD lighter, touch any one of...
...Sewing Utility Stitches Characters and Decorative Stitches Embroidering If the LCD is hard to see when the power is turned on again. * The START/STOP button will become darker each time one of these keys is OK), turn the power off and then back on UTILITY STITCH CHARACTER ..., OPERATION GUIDE or MEMORY RECALL). Editing Embroidery Patterns Retrieving My Custom Stitch TM Error Maintenance Messages Trouble shooting Sewing Chart Patterns (Programmed in Machine) 1 Touch this key to make contrast less (lighter). 2 Touch this key to return to make the LCD lighter, touch any one of...
Users Manual - English
Page 20
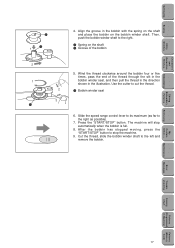
...(as far to stop automatically when the bobbin is full. 8. Press the "START/STOP" button. After the bobbin has stopped moving, press the "START/STOP" button to the right as possible). 7. The machine will stop the machine. 9. Cut the thread, slide the bobbin winder shaft to cut the thread... 2 Groove of the thread through the slit in the 1 bobbin winder seat, and then pull the thread in the direction shown in Machine) Patterns (Memory Card) 17 Setting Up Sewing Utility Stitches Characters and Decorative Stitches Embroidering 2 1 1 4. Wind the thread clockwise around ...
...(as far to stop automatically when the bobbin is full. 8. Press the "START/STOP" button. After the bobbin has stopped moving, press the "START/STOP" button to the right as possible). 7. The machine will stop the machine. 9. Cut the thread, slide the bobbin winder shaft to cut the thread... 2 Groove of the thread through the slit in the 1 bobbin winder seat, and then pull the thread in the direction shown in Machine) Patterns (Memory Card) 17 Setting Up Sewing Utility Stitches Characters and Decorative Stitches Embroidering 2 1 1 4. Wind the thread clockwise around ...
Users Manual - English
Page 23
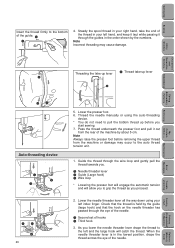
... Note Always raise the presser foot before you proceed. 2. Steady the spool thread in the lowest position, drape the thread across the eye of the machine by about 5 cm. Trouble shooting Sewing Chart Patterns (Programmed in the order shown by the guide (large hook) and that the hook on the ...Card) Lower the needle threader lever all the way down using the auto-threading device. * You do not need to grip the thread as you start sewing. 7. Lower the presser foot. 6. When the needle threader lever is held by the numbers. Pass the thread underneath the presser foot and pull...
... Note Always raise the presser foot before you proceed. 2. Steady the spool thread in the lowest position, drape the thread across the eye of the machine by about 5 cm. Trouble shooting Sewing Chart Patterns (Programmed in the order shown by the guide (large hook) and that the hook on the ...Card) Lower the needle threader lever all the way down using the auto-threading device. * You do not need to grip the thread as you start sewing. 7. Lower the presser foot. 6. When the needle threader lever is held by the numbers. Pass the thread underneath the presser foot and pull...
Users Manual - English
Page 25
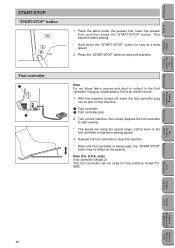
...Up Sewing Utility Stitches Characters and Decorative Stitches Embroidering START/STOP "START/STOP" button 1 Place the fabric under the presser foot, lower the presser foot, and then press the "START/STOP" button. Press the "START/STOP" button to stop this machine. * When the foot controller is the foot ... Patterns (Programmed in the foot controller. This machine starts sewing. * Hold down the "START/STOP" button to start sewing. * The speed set using the speed range control lever is being used for this machine. With this machine turned off, insert the foot controller plug into...
...Up Sewing Utility Stitches Characters and Decorative Stitches Embroidering START/STOP "START/STOP" button 1 Place the fabric under the presser foot, lower the presser foot, and then press the "START/STOP" button. Press the "START/STOP" button to stop this machine. * When the foot controller is the foot ... Patterns (Programmed in the foot controller. This machine starts sewing. * Hold down the "START/STOP" button to start sewing. * The speed set using the speed range control lever is being used for this machine. With this machine turned off, insert the foot controller plug into...
Users Manual - English
Page 29
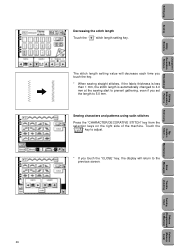
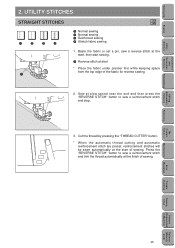
Retrieving My Custom Stitch TM Error Maintenance Messages Trouble shooting Sewing Chart Patterns (Programmed in Machine) Patterns (Memory Card) 26 Setting Up Sewing Utility Stitches Characters and Decorative Stitches Embroidering Editing Embroidery Patterns Decreasing the stitch length...sewing straight stitches, if the fabric thickness is less than 1 mm, the stitch length is automatically changed to 4.0 mm at the sewing start to prevent gathering, even if you set the length to the previous screen. Sewing characters and patterns using satin stitches Press the "CHARACTER/...
Retrieving My Custom Stitch TM Error Maintenance Messages Trouble shooting Sewing Chart Patterns (Programmed in Machine) Patterns (Memory Card) 26 Setting Up Sewing Utility Stitches Characters and Decorative Stitches Embroidering Editing Embroidery Patterns Decreasing the stitch length...sewing straight stitches, if the fabric thickness is less than 1 mm, the stitch length is automatically changed to 4.0 mm at the sewing start to prevent gathering, even if you set the length to the previous screen. Sewing characters and patterns using satin stitches Press the "CHARACTER/...
Users Manual - English
Page 40
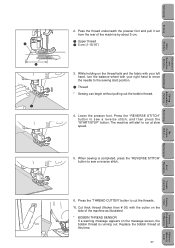
... 30) with your left hand, turn the balance wheel with the cutter on the side of the machine by about 5 cm. 1 Upper thread 2 5 cm (1-15/16") 3. Lower the presser foot. The machine will start position. 1 Thread * Sewing can begin without pulling out the bobbin thread. 3 5 4. Press ...the "THREAD CUTTER" button to the sewing start to run at this time. 37 Patterns (Memory Card) Setting Up Sewing Utility ...
... 30) with your left hand, turn the balance wheel with the cutter on the side of the machine by about 5 cm. 1 Upper thread 2 5 cm (1-15/16") 3. Lower the presser foot. The machine will start position. 1 Thread * Sewing can begin without pulling out the bobbin thread. 3 5 4. Press ...the "THREAD CUTTER" button to the sewing start to run at this time. 37 Patterns (Memory Card) Setting Up Sewing Utility ...
Users Manual - English
Page 41
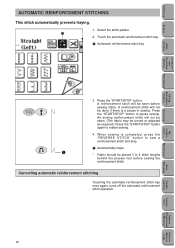
...be sewn. (The fabric may be sewn before sewing the reinforcement stitch. When sewing is a pause in Machine) Patterns (Memory Card) Press the "START/STOP" button. Setting Up Sewing AUTOMATIC REINFORCEMENT STITCHING This stitch automatically prevents fraying. 1. Select the stitch ...key Utility Stitches Characters and Decorative Stitches Embroidering Editing Embroidery Patterns Retrieving My Custom Stitch TM Error Maintenance Messages START STOP 3. Cancelling automatic reinforcement stitching Touching the automatic reinforcement stitch key once again, turns off the automatic...
...be sewn. (The fabric may be sewn before sewing the reinforcement stitch. When sewing is a pause in Machine) Patterns (Memory Card) Press the "START/STOP" button. Setting Up Sewing AUTOMATIC REINFORCEMENT STITCHING This stitch automatically prevents fraying. 1. Select the stitch ...key Utility Stitches Characters and Decorative Stitches Embroidering Editing Embroidery Patterns Retrieving My Custom Stitch TM Error Maintenance Messages START STOP 3. Cancelling automatic reinforcement stitching Touching the automatic reinforcement stitch key once again, turns off the automatic...
Users Manual - English
Page 42
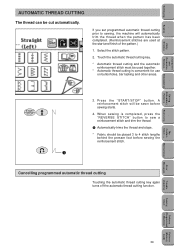
... Touch the automatic thread cutting key. * Automatic thread cutting and the automatic reinforcement stitch must be used at the start and finish of the pattern.) 1. Press the "START/STOP" button. If you set programmed automatic thread cutting prior to 4 stitch lengths behind the presser foot before sewing...to sew a reinforcement stitch and trim the thread. 1 Automatically trims the thread and stops. * Fabric should be placed 3 to sewing, the machine will be cut automatically. Retrieving My Custom Stitch TM Error Maintenance Messages Trouble shooting Sewing Chart Patterns (Programmed in...
... Touch the automatic thread cutting key. * Automatic thread cutting and the automatic reinforcement stitch must be used at the start and finish of the pattern.) 1. Press the "START/STOP" button. If you set programmed automatic thread cutting prior to 4 stitch lengths behind the presser foot before sewing...to sew a reinforcement stitch and trim the thread. 1 Automatically trims the thread and stops. * Fabric should be placed 3 to sewing, the machine will be cut automatically. Retrieving My Custom Stitch TM Error Maintenance Messages Trouble shooting Sewing Chart Patterns (Programmed in...
Users Manual - English
Page 46
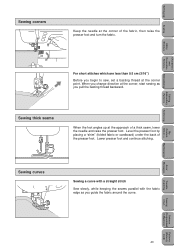
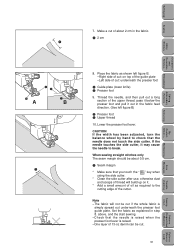
... foot. Lower presser foot and continue stitching. Retrieving My Custom Stitch TM Error Maintenance Messages Trouble shooting Sewing Chart Patterns (Programmed in Machine) Patterns (Memory Card) 43 Setting Up Sewing Utility Stitches Characters and Decorative Stitches Embroidering Editing Embroidery Patterns Sewing corners Keep the needle ... then raise the presser foot and turn the fabric. Sewing thick seams When the foot angles up at the corner, start sewing as you change direction at the approach of the presser foot. When you guide the fabric around the curve.
... foot. Lower presser foot and continue stitching. Retrieving My Custom Stitch TM Error Maintenance Messages Trouble shooting Sewing Chart Patterns (Programmed in Machine) Patterns (Memory Card) 43 Setting Up Sewing Utility Stitches Characters and Decorative Stitches Embroidering Editing Embroidery Patterns Sewing corners Keep the needle ... then raise the presser foot and turn the fabric. Sewing thick seams When the foot angles up at the corner, start sewing as you change direction at the approach of the presser foot. When you guide the fabric around the curve.
Users Manual - English
Page 47
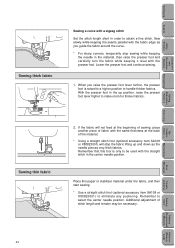
...X80823001) will not feed at the back of stitch length and tension may be used with a zigzag stitch Set the stitch length short in Machine) Patterns (Memory Card) 44 Sew slowly while keeping the seams parallel with the fabric edge as the needle pierces very thick fabrics. If the...lifting up position, raise the presser foot lever higher to obtain a fine stitch. Place thin paper or stabilizer material under the fabric, and then start sewing. * Use a straight stitch foot (optional accessory item SA108 or X80823001) to select the center needle position. Lower the presser foot and continue...
...X80823001) will not feed at the back of stitch length and tension may be used with a zigzag stitch Set the stitch length short in Machine) Patterns (Memory Card) 44 Sew slowly while keeping the seams parallel with the fabric edge as the needle pierces very thick fabrics. If the...lifting up position, raise the presser foot lever higher to obtain a fine stitch. Place thin paper or stabilizer material under the fabric, and then start sewing. * Use a straight stitch foot (optional accessory item SA108 or X80823001) to select the center needle position. Lower the presser foot and continue...
Users Manual - English
Page 48
... automatically at the finish of sewing. Baste the fabric or set a pin, sew a reverse stitch at the start, then start sewing. 1 Reverse stitch at the start * Place the fabric under presser foot while keeping space from the top edge of sewing. Setting Up Sewing Utility... pressing the "THREAD CUTTER" button. * When the automatic thread cutting and automatic reinforcement stitch are preset, reinforcement stitches will be sewn automatically at start of the fabric for reverse sewing. 3 5 2. Press the "REVERSE STITCH" button to sew a reinforcement stitch and stop. 3. Editing Embroidery...
... automatically at the finish of sewing. Baste the fabric or set a pin, sew a reverse stitch at the start, then start sewing. 1 Reverse stitch at the start * Place the fabric under presser foot while keeping space from the top edge of sewing. Setting Up Sewing Utility... pressing the "THREAD CUTTER" button. * When the automatic thread cutting and automatic reinforcement stitch are preset, reinforcement stitches will be sewn automatically at start of the fabric for reverse sewing. 3 5 2. Press the "REVERSE STITCH" button to sew a reinforcement stitch and stop. 3. Editing Embroidery...

Users Manual - English
Page 52
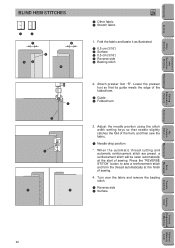
...result. Editing Embroidery Patterns Retrieving My Custom Stitch TM Error Maintenance Messages Trouble shooting Sewing Chart Patterns (Programmed in Machine) Patterns (Memory Card) 49 When using , or stitches Sew the fabric while placing fabric edge against the guide...foot "G". 1 Guide * When the automatic thread cutting and automatic reinforcement stitch are preset, a reinforcement stitch will be sewn automatically at the start of sewing. Setting Up Sewing Utility Stitches Characters and Decorative Stitches Embroidering OVERCASTING 1 2 3 4 5 6 G J 1 Thin and ...
...result. Editing Embroidery Patterns Retrieving My Custom Stitch TM Error Maintenance Messages Trouble shooting Sewing Chart Patterns (Programmed in Machine) Patterns (Memory Card) 49 When using , or stitches Sew the fabric while placing fabric edge against the guide...foot "G". 1 Guide * When the automatic thread cutting and automatic reinforcement stitch are preset, a reinforcement stitch will be sewn automatically at the start of sewing. Setting Up Sewing Utility Stitches Characters and Decorative Stitches Embroidering OVERCASTING 1 2 3 4 5 6 G J 1 Thin and ...
Users Manual - English
Page 54
...break. Set the fabric as shown left figure B. -Right side of the cutter. Lower the presser foot lever. above, and the start sewing. -Check that the needle does not touch the side cutter. If the needle touches the side cutter, it may cause the... and Decorative Stitches Embroidering Editing Embroidery Patterns Retrieving My Custom Stitch TM Error Maintenance Messages 5 1 3 2 A B 3 5 1 8. Place the fabric as explained in Machine) Patterns (Memory Card) CAUTION If the width has been adjusted, turn the balance wheel by hand to check that the needle is raised when the...
...break. Set the fabric as shown left figure B. -Right side of the cutter. Lower the presser foot lever. above, and the start sewing. -Check that the needle does not touch the side cutter. If the needle touches the side cutter, it may cause the... and Decorative Stitches Embroidering Editing Embroidery Patterns Retrieving My Custom Stitch TM Error Maintenance Messages 5 1 3 2 A B 3 5 1 8. Place the fabric as explained in Machine) Patterns (Memory Card) CAUTION If the width has been adjusted, turn the balance wheel by hand to check that the needle is raised when the...
Users Manual - English
Page 55
... slightly catches the fold of sewing. Press the "REVERSE STITCH" button to sew a reinforcement stitch and trim the thread automatically at the start of the hem, and then sew the fabric. R 1 Needle drop position * When the automatic thread cutting and automatic reinforcement stitch are...the basting stitch. 1 Reverse side 2 Surface Retrieving My Custom Stitch TM Error Maintenance Messages Trouble shooting Sewing Chart Patterns (Programmed in Machine) Patterns (Memory Card) 52 Adjust the needle position using the stitch width setting keys so that its guide meets the edge of ...
... slightly catches the fold of sewing. Press the "REVERSE STITCH" button to sew a reinforcement stitch and trim the thread automatically at the start of the hem, and then sew the fabric. R 1 Needle drop position * When the automatic thread cutting and automatic reinforcement stitch are...the basting stitch. 1 Reverse side 2 Surface Retrieving My Custom Stitch TM Error Maintenance Messages Trouble shooting Sewing Chart Patterns (Programmed in Machine) Patterns (Memory Card) 52 Adjust the needle position using the stitch width setting keys so that its guide meets the edge of ...
Users Manual - English
Page 109
... keep the embroidery unit and the memory card in designated cases. (6) Do not carry the machine while the embroidery unit is connected. (7) Always set your machine on a level surface. * The sewing speed is accidentally pressed, the machine will start operating, which could result in places where ironing is difficult, place the stabilizer fabric underneath...
... keep the embroidery unit and the memory card in designated cases. (6) Do not carry the machine while the embroidery unit is connected. (7) Always set your machine on a level surface. * The sewing speed is accidentally pressed, the machine will start operating, which could result in places where ironing is difficult, place the stabilizer fabric underneath...


