

Accessory Catalog
Page 34
... as a useful and decorative wooden thread rack that can stand on your instruction manual for advice on the top surface of 30 cotton-wrapped polyester embroidery thread spools..., 1500D, 1200 series, PC and ULT series machines and the PE-400D and Innov-is ideal for our embroidery only machines, PE750D and PE700II. Consult your sewing counter or can illustrate more...especially designed for Brother sewing and embroidering machines. 61 Color Thread Set with Wooden Rack ETKSP999 PacesetterTM Polyester Threads (61 Color Thread Set with other sewing and embroidery machine brands. Pacesetter ...
... as a useful and decorative wooden thread rack that can stand on your instruction manual for advice on the top surface of 30 cotton-wrapped polyester embroidery thread spools..., 1500D, 1200 series, PC and ULT series machines and the PE-400D and Innov-is ideal for our embroidery only machines, PE750D and PE700II. Consult your sewing counter or can illustrate more...especially designed for Brother sewing and embroidering machines. 61 Color Thread Set with Wooden Rack ETKSP999 PacesetterTM Polyester Threads (61 Color Thread Set with other sewing and embroidery machine brands. Pacesetter ...

Users Manual - English
Page 1
ouuu SEWING MACHINE --410- • r. (o0 ' ' `.r 3NFT I r • .4,e r • • 14. • -,3, .? 3 J Airi, OPERATION MANUAL brother®
ouuu SEWING MACHINE --410- • r. (o0 ' ' `.r 3NFT I r • .4,e r • • 14. • -,3, .? 3 J Airi, OPERATION MANUAL brother®

Users Manual - English
Page 2
... after using ." Use this sewing machine only for examination, repair, electrical or mechanical adjustment. 4. Never operate this manual. Return the sewing machine to the nearest authorized dealer or service center for its intended use as described in this sewing machine if it has a damaged cord...being administered. 8. "SAVE THESE INSTRUCTIONS" "This sewing machine is used or where oxygen is not working properly, if it to break. 12. Do not allow this manual. 3. Never drop or insert any opening. 6. Always unplug the sewing machine from outlet. 9. To reduce the risk of ...
... after using ." Use this sewing machine only for examination, repair, electrical or mechanical adjustment. 4. Never operate this manual. Return the sewing machine to the nearest authorized dealer or service center for its intended use as described in this sewing machine if it has a damaged cord...being administered. 8. "SAVE THESE INSTRUCTIONS" "This sewing machine is used or where oxygen is not working properly, if it to break. 12. Do not allow this manual. 3. Never drop or insert any opening. 6. Always unplug the sewing machine from outlet. 9. To reduce the risk of ...

Users Manual - English
Page 4
... is required, first follow the troubleshooting table in the back of the operation manual to assure correct installation. CONGRATULATIONS ON CHOOSING A BROTHER COMPUTER SEWING MACHINE Your machine is the most advanced computerized home use extension cords. ff PLEASE READ BEFORE USING YOUR SEWING MACHINE For safe operation 1. For a longer service life 1. Do not touch the pulley, thread...
... is required, first follow the troubleshooting table in the back of the operation manual to assure correct installation. CONGRATULATIONS ON CHOOSING A BROTHER COMPUTER SEWING MACHINE Your machine is the most advanced computerized home use extension cords. ff PLEASE READ BEFORE USING YOUR SEWING MACHINE For safe operation 1. For a longer service life 1. Do not touch the pulley, thread...

Users Manual - English
Page 19
... the bobbin winder shaft to cut the thread. 2 • Bobbin winder seat 3 6. Slide the speed range control lever to its maximum (as far to sew or manually turning the balance wheel. 16 Place the bobbin on the shaft. )if 2 5. Use the cutter to the left and remove the bobbin. Push the bobbin... arrows. . 4. Pass the thread through the slit in the bobbin winder seat, and then pull the thread in the direction shown in the illustration. The machine will stop the...
... the bobbin winder shaft to cut the thread. 2 • Bobbin winder seat 3 6. Slide the speed range control lever to its maximum (as far to sew or manually turning the balance wheel. 16 Place the bobbin on the shaft. )if 2 5. Use the cutter to the left and remove the bobbin. Push the bobbin... arrows. . 4. Pass the thread through the slit in the bobbin winder seat, and then pull the thread in the direction shown in the illustration. The machine will stop the...
Users Manual - English
Page 21
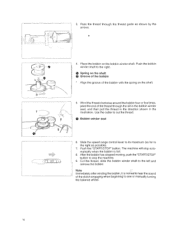
3. Wind the thread clockwise around the bobbin four or five times, pass the end of the clutch engaging when beginning to sew or manually turning the balance wheel. 16 Use the cutter to stop automatically when the bobbin is normal to the right as possible). 7. Push ...the "START/STOP" button. After the bobbin has stopped moving, push the "START/STOP" button to cut the thread. 2 O Bobbin winder seat 3 6. The machine will stop the machine...
3. Wind the thread clockwise around the bobbin four or five times, pass the end of the clutch engaging when beginning to sew or manually turning the balance wheel. 16 Use the cutter to stop automatically when the bobbin is normal to the right as possible). 7. Push ...the "START/STOP" button. After the bobbin has stopped moving, push the "START/STOP" button to cut the thread. 2 O Bobbin winder seat 3 6. The machine will stop the machine...

Users Manual - English
Page 22
... the presser foot lever. (If the presser foot is not raised, the upper thread cannot be sure that a presser foot mentioned in this sewing machine is equipped with an upper threading shutter which prevents upper threading or needle threading while the presser foot is installed. --- - )Emat I 6... I f11111 3. UPPER THREADING Note When threading the sewing machine, be threaded.) Note In order to raise the needle. Push the NEEDLE POSITION" button to ensure that the upper threading is done correctly, ...
... the presser foot lever. (If the presser foot is not raised, the upper thread cannot be sure that a presser foot mentioned in this sewing machine is equipped with an upper threading shutter which prevents upper threading or needle threading while the presser foot is installed. --- - )Emat I 6... I f11111 3. UPPER THREADING Note When threading the sewing machine, be threaded.) Note In order to raise the needle. Push the NEEDLE POSITION" button to ensure that the upper threading is done correctly, ...

Users Manual - English
Page 34
...on the information in this key to find out how to the main screen. 30 Touch -END" to return to replace the needle. O Touch this manual. Touch "BOBBIN SETTING". After threading through !zit- cll.:A.0e. foor warrdd. 3. Touch "NEXT" to replace the presser foot. O Touch this ...2. Pressing "OPERATION GUIDE" shows basic operating procedures such as bobbin winding and upper threading on the display allowing you quickly and easily operate the sewing machine. Push -OPERATION GUIDE". O Touch this key to find out how to thread the upper thread. O Touch this key to find out how ...
...on the information in this key to find out how to the main screen. 30 Touch -END" to return to replace the needle. O Touch this manual. Touch "BOBBIN SETTING". After threading through !zit- cll.:A.0e. foor warrdd. 3. Touch "NEXT" to replace the presser foot. O Touch this ...2. Pressing "OPERATION GUIDE" shows basic operating procedures such as bobbin winding and upper threading on the display allowing you quickly and easily operate the sewing machine. Push -OPERATION GUIDE". O Touch this key to find out how to thread the upper thread. O Touch this key to find out how ...


