

Accessory Catalog
Page 13
...The ruffling blade on lightweight fabric. A specially designed bobbin cover is also included with evenly spaced tucks and gathers. Sew slowly for details.) Brother Embellishment Feet Pin Tuck Foot 24 Ruffler Foot Pin Tuck Foot This presser foot has 7 grooves and produces perfect pin tucks and corded pin...guide your first row of stitching and use that to sew the first row in one of stitch length, tuck setting and depth setting. 2. Brother Embellishment Feet 23 Bed Runner & Pillowcase Innov-is Project Book (See pages 16 and 17 for most consistent results. Move fabric about 1" ...
...The ruffling blade on lightweight fabric. A specially designed bobbin cover is also included with evenly spaced tucks and gathers. Sew slowly for details.) Brother Embellishment Feet Pin Tuck Foot 24 Ruffler Foot Pin Tuck Foot This presser foot has 7 grooves and produces perfect pin tucks and corded pin...guide your first row of stitching and use that to sew the first row in one of stitch length, tuck setting and depth setting. 2. Brother Embellishment Feet 23 Bed Runner & Pillowcase Innov-is Project Book (See pages 16 and 17 for most consistent results. Move fabric about 1" ...

Accessory Catalog
Page 34
...Pack) Attention all embroiderers, Quilters and Heirloom stitchers! Dependable thread delivery through machine tensions. Consult your fabric properly with a stabilizer. All 61 exclusive Brother palette colors are also available at selected Dealers. MT986, MT987, MT988, MT989, MT990, MT991, MT992, MT993, MT994, MT995, MT996, MT997,... polyester mini king embroidery thread (1100 yds) is designed to hoop your instruction manual for the Quattro™ 6000D, Duetta™ 4500D/Innov-is 4000D, 2500D, 1500D, 1200 series, PC and ULT series machines and the PE-400D and Innov-is best suited for ...
...Pack) Attention all embroiderers, Quilters and Heirloom stitchers! Dependable thread delivery through machine tensions. Consult your fabric properly with a stabilizer. All 61 exclusive Brother palette colors are also available at selected Dealers. MT986, MT987, MT988, MT989, MT990, MT991, MT992, MT993, MT994, MT995, MT996, MT997,... polyester mini king embroidery thread (1100 yds) is designed to hoop your instruction manual for the Quattro™ 6000D, Duetta™ 4500D/Innov-is 4000D, 2500D, 1500D, 1200 series, PC and ULT series machines and the PE-400D and Innov-is best suited for ...
Users Manual - English
Page 1
® SEWING MACHINE OPERATION MANUAL
® SEWING MACHINE OPERATION MANUAL

Users Manual - English
Page 2
The sewing machine should be supervised to the nearest authorized dealer or service center for household use as a toy. Use this manual. To disconnect, turn the main switch to be used as described in this sewing machine if it has a damaged cord or ...with any opening. 6. Close attention is necessary when the sewing machine is intended for examination, repair, electrical or mechanical adjustment. 4. Never operate this manual. 3. Do not use the proper needle plate. WARNING - Do not pull or push fabric while stitching. Never operate the sewing machine with same ...
The sewing machine should be supervised to the nearest authorized dealer or service center for household use as a toy. Use this manual. To disconnect, turn the main switch to be used as described in this sewing machine if it has a damaged cord or ...with any opening. 6. Close attention is necessary when the sewing machine is intended for examination, repair, electrical or mechanical adjustment. 4. Never operate this manual. 3. Do not use the proper needle plate. WARNING - Do not pull or push fabric while stitching. Never operate the sewing machine with same ...
Users Manual - English
Page 4
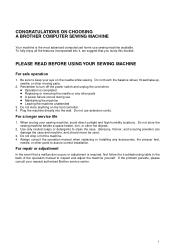
... study this booklet. If the problem persists, please consult your eye on the foot controller. 4. Be sure to keep your nearest authorized Brother service center. 1 Do not store anything on the needle while sewing. Do not store the sewing machine beside a space heater, iron,... or other parts to assure correct installation. CONGRATULATIONS ON CHOOSING A BROTHER COMPUTER SEWING MACHINE Your machine is required, first follow the troubleshooting table in the back of the operation manual to inspect and adjust the machine yourself. To fully enjoy all the features incorporated ...
... study this booklet. If the problem persists, please consult your eye on the foot controller. 4. Be sure to keep your nearest authorized Brother service center. 1 Do not store anything on the needle while sewing. Do not store the sewing machine beside a space heater, iron,... or other parts to assure correct installation. CONGRATULATIONS ON CHOOSING A BROTHER COMPUTER SEWING MACHINE Your machine is required, first follow the troubleshooting table in the back of the operation manual to inspect and adjust the machine yourself. To fully enjoy all the features incorporated ...
Users Manual - English
Page 13
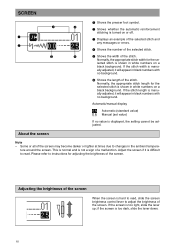
... on a black background. If the stitch width is not a sign of the stitch. If the stitch length is manually adjusted, it will appear in the ambient tempera- Automatic/manual display Automatic (standard value) Manual (set value) If no background. This is normal and is manu- ally adjusted, it is shown in black numbers...
... on a black background. If the stitch width is not a sign of the stitch. If the stitch length is manually adjusted, it will appear in the ambient tempera- Automatic/manual display Automatic (standard value) Manual (set value) If no background. This is normal and is manu- ally adjusted, it is shown in black numbers...
Users Manual - English
Page 17
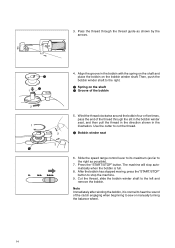
... the "START/STOP" button to stop automatically when the bobbin is normal to hear the sound of the clutch engaging when beginning to sew or manually turning the balance wheel. 14 Then, push the bobbin winder shaft to cut the thread. 1 Bobbin winder seat 6. Use the cutter to the right. 1 Spring...
... the "START/STOP" button to stop automatically when the bobbin is normal to hear the sound of the clutch engaging when beginning to sew or manually turning the balance wheel. 14 Then, push the bobbin winder shaft to cut the thread. 1 Bobbin winder seat 6. Use the cutter to the right. 1 Spring...
Users Manual - English
Page 19
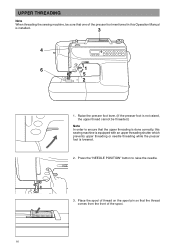
... or needle threading while the presser foot is installed. 3 4 6 1 5 2 1. Press the "NEEDLE POSITION" button to ensure that the upper threading is done correctly, this Operation Manual is lowered. 2. UPPER THREADING Note When threading the sewing machine, be threaded.) Note In order to raise the needle. 3. Place the spool of thread on...
... or needle threading while the presser foot is installed. 3 4 6 1 5 2 1. Press the "NEEDLE POSITION" button to ensure that the upper threading is done correctly, this Operation Manual is lowered. 2. UPPER THREADING Note When threading the sewing machine, be threaded.) Note In order to raise the needle. 3. Place the spool of thread on...

Users Manual - English
Page 24
... stitch 11 12 13 14 15 Buttonhole 16 Stitch width [mm (in.)] Stitch length [mm (in.)] Auto Manual Auto Manual - - 2.5 0.2-5.0 (3/32) (1/128-13/64) [0.0 0.0-7.0 2.5 0.2-5.0 (0.0)] (0-9/32) (3/32) (1/128...) (1/64) (1/128-3/64) 6.0 3.0-6.0 1.0 0.5-2.0 (1/4) (1/8-1/4) (3/64) (1/64-5/64) 6.0 3.0-6.0 1.5 1.0-3.0 (1/4) (1/8-1/4) (1/16) (3/64-1/8) Stitch width [mm (in.)] Stitch length [mm (in.)] Auto Manual Auto Manual 7.0 2.5-7.0 2.0 0.4-2.5 (9/32) (3/32-9/32) (5/64) (1/64-3/32) 2.0 1.0-3.0 0.4 0.3-1.0 (5/64) (3/64-1/8) (1/64) (1/64-3/64) 7.0 7.0, 6.0, 5.0 7.0 7.0, 6.0, 5.0 (9/32) (9/32-...
... stitch 11 12 13 14 15 Buttonhole 16 Stitch width [mm (in.)] Stitch length [mm (in.)] Auto Manual Auto Manual - - 2.5 0.2-5.0 (3/32) (1/128-13/64) [0.0 0.0-7.0 2.5 0.2-5.0 (0.0)] (0-9/32) (3/32) (1/128...) (1/64) (1/128-3/64) 6.0 3.0-6.0 1.0 0.5-2.0 (1/4) (1/8-1/4) (3/64) (1/64-5/64) 6.0 3.0-6.0 1.5 1.0-3.0 (1/4) (1/8-1/4) (1/16) (3/64-1/8) Stitch width [mm (in.)] Stitch length [mm (in.)] Auto Manual Auto Manual 7.0 2.5-7.0 2.0 0.4-2.5 (9/32) (3/32-9/32) (5/64) (1/64-3/32) 2.0 1.0-3.0 0.4 0.3-1.0 (5/64) (3/64-1/8) (1/64) (1/64-3/64) 7.0 7.0, 6.0, 5.0 7.0 7.0, 6.0, 5.0 (9/32) (9/32-...

Users Manual - English
Page 75
Pull out several threads from one edge of the frayed part. 4. Attach presser foot "N". In decorative stitch mode, enter "49" to manual, check that the needle will not touch the presser foot before starting sewing. 1. With the back side of the fabric continuing to face you use ...
Pull out several threads from one edge of the frayed part. 4. Attach presser foot "N". In decorative stitch mode, enter "49" to manual, check that the needle will not touch the presser foot before starting sewing. 1. With the back side of the fabric continuing to face you use ...
Users Manual - English
Page 77
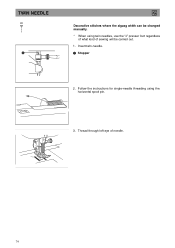
Follow the instructions for single-needle threading using twin needles, use the "J" presser foot regardless of what kind of needle. 5 6 74 TWIN NEEDLE 00 1 J Decorative stitches where the zigzag width can be changed manually. * When using the horizontal spool pin. 3. Thread through left eye of sewing will be carried out. 1. Insert twin-needle. 1 Stopper 2.
Follow the instructions for single-needle threading using twin needles, use the "J" presser foot regardless of what kind of needle. 5 6 74 TWIN NEEDLE 00 1 J Decorative stitches where the zigzag width can be changed manually. * When using the horizontal spool pin. 3. Thread through left eye of sewing will be carried out. 1. Insert twin-needle. 1 Stopper 2.


