Quick Setup Guide - English
Page 51
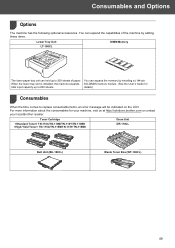
Toner Cartridge TN-110C/TN-110M/TN-110Y/TN-110BK TN-115C/TN-115M/TN-115Y/TN-115BK Drum Unit DR-110CL Belt Unit (BU-100CL) Waste Toner Box (WT-100CL) 49 You can expand the memory by adding these items. Lower Tray Unit ... SO-DIMM) memory module. (See the User's Guide for your machine, visit us at http://solutions.brother.com or contact your local Brother reseller. For more information about the consumables for total input capacity up to replace consumable items, an error message will be indicated on the LCD. details.) Consumables 2 When the time...
Toner Cartridge TN-110C/TN-110M/TN-110Y/TN-110BK TN-115C/TN-115M/TN-115Y/TN-115BK Drum Unit DR-110CL Belt Unit (BU-100CL) Waste Toner Box (WT-100CL) 49 You can expand the memory by adding these items. Lower Tray Unit ... SO-DIMM) memory module. (See the User's Guide for your machine, visit us at http://solutions.brother.com or contact your local Brother reseller. For more information about the consumables for total input capacity up to replace consumable items, an error message will be indicated on the LCD. details.) Consumables 2 When the time...
Users Manual - English
Page 9
...MFC/Fax machine to the Laser Printer/MFC/Fax machine and will void the warranty. BROTHER LASER PRINTER / MULTIFUNCTION CENTER®/ FAX ON-SITE WARRANTY (Canada only) For a limited on-site warranty of 1 year labour and parts from the date of purchase, Brother International Corporation (Canada) Ltd. ("Brother...the use of or inability to Province. This limited Warranty does not include cleaning, consumables (including, without limitation, toner cartridges and drum units, OPC belts, fixing units, print heads, paper feed rollers, transfer rolls, cleaning rollers, waste toner packs, oil bottles...
...MFC/Fax machine to the Laser Printer/MFC/Fax machine and will void the warranty. BROTHER LASER PRINTER / MULTIFUNCTION CENTER®/ FAX ON-SITE WARRANTY (Canada only) For a limited on-site warranty of 1 year labour and parts from the date of purchase, Brother International Corporation (Canada) Ltd. ("Brother...the use of or inability to Province. This limited Warranty does not include cleaning, consumables (including, without limitation, toner cartridges and drum units, OPC belts, fixing units, print heads, paper feed rollers, transfer rolls, cleaning rollers, waste toner packs, oil bottles...
Users Manual - English
Page 15
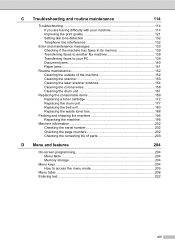
... Cleaning the scanner 153 Cleaning the laser scanner windows 154 Cleaning the corona wires 158 Cleaning the drum unit 161 Replacing the consumable items 169 Replacing a toner cartridge 172 Replacing the drum unit 177 Replacing the belt unit 183 Replacing the waste toner box 188 Packing and shipping the machine 194 Repacking the machine 195 Machine information...
... Cleaning the scanner 153 Cleaning the laser scanner windows 154 Cleaning the corona wires 158 Cleaning the drum unit 161 Replacing the consumable items 169 Replacing a toner cartridge 172 Replacing the drum unit 177 Replacing the belt unit 183 Replacing the waste toner box 188 Packing and shipping the machine 194 Repacking the machine 195 Machine information...
Users Manual - English
Page 132
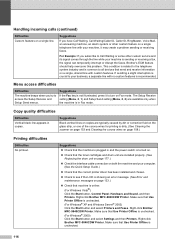
...drum unit are installed properly. (See Replacing the drum unit on page 177.) „ Check the interface cable connection on both the machine and your machine is sending or receiving a fax, the signal can temporarily interrupt or disrupt the faxes. Right-click Brother MFC-9840CDW Printer. Right-click Brother MFC-9840CDW... Black vertical lines on a single line. Suggestions „ Check that the machine is plugged in copies. Right-click Brother MFC-9840CDW Printer. Handling incoming calls (continued) Difficulties Custom features on copies are available only when the machine is in Fax mode...
...drum unit are installed properly. (See Replacing the drum unit on page 177.) „ Check the interface cable connection on both the machine and your machine is sending or receiving a fax, the signal can temporarily interrupt or disrupt the faxes. Right-click Brother MFC-9840CDW Printer. Right-click Brother MFC-9840CDW... Black vertical lines on a single line. Suggestions „ Check that the machine is plugged in copies. Right-click Brother MFC-9840CDW Printer. Handling incoming calls (continued) Difficulties Custom features on copies are available only when the machine is in Fax mode...
Users Manual - English
Page 137
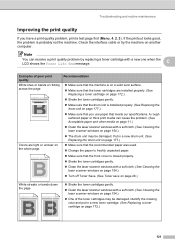
... abcdefghijklmnopqrstuvwxyz. ABCDEFGHIJKLMNOPQRSTUVWXYZ. 0123456789. Recommendation „ Make sure that the machine is installed properly. (See Replacing the drum unit on the whole page. ABCDEFGHIJKLMNOPQRSTUVWXYZ. 0123456789. ABCDEFGHIJKLMNOPQRSTUVWXYZ. 0123456789. abcdefghijklmnopqrstuvwxyz. ABCDEFGHIJKLMNOPQRSTUVWXYZ. 0123456789. Check the.... 0123456789. abcdefghijklmnopqrstuvwxyz. ABCDEFGHIJKLMNOPQRSTUVWXYZ. 0123456789. Identify the missing color and put in a new drum unit. (See Replacing the drum unit on page 177.) „ Make sure that the recommended paper was used. &#...
... abcdefghijklmnopqrstuvwxyz. ABCDEFGHIJKLMNOPQRSTUVWXYZ. 0123456789. Recommendation „ Make sure that the machine is installed properly. (See Replacing the drum unit on the whole page. ABCDEFGHIJKLMNOPQRSTUVWXYZ. 0123456789. ABCDEFGHIJKLMNOPQRSTUVWXYZ. 0123456789. abcdefghijklmnopqrstuvwxyz. ABCDEFGHIJKLMNOPQRSTUVWXYZ. 0123456789. Check the.... 0123456789. abcdefghijklmnopqrstuvwxyz. ABCDEFGHIJKLMNOPQRSTUVWXYZ. 0123456789. Identify the missing color and put in a new drum unit. (See Replacing the drum unit on page 177.) „ Make sure that the recommended paper was used. &#...
Users Manual - English
Page 138
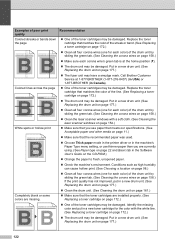
...abcdefghijklmnopqrstuvwxyz. ABCDEFGHIJKLMNOPQRSTUVWXYZ. 0123456789. Call Brother Customer Service at the home position (b). „ The drum unit may be damaged. Identify the missing color and put in a new drum unit. (See Replacing the drum unit on page 177.) „ Clean the drum unit. (See Cleaning the drum unit on page 161.) &#...Clean all four corona wires (one for each corona wire's green tab is at 1-877-BROTHER (1-877-276-8437) (in USA) or 1-877-BROTHER (in a new drum unit. (See Replacing the drum unit on page 172.) „ One of poor print quality Colored streaks or bands ...
...abcdefghijklmnopqrstuvwxyz. ABCDEFGHIJKLMNOPQRSTUVWXYZ. 0123456789. Call Brother Customer Service at the home position (b). „ The drum unit may be damaged. Identify the missing color and put in a new drum unit. (See Replacing the drum unit on page 177.) „ Clean the drum unit. (See Cleaning the drum unit on page 161.) &#...Clean all four corona wires (one for each corona wire's green tab is at 1-877-BROTHER (1-877-276-8437) (in USA) or 1-877-BROTHER (in a new drum unit. (See Replacing the drum unit on page 172.) „ One of poor print quality Colored streaks or bands ...
Users Manual - English
Page 139
...blank, white sheet of poor print quality Recommendation Colored spots at 2.95 in. (75 mm) 75 mm / 2.95 in a new drum unit. (See Replacing the drum unit on page 177.) „ Make sure that you use paper that meets our specifications. (See Acceptable paper and other media on... page 11.) 123 abcdefghijklmnopqrstuvwxyz. abcdefghijklmnopqrstuvwxyz. d If the print quality still has not improved you need to install a new drum. (See Replacing the drum unit on page 98.) „ Make sure that you use paper that meets our specifications. Conditions such as high humidity and ...
...blank, white sheet of poor print quality Recommendation Colored spots at 2.95 in. (75 mm) 75 mm / 2.95 in a new drum unit. (See Replacing the drum unit on page 177.) „ Make sure that you use paper that meets our specifications. (See Acceptable paper and other media on... page 11.) 123 abcdefghijklmnopqrstuvwxyz. abcdefghijklmnopqrstuvwxyz. d If the print quality still has not improved you need to install a new drum. (See Replacing the drum unit on page 98.) „ Make sure that you use paper that meets our specifications. Conditions such as high humidity and ...

Users Manual - English
Page 140
... you use paper that meets our specifications. (See Acceptable paper and other media on page 11 and Basic tab in a new drum unit. (See Replacing the drum unit on page 177.) „ The drum unit may be damaged. Colors the machine can print and colors you see on a monitor are not empty. (See Toner... may not be able to reproduce the colors on your printouts are not what you expected. Put in a new drum unit. (See Replacing the drum unit on the CD-ROM.) „ Adjust the color by using the custom setting in the printer driver. Press Menu, 4, 6. (See Software User's Guide on ...
... you use paper that meets our specifications. (See Acceptable paper and other media on page 11 and Basic tab in a new drum unit. (See Replacing the drum unit on page 177.) „ The drum unit may be damaged. Colors the machine can print and colors you see on a monitor are not empty. (See Toner... may not be able to reproduce the colors on your printouts are not what you expected. Put in a new drum unit. (See Replacing the drum unit on the CD-ROM.) „ Adjust the color by using the custom setting in the printer driver. Press Menu, 4, 6. (See Software User's Guide on ...
Users Manual - English
Page 141
... be damaged. abcdefghijklmnopqrstuvwxyz. ABCDEFGHIJKLMNOPQRSTUVWXYZ. 0123456789. ABCDEFGHIJKLMNOPQRSTUVWXYZ. 0123456789. abcdefghijklmnopqrstuvwxyz. Recommendation „ Make sure that the drum unit is installed properly. (See Replacing the drum unit on page 177.) „ Make sure that the belt unit is installed properly. (See Replacing the belt unit on page 183.) „ Make sure that the waste toner box is...
... be damaged. abcdefghijklmnopqrstuvwxyz. ABCDEFGHIJKLMNOPQRSTUVWXYZ. 0123456789. ABCDEFGHIJKLMNOPQRSTUVWXYZ. 0123456789. abcdefghijklmnopqrstuvwxyz. Recommendation „ Make sure that the drum unit is installed properly. (See Replacing the drum unit on page 177.) „ Make sure that the belt unit is installed properly. (See Replacing the belt unit on page 183.) „ Make sure that the waste toner box is...
Users Manual - English
Page 142
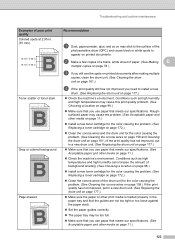
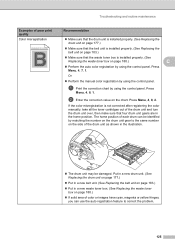
.... (See Recommended paper on page 177.) „ If you are installed properly. (See Replacing a toner cartridge on page 172.) „ The drum unit may be damaged. ABCDEFGHIJKLMNOPQRSTUVWXYZ. 0123456789. ABCDEFGHIJKLMNOPQRSTUVWXYZ. 0123456789. abcdefghijklmnopqrstuvwxyz. ABCDEFGHIJKLMNOPQRSTUVWXYZ. 0123456789. abcdefghijklmnopqrstuvwxyz. Insufficient...a new drum unit. (See Replacing the drum unit on page 177.) „ Make sure that the fuser unit is installed properly. (See Replacing the drum unit on page 172.) „ The drum unit may be damaged. Call Brother Customer Service...
.... (See Recommended paper on page 177.) „ If you are installed properly. (See Replacing a toner cartridge on page 172.) „ The drum unit may be damaged. ABCDEFGHIJKLMNOPQRSTUVWXYZ. 0123456789. ABCDEFGHIJKLMNOPQRSTUVWXYZ. 0123456789. abcdefghijklmnopqrstuvwxyz. ABCDEFGHIJKLMNOPQRSTUVWXYZ. 0123456789. abcdefghijklmnopqrstuvwxyz. Insufficient...a new drum unit. (See Replacing the drum unit on page 177.) „ Make sure that the fuser unit is installed properly. (See Replacing the drum unit on page 172.) „ The drum unit may be damaged. Call Brother Customer Service...
Users Manual - English
Page 143
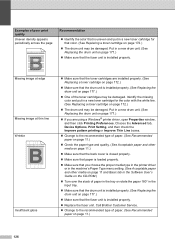
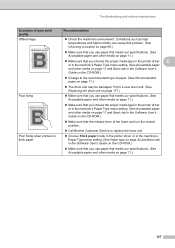
.... ABCDEFGHIJKLMNOPQRSTUVWXYZ. 0123456789. Poor fixing ABCDEFGHIJKLMNOPQRSTUVWXYZ. 0123456789. abcdefghijklmnopqrstuvwxyz. ABCDEFGHIJKLMNOPQRSTUVWXYZ. 0123456789. ABCDEFGHIJKLMNOPQRSTUVWXYZ. 0123456789. Put in a new drum unit. (See Replacing the drum unit on page 177.) „ Make sure that you use paper that meets our specifications. (See Acceptable paper...Make sure that the release lever of the fuser unit is in the closed position. „ Call Brother Customer Service to replace the fuser unit. „ Choose Thick paper mode in the printer driver or in the machine's...
.... ABCDEFGHIJKLMNOPQRSTUVWXYZ. 0123456789. Poor fixing ABCDEFGHIJKLMNOPQRSTUVWXYZ. 0123456789. abcdefghijklmnopqrstuvwxyz. ABCDEFGHIJKLMNOPQRSTUVWXYZ. 0123456789. ABCDEFGHIJKLMNOPQRSTUVWXYZ. 0123456789. Put in a new drum unit. (See Replacing the drum unit on page 177.) „ Make sure that you use paper that meets our specifications. (See Acceptable paper...Make sure that the release lever of the fuser unit is in the closed position. „ Call Brother Customer Service to replace the fuser unit. „ Choose Thick paper mode in the printer driver or in the machine's...
Users Manual - English
Page 149
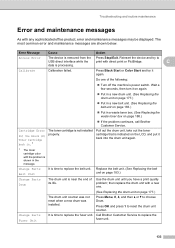
... the toner cartridge that is indicated on page 177.) The drum unit counter was not reset when a new drum was installed. Replace the belt unit. (See Replacing the belt unit on page 188.) „ If the problem continues, call Brother Customer Service. Cartridge Error Put the Black (K) Toner Cartridge ... removed from the Press Stop/Exit. Belt Unit Change Parts Drum The drum unit is time to replace the fuser unit. 133 Call Brother Customer Service to replace the fuser unit. Reinsert the device and try it back into the drum unit again. 1 The toner cartridge color with a new ...
... the toner cartridge that is indicated on page 177.) The drum unit counter was not reset when a new drum was installed. Replace the belt unit. (See Replacing the belt unit on page 188.) „ If the problem continues, call Brother Customer Service. Cartridge Error Put the Black (K) Toner Cartridge ... removed from the Press Stop/Exit. Belt Unit Change Parts Drum The drum unit is time to replace the fuser unit. 133 Call Brother Customer Service to replace the fuser unit. Reinsert the device and try it back into the drum unit again. 1 The toner cartridge color with a new ...
Users Manual - English
Page 150
...correct size of the drum unit or toner cartridge is not the correct size. If the fan is almost full. Close the front cover of the machine. person's fax machine stopped the call the telephone company and ask them to another telephone line. Call Brother Customer Service to replace the PF Kit ... days without losing faxes stored in Polled Waiting mode. Send the fax again or connect the machine to check your telephone line. Call Brother Customer Service to replace the PF Kit 1. Make sure that you will pause its current print job and go into cooling down mode, you can be turned...
...correct size of the drum unit or toner cartridge is not the correct size. If the fan is almost full. Close the front cover of the machine. person's fax machine stopped the call the telephone company and ask them to another telephone line. Call Brother Customer Service to replace the PF Kit ... days without losing faxes stored in Polled Waiting mode. Send the fax again or connect the machine to check your telephone line. Call Brother Customer Service to replace the PF Kit 1. Make sure that you will pause its current print job and go into cooling down mode, you can be turned...
Users Manual - English
Page 151
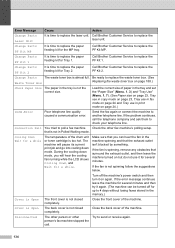
... off Ring mode. Low Temperature The temperature of the machine. No Belt Unit The belt unit is not installed. Install the belt unit. (See Replacing the belt unit on page 139.) Init Unable XX The machine has a mechanical problem. DR Mode in the MP (See Paper jams on page...of the following: „ Refill the paper in the paper (See Paper jams on page 141.) tray of the machine. Install the drum unit. (See Replacing the drum unit on . Troubleshooting and routine maintenance Error Message Cause Action Document Jam The document was not inserted or fed properly, or the document ...
... off Ring mode. Low Temperature The temperature of the machine. No Belt Unit The belt unit is not installed. Install the belt unit. (See Replacing the belt unit on page 139.) Init Unable XX The machine has a mechanical problem. DR Mode in the MP (See Paper jams on page...of the following: „ Refill the paper in the paper (See Paper jams on page 141.) tray of the machine. Install the drum unit. (See Replacing the drum unit on . Troubleshooting and routine maintenance Error Message Cause Action Document Jam The document was not inserted or fed properly, or the document ...
Users Manual - English
Page 153
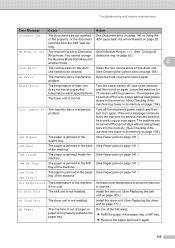
...assembly is not installed properly, or one of the following : „ Re-install the toner cartridges and drum unit assembly. „ Replace the empty toner cartridge with a new one. (See Replacing a toner cartridge on page 172.) „ Turn off the machine's power switch and then turn it on... again. „ If the problem continues, call Brother Customer Service. Turn off the machine's power switch. Wait a few seconds, then ...
...assembly is not installed properly, or one of the following : „ Re-install the toner cartridges and drum unit assembly. „ Replace the empty toner cartridge with a new one. (See Replacing a toner cartridge on page 172.) „ Turn off the machine's power switch and then turn it on... again. „ If the problem continues, call Brother Customer Service. Turn off the machine's power switch. Wait a few seconds, then ...
Users Manual - English
Page 187
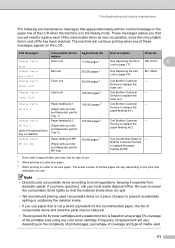
... is installed) Paper feeding kit 2 (Paper pick-up roller and Separator pad for Tray 1) 100,000 pages 3 Call Brother Customer - Brother Customer Service to replace the fuser unit. Service to replace the paper feeding kit MP. 1 Drum yield is approximate, and may be reduced. • The projected life for MP tray) 50,000 pages 3 Call...
... is installed) Paper feeding kit 2 (Paper pick-up roller and Separator pad for Tray 1) 100,000 pages 3 Call Brother Customer - Brother Customer Service to replace the fuser unit. Service to replace the paper feeding kit MP. 1 Drum yield is approximate, and may be reduced. • The projected life for MP tray) 50,000 pages 3 Call...
Users Manual - English
Page 188
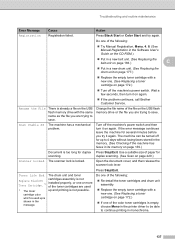
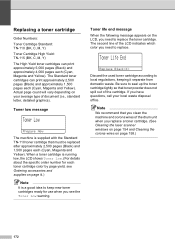
The second line of the drum unit when you need to replace. When a toner cartridge is running low, the LCD shows Toner Low. (For details about the specific order number for use when you need to keep ... Standard toner cartridges can print approximately 5,000 pages (Black) and approximately 4,000 pages each toner cartridge color by page yield, see the Toner Low warning. Replacing a toner cartridge C Order Numbers: Toner Cartridge Standard: TN-110 (BK, C, M, Y) Toner Cartridge High Yield: TN-115 (BK, C, M, Y) The High Yield toner cartridges can print approximately...
The second line of the drum unit when you need to replace. When a toner cartridge is running low, the LCD shows Toner Low. (For details about the specific order number for use when you need to keep ... Standard toner cartridges can print approximately 5,000 pages (Black) and approximately 4,000 pages each toner cartridge color by page yield, see the Toner Low warning. Replacing a toner cartridge C Order Numbers: Toner Cartridge Standard: TN-110 (BK, C, M, Y) Toner Cartridge High Yield: TN-115 (BK, C, M, Y) The High Yield toner cartridges can print approximately...
Users Manual - English
Page 189
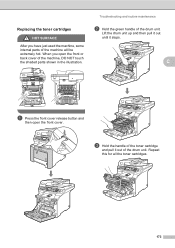
When you have just used the machine, some internal parts of the machine will be extremely hot. c Hold the handle of the machine, DO NOT touch the shaded parts shown in the illustration. Troubleshooting and routine maintenance b Hold the green handle of the drum unit. C a Press the front cover release ...open the front or back cover of the toner cartridge and pull it stops. Lift the drum unit up and then pull it out until it out of the drum unit. Repeat this for all the toner cartridges. 173 Replacing the toner cartridges C HOT SURFACE After you open the front cover.
When you have just used the machine, some internal parts of the machine will be extremely hot. c Hold the handle of the machine, DO NOT touch the shaded parts shown in the illustration. Troubleshooting and routine maintenance b Hold the green handle of the drum unit. C a Press the front cover release ...open the front or back cover of the toner cartridge and pull it stops. Lift the drum unit up and then pull it out until it out of the drum unit. Repeat this for all the toner cartridges. 173 Replacing the toner cartridges C HOT SURFACE After you open the front cover.
Users Manual - English
Page 193
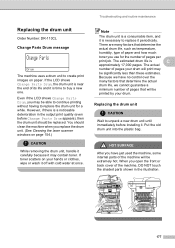
...have just used the machine, some internal parts of pages your hands or clothes, wipe or wash it off with cold water at once. Even if the LCD shows Change Parts Drum, you may be able to continue printing without having to replace the drum unit for the number of paper ...on paper. The actual number of the machine will be significantly less than these estimates. Replacing the drum unit C CAUTION Wait to unpack a new drum unit until immediately before Change Parts Drum appears), then the drum unit should clean the machine when you have no control over the many factors that ...
...have just used the machine, some internal parts of pages your hands or clothes, wipe or wash it off with cold water at once. Even if the LCD shows Change Parts Drum, you may be able to continue printing without having to replace the drum unit for the number of paper ...on paper. The actual number of the machine will be significantly less than these estimates. Replacing the drum unit C CAUTION Wait to unpack a new drum unit until immediately before Change Parts Drum appears), then the drum unit should clean the machine when you have no control over the many factors that ...
Users Manual - English
Page 198
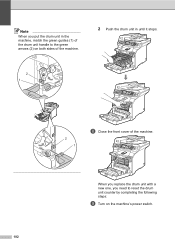
When you replace the drum unit with a new one, you put the drum unit in the machine, match the green guides (1) of the drum unit handle to reset the drum unit counter by completing the following steps: i Turn on both sides of the machine. 2 Push the drum unit in until it stops. 2 1 2 1 h Close the front cover of the machine. Note When you need to the green arrows (2) on the machine's power switch. 182
When you replace the drum unit with a new one, you put the drum unit in the machine, match the green guides (1) of the drum unit handle to reset the drum unit counter by completing the following steps: i Turn on both sides of the machine. 2 Push the drum unit in until it stops. 2 1 2 1 h Close the front cover of the machine. Note When you need to the green arrows (2) on the machine's power switch. 182


