Quick Setup Guide - English
Page 1
...://solutions.brother.com Call Brother Customer Service at : 1-877-268-9575 For the MFC, continue to distribute the toner evenly inside the cartridge. Insert the drum unit the machine. To select which cassette will ring (double ring) for possible future transport. the call is connected to carefully lift Cassette #2 with a dedicated fax line. MFC-9700 2.DATE/TIME MFC...
...://solutions.brother.com Call Brother Customer Service at : 1-877-268-9575 For the MFC, continue to distribute the toner evenly inside the cartridge. Insert the drum unit the machine. To select which cassette will ring (double ring) for possible future transport. the call is connected to carefully lift Cassette #2 with a dedicated fax line. MFC-9700 2.DATE/TIME MFC...
Users Manual - English
Page 6
... alteration or repairs performed by anyone other than a Brother Authorized Service Representative. (7) NOT COVERED UNDER WARRANTY ARE: Consumable items, for example (including, but not limited to): ribbons, ink or toner cartridges, toner drum units, print heads, cleaning and/or instances where no cost.... working product with a refurbished or remanufactured product that is 1 year from this Product, (4) NonBrother®-brand or non-Brother approved parts, supplies, power supplies or...
... alteration or repairs performed by anyone other than a Brother Authorized Service Representative. (7) NOT COVERED UNDER WARRANTY ARE: Consumable items, for example (including, but not limited to): ribbons, ink or toner cartridges, toner drum units, print heads, cleaning and/or instances where no cost.... working product with a refurbished or remanufactured product that is 1 year from this Product, (4) NonBrother®-brand or non-Brother approved parts, supplies, power supplies or...
Users Manual - English
Page 8
...or workmanship. Internet support: support@brother.ca or browse Brother's Web Site: www.brother.com Brother International Corporation (Canada) Ltd. 1 Rue Hôtel de Ville Dollard-Des-Ormeaux, QC H9B 3H6 vi L I M I T E D W A R R A N T Y ( C A N A D A ) In order to obtain warranty service, the MFC/Facsimile machine must be delivered or...of such damages. For laser products: Failure to remove the Toner Cartridge (and Toner Drum Unit on applicable models) during shipping will cause severe damage to the MFC/Facsimile and will VOID your warranty. (Refer to use of or inability to your ...
...or workmanship. Internet support: support@brother.ca or browse Brother's Web Site: www.brother.com Brother International Corporation (Canada) Ltd. 1 Rue Hôtel de Ville Dollard-Des-Ormeaux, QC H9B 3H6 vi L I M I T E D W A R R A N T Y ( C A N A D A ) In order to obtain warranty service, the MFC/Facsimile machine must be delivered or...of such damages. For laser products: Failure to remove the Toner Cartridge (and Toner Drum Unit on applicable models) during shipping will cause severe damage to the MFC/Facsimile and will VOID your warranty. (Refer to use of or inability to your ...
Users Manual - English
Page 11
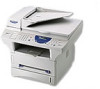
... Manual 1-1 Test Sheet Procedure and Product Registration (For USA Only) ....1-2 To Complete Your MFC-9700 Registration On-Line (For USA Only 1-2 MFC-9700 Control Panel Overview 1-3 About Your Machines 1-5 Custom Features 1-5 Do You Have Voice Mail ... and Connections 2-1 Packing List 2-1 Choosing a Location 2-2 Important Safety Instructions 2-3 Release the Scanner Lock 2-3 Assembly 2-4 Installing the Drum Unit Assembly (with Toner Cartridge) ....2-4 Paper 2-5 Acceptable Paper 2-5 Paper Capacity of Paper Cassette 2-5 Paper Specification for the Cassette 2-5 Manual...
... Manual 1-1 Test Sheet Procedure and Product Registration (For USA Only) ....1-2 To Complete Your MFC-9700 Registration On-Line (For USA Only 1-2 MFC-9700 Control Panel Overview 1-3 About Your Machines 1-5 Custom Features 1-5 Do You Have Voice Mail ... and Connections 2-1 Packing List 2-1 Choosing a Location 2-2 Important Safety Instructions 2-3 Release the Scanner Lock 2-3 Assembly 2-4 Installing the Drum Unit Assembly (with Toner Cartridge) ....2-4 Paper 2-5 Acceptable Paper 2-5 Paper Capacity of Paper Cassette 2-5 Paper Specification for the Cassette 2-5 Manual...
Users Manual - English
Page 21
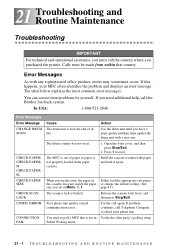
... Sending a Fax from Your Macintosh® Application 19-3 Setting Up Your Address Book 19-5 Adding a New Member 19-5 Adding a New Group 19-6 Using Brother TWAIN Scanner Driver with Your Apple® Macintosh 19-7 Accessing the Scanner 19-8 Scanning a Document into Your Macintosh G3, G4 or iMac 19-8 Settings in...-4 Paper is Jammed in the Paper Cassette 21-4 Paper is Jammed near the Drum Unit 21-5 Paper is Jammed in the Fuser Unit 21-5 If You Are Having Difficulty with Your MFC 21-6 Packing and Shipping the MFC 21-13 Lock the Scanner Lock 21-13 Routine Maintenance 21-16 Cleaning the ...
... Sending a Fax from Your Macintosh® Application 19-3 Setting Up Your Address Book 19-5 Adding a New Member 19-5 Adding a New Group 19-6 Using Brother TWAIN Scanner Driver with Your Apple® Macintosh 19-7 Accessing the Scanner 19-8 Scanning a Document into Your Macintosh G3, G4 or iMac 19-8 Settings in...-4 Paper is Jammed in the Paper Cassette 21-4 Paper is Jammed near the Drum Unit 21-5 Paper is Jammed in the Fuser Unit 21-5 If You Are Having Difficulty with Your MFC 21-6 Packing and Shipping the MFC 21-13 Lock the Scanner Lock 21-13 Routine Maintenance 21-16 Cleaning the ...

Users Manual - English
Page 22
Replacing the Drum Unit 21-21 Checking the Drum Life 21-22 22 Important Information 22-1 Standard Telephone and FCC Notices 22-1 Laser Safety 22-2 FDA Regulations 22-2 Federal Communications Commission (FCC) Declaration of... Conformity (For USA Only 22-3 Important 22-4 Industry Canada Compliance Statement (For Canada Only 22-4 Important - About the Interface Cable 22-4 Warranty 22-4 International ...
Replacing the Drum Unit 21-21 Checking the Drum Life 21-22 22 Important Information 22-1 Standard Telephone and FCC Notices 22-1 Laser Safety 22-2 FDA Regulations 22-2 Federal Communications Commission (FCC) Declaration of... Conformity (For USA Only 22-3 Important 22-4 Industry Canada Compliance Statement (For Canada Only 22-4 Important - About the Interface Cable 22-4 Warranty 22-4 International ...
Users Manual - English
Page 29
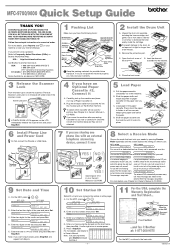
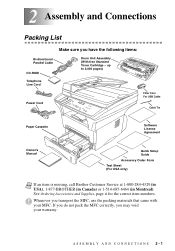
If you do not pack the MFC correctly, you have the following items: Bi-directional Parallel Cable CD-ROM Telephone Line Cord Drum Unit Assembly (With free Standard Toner Cartridge - ASSEMBLY AND CONNECTIONS 2-1 up to 3,000 pages) Power Cord Filter Core For USB Cable ...Cable Tie Paper Cassette Software License Agreement Owner's Manual Quick Setup Guide Accessory Order Form Test Sheet (For USA only) Note If an item is missing, call Brother...
If you do not pack the MFC correctly, you have the following items: Bi-directional Parallel Cable CD-ROM Telephone Line Cord Drum Unit Assembly (With free Standard Toner Cartridge - ASSEMBLY AND CONNECTIONS 2-1 up to 3,000 pages) Power Cord Filter Core For USB Cable ...Cable Tie Paper Cassette Software License Agreement Owner's Manual Quick Setup Guide Accessory Order Form Test Sheet (For USA only) Note If an item is missing, call Brother...
Users Manual - English
Page 32
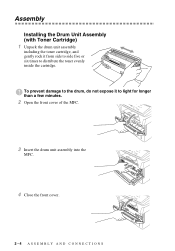
Assembly Installing the Drum Unit Assembly (with Toner Cartridge) 1 Unpack the drum unit assembly including the toner cartridge, and gently rock it to distribute the toner evenly inside the cartridge. To prevent damage to the drum, do not expose it from side to side five or six times to light for longer than a few minutes. 2 Open the front cover of the MFC. 3 Insert the drum unit assembly into the MFC. 4 Close the front cover. 2-4 ASSEMBLY AND CONNECTIONS
Assembly Installing the Drum Unit Assembly (with Toner Cartridge) 1 Unpack the drum unit assembly including the toner cartridge, and gently rock it to distribute the toner evenly inside the cartridge. To prevent damage to the drum, do not expose it from side to side five or six times to light for longer than a few minutes. 2 Open the front cover of the MFC. 3 Insert the drum unit assembly into the MFC. 4 Close the front cover. 2-4 ASSEMBLY AND CONNECTIONS
Users Manual - English
Page 182
.... then replace the drum unit with any sophisticated office product, errors may sometimes occur. Press 1 to poll a MFC that country. Try the call Telephone Company to check your MFC often identifies the problem and displays an error message. Calls must call the Brother fax-back system. ...The table below explains the most problems by yourself. ERROR CONNECTION FAIL Cause The drum unit is locked. The scanner lock is...
.... then replace the drum unit with any sophisticated office product, errors may sometimes occur. Press 1 to poll a MFC that country. Try the call Telephone Company to check your MFC often identifies the problem and displays an error message. Calls must call the Brother fax-back system. ...The table below explains the most problems by yourself. ERROR CONNECTION FAIL Cause The drum unit is locked. The scanner lock is...

Users Manual - English
Page 183
...A page, piece of the drum unit or toner cartridge is busy. The paper is not programmed. Please call . The MFC will pause its current print job and go into cooling down mode, you see any jammed paper or other party's fax machine terminated the call Brother Customer Service and tell them the... MFC Error number at: In USA: 1-800-284-4329 In Canada: 1-877-BROTHER In Montreal: 1-514-685-6464 See page 21-4. unit. Try to access a One Touch or Speed Dial number that is...
...A page, piece of the drum unit or toner cartridge is busy. The paper is not programmed. Please call . The MFC will pause its current print job and go into cooling down mode, you see any jammed paper or other party's fax machine terminated the call Brother Customer Service and tell them the... MFC Error number at: In USA: 1-800-284-4329 In Canada: 1-877-BROTHER In Montreal: 1-514-685-6464 See page 21-4. unit. Try to access a One Touch or Speed Dial number that is...
Users Manual - English
Page 186
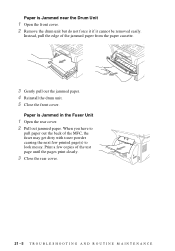
... edge of the MFC, the fuser may get dirty with toner powder causing the next few copies of the test page until the pages print clearly. 3 Close the rear cover. 21 - 5 T R O U B L E S H O O T I N G A N D R O U T I N E M A I N T E N A N C E When you have to look messy. Paper is Jammed in the Fuser Unit 1 Open the ... back of the jammed paper from the paper cassette. 3 Gently pull out the jammed paper. 4 Reinstall the drum unit. 5 Close the front cover. Paper is Jammed near the Drum Unit 1 Open the front cover. 2 Remove the drum unit but do not force it if it cannot be removed easily.
... edge of the MFC, the fuser may get dirty with toner powder causing the next few copies of the test page until the pages print clearly. 3 Close the rear cover. 21 - 5 T R O U B L E S H O O T I N G A N D R O U T I N E M A I N T E N A N C E When you have to look messy. Paper is Jammed in the Fuser Unit 1 Open the ... back of the jammed paper from the paper cassette. 3 Gently pull out the jammed paper. 4 Reinstall the drum unit. 5 Close the front cover. Paper is Jammed near the Drum Unit 1 Open the front cover. 2 Remove the drum unit but do not force it if it cannot be removed easily.

Users Manual - English
Page 188
... features is recommended. Check the following: • The MFC is plugged in. (See page 2-8.) • The toner cartridge and drum unit are installed properly. (See page 2-4.) • The interface cable is securely connected between the MFC and computer. (See Quick Setup Guide.) • Check...in copies. DIFFICULTY SUGGESTIONS Transmission Verification Report says "Result:NG" There is probably temporary noise or static on your copies. Brother's ECM feature should help overcome this problem. Sometimes you have Call Waiting, Call Waiting/Caller ID, RingMaster, Voice Mail, ...
... features is recommended. Check the following: • The MFC is plugged in. (See page 2-8.) • The toner cartridge and drum unit are installed properly. (See page 2-4.) • The interface cable is securely connected between the MFC and computer. (See Quick Setup Guide.) • Check...in copies. DIFFICULTY SUGGESTIONS Transmission Verification Report says "Result:NG" There is probably temporary noise or static on your copies. Brother's ECM feature should help overcome this problem. Sometimes you have Call Waiting, Call Waiting/Caller ID, RingMaster, Voice Mail, ...
Users Manual - English
Page 191
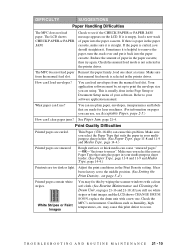
...the paper cassette. The MFC does not feed paper Reinsert the paper firmly, load one . What paper can I use? Thin Paper (17lb-18.4lb) can cause this by wiping the scanner windows with a clean soft cloth. (See Routine Maintenance and Cleaning the Drum Unit, on page 5-4.) Printed... pages contain white stripes. Check the MFC's environment. Reduce the amount of your multi-purpose sheet feeder. (See Paper Type, page 11-8 and 11-9 ...
...the paper cassette. The MFC does not feed paper Reinsert the paper firmly, load one . What paper can I use? Thin Paper (17lb-18.4lb) can cause this by wiping the scanner windows with a clean soft cloth. (See Routine Maintenance and Cleaning the Drum Unit, on page 5-4.) Printed... pages contain white stripes. Check the MFC's environment. Reduce the amount of your multi-purpose sheet feeder. (See Paper Type, page 11-8 and 11-9 ...

Users Manual - English
Page 192
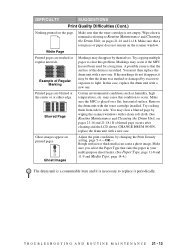
...scattered toner and the LCD shows CHANGE DRUM SOON, replace the drum unit with a new one . White Spots Toner scatters and stains the printed page. Check the MFC's environment; Remove the drum unit and clean the MFC's interior. (See Routine Maintenance and Cleaning the Drum Unit, on pages 21-16 and 21-18... spots in the Print Density setting. conditions such as it will cause this condition to occur. The drum unit may cause this situation to occur. Clean the MFC's interior and the primary corona wire of the corona wire is printed black. high temperature and high ...
...scattered toner and the LCD shows CHANGE DRUM SOON, replace the drum unit with a new one . White Spots Toner scatters and stains the printed page. Check the MFC's environment; Remove the drum unit and clean the MFC's interior. (See Routine Maintenance and Cleaning the Drum Unit, on pages 21-16 and 21-18... spots in the Print Density setting. conditions such as it will cause this condition to occur. The drum unit may cause this situation to occur. Clean the MFC's interior and the primary corona wire of the corona wire is printed black. high temperature and high ...
Users Manual - English
Page 193
.... (See Paper Type, page 11-8 and 11-9 and Media Type, page 14-4.) The drum unit is a consumable item and it periodically. Rough surfaces or thick media can cause a ghost image. Make sure the MFC is not empty. Ghost images appear on the page. Make sure that the toner cartridge is... placed on the scanner window. You may disappear by excessive exposure to clear this condition to Routine Maintenance and Cleaning the Drum Unit, on pages 21-16 and 21...
.... (See Paper Type, page 11-8 and 11-9 and Media Type, page 14-4.) The drum unit is a consumable item and it periodically. Rough surfaces or thick media can cause a ghost image. Make sure the MFC is not empty. Ghost images appear on the page. Make sure that the toner cartridge is... placed on the scanner window. You may disappear by excessive exposure to clear this condition to Routine Maintenance and Cleaning the Drum Unit, on pages 21-16 and 21...
Users Manual - English
Page 195
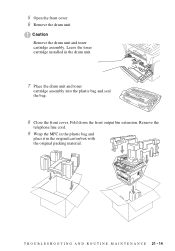
5 Open the front cover. 6 Remove the drum unit. Leave the toner cartridge installed in the original carton box with the original packing material. Remove the telephone line cord. 9 Wrap the MFC in the plastic bag and place it in the drum unit. 7 Place the drum unit and toner cartridge assembly into the plastic bag and seal the bag. 8 Close the front cover. Fold down the front output bin extension. T R O U B L E S H O O T I N G A N D R O U T I N E M A I N T E N A N C E 21 - 14 Caution Remove the drum unit and toner cartridge assembly.
5 Open the front cover. 6 Remove the drum unit. Leave the toner cartridge installed in the original carton box with the original packing material. Remove the telephone line cord. 9 Wrap the MFC in the plastic bag and place it in the drum unit. 7 Place the drum unit and toner cartridge assembly into the plastic bag and seal the bag. 8 Close the front cover. Fold down the front output bin extension. T R O U B L E S H O O T I N G A N D R O U T I N E M A I N T E N A N C E 21 - 14 Caution Remove the drum unit and toner cartridge assembly.
Users Manual - English
Page 196
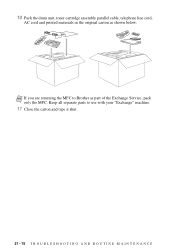
Keep all separate parts to Brother as shown below: Note If you are returning the MFC to use with your "Exchange" machine. 11 Close the carton and tape it shut. 21 - 15 T R O U B L E S H O O T I N G A N D R O U T I N E M A I N T E N A N C E 10 Pack the drum unit, toner cartridge assembly parallel cable, telephone line cord, AC cord and printed materials in the original carton as part of the Exchange Service, pack only the MFC.
Keep all separate parts to Brother as shown below: Note If you are returning the MFC to use with your "Exchange" machine. 11 Close the carton and tape it shut. 21 - 15 T R O U B L E S H O O T I N G A N D R O U T I N E M A I N T E N A N C E 10 Pack the drum unit, toner cartridge assembly parallel cable, telephone line cord, AC cord and printed materials in the original carton as part of the Exchange Service, pack only the MFC.
Users Manual - English
Page 198
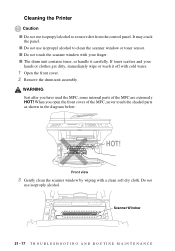
WARNING Just after you open the front cover of the MFC are extremely HOT! When you have used the MFC, some internal parts of the MFC, never touch the shaded parts as shown in the diagram below. HOT! It may crack the...H O O T I N G A N D R O U T I N E M A I N T E N A N C E I Do not touch the scanner window with cold water. 1 Open the front cover. 2 Remove the drum unit assembly. Front view 3 Gently clean the scanner window by wiping with a clean soft dry cloth. I The drum unit contains toner, so handle it off with your hands or clothes get dirty, immediately wipe or wash...
WARNING Just after you open the front cover of the MFC are extremely HOT! When you have used the MFC, some internal parts of the MFC, never touch the shaded parts as shown in the diagram below. HOT! It may crack the...H O O T I N G A N D R O U T I N E M A I N T E N A N C E I Do not touch the scanner window with cold water. 1 Open the front cover. 2 Remove the drum unit assembly. Front view 3 Gently clean the scanner window by wiping with a clean soft dry cloth. I The drum unit contains toner, so handle it off with your hands or clothes get dirty, immediately wipe or wash...
Users Manual - English
Page 199
... does not spill out of them separate from right to left several times. 2 Return the tab and snap it into the MFC. (See Replacing the Drum Unit, page 21-21.) 4 Close the front cover. 5 Plug in the power cord first, then the telephone cord. When... the toner cartridge is not at Home position ( ), printed pages may have vertical stripes. 3 Reinstall the drum unit into the Home position ( ). The MFC is a good idea to 6,000 pages using a high yield toner cartridge. T R O U B L E S H O O T I N G A N D R O U T I N E M A I N T E N A N C E 21 - 18 Note ...
... does not spill out of them separate from right to left several times. 2 Return the tab and snap it into the MFC. (See Replacing the Drum Unit, page 21-21.) 4 Close the front cover. 5 Plug in the power cord first, then the telephone cord. When... the toner cartridge is not at Home position ( ), printed pages may have vertical stripes. 3 Reinstall the drum unit into the Home position ( ). The MFC is a good idea to 6,000 pages using a high yield toner cartridge. T R O U B L E S H O O T I N G A N D R O U T I N E M A I N T E N A N C E 21 - 18 Note ...
Users Manual - English
Page 200
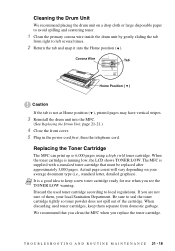
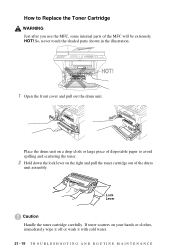
..., never touch the shaded parts shown in the illustration. Place the drum unit on a drop cloth or large piece of disposable paper to Replace the Toner Cartridge WARNING Just after you use the MFC, some internal parts of the drum unit assembly. If toner scatters on the right and pull the toner cartridge... out of the MFC will be extremely HOT! HOT! 1 Open the front cover and pull out the...
..., never touch the shaded parts shown in the illustration. Place the drum unit on a drop cloth or large piece of disposable paper to Replace the Toner Cartridge WARNING Just after you use the MFC, some internal parts of the drum unit assembly. If toner scatters on the right and pull the toner cartridge... out of the MFC will be extremely HOT! HOT! 1 Open the front cover and pull out the...


