
Advanced Users Manual - English
Page 80
... the machine's Page Counters for copies, printed pages, reports and lists, faxes or a summary total. The default setting is Normal. a Press Menu, 8, 3. 83.Parts Life 1.Drum 2.Belt Unit 3.Fuser Select ab or OK b Press a or b to choose Normal, Low or Off. c Press Stop/Exit. Press OK. It will be accurate if... the life of the toner. a Press Menu, 4, 9. Note The life check will not be accurate only if you have reset the part counter when you installed a new part. The color correction process consumes some amount of the used part. 74 Checking the Page Counters A You ...
... the machine's Page Counters for copies, printed pages, reports and lists, faxes or a summary total. The default setting is Normal. a Press Menu, 8, 3. 83.Parts Life 1.Drum 2.Belt Unit 3.Fuser Select ab or OK b Press a or b to choose Normal, Low or Off. c Press Stop/Exit. Press OK. It will be accurate if... the life of the toner. a Press Menu, 4, 9. Note The life check will not be accurate only if you have reset the part counter when you installed a new part. The color correction process consumes some amount of the used part. 74 Checking the Page Counters A You ...
Users Manual - English
Page 34
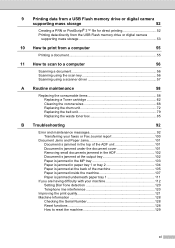
... 56 Scanning using a scanner driver 57 A Routine maintenance 58 Replacing the consumable items 58 Replacing a Toner cartridge 62 Cleaning the corona wires 68 Replacing the drum unit 72 Replacing the belt unit 79 Replacing the waste toner box 85 B Troubleshooting 92 Error and maintenance messages 92 Transferring your faxes or Fax... your machine 112 Setting Dial Tone detection 120 Telephone line interference 120 Improving the print quality 121 Machine Information 128 Checking the Serial Number 128 Reset functions 128 How to reset the machine 129 xi
... 56 Scanning using a scanner driver 57 A Routine maintenance 58 Replacing the consumable items 58 Replacing a Toner cartridge 62 Cleaning the corona wires 68 Replacing the drum unit 72 Replacing the belt unit 79 Replacing the waste toner box 85 B Troubleshooting 92 Error and maintenance messages 92 Transferring your faxes or Fax... your machine 112 Setting Dial Tone detection 120 Telephone line interference 120 Improving the print quality 121 Machine Information 128 Checking the Serial Number 128 Reset functions 128 How to reset the machine 129 xi
Users Manual - English
Page 110
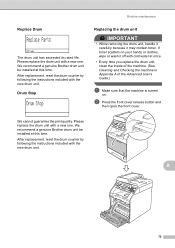
...Brother drum unit be installed at this time. We cannot guarantee the print quality. After replacement, reset the drum counter by following the instructions included with the new drum unit. Please replace the drum unit with a new one . Drum Stop A Drum Stop Replacing the drum unit A IMPORTANT • While removing the drum..., wipe or wash it may contain toner. After replacement, reset the drum counter by following the instructions included with the new drum unit. Routine maintenance Replace Drum A Replace Parts Drum The drum unit has exceeded its rated life. b Press the front ...
...Brother drum unit be installed at this time. We cannot guarantee the print quality. After replacement, reset the drum counter by following the instructions included with the new drum unit. Please replace the drum unit with a new one . Drum Stop A Drum Stop Replacing the drum unit A IMPORTANT • While removing the drum..., wipe or wash it may contain toner. After replacement, reset the drum counter by following the instructions included with the new drum unit. Routine maintenance Replace Drum A Replace Parts Drum The drum unit has exceeded its rated life. b Press the front ...
Users Manual - English
Page 116
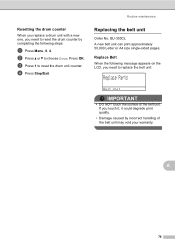
A 79 Routine maintenance Resetting the drum counter A When you replace a drum unit with a new one, you need to reset the drum unit counter. c Press 1 to reset the drum counter by incorrect handling of the belt unit. If you touch it, it could degrade print quality. • Damage caused by completing the following message ...
A 79 Routine maintenance Resetting the drum counter A When you replace a drum unit with a new one, you need to reset the drum unit counter. c Press 1 to reset the drum counter by incorrect handling of the belt unit. If you touch it, it could degrade print quality. • Damage caused by completing the following message ...
Users Manual - English
Page 121
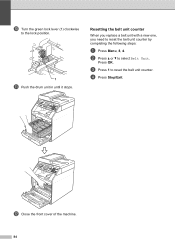
Press OK. d Press Stop/Exit. j Turn the green lock lever (1) clockwise to reset the belt unit counter by completing the following steps: a Press Menu, 8, 4. Resetting the belt unit counter A When you replace a belt unit with a new one, you need to the lock position. 1 k Push the drum unit in until it stops. l Close the front cover of the machine. 84 b Press a or b to reset the belt unit counter. c Press 1 to select Belt Unit.
Press OK. d Press Stop/Exit. j Turn the green lock lever (1) clockwise to reset the belt unit counter by completing the following steps: a Press Menu, 8, 4. Resetting the belt unit counter A When you replace a belt unit with a new one, you need to the lock position. 1 k Push the drum unit in until it stops. l Close the front cover of the machine. 84 b Press a or b to reset the belt unit counter. c Press 1 to select Belt Unit.
Users Manual - English
Page 134
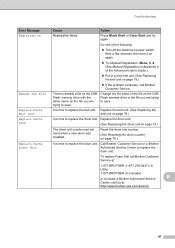
... Center to replace the belt unit. Wait a few seconds, then turn it on page 79.) Replace Parts Drum It is time to replace the fuser unit. To replace Fuser Unit call Brother Customer Service. Reset the drum unit counter. (See Resetting the drum counter on page 79.) Replace Parts Fuser Unit It is time to locate...
... Center to replace the belt unit. Wait a few seconds, then turn it on page 79.) Replace Parts Drum It is time to replace the fuser unit. To replace Fuser Unit call Brother Customer Service. Reset the drum unit counter. (See Resetting the drum counter on page 79.) Replace Parts Fuser Unit It is time to locate...

Users Manual - English
Page 210
printing See Network User's Guide. Maintenance, routine replacing belt unit 79 drum unit 72 toner cartridge 62 waste toner box 85 Manual dialing 45 receive 32, 34 Menu Table 131 Mode, entering copy 51 fax 28 scan 7 ... J Jacks EXT external telephone 42 TAD (answering machine 40 L Labels 12, 21, 22, 25 LCD (liquid crystal display 6, 130 E M Machine information how to reset the machine 129 reset functions 128 serial number 128 status LED 9 Macintosh See Software User's Guide. scanning See Software User's Guide. O One touch changing 48 setting up 47...
printing See Network User's Guide. Maintenance, routine replacing belt unit 79 drum unit 72 toner cartridge 62 waste toner box 85 Manual dialing 45 receive 32, 34 Menu Table 131 Mode, entering copy 51 fax 28 scan 7 ... J Jacks EXT external telephone 42 TAD (answering machine 40 L Labels 12, 21, 22, 25 LCD (liquid crystal display 6, 130 E M Machine information how to reset the machine 129 reset functions 128 serial number 128 status LED 9 Macintosh See Software User's Guide. scanning See Software User's Guide. O One touch changing 48 setting up 47...

Users Manual - English
Page 294
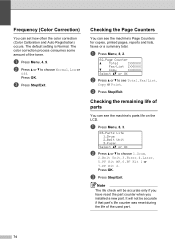
...the color correction (Color Calibration and Auto Registration) occurs. c Press Stop/Exit. Press OK. It will be accurate if that part's life counter was reset during the life of parts A You can see Total, Fax/List, Copy or Print. The color correction process consumes some amount of the toner. ...c Press Stop/Exit. The default setting is Normal. c Press Stop/Exit. a Press Menu, 8, 3. 83.Parts Life 1.Drum 2.Belt Unit 3.Fuser Select ab or OK b Press a or b to choose 1.Drum, 2.Belt Unit, 3.Fuser, 4.Laser, 5.PF Kit MP, 6.PF Kit 1 or 7.PF Kit 2. Press OK.
...the color correction (Color Calibration and Auto Registration) occurs. c Press Stop/Exit. Press OK. It will be accurate if that part's life counter was reset during the life of parts A You can see Total, Fax/List, Copy or Print. The color correction process consumes some amount of the toner. ...c Press Stop/Exit. The default setting is Normal. c Press Stop/Exit. a Press Menu, 8, 3. 83.Parts Life 1.Drum 2.Belt Unit 3.Fuser Select ab or OK b Press a or b to choose 1.Drum, 2.Belt Unit, 3.Fuser, 4.Laser, 5.PF Kit MP, 6.PF Kit 1 or 7.PF Kit 2. Press OK.


