
Users Manual - English
Page 4
... USA: 1-877-552-MALL (1-877-552-6255) 1-800-947-1445 (fax) http://www.brothermall.com/ In Canada: 1-877-BROTHER http://www.brother.ca/ Description Toner Cartridge Standard Toner Cartridge High Yield Drum Unit Belt Unit Waste Toner Box Telephone Line Cord Paper Tray #2 (Option) User's Guide Quick Setup Guide Item Black: TN-110BK (Prints approx... If you cannot find the accessory you need and you have a Visa, MasterCard, Discover, or American Express credit card, you can order accessories directly from Brother. (You can visit us online for a complete selection of the...
... USA: 1-877-552-MALL (1-877-552-6255) 1-800-947-1445 (fax) http://www.brothermall.com/ In Canada: 1-877-BROTHER http://www.brother.ca/ Description Toner Cartridge Standard Toner Cartridge High Yield Drum Unit Belt Unit Waste Toner Box Telephone Line Cord Paper Tray #2 (Option) User's Guide Quick Setup Guide Item Black: TN-110BK (Prints approx... If you cannot find the accessory you need and you have a Visa, MasterCard, Discover, or American Express credit card, you can order accessories directly from Brother. (You can visit us online for a complete selection of the...
Users Manual - English
Page 6
... to floor models or refurbished product), prior to your purchase you are not limited to Toner Cartridges, Drum Unit, Belt Unit, and Waste Toner Box. „ Except as otherwise provided herein, Brother warrants that expired in accordance with a copy of your dated bill of sale showing that... materials and workmanship, when used under normal conditions. „ This warranty applies only to products purchased and used in the United States. Brother® Color Laser One-Year On-Site Limited Warranty (USA only) Who is covered: „ This limited warranty ("warranty") is given only to the original...
... to floor models or refurbished product), prior to your purchase you are not limited to Toner Cartridges, Drum Unit, Belt Unit, and Waste Toner Box. „ Except as otherwise provided herein, Brother warrants that expired in accordance with a copy of your dated bill of sale showing that... materials and workmanship, when used under normal conditions. „ This warranty applies only to products purchased and used in the United States. Brother® Color Laser One-Year On-Site Limited Warranty (USA only) Who is covered: „ This limited warranty ("warranty") is given only to the original...
Users Manual - English
Page 8
..., Brother International Corporation (Canada) Ltd. ("Brother"), or its Authorized Service Centres, Distributors, Dealers, Agents or employees, shall create another warranty or modify this warranty. In the event that are non-Brother products may not apply to you , Brother reserves the right to your nearest Authorized Service Centre call 1-877-Brother. When shipping or transporting your Laser Printer/MFC...
..., Brother International Corporation (Canada) Ltd. ("Brother"), or its Authorized Service Centres, Distributors, Dealers, Agents or employees, shall create another warranty or modify this warranty. In the event that are non-Brother products may not apply to you , Brother reserves the right to your nearest Authorized Service Centre call 1-877-Brother. When shipping or transporting your Laser Printer/MFC...

Users Manual - English
Page 9
...of Contents Section I General 1 General information 2 Using the documentation 2 Symbols and conventions used in the documentation 2 Accessing the User's Guides 2 Viewing documentation 3 Accessing Brother support (for Windows 5 Control panel overview 6 Data LED indications 8 2 Loading paper and documents 9 Loading paper and envelopes 9 Loading plain paper in the paper tray...mode 23 Volume settings 24 Ring volume 24 Beeper volume 24 Speaker volume 24 Automatic daylight savings time 25 Ecology features 25 Toner save...25 Sleep time...25 LCD contrast...25 Dial Prefix ...26 vii
...of Contents Section I General 1 General information 2 Using the documentation 2 Symbols and conventions used in the documentation 2 Accessing the User's Guides 2 Viewing documentation 3 Accessing Brother support (for Windows 5 Control panel overview 6 Data LED indications 8 2 Loading paper and documents 9 Loading paper and envelopes 9 Loading plain paper in the paper tray...mode 23 Volume settings 24 Ring volume 24 Beeper volume 24 Speaker volume 24 Automatic daylight savings time 25 Ecology features 25 Toner save...25 Sleep time...25 LCD contrast...25 Dial Prefix ...26 vii

Users Manual - English
Page 14
...Cleaning the outside of the machine 145 Cleaning the scanner 146 Cleaning the laser scanner windows 147 Cleaning the corona wires 151 Cleaning the drum unit 155 Replacing the consumable items 163 Replacing a toner cartridge 166 Replacing the drum unit 171 Replacing the belt unit 178 Replacing... the waste toner box 183 Packing and shipping the machine 188 Repacking the machine 189 Machine information 196...
...Cleaning the outside of the machine 145 Cleaning the scanner 146 Cleaning the laser scanner windows 147 Cleaning the corona wires 151 Cleaning the drum unit 155 Replacing the consumable items 163 Replacing a toner cartridge 166 Replacing the drum unit 171 Replacing the belt unit 178 Replacing... the waste toner box 183 Packing and shipping the machine 188 Repacking the machine 189 Machine information 196...

Users Manual - English
Page 41
...Menu, 1, 8. c Press Stop/Exit. 25 It will be a short delay while the fuser warms up. a Press Menu, 1, 6, 1. Note We do not recommend Toner Save for Daylight Savings Time. a Press Menu 1, 6, 2. Or, press b to make the LCD look lighter or darker. Sleep time 3 Setting the sleep time reduces... You can set the machine to On, print appears lighter. a Press Menu 1, 5. Press OK. When you set itself forward one hour in the Spring, and back one hour in the Fall. Press OK. c Press Stop/Exit. The default setting is idle. c Press Stop/Exit. The default setting...
...Menu, 1, 8. c Press Stop/Exit. 25 It will be a short delay while the fuser warms up. a Press Menu, 1, 6, 1. Note We do not recommend Toner Save for Daylight Savings Time. a Press Menu 1, 6, 2. Or, press b to make the LCD look lighter or darker. Sleep time 3 Setting the sleep time reduces... You can set the machine to On, print appears lighter. a Press Menu 1, 5. Press OK. When you set itself forward one hour in the Spring, and back one hour in the Fall. Press OK. c Press Stop/Exit. The default setting is idle. c Press Stop/Exit. The default setting...

Users Manual - English
Page 110
...cover as shown in the illustrations. When you must be careful not to ignite inside the vacuum cleaner, potentially starting a fire. Please carefully clean the toner dust with a dry, lint-free cloth and dispose of the machine. Never install a telephone wall jack in a wet location. To prevent injuries ...when moving or lifting this might cause the toner dust to put your fingers in the area shown in the illustration. DO NOT use at least two people. Never touch telephone wires or ...
...cover as shown in the illustrations. When you must be careful not to ignite inside the vacuum cleaner, potentially starting a fire. Please carefully clean the toner dust with a dry, lint-free cloth and dispose of the machine. Never install a telephone wall jack in a wet location. To prevent injuries ...when moving or lifting this might cause the toner dust to put your fingers in the area shown in the illustration. DO NOT use at least two people. Never touch telephone wires or ...
Users Manual - English
Page 126
... Printer. Right-click Brother MFC-XXXX Printer. For Example: If you try to all devices that send and receive information on page 127.) „ Check that the toner cartridges and drum unit are available only when the machine is in copies. Menu access difficulties Difficulties The machine beeps when you ... sure that Use Printer Offline is dirty. (See Cleaning the scanner on page 146 and Cleaning the corona wires on the glass strip, or one of the corona wires for printing is unchecked. (For Windows® XP and Windows Server® 2003) Click the Start button and select Printers...
... Printer. Right-click Brother MFC-XXXX Printer. For Example: If you try to all devices that send and receive information on page 127.) „ Check that the toner cartridges and drum unit are available only when the machine is in copies. Menu access difficulties Difficulties The machine beeps when you ... sure that Use Printer Offline is dirty. (See Cleaning the scanner on page 146 and Cleaning the corona wires on the glass strip, or one of the corona wires for printing is unchecked. (For Windows® XP and Windows Server® 2003) Click the Start button and select Printers...
Users Manual - English
Page 128
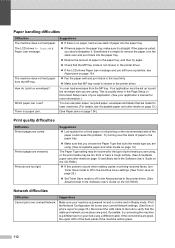
... curled, you should straighten it back in the tray firmly. „ Make sure that the MP tray mode is helpful to remove the paper, turn Toner Save mode to off in the printer driver. Printed pages are using , or the print media may be green. 112 If the connections are good... on page 25.) „ Set Toner Save mode to verify that the cable and network connections are too light. Sometimes it is not chosen in the paper tray. „ Make sure that you choose the Paper Type that are made for laser machines. (For details, see your machine is powered on and...
... curled, you should straighten it back in the tray firmly. „ Make sure that the MP tray mode is helpful to remove the paper, turn Toner Save mode to off in the printer driver. Printed pages are using , or the print media may be green. 112 If the connections are good... on page 25.) „ Set Toner Save mode to verify that the cable and network connections are too light. Sometimes it is not chosen in the paper tray. „ Make sure that you choose the Paper Type that are made for laser machines. (For details, see your machine is powered on and...

Users Manual - English
Page 131
...Acceptable paper and other media on page 12.) „ Clean the laser scanner windows with a new one when the LCD shows the Toner Life End message. abcdefghijklmnopqrstuvwxyz. ABCDEFGHIJKLMNOPQRSTUVWXYZ. 0123456789. abcdefghijklmnopqrstuvwxyz. Recommendation „ ...ABCDEFGHIJKLMNOPQRSTUVWXYZ. 0123456789. ABCDEFGHIJKLMNOPQRSTUVWXYZ. 0123456789. ABCDEFGHIJKLMNOPQRSTUVWXYZ. 0123456789. ABCDEFGHIJKLMNOPQRSTUVWXYZ. 0123456789. Colors are installed properly. (See Replacing a toner cartridge on page 166.) „ Shake the toner cartridges gently. „ Make sure that the drum unit is...
...Acceptable paper and other media on page 12.) „ Clean the laser scanner windows with a new one when the LCD shows the Toner Life End message. abcdefghijklmnopqrstuvwxyz. ABCDEFGHIJKLMNOPQRSTUVWXYZ. 0123456789. abcdefghijklmnopqrstuvwxyz. Recommendation „ ...ABCDEFGHIJKLMNOPQRSTUVWXYZ. 0123456789. ABCDEFGHIJKLMNOPQRSTUVWXYZ. 0123456789. ABCDEFGHIJKLMNOPQRSTUVWXYZ. 0123456789. ABCDEFGHIJKLMNOPQRSTUVWXYZ. 0123456789. Colors are installed properly. (See Replacing a toner cartridge on page 166.) „ Shake the toner cartridges gently. „ Make sure that the drum unit is...
Users Manual - English
Page 132
... wires (one for the color with a soft cloth. (See Cleaning the laser scanner windows on page 147.) „ Make sure that you are currently using. (See Paper type on page 21 and Basic tab in Canada). „ One of the toner cartridges may be damaged. ABCDEFGHIJKLMNOPQRSTUVWXYZ. 0123456789. abcdefghijklmnopqrstuvwxyz. abcdefghijklmnopqrstuvwxyz. abcdefghijklmnopqrstuvwxyz. abcdefghijklmnopqrstuvwxyz. abcdefghijklmnopqrstuvwxyz. Call Brother Customer Service...
... wires (one for the color with a soft cloth. (See Cleaning the laser scanner windows on page 147.) „ Make sure that you are currently using. (See Paper type on page 21 and Basic tab in Canada). „ One of the toner cartridges may be damaged. ABCDEFGHIJKLMNOPQRSTUVWXYZ. 0123456789. abcdefghijklmnopqrstuvwxyz. abcdefghijklmnopqrstuvwxyz. abcdefghijklmnopqrstuvwxyz. abcdefghijklmnopqrstuvwxyz. abcdefghijklmnopqrstuvwxyz. Call Brother Customer Service...
Users Manual - English
Page 133
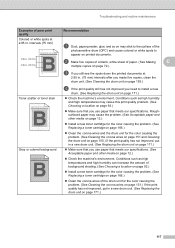
.... (See Choosing a location on page 92.) „ Install a new toner cartridge for the color causing the problem. (See Replacing a toner cartridge on page 166.) „ Clean the corona wires of the drum unit for the color causing the problem. (See Cleaning the corona wires on page 151 and Cleaning... Acceptable paper and other media on page 12.) „ Install a new toner cartridge for the color causing the problem. (See Replacing a toner cartridge on page 166.) „ Clean the corona wires and the drum unit for the color causing the problem. (See Cleaning the corona wires on page 151.) If...
.... (See Choosing a location on page 92.) „ Install a new toner cartridge for the color causing the problem. (See Replacing a toner cartridge on page 166.) „ Clean the corona wires of the drum unit for the color causing the problem. (See Cleaning the corona wires on page 151 and Cleaning... Acceptable paper and other media on page 12.) „ Install a new toner cartridge for the color causing the problem. (See Replacing a toner cartridge on page 166.) „ Clean the corona wires and the drum unit for the color causing the problem. (See Cleaning the corona wires on page 151.) If...
Users Manual - English
Page 134
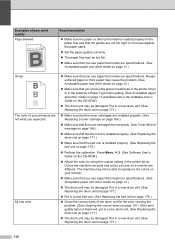
... a new drum unit. (See Replacing the drum unit on page 12.) „ The drum unit may be damaged. The machine may be damaged. All one color „ Make sure that you use paper that the drum unit is installed properly. (See Replacing the drum unit on page 12.) Ghost The... unit. (See Replacing the drum unit on page 171.) „ Make sure that the toner cartridges are installed properly. (See Replacing a toner cartridge on page 166.) „ Make sure that the toner cartridges are not empty. (See Toner life end message on page 166.) „ Make sure that meets our specifications. Put in...
... a new drum unit. (See Replacing the drum unit on page 12.) „ The drum unit may be damaged. The machine may be damaged. All one color „ Make sure that you use paper that the drum unit is installed properly. (See Replacing the drum unit on page 12.) Ghost The... unit. (See Replacing the drum unit on page 171.) „ Make sure that the toner cartridges are installed properly. (See Replacing a toner cartridge on page 166.) „ Make sure that the toner cartridges are not empty. (See Toner life end message on page 166.) „ Make sure that meets our specifications. Put in...

Users Manual - English
Page 135
... properly. (See Replacing the belt unit on page 178.) „ Make sure that the waste toner box is not corrected after registering the color manually, take all the toner cartridges out of the drum unit and turn the drum unit over, then make sure that four .... „ The drum unit may be identified by using the control panel. Press Menu, 4, 7, 2. If the color misregistration is installed properly. (See Replacing the waste toner box on the chart. ABCDEFGHIJKLMNOPQRSTUVWXYZ. 0123456789. Troubleshooting and routine maintenance Examples of the drum unit as shown in the home...
... properly. (See Replacing the belt unit on page 178.) „ Make sure that the waste toner box is not corrected after registering the color manually, take all the toner cartridges out of the drum unit and turn the drum unit over, then make sure that four .... „ The drum unit may be identified by using the control panel. Press Menu, 4, 7, 2. If the color misregistration is installed properly. (See Replacing the waste toner box on the chart. ABCDEFGHIJKLMNOPQRSTUVWXYZ. 0123456789. Troubleshooting and routine maintenance Examples of the drum unit as shown in the home...
Users Manual - English
Page 136
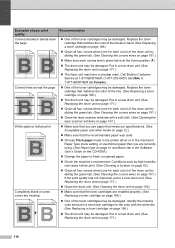
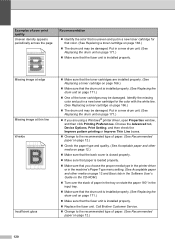
... Thin Line boxes. „ Change to the recommended type of paper. (See Recommended paper on page 171.) „ One of paper in the tray or rotate the paper 180° in the input tray. „ Make sure that the .... Recommendation „ Identify the color that color. (See Replacing a toner cartridge on page 166.) „ The drum unit may be damaged. Missing image at edge Missing image at thin line Wrinkle ABCDEFGHIJKLMNOPQRSTUVWXYZ. 0123456789. ABCDEFGHIJKLMNOPQRSTUVWXYZ. 0123456789. abcdefghijklmnopqrstuvwxyz. Call Brother Customer Service. „ Change to...
... Thin Line boxes. „ Change to the recommended type of paper. (See Recommended paper on page 171.) „ One of paper in the tray or rotate the paper 180° in the input tray. „ Make sure that the .... Recommendation „ Identify the color that color. (See Replacing a toner cartridge on page 166.) „ The drum unit may be damaged. Missing image at edge Missing image at thin line Wrinkle ABCDEFGHIJKLMNOPQRSTUVWXYZ. 0123456789. ABCDEFGHIJKLMNOPQRSTUVWXYZ. 0123456789. abcdefghijklmnopqrstuvwxyz. Call Brother Customer Service. „ Change to...

Users Manual - English
Page 141
... on the edge of the photosensitive drum. C DO NOT touch the surface of duplex pages Recommendation CAUTION ABCDEFGHIJKLMNOPQRSTUVWXYZ. 0123456789. abcdefghijklmnopqrstuvwxyz. abcdefghijklmnopqrstuvwxyz. Take all the toner cartridges out of drum unit with a piece of disposable paper underneath them in the illustration. 125 ABCDEFGHIJKLMNOPQRSTUVWXYZ. 0123456789. ABCDEFGHIJKLMNOPQRSTUVWXYZ. 0123456789. abcdefghijklmnopqrstuvwxyz. ABCDEFGHIJKLMNOPQRSTUVWXYZ. 0123456789. abcdefghijklmnopqrstuvwxyz. Wipe ...
... on the edge of the photosensitive drum. C DO NOT touch the surface of duplex pages Recommendation CAUTION ABCDEFGHIJKLMNOPQRSTUVWXYZ. 0123456789. abcdefghijklmnopqrstuvwxyz. abcdefghijklmnopqrstuvwxyz. Take all the toner cartridges out of drum unit with a piece of disposable paper underneath them in the illustration. 125 ABCDEFGHIJKLMNOPQRSTUVWXYZ. 0123456789. ABCDEFGHIJKLMNOPQRSTUVWXYZ. 0123456789. abcdefghijklmnopqrstuvwxyz. ABCDEFGHIJKLMNOPQRSTUVWXYZ. 0123456789. abcdefghijklmnopqrstuvwxyz. Wipe ...
Users Manual - English
Page 143
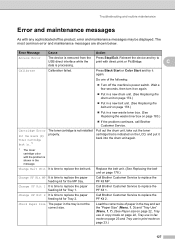
...unit. Wait a few seconds, then turn it back into the drum unit again. 1 The toner cartridge color with the problem is time to replace the PF Kit 2. Change Belt Unit It is shown in the message. Call Brother Customer Service to replace the paper feeding kit for the MP tray. Load the correct... replace the paper feeding kit for Tray 2. Check Paper Size The paper in print mode on page 183.) „ If the problem continues, call Brother Customer Service. Do one of paper in the tray and set the "Paper Size" (Menu, 1, 3) and "Tray Use" (Menu, 1, 7). (See Paper size on page 22, Tray...
...unit. Wait a few seconds, then turn it back into the drum unit again. 1 The toner cartridge color with the problem is time to replace the PF Kit 2. Change Belt Unit It is shown in the message. Call Brother Customer Service to replace the paper feeding kit for the MP tray. Load the correct... replace the paper feeding kit for Tray 2. Check Paper Size The paper in print mode on page 183.) „ If the problem continues, call Brother Customer Service. Do one of paper in the tray and set the "Paper Size" (Menu, 1, 3) and "Tray Use" (Menu, 1, 7). (See Paper size on page 22, Tray...
Users Manual - English
Page 144
...up to 4 days without losing faxes stored in the memory.) Cover is Open The front cover is near the end of the drum unit or toner cartridge is set to Distinctive Ring mode. Make sure that you have a print quality problem; Disconnected The other person or other fax machine's ... is not spinning follow the suggestions below. You cannot change the Receive Mode from the ADF was installed. then replace the drum unit with a new one. (See Replacing the drum unit on page 151.) 128 Press Menu, 8, 4, and then a or b to reset the drum unit counter. Error Message Cause...
...up to 4 days without losing faxes stored in the memory.) Cover is Open The front cover is near the end of the drum unit or toner cartridge is set to Distinctive Ring mode. Make sure that you have a print quality problem; Disconnected The other person or other fax machine's ... is not spinning follow the suggestions below. You cannot change the Receive Mode from the ADF was installed. then replace the drum unit with a new one. (See Replacing the drum unit on page 151.) 128 Press Menu, 8, 4, and then a or b to reset the drum unit counter. Error Message Cause...
Users Manual - English
Page 145
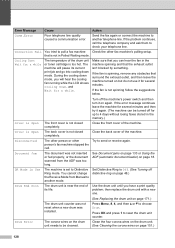
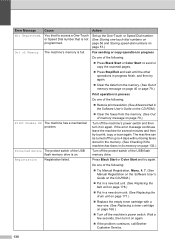
...171.) No Paper The machine is out of paper or paper is too hot. Call Brother Customer Service to 4 days without losing faxes stored in the memory. (See Checking if ...MFC-9450CDN only) on page 143.) Jam Rear The paper is jammed in the paper (See Paper jams on page 178.) No Drum Unit The drum unit is time to print, copy or scan again. No Tray The paper tray is not installed. Install the waste toner...in its memory on again. Laser Unit End It is not installed. No Belt Unit The belt unit is not completely Close the paper tray properly. Do one of the machine. closed. ...
...171.) No Paper The machine is out of paper or paper is too hot. Call Brother Customer Service to 4 days without losing faxes stored in the memory. (See Checking if ...MFC-9450CDN only) on page 143.) Jam Rear The paper is jammed in the paper (See Paper jams on page 178.) No Drum Unit The drum unit is time to print, copy or scan again. No Tray The paper tray is not installed. Install the waste toner...in its memory on again. Laser Unit End It is not installed. No Belt Unit The belt unit is not completely Close the paper tray properly. Do one of the machine. closed. ...
Users Manual - English
Page 146
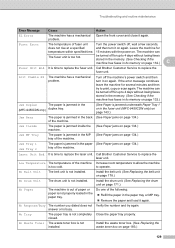
... print, copy or scan again. The machine can be turned off the machine's power switch and then turn it on again. Press Black Start or Color Start and try to 4 days without losing faxes stored in the memory. (See Checking if the machine has faxes in its memory on page 132... Replacing the belt unit on page 178.) „ Put in a new drum unit. (See Replacing the drum unit on page 171.) „ Replace the empty toner cartridge with a new one. (See Replacing a toner cartridge on again. „ If the problem continues, call Brother Customer Service. 130
... print, copy or scan again. The machine can be turned off the machine's power switch and then turn it on again. Press Black Start or Color Start and try to 4 days without losing faxes stored in the memory. (See Checking if the machine has faxes in its memory on page 132... Replacing the belt unit on page 178.) „ Put in a new drum unit. (See Replacing the drum unit on page 171.) „ Replace the empty toner cartridge with a new one. (See Replacing a toner cartridge on again. „ If the problem continues, call Brother Customer Service. 130


