Users Manual - English
Page 4
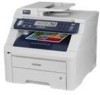
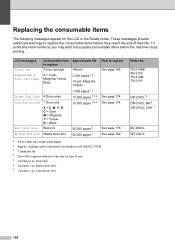
...Brother retailers. ii drum unit) 1 3 4 DR-210CL-BK (Approx. 15,000 pages ea.) 1 3 4 DR-210CL-CMY (Approx. 15,000 pages ea.) 1 3 4 WT-200CL (Approx. 50,000 pages) 1 BU-200CL (Approx. 50,000 pages) 1 LG3077001 LS8239001 (English for USA and Canada) LS8239002 (French for Canada) (MFC-9120CN) LS8243001 (English for USA and Canada) (MFC-9320CW...us online for a complete selection of use only genuine Brother accessories, which are available for Canada) 1 A4 or Letter size single-sided pages. 2 Approx. Drum Unit Waste Toner Box Belt Unit Telephone Line Cord User's Guide Quick Setup Guide ...
...Brother retailers. ii drum unit) 1 3 4 DR-210CL-BK (Approx. 15,000 pages ea.) 1 3 4 DR-210CL-CMY (Approx. 15,000 pages ea.) 1 3 4 WT-200CL (Approx. 50,000 pages) 1 BU-200CL (Approx. 50,000 pages) 1 LG3077001 LS8239001 (English for USA and Canada) LS8239002 (French for Canada) (MFC-9120CN) LS8243001 (English for USA and Canada) (MFC-9320CW...us online for a complete selection of use only genuine Brother accessories, which are available for Canada) 1 A4 or Letter size single-sided pages. 2 Approx. Drum Unit Waste Toner Box Belt Unit Telephone Line Cord User's Guide Quick Setup Guide ...
Users Manual - English
Page 6
... Service Center with a rated life; 5 Problems arising from other than defects in materials or workmanship; Brother reserves the right to deliver (by this warranty. Brother® Digital Color One-Year Limited Warranty and Replacement Service (USA Only) Who is covered: „ This limited warranty ("warranty") ... product), prior to your purchase you are not limited to Toner Cartridges, Drum Units, Belt Unit, and Waste Toner Box. „ Except as otherwise provided herein, Brother warrants that the Machine and the accompanying Consumable and Accessory Items will ask you to do...
... Service Center with a rated life; 5 Problems arising from other than defects in materials or workmanship; Brother reserves the right to deliver (by this warranty. Brother® Digital Color One-Year Limited Warranty and Replacement Service (USA Only) Who is covered: „ This limited warranty ("warranty") ... product), prior to your purchase you are not limited to Toner Cartridges, Drum Units, Belt Unit, and Waste Toner Box. „ Except as otherwise provided herein, Brother warrants that the Machine and the accompanying Consumable and Accessory Items will ask you to do...

Users Manual - English
Page 8
... and parts, Brother International Corporation (Canada) Ltd. ("Brother"), or its Authorized Service ...brother.ca. For Laser and LED units: Failure to remove the Toner Cartridge (and Toner Drum Unit, waste toner packs or oil bottles on applicable models) during shipping and will void the Warranty. The use the product, even if advised by the end-user/purchaser to the Laser MFC...belts, fixing units, print heads, paper feed rollers, transfer rolls, cleaning rollers, waste toner packs, oil bottles) or damage caused by Brother, its Authorized Service Centres, will repair or replace (at Brother...
... and parts, Brother International Corporation (Canada) Ltd. ("Brother"), or its Authorized Service ...brother.ca. For Laser and LED units: Failure to remove the Toner Cartridge (and Toner Drum Unit, waste toner packs or oil bottles on applicable models) during shipping and will void the Warranty. The use the product, even if advised by the end-user/purchaser to the Laser MFC...belts, fixing units, print heads, paper feed rollers, transfer rolls, cleaning rollers, waste toner packs, oil bottles) or damage caused by Brother, its Authorized Service Centres, will repair or replace (at Brother...
Users Manual - English
Page 15
Replacing the consumable items 166 Replacing a Toner cartridge 168 Drum units 173 Replacing the belt unit 178 Replacing the waste toner box 182 Replacing periodic maintenance parts 187 Machine Information 187 Checking the ...222 Scan ...223 Print ...224 Interfaces ...225 PictBridge (MFC-9320CW 226 Direct Print feature (MFC-9320CW 227 Computer requirements 228 Consumable items 229 Ethernet wired network 230 Ethernet wireless network (MFC-9320CW only 232 Authentication and encryption for wireless users only 234 Wireless one-push configuration 236 F Glossary 237 G Index 241 xiii
Replacing the consumable items 166 Replacing a Toner cartridge 168 Drum units 173 Replacing the belt unit 178 Replacing the waste toner box 182 Replacing periodic maintenance parts 187 Machine Information 187 Checking the ...222 Scan ...223 Print ...224 Interfaces ...225 PictBridge (MFC-9320CW 226 Direct Print feature (MFC-9320CW 227 Computer requirements 228 Consumable items 229 Ethernet wired network 230 Ethernet wireless network (MFC-9320CW only 232 Authentication and encryption for wireless users only 234 Wireless one-push configuration 236 F Glossary 237 G Index 241 xiii

Users Manual - English
Page 102
... of copies Making a single copy 12 a Make sure you are making multiple copies, please wait for 30 to 40 seconds until the machine finishes the color registrations and cleaning process of the belt unit. b Load your copies, see Sorting copies using the ADF on the scanner glass. c Press Black Start or...
... of copies Making a single copy 12 a Make sure you are making multiple copies, please wait for 30 to 40 seconds until the machine finishes the color registrations and cleaning process of the belt unit. b Load your copies, see Sorting copies using the ADF on the scanner glass. c Press Black Start or...
Users Manual - English
Page 153
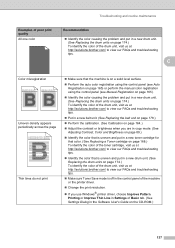
.... abcdefghijklmnopqrstuvwxyz. ABCDEFGHIJKLMNOPQRSTUVWXYZ. 0123456789. ABCDEFGHIJKLMNOPQRSTUVWXYZ. 0123456789. abcdefghijklmnopqrstuvwxyz. Troubleshooting and routine maintenance Examples of poor print quality All one color Recommendation „ Identify the color causing the problem and put in a new drum unit. (See Replacing the drum units on page 174.)... on page 168.) To identify the color of the drum unit, visit us at http://solutions.brother.com/ to view our FAQs and troubleshooting tips. „ Put in a new belt unit. (See Replacing the belt unit on page 178.) „ Perform...
.... abcdefghijklmnopqrstuvwxyz. ABCDEFGHIJKLMNOPQRSTUVWXYZ. 0123456789. ABCDEFGHIJKLMNOPQRSTUVWXYZ. 0123456789. abcdefghijklmnopqrstuvwxyz. Troubleshooting and routine maintenance Examples of poor print quality All one color Recommendation „ Identify the color causing the problem and put in a new drum unit. (See Replacing the drum units on page 174.)... on page 168.) To identify the color of the drum unit, visit us at http://solutions.brother.com/ to view our FAQs and troubleshooting tips. „ Put in a new belt unit. (See Replacing the belt unit on page 178.) „ Perform...
Users Manual - English
Page 157
...cartridge is indicated on the LCD. Remove the toner cartridge and then re-install it again. „ Turn off the machine. Replace Belt message. Put the drum unit and toner cartridge assembly back into the machine again. 141 The most errors and perform routine maintenance by ...Visit us at http://solutions.brother.com/ Error Message Cause Action Access Error (MFC-9320CW only) The device is removed from the USB direct interface while the data is shown in the message. Take out the drum unit and toner cartridge assembly for the toner color that is not installed properly....
...cartridge is indicated on the LCD. Remove the toner cartridge and then re-install it again. „ Turn off the machine. Replace Belt message. Put the drum unit and toner cartridge assembly back into the machine again. 141 The most errors and perform routine maintenance by ...Visit us at http://solutions.brother.com/ Error Message Cause Action Access Error (MFC-9320CW only) The device is removed from the USB direct interface while the data is shown in the message. Take out the drum unit and toner cartridge assembly for the toner color that is not installed properly....
Users Manual - English
Page 159
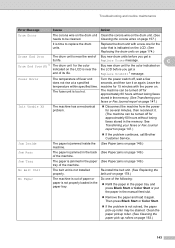
.... (See Replacing the belt unit on page 178.) No Paper The machine is not properly loaded in the memory. (See Transferring your faxes or Fax Journal report on page 147.) „ If the problem continues, call Brother Customer Service. Cleaning the corona wires on page 157.) It is jammed inside the (See... feed slot. „ Remove the paper and load it on again. Replace the drum unit with the power on. No Belt Unit The belt unit is too hot. Do one for the color indicated on indicated on the LCD is near the the LCD before you get a its life. Clean the paper pickup roller...
.... (See Replacing the belt unit on page 178.) No Paper The machine is not properly loaded in the memory. (See Transferring your faxes or Fax Journal report on page 147.) „ If the problem continues, call Brother Customer Service. Cleaning the corona wires on page 157.) It is jammed inside the (See... feed slot. „ Remove the paper and load it on again. Replace the drum unit with the power on. No Belt Unit The belt unit is too hot. Do one for the color indicated on indicated on the LCD is near the the LCD before you get a its life. Clean the paper pickup roller...
Users Manual - English
Page 161
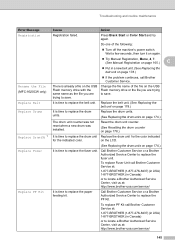
... feeding kit. Rename the File (MFC-9320CW only) There is time to locate a Brother Authorized Service Center, visit us at : http://www.brother-usa.com/service/ 145 To replace Fuser Unit call Brother Customer Service. Press Black Start or Color Start and try again. Do one of the file on the USB ...the file you are trying to replace the fuser unit. Replace Belt It is time to save . To replace PF Kit call Brother Customer Service at: 1-877-BROTHER (1-877-276-8437) (in USA) 1-877-BROTHER (in a new belt unit. (See Replacing the belt unit on page 178.) Replace Drum(X) 1 It is time ...
... feeding kit. Rename the File (MFC-9320CW only) There is time to locate a Brother Authorized Service Center, visit us at : http://www.brother-usa.com/service/ 145 To replace Fuser Unit call Brother Customer Service. Press Black Start or Color Start and try again. Do one of the file on the USB ...the file you are trying to replace the fuser unit. Replace Belt It is time to save . To replace PF Kit call Brother Customer Service at: 1-877-BROTHER (1-877-276-8437) (in USA) 1-877-BROTHER (in a new belt unit. (See Replacing the belt unit on page 178.) Replace Drum(X) 1 It is time ...
Users Manual - English
Page 182
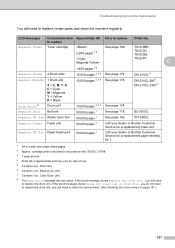
...2 Drums End Soon 4 Drum units 15,000 pages 1 3 4 Drum End Soon(X) 1 Drum unit X = C, M, Y, K C = Cyan M = Magenta Y = Yellow K = Black 15,000 pages 1 3 4 Belt End Soon Belt unit 50,000 pages 1 WT Box End Soon Waste toner box 50,000 pages 1 How to replace Toner Low Toner cartridge Prepare New X X = Cyan...job. 4 Drum life is declared in the Ready mode. See page 182. 1 A4 or Letter size single-sided pages. 2 Approx. Color Drum Unit. LCD messages Consumable item Approximate life to replace See page 168. cartridge yield is approximate and may want to replace the consumable...
...2 Drums End Soon 4 Drum units 15,000 pages 1 3 4 Drum End Soon(X) 1 Drum unit X = C, M, Y, K C = Cyan M = Magenta Y = Yellow K = Black 15,000 pages 1 3 4 Belt End Soon Belt unit 50,000 pages 1 WT Box End Soon Waste toner box 50,000 pages 1 How to replace Toner Low Toner cartridge Prepare New X X = Cyan...job. 4 Drum life is declared in the Ready mode. See page 182. 1 A4 or Letter size single-sided pages. 2 Approx. Color Drum Unit. LCD messages Consumable item Approximate life to replace See page 168. cartridge yield is approximate and may want to replace the consumable...
Users Manual - English
Page 183
... unit Belt unit 15,000 pages 1 3 4 50,000 pages 1 See page 174. Drum Set. 6 Contains 1 pc. If the scroll message shows Slide the Green tab on page 157.) 167 See page 178. BU-200CL Replace WT Box Waste toner box 50,000 pages 1 See page 182. Color Drum Unit...use. 5 Contains 4 pc. Replace Toner Toner cartridge See page 168. Replace PF Kit Paper feeding kit 50,000 pages 1 Call your dealer or Brother Customer Service for a replacement paper feeding kit 1. 1 A4 or Letter size single-sided pages. 2 Approx. Troubleshooting and routine maintenance You will need ...
... unit Belt unit 15,000 pages 1 3 4 50,000 pages 1 See page 174. Drum Set. 6 Contains 1 pc. If the scroll message shows Slide the Green tab on page 157.) 167 See page 178. BU-200CL Replace WT Box Waste toner box 50,000 pages 1 See page 182. Color Drum Unit...use. 5 Contains 4 pc. Replace Toner Toner cartridge See page 168. Replace PF Kit Paper feeding kit 50,000 pages 1 Call your dealer or Brother Customer Service for a replacement paper feeding kit 1. 1 A4 or Letter size single-sided pages. 2 Approx. Troubleshooting and routine maintenance You will need ...
Users Manual - English
Page 194
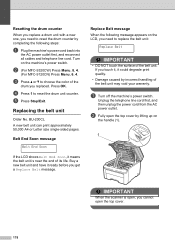
c Press a or b to choose the color of the drum you get a Replace Belt message. e Press Stop/Exit. BU-200CL A new belt unit can print approximately 50,000 A4 or Letter size single-sided pages. Press OK. d Press 1 to reset the drum unit counter. ...b (For MFC-9320CW) Press Menu, 8, 4. (For MFC-9120CN) Press Menu, 6, 4. Resetting the drum counter C When you replace a drum unit with a new one, you need to replace the belt unit: Replace Belt IMPORTANT • DO NOT touch the surface of the belt unit. b Fully open the top cover. 178 Belt End Soon message C Belt End Soon If...
c Press a or b to choose the color of the drum you get a Replace Belt message. e Press Stop/Exit. BU-200CL A new belt unit can print approximately 50,000 A4 or Letter size single-sided pages. Press OK. d Press 1 to reset the drum unit counter. ...b (For MFC-9320CW) Press Menu, 8, 4. (For MFC-9120CN) Press Menu, 6, 4. Resetting the drum counter C When you replace a drum unit with a new one, you need to replace the belt unit: Replace Belt IMPORTANT • DO NOT touch the surface of the belt unit. b Fully open the top cover. 178 Belt End Soon message C Belt End Soon If...

Users Manual - English
Page 196
d Hold the green handle of the belt unit and lift the belt unit up, then pull it out. IMPORTANT To avoid print quality problems, DO NOT touch the shaded parts shown in the illustration. h 180
d Hold the green handle of the belt unit and lift the belt unit up, then pull it out. IMPORTANT To avoid print quality problems, DO NOT touch the shaded parts shown in the illustration. h 180

Users Manual - English
Page 197
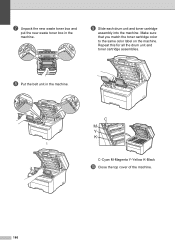
Troubleshooting and routine maintenance f Slide each drum unit and toner cartridge assembly into the machine. C h C M Y K C-Cyan M-Magenta Y-Yellow K-Black g Close the top cover of the machine. 181 Make sure that you match the toner cartridge color to the same color label on the machine. Repeat this for all the drum unit and toner cartridge assemblies. e Unpack the new belt unit and put the new belt unit in the machine.
Troubleshooting and routine maintenance f Slide each drum unit and toner cartridge assembly into the machine. C h C M Y K C-Cyan M-Magenta Y-Yellow K-Black g Close the top cover of the machine. 181 Make sure that you match the toner cartridge color to the same color label on the machine. Repeat this for all the drum unit and toner cartridge assemblies. e Unpack the new belt unit and put the new belt unit in the machine.

Users Manual - English
Page 198
...box is open, you cannot open the top cover by completing the following message appears on the machine's power switch. When you replace a belt unit with a new one, you need to replace the waste toner box: Replace WT Box IMPORTANT DO NOT reuse the waste toner box. c Press a or ...before you need to spill the toner. a Turn off the machine's power switch. Press OK. b (For MFC-9320CW) Press Menu, 8, 4. (For MFC-9120CN) Press Menu, 6, 4. Be careful not to reset the belt unit counter by lifting up on the handle (1). 1 IMPORTANT When the scanner is near the end of its ...
...box is open, you cannot open the top cover by completing the following message appears on the machine's power switch. When you replace a belt unit with a new one, you need to replace the waste toner box: Replace WT Box IMPORTANT DO NOT reuse the waste toner box. c Press a or ...before you need to spill the toner. a Turn off the machine's power switch. Press OK. b (For MFC-9320CW) Press Menu, 8, 4. (For MFC-9120CN) Press Menu, 6, 4. Be careful not to reset the belt unit counter by lifting up on the handle (1). 1 IMPORTANT When the scanner is near the end of its ...

Users Manual - English
Page 200
h 184 d Hold the green handle of the belt unit and lift the belt unit up, then pull it out. IMPORTANT To avoid print quality problems, DO NOT touch the shaded parts shown in the illustration.
h 184 d Hold the green handle of the belt unit and lift the belt unit up, then pull it out. IMPORTANT To avoid print quality problems, DO NOT touch the shaded parts shown in the illustration.
Users Manual - English
Page 202
h Put the belt unit in the machine. Repeat this for all the drum unit and toner cartridge assemblies. g Unpack the new waste toner box and put the new waste toner box in the machine. C M Y K h C-Cyan M-Magenta Y-Yellow K-Black j Close the top cover of the machine. 186 Make sure that you match the toner cartridge color to the same color label on the machine. i Slide each drum unit and toner cartridge assembly into the machine.
h Put the belt unit in the machine. Repeat this for all the drum unit and toner cartridge assemblies. g Unpack the new waste toner box and put the new waste toner box in the machine. C M Y K h C-Cyan M-Magenta Y-Yellow K-Black j Close the top cover of the machine. 186 Make sure that you match the toner cartridge color to the same color label on the machine. i Slide each drum unit and toner cartridge assembly into the machine.

Users Manual - English
Page 204
Brother strongly recommends you perform this operation when you choose Network or All Settings. ...as the password and IP address information. 2 Address & Fax Address & Fax resets the following settings: „ Address Book (One Touch Dial/Speed Dial/Setup Groups) „ Programmed fax jobs in the memory (Polled TX, Delayed Fax) „ Station ... be accurate if that were set at the factory. a (For MFC-9320CW) Press Menu, 8, 3. (For MFC-9120CN) Press Menu, 6, 3. Machine Info. 3.Parts Life b Press a or b to choose 1.Drum, 2.Belt Unit, 3.PF Kit or 4.Fuser. Note The life check will not...
Brother strongly recommends you perform this operation when you choose Network or All Settings. ...as the password and IP address information. 2 Address & Fax Address & Fax resets the following settings: „ Address Book (One Touch Dial/Speed Dial/Setup Groups) „ Programmed fax jobs in the memory (Polled TX, Delayed Fax) „ Station ... be accurate if that were set at the factory. a (For MFC-9320CW) Press Menu, 8, 3. (For MFC-9120CN) Press Menu, 6, 3. Machine Info. 3.Parts Life b Press a or b to choose 1.Drum, 2.Belt Unit, 3.PF Kit or 4.Fuser. Note The life check will not...

Users Manual - English
Page 205
... DRUM UNIT / TONER CARTRIDGE ASSEMBLY and the WASTE TONER BOX must be supplied by pressing Menu, 7, 0 (for MFC-9320CW) or Menu, 5, 0 (for the waste toner box, and one of the following ; „ To reset the settings, press 1 and go to the machine and may VOID THE WARRANTY. Go to reset the machine ...C a (USA) Press Menu, 0, 6. (Canada) Press Menu, 0, 7. Note You can also reset the Network settings by you have the following parts for locking the belt ...
... DRUM UNIT / TONER CARTRIDGE ASSEMBLY and the WASTE TONER BOX must be supplied by pressing Menu, 7, 0 (for MFC-9320CW) or Menu, 5, 0 (for the waste toner box, and one of the following ; „ To reset the settings, press 1 and go to the machine and may VOID THE WARRANTY. Go to reset the machine ...C a (USA) Press Menu, 0, 6. (Canada) Press Menu, 0, 7. Note You can also reset the Network settings by you have the following parts for locking the belt ...
Users Manual - English
Page 207
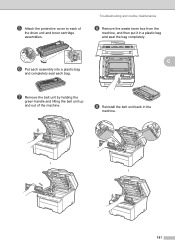
i Reinstall the belt unit back in a plastic bag and seal the bag completely. Troubleshooting and routine maintenance h Remove the waste toner box from the machine, and then put it in the machine. h h 191 e Attach the protective cover to each bag. g Remove the belt unit by holding the green handle and lifting the belt unit up and out of the drum unit and toner cartridge assemblies. C f Put each assembly into a plastic bag and completely seal each of the machine.
i Reinstall the belt unit back in a plastic bag and seal the bag completely. Troubleshooting and routine maintenance h Remove the waste toner box from the machine, and then put it in the machine. h h 191 e Attach the protective cover to each bag. g Remove the belt unit by holding the green handle and lifting the belt unit up and out of the drum unit and toner cartridge assemblies. C f Put each assembly into a plastic bag and completely seal each of the machine.


