Owners Manual
Page 125
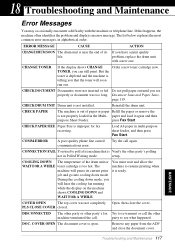
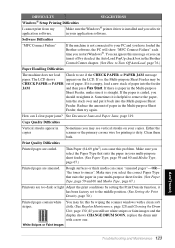
... too long. If this happens, the machine often identifies the problem and displays an error message. ERROR MESSAGE CAUSE ACTION CHANGE DRUM SOON The drum unit is ready. The machine to poll a fax machine that the toner will pause its If you see what happened. DOC....the other party's polling not in the Multi- 18 Troubleshooting and Maintenance Error Messages You may occasionally encounter a difficulty with a new one. CHECK DRUM UNIT Drum unit is too hot. press Fax Start. Load A4 paper in alphabetical order. job and go into cooling down mode, you can still ...
... too long. If this happens, the machine often identifies the problem and displays an error message. ERROR MESSAGE CAUSE ACTION CHANGE DRUM SOON The drum unit is ready. The machine to poll a fax machine that the toner will pause its If you see what happened. DOC....the other party's polling not in the Multi- 18 Troubleshooting and Maintenance Error Messages You may occasionally encounter a difficulty with a new one. CHECK DRUM UNIT Drum unit is too hot. press Fax Start. Load A4 paper in alphabetical order. job and go into cooling down mode, you can still ...
Owners Manual
Page 126
... or Paper Jam, machine. page 119. Reinstall the drum unit, then close the top cover again. Replace the toner cartridge with a new one, or install the toner cartridge into the drum unit. used as a copier.) See Out of your Brother dealer for service. PLS OPEN COVER A page, piece... of your Brother dealer for service. TONER EMPTY Toner is used as a ...
... or Paper Jam, machine. page 119. Reinstall the drum unit, then close the top cover again. Replace the toner cartridge with a new one, or install the toner cartridge into the drum unit. used as a copier.) See Out of your Brother dealer for service. PLS OPEN COVER A page, piece... of your Brother dealer for service. TONER EMPTY Toner is used as a ...

Owners Manual
Page 128
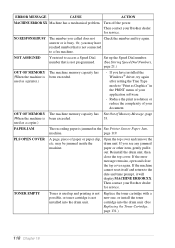
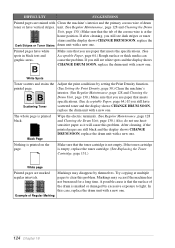
Paper is jammed near the Drum Unit or in the Multi-purpose Sheet Feeder 1 Push down the paper lever to pull the jammed paper upward and out of the feeder. 2 Open the top cover and check that a torn piece of paper does not remain inside the machine. 3 Close the top cover. Paper is Jammed near drum unit 120 Chapter 18 Paper is Jammed in the Fuser Unit 1 Open the top cover by pulling the lever toward you. 2 Remove the drum unit. 3 Gently pull out the jammed paper. 4 Reinstall the drum unit. 5 Close the top cover.
Paper is jammed near the Drum Unit or in the Multi-purpose Sheet Feeder 1 Push down the paper lever to pull the jammed paper upward and out of the feeder. 2 Open the top cover and check that a torn piece of paper does not remain inside the machine. 3 Close the top cover. Paper is Jammed near drum unit 120 Chapter 18 Paper is Jammed in the Fuser Unit 1 Open the top cover by pulling the lever toward you. 2 Remove the drum unit. 3 Gently pull out the jammed paper. 4 Reinstall the drum unit. 5 Close the top cover.
Owners Manual
Page 130
... software. The machine knows the incoming call is not a fax so it is 51). Pick up . My headers or footers appear Most laser printers have been appropriate. The machine prints unexpectedly or it . Send the fax again, but do not show up immediately. Transmission verification prints...is securely connected between the machine and computer. When the receiving party says The machine's scanner may be dirty. The toner cartridge and drum unit are the first two lines and last two lines, leaves 62 the screen but try again. Check to answer the telephone call. The...
... software. The machine knows the incoming call is not a fax so it is 51). Pick up . My headers or footers appear Most laser printers have been appropriate. The machine prints unexpectedly or it . Send the fax again, but do not show up immediately. Transmission verification prints...is securely connected between the machine and computer. When the receiving party says The machine's scanner may be dirty. The toner cartridge and drum unit are the first two lines and last two lines, leaves 62 the screen but try again. Check to answer the telephone call. The...
Owners Manual
Page 131
... Type that suits the paper in your application software. Make sure you can ignore this problem. Software Difficulties "MFC Connect Failure" If the machine is dirty. If it is empty, load a new stack of paper into the... windows with a clean soft cloth. (See Regular Maintenance, page 128 and Cleaning the Drum Unit, page 130.) If you should straighten it in the Brother Control Center chapter. (See How to Turn Off AutoLoad, page 76.) Paper Handling Difficulties... may see white stripes or faint images and the display shows CHANGE DRUM SOON, replace the drum unit with a new one.
... Type that suits the paper in your application software. Make sure you can ignore this problem. Software Difficulties "MFC Connect Failure" If the machine is dirty. If it is empty, load a new stack of paper into the... windows with a clean soft cloth. (See Regular Maintenance, page 128 and Cleaning the Drum Unit, page 130.) If you should straighten it in the Brother Control Center chapter. (See How to Turn Off AutoLoad, page 76.) Paper Handling Difficulties... may see white stripes or faint images and the display shows CHANGE DRUM SOON, replace the drum unit with a new one.
Owners Manual
Page 132
... still see white spots and the display shows CHANGE DRUM SOON, replace the drum unit with a new one . After cleaning, if the printed pages are still black and the display shows CHANGE DRUM SOON, replace the drum unit with a new one . DIFFICULTY SUGGESTIONS Printed pages are stained with Clean the... 131.) White page Printed pages are marked regular intervals. Printed pages have scattered toner and the display shows CHANGE DRUM SOON, replace the drum unit with a new one. Make sure that meets the specifications. (See Acceptable Paper, page 64.) Rough surface or thick media can cause...
... still see white spots and the display shows CHANGE DRUM SOON, replace the drum unit with a new one . After cleaning, if the printed pages are still black and the display shows CHANGE DRUM SOON, replace the drum unit with a new one . DIFFICULTY SUGGESTIONS Printed pages are stained with Clean the... 131.) White page Printed pages are marked regular intervals. Printed pages have scattered toner and the display shows CHANGE DRUM SOON, replace the drum unit with a new one. Make sure that meets the specifications. (See Acceptable Paper, page 64.) Rough surface or thick media can cause...
Owners Manual
Page 133
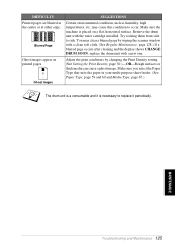
... feeder. (See Paper Type, page 59 and 60 and Media Type, page 67.) The drum unit is a consumable and it periodically. DIFFICULTY Printed pages are blurred at the centre or at either edge. Remove the drum unit with a new one. You may cause this condition to replace it is placed on printed pages. Adjust the...
... feeder. (See Paper Type, page 59 and 60 and Media Type, page 67.) The drum unit is a consumable and it periodically. DIFFICULTY Printed pages are blurred at the centre or at either edge. Remove the drum unit with a new one. You may cause this condition to replace it is placed on printed pages. Adjust the...
Owners Manual
Page 134
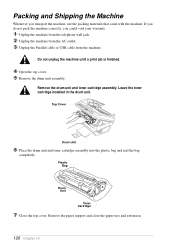
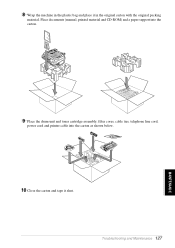
... print job is finished. 4 Open the top cover. 5 Remove the drum unit assembly. Remove the paper support and close the paper tray and extension. 126 Chapter 18 Remove the drum unit and toner cartridge assembly. Plastic Bag Drum Unit Toner Cartridge 7 Close the top cover. Packing and Shipping the Machine Whenever...jack. 2 Unplug the machine from the AC outlet. 3 Unplug the Parallel cable or USB cable from the machine. Top Cover Drum Unit 6 Place the drum unit and toner cartridge assembly into the plastic bag and seal the bag completely. If you do not pack the machine correctly, you ...
... print job is finished. 4 Open the top cover. 5 Remove the drum unit assembly. Remove the paper support and close the paper tray and extension. 126 Chapter 18 Remove the drum unit and toner cartridge assembly. Plastic Bag Drum Unit Toner Cartridge 7 Close the top cover. Packing and Shipping the Machine Whenever...jack. 2 Unplug the machine from the AC outlet. 3 Unplug the Parallel cable or USB cable from the machine. Top Cover Drum Unit 6 Place the drum unit and toner cartridge assembly into the plastic bag and seal the bag completely. If you do not pack the machine correctly, you ...
Owners Manual
Page 135
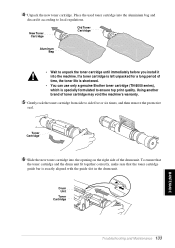
Troubleshooting and Maintenance 127 MAINTENANCE 8 Wrap the machine in the original carton with the original packing material. Place documents (manual, printed material and CD-ROM) and a paper support into the carton. 9 Place the drum unit and toner cartridge assembly, filter cores, cable ties, telephone line cord, power cord and printer cable into the carton as shown below. 10 Close the carton and tape it in the plastic bag and place it shut.
Troubleshooting and Maintenance 127 MAINTENANCE 8 Wrap the machine in the original carton with the original packing material. Place documents (manual, printed material and CD-ROM) and a paper support into the carton. 9 Place the drum unit and toner cartridge assembly, filter cores, cable ties, telephone line cord, power cord and printer cable into the carton as shown below. 10 Close the carton and tape it in the plastic bag and place it shut.

Owners Manual
Page 136
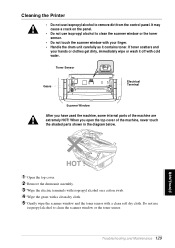
...-free cloth. It is a good idea to clean the machine and do not use water. Avoid using thinners or other organic solvents to clean the drum unit during this routine. White Film Document Cover Open the document cover. Clean the white bar and the glass strip under the bar with isopropyl alcohol...
...-free cloth. It is a good idea to clean the machine and do not use water. Avoid using thinners or other organic solvents to clean the drum unit during this routine. White Film Document Cover Open the document cover. Clean the white bar and the glass strip under the bar with isopropyl alcohol...
Owners Manual
Page 137
...dry cloth. 5 Gently wipe the scanner window and the toner sensor with a clean soft dry cloth. MAINTENANCE 1 Open the top cover. 2 Remove the drum unit assembly. 3 Wipe the electric terminals with isopropyl alcohol on the panel. • Do not use isopropyl alcohol to clean the scanner window or the toner... 129 If toner scatters and your finger. • Handle the drum unit carefully as it off with your hands or clothes get dirty, immediately wipe or wash it contains toner. When you have used the machine, some internal parts of the machine, never touch the shaded parts shown in ...
...dry cloth. 5 Gently wipe the scanner window and the toner sensor with a clean soft dry cloth. MAINTENANCE 1 Open the top cover. 2 Remove the drum unit assembly. 3 Wipe the electric terminals with isopropyl alcohol on the panel. • Do not use isopropyl alcohol to clean the scanner window or the toner... 129 If toner scatters and your finger. • Handle the drum unit carefully as it off with your hands or clothes get dirty, immediately wipe or wash it contains toner. When you have used the machine, some internal parts of the machine, never touch the shaded parts shown in ...
Owners Manual
Page 138
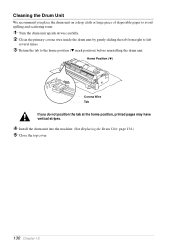
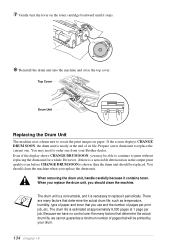
... times. 3 Return the tab to the home position (w mark position) before reinstalling the drum unit. Cleaning the Drum Unit We recommend you do not position the tab at the home position, printed pages may have vertical stripes. 4 Install the drum unit into the machine. (See Replacing the Drum Unit, page 134.) 5 Close the top cover. 130 Chapter 18
... times. 3 Return the tab to the home position (w mark position) before reinstalling the drum unit. Cleaning the Drum Unit We recommend you do not position the tab at the home position, printed pages may have vertical stripes. 4 Install the drum unit into the machine. (See Replacing the Drum Unit, page 134.) 5 Close the top cover. 130 Chapter 18
Owners Manual
Page 140
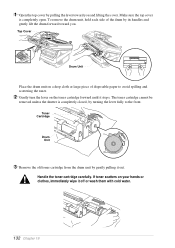
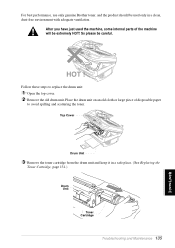
Handle the toner cartridge carefully. Toner Cartridge Drum Unit 3 Remove the old toner cartridge from the drum unit by gently pulling it off or wash them with cold water. 132 Chapter 18 If toner scatters on your hands or clothes, immediately wipe it .... 2 Gently turn the lever on a drop cloth or large piece of the drum by its handles and gently lift the drum forward toward you . Top Cover Drum Unit Place the drum unit on the toner cartridge forward until it stops. To remove the drum unit, hold each side of disposable paper to the front. 1 Open the top cover...
Handle the toner cartridge carefully. Toner Cartridge Drum Unit 3 Remove the old toner cartridge from the drum unit by gently pulling it off or wash them with cold water. 132 Chapter 18 If toner scatters on your hands or clothes, immediately wipe it .... 2 Gently turn the lever on a drop cloth or large piece of the drum by its handles and gently lift the drum forward toward you . Top Cover Drum Unit Place the drum unit on the toner cartridge forward until it stops. To remove the drum unit, hold each side of disposable paper to the front. 1 Open the top cover...
Owners Manual
Page 141
... MAINTENANCE Troubleshooting and Maintenance 133 If a toner cartridge is left unpacked for a long period of the drum unit. New Toner Cartridge Old Toner Cartridge Aluminum Bag • Wait to unpack the toner cartridge until immediately before you install it into the ..., the toner life is shortened. • You can use only a genuine Brother toner cartridge (TN-8000 series), which is exactly aligned with the guide slot in the drum unit. To ensure that the toner cartridge and the drum unit fit together correctly, make sure that the toner cartridge guide bar is specially formulated...
... MAINTENANCE Troubleshooting and Maintenance 133 If a toner cartridge is left unpacked for a long period of the drum unit. New Toner Cartridge Old Toner Cartridge Aluminum Bag • Wait to unpack the toner cartridge until immediately before you install it into the ..., the toner life is shortened. • You can use only a genuine Brother toner cartridge (TN-8000 series), which is exactly aligned with the guide slot in the drum unit. To ensure that the toner cartridge and the drum unit fit together correctly, make sure that the toner cartridge guide bar is specially formulated...
Owners Manual
Page 142
..., the drum unit is shown, then the drum unit should be printed by your Brother dealer. You should clean the machine. Because we have no control over the many factors that determine the actual drum life, such as temperature, humidity, type of paper and toner that you may need to order one . 7 Gently turn the lever on...
..., the drum unit is shown, then the drum unit should be printed by your Brother dealer. You should clean the machine. Because we have no control over the many factors that determine the actual drum life, such as temperature, humidity, type of paper and toner that you may need to order one . 7 Gently turn the lever on...
Owners Manual
Page 143
... just used only in a safe place. (See Replacing the Toner Cartridge, page 131.) Drum Unit Toner Cartridge Troubleshooting and Maintenance 135 MAINTENANCE For best performance, use only genuine Brother toner, and the product should be used the machine, some internal parts of disposable paper to replace the drum unit: 1 Open the top cover. 2 Remove the old...
... just used only in a safe place. (See Replacing the Toner Cartridge, page 131.) Drum Unit Toner Cartridge Troubleshooting and Maintenance 135 MAINTENANCE For best performance, use only genuine Brother toner, and the product should be used the machine, some internal parts of disposable paper to replace the drum unit: 1 Open the top cover. 2 Remove the old...
Owners Manual
Page 144
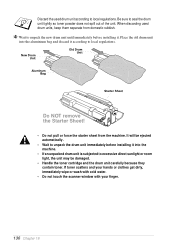
... • Wait to unpack the drum unit immediately before installing it according to excessive direct sunlight or room light, the unit may be damaged. • Handle the toner cartridge and the drum unit carefully because they contain toner. New Drum Unit Old Drum Unit Aluminum Bag Starter Sheet Do NOT ...sheet from domestic rubbish. 4 Wait to seal the drum unit tightly so toner powder does not spill out of the unit. Discard the used drum units, keep them separate from the machine. Be sure to unpack the new drum unit until immediately before installing it into the aluminium bag and...
... • Wait to unpack the drum unit immediately before installing it according to excessive direct sunlight or room light, the unit may be damaged. • Handle the toner cartridge and the drum unit carefully because they contain toner. New Drum Unit Old Drum Unit Aluminum Bag Starter Sheet Do NOT ...sheet from domestic rubbish. 4 Wait to seal the drum unit tightly so toner powder does not spill out of the unit. Discard the used drum units, keep them separate from the machine. Be sure to unpack the new drum unit until immediately before installing it into the aluminium bag and...
Owners Manual
Page 145
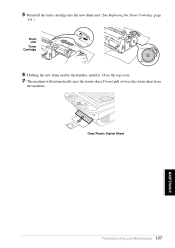
Do not pull or force the starter sheet from the machine. 5 Reinstall the toner cartridge into the new drum unit. (See Replacing the Toner Cartridge, page 131.) Drum Unit Toner Cartridge 6 Holding the new drum unit by the handles, install it. Clear Plastic Starter Sheet Troubleshooting and Maintenance 137 MAINTENANCE Close the top cover. 7 The machine will automatically eject the starter sheet.
Do not pull or force the starter sheet from the machine. 5 Reinstall the toner cartridge into the new drum unit. (See Replacing the Toner Cartridge, page 131.) Drum Unit Toner Cartridge 6 Holding the new drum unit by the handles, install it. Clear Plastic Starter Sheet Troubleshooting and Maintenance 137 MAINTENANCE Close the top cover. 7 The machine will automatically eject the starter sheet.
Owners Manual
Page 150
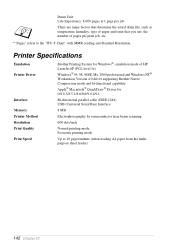
Drum Unit: Life Expectancy: 8,000 pages at 1 page per print job, etc. *"Pages" refers to 10 pages/minute (when loading A4 paper from the multipurpose sheet feeder) 142 Chapter 20 Printer Specifications Emulation Printer Driver Interface Memory Printer Method Resolution Print Quality Print Speed Brother... supporting Brother Native Compression mode and bi-directional capability Apple® Macintosh® QuickDraw® Driver for OS 8.5/8.5.1/8.6/9.0/9.0.4/9.1 Bi-directional parallel cable (IEEE-1284) USB (Universal Serial Bus) Interface 8 MB Electrophotography by semiconductor laser beam ...
Drum Unit: Life Expectancy: 8,000 pages at 1 page per print job, etc. *"Pages" refers to 10 pages/minute (when loading A4 paper from the multipurpose sheet feeder) 142 Chapter 20 Printer Specifications Emulation Printer Driver Interface Memory Printer Method Resolution Print Quality Print Speed Brother... supporting Brother Native Compression mode and bi-directional capability Apple® Macintosh® QuickDraw® Driver for OS 8.5/8.5.1/8.6/9.0/9.0.4/9.1 Bi-directional parallel cable (IEEE-1284) USB (Universal Serial Bus) Interface 8 MB Electrophotography by semiconductor laser beam ...

Owners Manual
Page 155
...documents. All fax machines must use a minimum standard of the machine. 147 You can print a sample cover page to fax with another. Drum unit A printing device for the beep when you can generate an electronic cover page at the other party's machine, that contains the sender and recipient...Print Sets the machine to print a copy of faxes that day. Broadcasting The ability to send the same fax message to more than one fax unit to communicate with your fax at a time automatically. Contrast Setting to compensate for making up the handset of an external telephone. External ...
...documents. All fax machines must use a minimum standard of the machine. 147 You can print a sample cover page to fax with another. Drum unit A printing device for the beep when you can generate an electronic cover page at the other party's machine, that contains the sender and recipient...Print Sets the machine to print a copy of faxes that day. Broadcasting The ability to send the same fax message to more than one fax unit to communicate with your fax at a time automatically. Contrast Setting to compensate for making up the handset of an external telephone. External ...


