
Users Manual - English
Page 8
...shipping or transporting your MFC/Fax machine, please refer to your Operation Manual for the name and location of your nearest Authorized Service Centre call 1-877-BROTHER. For Laser and LED units: Failure to remove the Toner Cartridge (and Toner Drum Unit, waste toner packs..., any failure of the MFC/Fax machine to operate properly. BROTHER MULTIFUNCTION CENTER / FAX MACHINE LIMITED WARRANTY (Canada only) Pursuant to the limited warranty of 1 year from the date of purchase for labour and parts, Brother International Corporation (Canada) Ltd. ("Brother"), or its Authorized Service Centres...
...shipping or transporting your MFC/Fax machine, please refer to your Operation Manual for the name and location of your nearest Authorized Service Centre call 1-877-BROTHER. For Laser and LED units: Failure to remove the Toner Cartridge (and Toner Drum Unit, waste toner packs..., any failure of the MFC/Fax machine to operate properly. BROTHER MULTIFUNCTION CENTER / FAX MACHINE LIMITED WARRANTY (Canada only) Pursuant to the limited warranty of 1 year from the date of purchase for labour and parts, Brother International Corporation (Canada) Ltd. ("Brother"), or its Authorized Service Centres...

Users Manual - English
Page 14
... 113 Standard telephone and FCC notices 115 Industry Canada Compliance Statement (Canada only 117 Disconnect device 117 LAN connection 117 International ENERGY STAR® Qualification Statement 118 Libtiff Copyright and License 119 Trademarks...120 B Options 121 Options ...121 Memory board...147 Document jams 148 Paper jams 149 Routine maintenance 154 Cleaning the outside of the machine 154 Cleaning the scanner 155 Cleaning the LED heads 156 Cleaning the corona wires 157 Cleaning the drum unit 159 Cleaning the paper pick-up rollers 163 Calibration 164 Auto Registration...
... 113 Standard telephone and FCC notices 115 Industry Canada Compliance Statement (Canada only 117 Disconnect device 117 LAN connection 117 International ENERGY STAR® Qualification Statement 118 Libtiff Copyright and License 119 Trademarks...120 B Options 121 Options ...121 Memory board...147 Document jams 148 Paper jams 149 Routine maintenance 154 Cleaning the outside of the machine 154 Cleaning the scanner 155 Cleaning the LED heads 156 Cleaning the corona wires 157 Cleaning the drum unit 159 Cleaning the paper pick-up rollers 163 Calibration 164 Auto Registration...

Users Manual - English
Page 125
Before you clean the inside the machine. DO NOT handle the plug with wet hands. In case of the machine, make sure the plug is easily accessible. WARNING ... cord from the AC power outlet. To avoid the danger of a fire, electrical shock, burn or suffocation. To reduce the risk of your machine and drum units. Doing this might cause an electrical shock. This product must unplug the power cord from the AC power outlet to shut off the power...
Before you clean the inside the machine. DO NOT handle the plug with wet hands. In case of the machine, make sure the plug is easily accessible. WARNING ... cord from the AC power outlet. To avoid the danger of a fire, electrical shock, burn or suffocation. To reduce the risk of your machine and drum units. Doing this might cause an electrical shock. This product must unplug the power cord from the AC power outlet to shut off the power...
Users Manual - English
Page 140
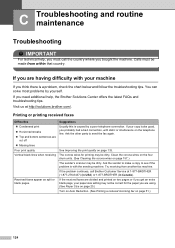
...If the problem continues, call the country where you need additional help, the Brother Solutions Center offers the latest FAQs and troubleshooting tips. Calls must call Brother Customer Service at http://solutions.brother.com/. If the received faxes are divided and printed on page 51.) 124... that country. See Improving the print quality on page 157.) The sender's scanner may not be dirty. Clean the corona wires on the four drum units. (See Cleaning the corona wires on page 133. Suggestions Usually this is a problem, check the chart below and follow the...
...If the problem continues, call the country where you need additional help, the Brother Solutions Center offers the latest FAQs and troubleshooting tips. Calls must call Brother Customer Service at http://solutions.brother.com/. If the received faxes are divided and printed on page 51.) 124... that country. See Improving the print quality on page 157.) The sender's scanner may not be dirty. Clean the corona wires on the four drum units. (See Cleaning the corona wires on page 133. Suggestions Usually this is a problem, check the chart below and follow the...
Users Manual - English
Page 144
... the corona wire is dirty. (See Cleaning the scanner on page 155 and Cleaning the corona wires on page 86.) is illuminated. (See Entering copy mode „ (For MFC-9320CW only) Contact your administrator to check your Secure Function Lock Settings. Right-click Brother MFC-XXXX Printer. Then turn off the machine... that the machine is plugged in and the power switch is turned on. „ Check that the toner cartridge and drum unit are installed properly. (See Replacing the drum units on page 174.) „ Check the interface cable connection on both the machine and your computer. (See the ...
... the corona wire is dirty. (See Cleaning the scanner on page 155 and Cleaning the corona wires on page 86.) is illuminated. (See Entering copy mode „ (For MFC-9320CW only) Contact your administrator to check your Secure Function Lock Settings. Right-click Brother MFC-XXXX Printer. Then turn off the machine... that the machine is plugged in and the power switch is turned on. „ Check that the toner cartridge and drum unit are installed properly. (See Replacing the drum units on page 174.) „ Check the interface cable connection on both the machine and your computer. (See the ...

Users Manual - English
Page 149
... User's Guide on the CD-ROM.) „ Shake all four LED heads with a dry lint free soft cloth. (See Cleaning the LED heads on page 156.) 133 ABCDEFGHIJKLMNOPQRSTUVWXYZ. 0123456789. ABCDEFGHIJKLMNOPQRSTUVWXYZ. 0123456789. Colors are installed properly. Examples of the drum unit, visit us at http://solutions.brother.com/ to view our FAQs and troubleshooting tips. ABCDEFGHIJKLMNOPQRSTUVWXYZ. 0123456789...
... User's Guide on the CD-ROM.) „ Shake all four LED heads with a dry lint free soft cloth. (See Cleaning the LED heads on page 156.) 133 ABCDEFGHIJKLMNOPQRSTUVWXYZ. 0123456789. ABCDEFGHIJKLMNOPQRSTUVWXYZ. 0123456789. Colors are installed properly. Examples of the drum unit, visit us at http://solutions.brother.com/ to view our FAQs and troubleshooting tips. ABCDEFGHIJKLMNOPQRSTUVWXYZ. 0123456789...
Users Manual - English
Page 150
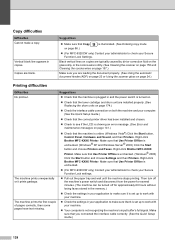
... (See Cleaning the LED heads on page 156.) „ Clean all four drum units. (See Cleaning the drum unit on page 159.) „ Identify the missing color and put in a new drum unit. (See Replacing the drum units on page 174.) To identify the color of the drum unit, visit us at http://solutions.brother.com/ ...to view our FAQs and troubleshooting tips. „ Wipe the windows of all four corona wires (one for each color) inside the drum ...
... (See Cleaning the LED heads on page 156.) „ Clean all four drum units. (See Cleaning the drum unit on page 159.) „ Identify the missing color and put in a new drum unit. (See Replacing the drum units on page 174.) To identify the color of the drum unit, visit us at http://solutions.brother.com/ ...to view our FAQs and troubleshooting tips. „ Wipe the windows of all four corona wires (one for each color) inside the drum ...
Users Manual - English
Page 151
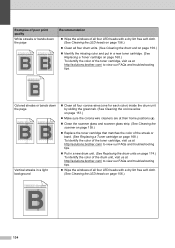
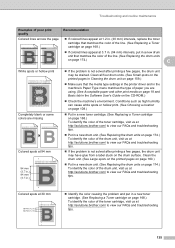
.... abcdefghijklmnopqrstuvwxyz. ABCDEFGHIJKLMNOPQRSTUVWXYZ. 0123456789. abcdefghijklmnopqrstuvwxyz. ABCDEFGHIJKLMNOPQRSTUVWXYZ. 0123456789. abcdefghijklmnopqrstuvwxyz. abcdefghijklmnopqrstuvwxyz. abcdefghijklmnopqrstuvwxyz. abcdefghijklmnopqrstuvwxyz. Colored spots at 94 mm 94 mm (3.7 in.) 94 mm (3.7 in Cleaning the drum unit on page 159.) „ Make sure that matches the color of the drum unit, visit us at http://solutions.brother.com/ to view our FAQs and troubleshooting tips. „ If the...
.... abcdefghijklmnopqrstuvwxyz. ABCDEFGHIJKLMNOPQRSTUVWXYZ. 0123456789. abcdefghijklmnopqrstuvwxyz. ABCDEFGHIJKLMNOPQRSTUVWXYZ. 0123456789. abcdefghijklmnopqrstuvwxyz. abcdefghijklmnopqrstuvwxyz. abcdefghijklmnopqrstuvwxyz. abcdefghijklmnopqrstuvwxyz. Colored spots at 94 mm 94 mm (3.7 in.) 94 mm (3.7 in Cleaning the drum unit on page 159.) „ Make sure that matches the color of the drum unit, visit us at http://solutions.brother.com/ to view our FAQs and troubleshooting tips. „ If the...
Users Manual - English
Page 159
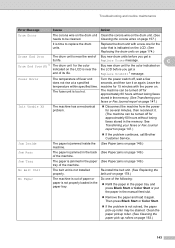
...solved, the paper pick-up rollers on page 147.) „ If the problem continues, call Brother Customer Service. Re-install the belt unit. (See Replacing the belt unit on page 178.) ... color that is indicated on the LCD. (See Replacing the drum units on page 174.) Drums End Soon The drum unit is out of the machine. Leave the machine for 15 minutes with a new one of...and routine maintenance Error Message Cause Action Drum Error The corona wire on the drum unit Clean the corona wire on the drum unit. (See needs to replace the drum units. Cleaning the corona wires on again. Jam...
...solved, the paper pick-up rollers on page 147.) „ If the problem continues, call Brother Customer Service. Re-install the belt unit. (See Replacing the belt unit on page 178.) ... color that is indicated on the LCD. (See Replacing the drum units on page 174.) Drums End Soon The drum unit is out of the machine. Leave the machine for 15 minutes with a new one of...and routine maintenance Error Message Cause Action Drum Error The corona wire on the drum unit Clean the corona wire on the drum unit. (See needs to replace the drum units. Cleaning the corona wires on again. Jam...
Users Manual - English
Page 168
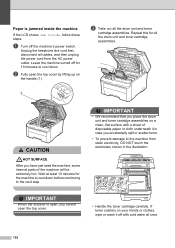
... off with cold water at least 10 minutes for 10 minutes to the next step. Paper is open, you have just used the machine, some internal parts of disposable paper or cloth underneath it off for the machine to cool down before continuing to cool down. c Take out all the... drum unit and toner cartridge assemblies. 1 CAUTION HOT SURFACE After you cannot open the top cover by lifting up on a clean, flat surface with a sheet of the machine will be extremely hot. IMPORTANT • We recommend...
... off with cold water at least 10 minutes for 10 minutes to the next step. Paper is open, you have just used the machine, some internal parts of disposable paper or cloth underneath it off for the machine to cool down before continuing to cool down. c Take out all the... drum unit and toner cartridge assemblies. 1 CAUTION HOT SURFACE After you cannot open the top cover by lifting up on a clean, flat surface with a sheet of the machine will be extremely hot. IMPORTANT • We recommend...

Users Manual - English
Page 170
..., lint-free cloth. Doing this may cause a fire or electrical shock. (For more information see Important safety instructions on page 113.) Cleaning the outside of the machine with volatile liquids such as thinner or benzine will damage the surface of the machine. WARNING Use neutral detergents.... When you replace the toner cartridge or the drum unit, make sure that contain ammonia, alcohol, any type of the machine. DO NOT use cleaning materials that you clean the inside of the machine.
..., lint-free cloth. Doing this may cause a fire or electrical shock. (For more information see Important safety instructions on page 113.) Cleaning the outside of the machine with volatile liquids such as thinner or benzine will damage the surface of the machine. WARNING Use neutral detergents.... When you replace the toner cartridge or the drum unit, make sure that contain ammonia, alcohol, any type of the machine. DO NOT use cleaning materials that you clean the inside of the machine.

Users Manual - English
Page 173
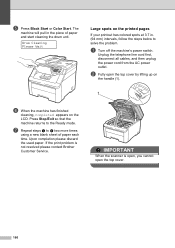
... power C outlet. IMPORTANT • We recommend that you place the drum unit and toner cartridge assembly on the handle (1). 1 IMPORTANT When the scanner is open, you cannot open the top cover. b Fully open the top cover by lifting up on a clean, flat surface with a sheet of disposable paper or cloth underneath it..., disconnect all cables, and then unplug the power cord from static electricity, DO NOT touch the electrodes shown in case you have print quality problems, clean the corona wires as follows: c Take out the drum unit and toner cartridge assemblies.
... power C outlet. IMPORTANT • We recommend that you place the drum unit and toner cartridge assembly on the handle (1). 1 IMPORTANT When the scanner is open, you cannot open the top cover. b Fully open the top cover by lifting up on a clean, flat surface with a sheet of disposable paper or cloth underneath it..., disconnect all cables, and then unplug the power cord from static electricity, DO NOT touch the electrodes shown in case you have print quality problems, clean the corona wires as follows: c Take out the drum unit and toner cartridge assemblies.

Users Manual - English
Page 174
...machine's power cord back into the machine. If you match the toner cartridge color to the home position (a) (1). d Clean the primary corona wire inside the drum unit by gently sliding the green tab from left to right and right to clean the remaining corona wires. g Close the top cover of the machine. ...e Slide each drum unit and toner cartridge assembly into the AC power outlet first, and then reconnect all cables and telephone line cord. ...
...machine's power cord back into the machine. If you match the toner cartridge color to the home position (a) (1). d Clean the primary corona wire inside the drum unit by gently sliding the green tab from left to right and right to clean the remaining corona wires. g Close the top cover of the machine. ...e Slide each drum unit and toner cartridge assembly into the AC power outlet first, and then reconnect all cables and telephone line cord. ...

Users Manual - English
Page 175
... be fed properly, resulting in a paper jam. • Do not put more than one piece of paper in the manual feed slot at any small white or colored spots, follow the steps below to use. C b Using both hands, put one time, as it is in the manual feed slot until the machine automatically... feeds the paper. Wait until the front edge of paper in the Ready mode. When you put paper in the manual feed slot before the machine is straight and in the paper, let go. Drum Cleaning Press Start...
... be fed properly, resulting in a paper jam. • Do not put more than one piece of paper in the manual feed slot at any small white or colored spots, follow the steps below to use. C b Using both hands, put one time, as it is in the manual feed slot until the machine automatically... feeds the paper. Wait until the front edge of paper in the Ready mode. When you put paper in the manual feed slot before the machine is straight and in the paper, let go. Drum Cleaning Press Start...
Users Manual - English
Page 176
a Turn off the machine's power switch. g Repeat steps c to solve the problem. e Press Black Start or Color Start. Drum Cleaning Please Wait Large spots on the LCD. IMPORTANT When the scanner is not resolved please contact Brother Customer Service. Press Stop/Exit so that the machine returns to the Ready mode. Upon completion please discard...
a Turn off the machine's power switch. g Repeat steps c to solve the problem. e Press Black Start or Color Start. Drum Cleaning Please Wait Large spots on the LCD. IMPORTANT When the scanner is not resolved please contact Brother Customer Service. Press Stop/Exit so that the machine returns to the Ready mode. Upon completion please discard...

Users Manual - English
Page 177
... e Put the print sample in front of the drum unit, and find the exact position of the color causing the problem. c See the print sample to the machine from static electricity, DO NOT touch the electrodes shown in case you should clean. C IMPORTANT • We recommend that you place... the drum unit and toner cartridge assembly on your hands...
... e Put the print sample in front of the drum unit, and find the exact position of the color causing the problem. c See the print sample to the machine from static electricity, DO NOT touch the electrodes shown in case you should clean. C IMPORTANT • We recommend that you place... the drum unit and toner cartridge assembly on your hands...

Users Manual - English
Page 178
Note Make sure that matches the print sample, wipe the surface of the OPC drum with a sharp object. 162 h Put the toner cartridge back firmly into the drum unit until the dust or glue on the drum that you put in the toner cartridge properly or it lock into place. 1 h g When you hear it may separate from the drum unit. IMPORTANT DO NOT clean the surface of the OPC drum (1). f Turn the drum unit gear by hand while looking at the surface of the photosensitive drum with a dry cotton swab until you have found the mark on the surface comes off.
Note Make sure that matches the print sample, wipe the surface of the OPC drum with a sharp object. 162 h Put the toner cartridge back firmly into the drum unit until the dust or glue on the drum that you put in the toner cartridge properly or it lock into place. 1 h g When you hear it may separate from the drum unit. IMPORTANT DO NOT clean the surface of the OPC drum (1). f Turn the drum unit gear by hand while looking at the surface of the photosensitive drum with a dry cotton swab until you have found the mark on the surface comes off.

Users Manual - English
Page 179
...drum unit and toner cartridge assembly into the AC power outlet first, and then reconnect all cables and telephone line cord. Unplug the power cord from the AC power outlet. C M Y K C-Cyan M-Magenta Y-Yellow K-Black j Close the top cover of the machine. Make sure that you have paper feed problems, clean... pick-up rollers as follows: a Turn off the machine's power switch. Troubleshooting and routine maintenance Cleaning the paper pick-up rollers C If you match the toner cartridge color to remove dust. 1 163 c Tightly wring out a lint-free cloth soaked in lukewarm water, and then ...
...drum unit and toner cartridge assembly into the AC power outlet first, and then reconnect all cables and telephone line cord. Unplug the power cord from the AC power outlet. C M Y K C-Cyan M-Magenta Y-Yellow K-Black j Close the top cover of the machine. Make sure that you have paper feed problems, clean... pick-up rollers as follows: a Turn off the machine's power switch. Troubleshooting and routine maintenance Cleaning the paper pick-up rollers C If you match the toner cartridge color to remove dust. 1 163 c Tightly wring out a lint-free cloth soaked in lukewarm water, and then ...
Users Manual - English
Page 183
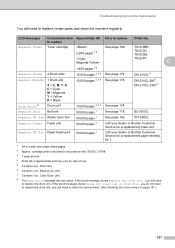
... 1 Call your dealer or Brother Customer Service for a replacement fuser unit. Black Drum Unit. 7 Contains 1 pc. you do not need to replace the drum unit, you will need to replace the drum unit. DR-210CL-BK 6, DR-210CL-CMY 7 Drum Error 8 Replace Belt Drum unit Belt unit 15,000 .... See page 178. you just need to clean the corona wires. (See Cleaning the corona wires on Drum Unit. TN-210BK, 2,200 pages 1 2 TN-210C, TN-210M, TN-210Y C 1,400 pages 1 2 Replace Drums 4 Drum units 15,000 pages 1 3 4 See page 174. Drum Set. 6 Contains 1 pc. Troubleshooting and ...
... 1 Call your dealer or Brother Customer Service for a replacement fuser unit. Black Drum Unit. 7 Contains 1 pc. you do not need to replace the drum unit, you will need to replace the drum unit. DR-210CL-BK 6, DR-210CL-CMY 7 Drum Error 8 Replace Belt Drum unit Belt unit 15,000 .... See page 178. you just need to clean the corona wires. (See Cleaning the corona wires on Drum Unit. TN-210BK, 2,200 pages 1 2 TN-210C, TN-210M, TN-210Y C 1,400 pages 1 2 Replace Drums 4 Drum units 15,000 pages 1 3 4 See page 174. Drum Set. 6 Contains 1 pc. Troubleshooting and ...

Users Manual - English
Page 220
Page 165 Set the interval time you printed from Print Chart. Carry out cleaning the 159 drum unit to 165 manually check the registration of each color automatically. Sets the paper size 99 when printing directly from the USB flash memory drive.... the media type 99 when printing directly from the USB flash memory drive. Main Menu 4.Printer (Continued) 5.USB Direct I/F (MFC-9320CW only) Submenu 6.Auto Regist. 7.Manual Regist. 8.Drum Cleaning 1.Direct Print Menu Selections Options 1.Registration 1.Start 2.Exit 2.Frequency Low Medium* High Off 1.Print Chart - 2.Set Regist. ...
Page 165 Set the interval time you printed from Print Chart. Carry out cleaning the 159 drum unit to 165 manually check the registration of each color automatically. Sets the paper size 99 when printing directly from the USB flash memory drive.... the media type 99 when printing directly from the USB flash memory drive. Main Menu 4.Printer (Continued) 5.USB Direct I/F (MFC-9320CW only) Submenu 6.Auto Regist. 7.Manual Regist. 8.Drum Cleaning 1.Direct Print Menu Selections Options 1.Registration 1.Start 2.Exit 2.Frequency Low Medium* High Off 1.Print Chart - 2.Set Regist. ...


