
Quick Setup Guide - English
Page 12
13 Automatic Daylight Savings Time You can set the machine to choose On (or Off). a Press Menu, 1, 4. Press OK. c Press Stop/Exit. 12 General Setup 4.Auto Daylight b Press a or b to change automatically for daylight savings time. It will reset itself forward one hour in the Spring and backward one hour in the Autumn.
13 Automatic Daylight Savings Time You can set the machine to choose On (or Off). a Press Menu, 1, 4. Press OK. c Press Stop/Exit. 12 General Setup 4.Auto Daylight b Press a or b to change automatically for daylight savings time. It will reset itself forward one hour in the Spring and backward one hour in the Autumn.

Quick Setup Guide - English
Page 29
For Network Users Web Based Management (web browser) The Brother print server is equipped with a web server that JavaScript ... Open your browser (Where "printer_ip_address" is the IP address of the print server. b Press Menu, 5, 0. Network 0.Network Reset c Press 1 to factory default To restore all the cables from the machine (except the power cord). To use a web ... To print the Network Configuration List: a Turn on the Network Configuration List. See Chapter 11 of the internal Print/Scan server to change some of the print server is listed on the machine and wait until the ...
For Network Users Web Based Management (web browser) The Brother print server is equipped with a web server that JavaScript ... Open your browser (Where "printer_ip_address" is the IP address of the print server. b Press Menu, 5, 0. Network 0.Network Reset c Press 1 to factory default To restore all the cables from the machine (except the power cord). To use a web ... To print the Network Configuration List: a Turn on the Network Configuration List. See Chapter 11 of the internal Print/Scan server to change some of the print server is listed on the machine and wait until the ...
Users Manual - English
Page 15
... 187 Checking the Serial Number 187 Checking the Page Counters 187 Checking the remaining life of parts 188 Reset functions 188 How to reset the machine 189 Packing and shipping the machine 189 D Menu and features 194 On-screen programming 194 ... Print ...224 Interfaces ...225 PictBridge (MFC-9320CW 226 Direct Print feature (MFC-9320CW 227 Computer requirements 228 Consumable items 229 Ethernet wired network 230 Ethernet wireless network (MFC-9320CW only 232 Authentication and encryption for wireless users only 234 Wireless one-push configuration 236 F Glossary 237 ...
... 187 Checking the Serial Number 187 Checking the Page Counters 187 Checking the remaining life of parts 188 Reset functions 188 How to reset the machine 189 Packing and shipping the machine 189 D Menu and features 194 On-screen programming 194 ... Print ...224 Interfaces ...225 PictBridge (MFC-9320CW 226 Direct Print feature (MFC-9320CW 227 Computer requirements 228 Consumable items 229 Ethernet wired network 230 Ethernet wireless network (MFC-9320CW only 232 Authentication and encryption for wireless users only 234 Wireless one-push configuration 236 F Glossary 237 ...

Users Manual - English
Page 43
... consumption by turning off the fuser while the machine is idle. When the machine receives a fax, computer data, or makes a copy, the timer will be reset. Ecology features 3 Toner Save 3 You can save toner using this feature. General Setup 4.Auto Daylight b Press a or b to On, print appears lighter. ...Press OK. c Press Stop/Exit. When you set itself forward one hour in the Spring, and back one hour in the Fall. c Press Stop/Exit. The default setting is in sleep mode, there will be a short delay while the fuser...
... consumption by turning off the fuser while the machine is idle. When the machine receives a fax, computer data, or makes a copy, the timer will be reset. Ecology features 3 Toner Save 3 You can save toner using this feature. General Setup 4.Auto Daylight b Press a or b to On, print appears lighter. ...Press OK. c Press Stop/Exit. When you set itself forward one hour in the Spring, and back one hour in the Fall. c Press Stop/Exit. The default setting is in sleep mode, there will be a short delay while the fuser...

Users Manual - English
Page 45
... note of the machine by limiting access to the Menu settings. If you forget it, you will have to reset the password call Brother Customer Service. For information about how to reset the password stored in the Fax menu. • Polling Receive is for the administrator 4 The password you set... Setup under 2.Setup Send in these steps is enabled only when both Fax Tx and Fax Rx are enabled. 4 Security features 4 Secure Function Lock 2.0 (MFC-9320CW only) 4 Secure Function Lock lets you restrict Public access to the following machine functions: „ Fax Tx „ Fax Rx „ Copy ...
... note of the machine by limiting access to the Menu settings. If you forget it, you will have to reset the password call Brother Customer Service. For information about how to reset the password stored in the Fax menu. • Polling Receive is for the administrator 4 The password you set... Setup under 2.Setup Send in these steps is enabled only when both Fax Tx and Fax Rx are enabled. 4 Security features 4 Secure Function Lock 2.0 (MFC-9320CW only) 4 Secure Function Lock lets you restrict Public access to the following machine functions: „ Fax Tx „ Fax Rx „ Copy ...
Users Manual - English
Page 50
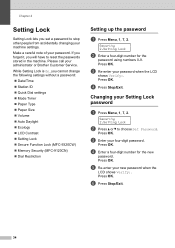
...Press OK. While Setting Lock is On, you will have to reset the passwords stored in the machine. c Re-enter your password. d Press Stop/Exit. e Re-enter your administrator or Brother Customer Service. Please call your new password when the LCD shows Verify... Paper Type „ Paper Size „ Volume „ Auto Daylight „ Ecology „ LCD Contrast „ Setting Lock „ Secure Function Lock (MFC-9320CW) „ Memory Security (MFC-9120CN) „ Dial Restriction Setting up the password 4 a Press Menu, 1, 7, 2. Press OK. c Enter your Setting Lock password 4 a Press Menu, ...
...Press OK. While Setting Lock is On, you will have to reset the passwords stored in the machine. c Re-enter your password. d Press Stop/Exit. e Re-enter your administrator or Brother Customer Service. Please call your new password when the LCD shows Verify... Paper Type „ Paper Size „ Volume „ Auto Daylight „ Ecology „ LCD Contrast „ Setting Lock „ Secure Function Lock (MFC-9320CW) „ Memory Security (MFC-9120CN) „ Dial Restriction Setting up the password 4 a Press Menu, 1, 7, 2. Press OK. c Enter your Setting Lock password 4 a Press Menu, ...
Users Manual - English
Page 70
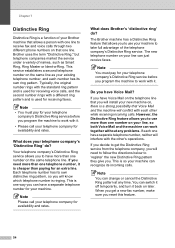
...the same telephone line. Chapter 7 Distinctive Ring 7 Distinctive Ring is a function of your Brother machine that allows a person with one line to 'register' the new Distinctive Ring pattern they give you. Brother uses the term "Distinctive Ring," but telephone companies market the service under a variety of the... Ring feature that allows you to use more than one number on , there is a strong possibility that Voice Mail and the machine will know which telephone number is ringing. However, the Distinctive Ring feature allows you reset this feature. 54 This is so your line can...
...the same telephone line. Chapter 7 Distinctive Ring 7 Distinctive Ring is a function of your Brother machine that allows a person with one line to 'register' the new Distinctive Ring pattern they give you. Brother uses the term "Distinctive Ring," but telephone companies market the service under a variety of the... Ring feature that allows you to use more than one number on , there is a strong possibility that Voice Mail and the machine will know which telephone number is ringing. However, the Distinctive Ring feature allows you reset this feature. 54 This is so your line can...

Users Manual - English
Page 92
... l). Remote Fax Opt 2.Remote Access b Enter a three-digit code using touch tone. c Press Stop/Exit. If you want to enter the code. 76 e Press 9 0 to reset the machine when you have 30 seconds to make your fax number from a telephone or another fax machine using the numbers 0 - 9, l or #. a Press Menu, 2, 5, 2. Note...
... l). Remote Fax Opt 2.Remote Access b Enter a three-digit code using touch tone. c Press Stop/Exit. If you want to enter the code. 76 e Press 9 0 to reset the machine when you have 30 seconds to make your fax number from a telephone or another fax machine using the numbers 0 - 9, l or #. a Press Menu, 2, 5, 2. Note...

Users Manual - English
Page 93
... messages forwarded followed by ## (up to 20 digits). e Press 9 0 to press 9 5 4. d Wait for a long beep, and then use the dial pad to reset the machine when you 9 have messages. d Wait for a long beep, and then use the dial pad to 20 digits). Note You can insert a pause in... Remote Access Code (3 digits followed by l). Note You can insert a pause in a fax number by using the # key. 77 If you hear one long beep, you hear your fax forwarding number from a telephone or another fax machine using touch tone. e Hang up after you have messages. Changing ...
... messages forwarded followed by ## (up to 20 digits). e Press 9 0 to press 9 5 4. d Wait for a long beep, and then use the dial pad to reset the machine when you 9 have messages. d Wait for a long beep, and then use the dial pad to 20 digits). Note You can insert a pause in... Remote Access Code (3 digits followed by l). Note You can insert a pause in a fax number by using the # key. 77 If you hear one long beep, you hear your fax forwarding number from a telephone or another fax machine using touch tone. e Hang up after you have messages. Changing ...
Users Manual - English
Page 142
... or press l51 and Start to send a fax." 5 Set your answering machine to answer calls. 6 Set your Brother machine's Receive Mode to answer within 2 or 3 rings. 4 Record the outgoing message on your answering machine. &#...to Basic(for VoIP). (See Telephone line interference on page 140.) (For MFC-9320CW only) Contact your administrator to 20 seconds. „ End your outgoing message with your...your fax reception or there may be a problem with your fax line. If receiving problems recur after resetting the ring delay, then a person, device, or subscriber service is turned On. Easy Receive is ...
... or press l51 and Start to send a fax." 5 Set your answering machine to answer calls. 6 Set your Brother machine's Receive Mode to answer within 2 or 3 rings. 4 Record the outgoing message on your answering machine. &#...to Basic(for VoIP). (See Telephone line interference on page 140.) (For MFC-9320CW only) Contact your administrator to 20 seconds. „ End your outgoing message with your...your fax reception or there may be a problem with your fax line. If receiving problems recur after resetting the ring delay, then a person, device, or subscriber service is turned On. Easy Receive is ...
Users Manual - English
Page 161
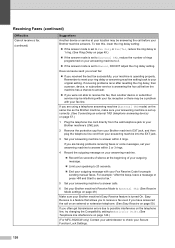
... the drum unit for the color indicated for the indicated color. Reset the drum unit counter. (See Resetting the drum counter on page 174.) Replace Fuser It is time to locate a Brother Authorized Service Center, visit us at : 1-877-BROTHER (1-877-276-8437) (in USA) 1-877-BROTHER (in Canada) or to ...name of the following: „ Turn off the machine's power switch. Press Black Start or Color Start and try again. To replace PF Kit call Brother Customer Service at : http://www.brother-usa.com/service/ 145 Rename the File (MFC-9320CW only) There is time to replace the PF Kit.
... the drum unit for the color indicated for the indicated color. Reset the drum unit counter. (See Resetting the drum counter on page 174.) Replace Fuser It is time to locate a Brother Authorized Service Center, visit us at : 1-877-BROTHER (1-877-276-8437) (in USA) 1-877-BROTHER (in Canada) or to ...name of the following: „ Turn off the machine's power switch. Press Black Start or Color Start and try again. To replace PF Kit call Brother Customer Service at : http://www.brother-usa.com/service/ 145 Rename the File (MFC-9320CW only) There is time to replace the PF Kit.

Users Manual - English
Page 165
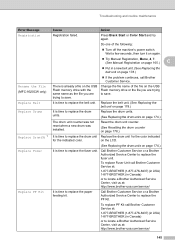
... the LCD shows Jam Tray, follow these items or improper installation may cause a paper jam in this direction, stop and follow the steps in your Brother machine. Paper is jammed inside the machine on page 152. 149 C Note If the error message remains, open and close the top cover and fuser... cover firmly to reset the machine. Note The LCD names for Paper is jammed in the machine. Failure to install these steps: a Pull the paper tray completely out of...
... the LCD shows Jam Tray, follow these items or improper installation may cause a paper jam in this direction, stop and follow the steps in your Brother machine. Paper is jammed inside the machine on page 152. 149 C Note If the error message remains, open and close the top cover and fuser... cover firmly to reset the machine. Note The LCD names for Paper is jammed in the machine. Failure to install these steps: a Pull the paper tray completely out of...

Users Manual - English
Page 180
...those set at the factory. You can reset the calibration parameters back to select Yes. Note • If an error message is in the Software User's Guide on the CD-ROM. • If you print using the Macintosh printer driver, you to improve the color density. See Advanced tab in such as...® printer driver, you need to perform the calibration from the menu bar. 164 c Press OK. a Press Menu, 4, 5. Calibration C The output density for each color may vary depending on the machine's power switch. d Press 1 to select Calibrate. When the Status Monitor is open, choose Control...
...those set at the factory. You can reset the calibration parameters back to select Yes. Note • If an error message is in the Software User's Guide on the CD-ROM. • If you print using the Macintosh printer driver, you to improve the color density. See Advanced tab in such as...® printer driver, you need to perform the calibration from the menu bar. 164 c Press OK. a Press Menu, 4, 5. Calibration C The output density for each color may vary depending on the machine's power switch. d Press 1 to select Calibrate. When the Status Monitor is open, choose Control...
Users Manual - English
Page 194
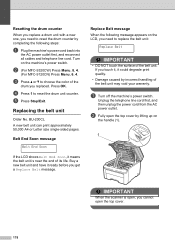
Resetting the drum counter C When you replace a drum unit with a new one, you cannot open the top cover. 178 d Press 1 to choose the color of its life. e Press Stop/Exit. If you need to replace the belt unit: Replace Belt IMPORTANT • DO NOT touch the ..., 8, 4. (For MFC-9120CN) Press Menu, 6, 4. Press OK. Replacing the belt unit C Order No. Replace Belt message C When the following steps: a Plug the machine's power cord back into the AC power outlet first, and reconnect all cables and telephone line cord. b Fully open , you need to reset the drum counter by ...
Resetting the drum counter C When you replace a drum unit with a new one, you cannot open the top cover. 178 d Press 1 to choose the color of its life. e Press Stop/Exit. If you need to replace the belt unit: Replace Belt IMPORTANT • DO NOT touch the ..., 8, 4. (For MFC-9120CN) Press Menu, 6, 4. Press OK. Replacing the belt unit C Order No. Replace Belt message C When the following steps: a Plug the machine's power cord back into the AC power outlet first, and reconnect all cables and telephone line cord. b Fully open , you need to reset the drum counter by ...

Users Manual - English
Page 198
...) Press Menu, 8, 4. (For MFC-9120CN) Press Menu, 6, 4. WT Box End Soon message C WT Box End Soon If the LCD shows WT Box End Soon, it to get a Replace WT Box message. It could explode. a Turn off the machine's power switch. When you replace a belt unit with a new one, you need to replace the... then unplug the power cord from the AC power outlet. Replace WT Box message C When the following message appears on the LCD, you need to reset the belt unit counter. WARNING DO NOT put the waste toner box into the AC power outlet first, and reconnect all cables and telephone line...
...) Press Menu, 8, 4. (For MFC-9120CN) Press Menu, 6, 4. WT Box End Soon message C WT Box End Soon If the LCD shows WT Box End Soon, it to get a Replace WT Box message. It could explode. a Turn off the machine's power switch. When you replace a belt unit with a new one, you need to replace the... then unplug the power cord from the AC power outlet. Replace WT Box message C When the following message appears on the LCD, you need to reset the belt unit counter. WARNING DO NOT put the waste toner box into the AC power outlet first, and reconnect all cables and telephone line...

Users Manual - English
Page 204
...MFC-9320CW) Press Menu, 8, 3. (For MFC-9120CN) Press Menu, 6, 3. Note Unplug the interface cable before you installed a new part. Machine Info. 3.Parts Life b Press a or b to its default factory settings such as the password and IP address information. 2 Address & Fax Address & Fax resets the following reset functions are available: 1 Network You can reset...accurate if that were set at the factory. Brother strongly recommends you perform this operation when you dispose of the used part. Checking the remaining life of parts C You can reset all the machine settings back to the settings ...
...MFC-9320CW) Press Menu, 8, 3. (For MFC-9120CN) Press Menu, 6, 3. Note Unplug the interface cable before you installed a new part. Machine Info. 3.Parts Life b Press a or b to its default factory settings such as the password and IP address information. 2 Address & Fax Address & Fax resets the following reset functions are available: 1 Network You can reset...accurate if that were set at the factory. Brother strongly recommends you perform this operation when you dispose of the used part. Checking the remaining life of parts C You can reset all the machine settings back to the settings ...

Users Manual - English
Page 205
...and put them in a plastic bag. Do one of the following parts for MFC-9120CN). CAUTION When shipping the machine, each for locking the belt unit 189 Troubleshooting and routine maintenance How to step e. d You will begin the reset. „ To exit without making changes, press... „ To reboot the machine press 1. one for the waste toner box, and one each DRUM UNIT / TONER CARTRIDGE ASSEMBLY and the WASTE TONER BOX must be supplied by pressing Menu, 7, 0 (for MFC-9320CW) or Menu, 5, 0 (for repacking: 1 2 3 1 Plastic bags - Go to reset the machine C a (USA) Press Menu,...
...and put them in a plastic bag. Do one of the following parts for MFC-9120CN). CAUTION When shipping the machine, each for locking the belt unit 189 Troubleshooting and routine maintenance How to step e. d You will begin the reset. „ To exit without making changes, press... „ To reboot the machine press 1. one for the waste toner box, and one each DRUM UNIT / TONER CARTRIDGE ASSEMBLY and the WASTE TONER BOX must be supplied by pressing Menu, 7, 0 (for MFC-9320CW) or Menu, 5, 0 (for repacking: 1 2 3 1 Plastic bags - Go to reset the machine C a (USA) Press Menu,...
Users Manual - English
Page 219
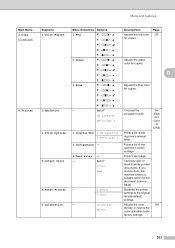
... option for copies. Prints a list of the machine's internal fonts. 2.Configuration - b -nnonn+ a* D b -nonnn+ a b -onnnn+ a 3.Blue b -nnnno+ a b -nnnon+ a Adjusts the blue color for the document (color or B&W). 4.Reset Printer - 1.Reset 2.Exit Restores the printer settings to the factory settings. 203 Calibrate Reset Adjusts the color 164 density or returns the color calibration to the original factory default settings. 5.Calibration...
... option for copies. Prints a list of the machine's internal fonts. 2.Configuration - b -nnonn+ a* D b -nonnn+ a b -onnnn+ a 3.Blue b -nnnno+ a b -nnnon+ a Adjusts the blue color for the document (color or B&W). 4.Reset Printer - 1.Reset 2.Exit Restores the printer settings to the factory settings. 203 Calibrate Reset Adjusts the color 164 density or returns the color calibration to the original factory default settings. 5.Calibration...

Users Manual - English
Page 225
... (MFC-9120CN) FTP (Continued) Menu Selections - 4.Scan to send the scanned data via FTP. Gray 200 dpi Gray 300 dpi B&W 200 dpi B&W 200x100 dpi UTCXXX:XX Sets the time zone for your local network or on the internet. Gray 200 dpi Gray 300 dpi B&W 200 dpi D B&W 200x100 dpi Color 100 dpi* Color 200 dpi Color...
... (MFC-9120CN) FTP (Continued) Menu Selections - 4.Scan to send the scanned data via FTP. Gray 200 dpi Gray 300 dpi B&W 200 dpi B&W 200x100 dpi UTCXXX:XX Sets the time zone for your local network or on the internet. Gray 200 dpi Gray 300 dpi B&W 200 dpi D B&W 200x100 dpi Color 100 dpi* Color 200 dpi Color...
Users Manual - English
Page 227
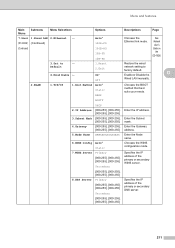
... features Main Menu Submenu Menu Selections Options Descriptions Page 7.Network 1.Wired LAN 2.Ethernet - (MFC-9320CW ) (Continued) (Continued) 3.Set to factory default. Enable or Disable the D Wired LAN manually. Default Auto* 100B-FD 100B-HD 10B-FD 10B-HD 1.Reset 2.Exit 2.WLAN 4.Wired Enable - See Network User's Guide on the CD-ROM. Enter...
... features Main Menu Submenu Menu Selections Options Descriptions Page 7.Network 1.Wired LAN 2.Ethernet - (MFC-9320CW ) (Continued) (Continued) 3.Set to factory default. Enable or Disable the D Wired LAN manually. Default Auto* 100B-FD 100B-HD 10B-FD 10B-HD 1.Reset 2.Exit 2.WLAN 4.Wired Enable - See Network User's Guide on the CD-ROM. Enter...


