
Owners Manual
Page 14
... use, thus it will not attempt to seize the line during that your premises are already wired with someone picking up an extension handset. Such problems can always detect whether a telephone is known as part of your PABX maintainer or a qualified telephone installation company as to the machine. a transmission at a pre...
... use, thus it will not attempt to seize the line during that your premises are already wired with someone picking up an extension handset. Such problems can always detect whether a telephone is known as part of your PABX maintainer or a qualified telephone installation company as to the machine. a transmission at a pre...
Owners Manual
Page 15
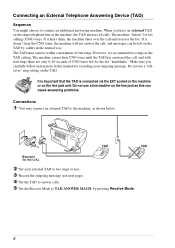
... jack unit. TAD TAD (Example for fax calling (CNG) tones. If it hears them, the machine takes over the call , and messages can cause answering problems. Connections 1 You may connect an external TAD to connect an additional answering machine. However, we recommend two rings as shown below. When you carefully follow...
... jack unit. TAD TAD (Example for fax calling (CNG) tones. If it hears them, the machine takes over the call , and messages can cause answering problems. Connections 1 You may connect an external TAD to connect an additional answering machine. However, we recommend two rings as shown below. When you carefully follow...

Owners Manual
Page 48
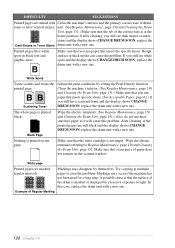
.... to select ON (or OFF), and press Menu/Set when the screen displays your Brother machine will not start scanning the document until the time you set Batch Transmission to ON...to select additional settings. The machine will be experienced. Delayed Transmission (Timer) You can be sent as one transmission. 1 Press Menu/Set, 2, 2, 4. 2 Press or to select ON (or OFF) and...time. Advanced Sending 39 ADVANCED FAX USE Overseas Mode Sometimes, when sending a fax to overseas numbers, problems can use this feature, the feature turns itself off. 1 Insert the document face down in the ...
.... to select ON (or OFF), and press Menu/Set when the screen displays your Brother machine will not start scanning the document until the time you set Batch Transmission to ON...to select additional settings. The machine will be experienced. Delayed Transmission (Timer) You can be sent as one transmission. 1 Press Menu/Set, 2, 2, 4. 2 Press or to select ON (or OFF) and...time. Advanced Sending 39 ADVANCED FAX USE Overseas Mode Sometimes, when sending a fax to overseas numbers, problems can use this feature, the feature turns itself off. 1 Insert the document face down in the ...
Owners Manual
Page 128
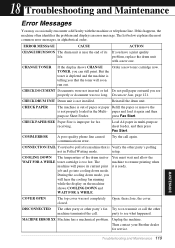
... the machine. If this happens, the machine often identifies the problem and displays an error message. ERROR MESSAGE CAUSE ACTION CHANGE DRUM...The other party or other party's polling not in the Multi- problem, replace the drum unit with the machine or telephone line. But ... COOLING DOWN and WAIT FOR A WHILE. Then contact your Brother dealer for fax receiving. Troubleshooting and Maintenance 119 MAINTENANCE CHECK PAPER...you see what happened. closed. MACHINE ERROR XX Machine has a mechanical problem. CONNECTION FAIL You tried to see properly or document was not completely ...
... the machine. If this happens, the machine often identifies the problem and displays an error message. ERROR MESSAGE CAUSE ACTION CHANGE DRUM...The other party or other party's polling not in the Multi- problem, replace the drum unit with the machine or telephone line. But ... COOLING DOWN and WAIT FOR A WHILE. Then contact your Brother dealer for fax receiving. Troubleshooting and Maintenance 119 MAINTENANCE CHECK PAPER...you see what happened. closed. MACHINE ERROR XX Machine has a mechanical problem. CONNECTION FAIL You tried to see properly or document was not completely ...
Owners Manual
Page 132
.... Send a manual fax by pressing Stop/Exit. Check for service. If your Brother dealer for dial tone. Check that the external telephone is probably not the machine. If the copy looks good, the problem is connected to see if there is in the correct receiving mode for service. ...If a copy looks worse, then call Brother dealer for your primary corona wire, or ask the sender to hear fax ...
.... Send a manual fax by pressing Stop/Exit. Check for service. If your Brother dealer for dial tone. Check that the external telephone is probably not the machine. If the copy looks good, the problem is connected to see if there is in the correct receiving mode for service. ...If a copy looks worse, then call Brother dealer for your primary corona wire, or ask the sender to hear fax ...

Owners Manual
Page 133
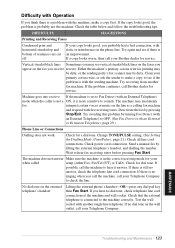
... Check to allow for this. 124 Chapter 18 The machine cannot print full Reduce the printer resolution. My headers or footers appear Most laser printers have been appropriate. when I print them. to see if LCD is #51). When the receiving party says Sometimes the resolution ...up immediately. If you to check if faxes they receive the problem was caused by checking the primary settings in your document when I view my document on the phone line. General Printing Difficulties (For MFC-9030 and MFC-9070 Only) The machine does not print. The machine prints ...
... Check to allow for this. 124 Chapter 18 The machine cannot print full Reduce the printer resolution. My headers or footers appear Most laser printers have been appropriate. when I print them. to see if LCD is #51). When the receiving party says Sometimes the resolution ...up immediately. If you to check if faxes they receive the problem was caused by checking the primary settings in your document when I view my document on the phone line. General Printing Difficulties (For MFC-9030 and MFC-9070 Only) The machine does not print. The machine prints ...
Owners Manual
Page 135
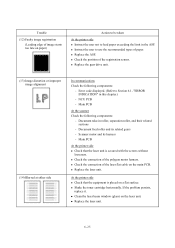
...is printed on the scanner window. If you use paper that meets the specifications. The whole page is at multiple pages to clear this problem. Wipe the electric terminals. (See Regular Maintenance, page 130 and Cleaning the Drum Unit, page 131.) Also, do not use heatsensitive ..., you still have scattered toner and the display shows CHANGE DRUM SOON, replace the drum unit with a new one. Rough surface or thick media can cause the problem. DIFFICULTY SUGGESTIONS Printed pages are stained with Clean the machine's interior and the primary corona wire of Regular Marking 126...
...is printed on the scanner window. If you use paper that meets the specifications. The whole page is at multiple pages to clear this problem. Wipe the electric terminals. (See Regular Maintenance, page 130 and Cleaning the Drum Unit, page 131.) Also, do not use heatsensitive ..., you still have scattered toner and the display shows CHANGE DRUM SOON, replace the drum unit with a new one. Rough surface or thick media can cause the problem. DIFFICULTY SUGGESTIONS Printed pages are stained with Clean the machine's interior and the primary corona wire of Regular Marking 126...

Quick Setup Guide
Page 1
... minutes. Every call is toward you cannot solve a problem: Refer to pick up . Enter two digits for ... 4 G L 5 J O 6 M R S 7 V 8 T Y Z 9 Note: If you do not expose it may void your warranty. 2 Install the Drum Unit A. MFC-9030 MFC-9070 Quick Setup Guide THANK YOU! ... If you can 't step forward, press Stop/Exit and repeat from Step A. - 1 - 9 Set Station ID A. Adjust the guides to... (With Regular Toner Cartridge) Brother Quick Setup Guide Keep the packing...to Frequently Asked Questions (FAQ's) on one line. Make sure the print side is...
... minutes. Every call is toward you cannot solve a problem: Refer to pick up . Enter two digits for ... 4 G L 5 J O 6 M R S 7 V 8 T Y Z 9 Note: If you do not expose it may void your warranty. 2 Install the Drum Unit A. MFC-9030 MFC-9070 Quick Setup Guide THANK YOU! ... If you can 't step forward, press Stop/Exit and repeat from Step A. - 1 - 9 Set Station ID A. Adjust the guides to... (With Regular Toner Cartridge) Brother Quick Setup Guide Keep the packing...to Frequently Asked Questions (FAQ's) on one line. Make sure the print side is...
Quick Setup Guide
Page 3
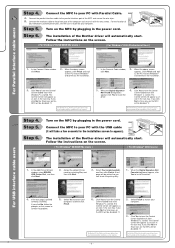
... Scanner drivers have the Control Centre loaded each time Windows® is started . Connect the MFC to restart your computer, and then click Finish. 6. The Control Centre will be disabled. *3 The Brother PC fax, Printer and Scanner drivers have been installed and the installation is started . B. Step... 4. Click Yes to correct the problem. 5. Step 6. Select Yes (recommended), and then click Finish. If you click No the Scan keys on the MFC by selecting Yes, and then click Next. 3. Connect the MFC to the printer port of the MFC and secure the wire clips. Connect...
... Scanner drivers have the Control Centre loaded each time Windows® is started . Connect the MFC to restart your computer, and then click Finish. 6. The Control Centre will be disabled. *3 The Brother PC fax, Printer and Scanner drivers have been installed and the installation is started . B. Step... 4. Click Yes to correct the problem. 5. Step 6. Select Yes (recommended), and then click Finish. If you click No the Scan keys on the MFC by selecting Yes, and then click Next. 3. Connect the MFC to the printer port of the MFC and secure the wire clips. Connect...

Service Manual
Page 36
... access to the power supply, be sure to unplug the power cord from the power outlet. (2) When servicing the optical system of the laser printing unit, be sure to wrap them in conductive sheets such as wires, PCBs, and covers. (7) Before handling the PCBs, touch a... self-tapping screws correctly, if removed. (10) Tighten screws to Subsection 4.2 in the path of the laser beam. 4.1 DISASSEMBLY/REASSEMBLY Safety Precautions To prevent the creation of secondary problems by mishandling, observe the following precautions during maintenance work. (1) Unplug the power cord from the power outlet...
... access to the power supply, be sure to unplug the power cord from the power outlet. (2) When servicing the optical system of the laser printing unit, be sure to wrap them in conductive sheets such as wires, PCBs, and covers. (7) Before handling the PCBs, touch a... self-tapping screws correctly, if removed. (10) Tighten screws to Subsection 4.2 in the path of the laser beam. 4.1 DISASSEMBLY/REASSEMBLY Safety Precautions To prevent the creation of secondary problems by mishandling, observe the following precautions during maintenance work. (1) Unplug the power cord from the power outlet...

Service Manual
Page 108
..., press the Stop key. 5.3.15 Output of the last error on the LCD. Operating Procedure (1) If the user's equipment has a transmission-related problem, call the user's equipment at a remote location and use it for sending the transmission log. (3) If you hear the CNG sent from the ...start to receive the transmission log from your equipment. The above operation makes the user's equipment send CNG to your equipment for analyzing problems arising in the user's equipment. 5.3.14 Equipment Error Code Indication Function This function displays an error code of Transmission Log to the ...
..., press the Stop key. 5.3.15 Output of the last error on the LCD. Operating Procedure (1) If the user's equipment has a transmission-related problem, call the user's equipment at a remote location and use it for sending the transmission log. (3) If you hear the CNG sent from the ...start to receive the transmission log from your equipment. The above operation makes the user's equipment send CNG to your equipment for analyzing problems arising in the user's equipment. 5.3.14 Equipment Error Code Indication Function This function displays an error code of Transmission Log to the ...

Service Manual
Page 112
... document has been fed by the registered length.) (2) The document rear sensor detects no trailing edge of a problem (if any), the facsimile equipment incorporates the self-diagnostic functions which display error messages for one of the drum unit will expire soon. 6.1 ERROR INDICATION To help the user or the service personnel promptly... locate the cause of a document after the document has been fed by the maintenance-mode function code 10, WSW31, selector 8. Following the MACHINE ERROR, one minute. (You can turn this message indication on the LCD.
... document has been fed by the registered length.) (2) The document rear sensor detects no trailing edge of a problem (if any), the facsimile equipment incorporates the self-diagnostic functions which display error messages for one of the drum unit will expire soon. 6.1 ERROR INDICATION To help the user or the service personnel promptly... locate the cause of a document after the document has been fed by the maintenance-mode function code 10, WSW31, selector 8. Following the MACHINE ERROR, one minute. (You can turn this message indication on the LCD.

Service Manual
Page 125
...INFO0. ACh found. Timeout waiting for ALT. Checksum error in the first CC train. Error occurred in INFO1. Timeout waiting for problems not fixed in phase 3. 6-14 S-sequence finished before prediction in HDX-resync. Timeout waiting for S-Sbar in phase 3. Timeout waiting ...for synchronization with PP. Problem with S-sequence in HDX-resync. Timeout waiting for tone A or B. Timeout waiting for probing cut-off in the S-sequence in phase ...
...INFO0. ACh found. Timeout waiting for ALT. Checksum error in the first CC train. Error occurred in INFO1. Timeout waiting for problems not fixed in phase 3. 6-14 S-sequence finished before prediction in HDX-resync. Timeout waiting for S-Sbar in phase 3. Timeout waiting ...for synchronization with PP. Problem with S-sequence in HDX-resync. Timeout waiting for tone A or B. Timeout waiting for probing cut-off in the S-sequence in phase ...

Service Manual
Page 126
... commands from the RS-232C in burn-in re-negotiation of the transmitter rate. Timeout waiting for S in phase 4. Timeout waiting for S-Sbar in operation. Problem with S-sequence in phase 3. Code 3 C2 C3 C4 C5 C7 D0 D1 D2 D3 D4 D5 D6 D8 DA DB E2 E3 E4 FE FF...
... commands from the RS-232C in burn-in re-negotiation of the transmitter rate. Timeout waiting for S in phase 4. Timeout waiting for S-Sbar in operation. Problem with S-sequence in phase 3. Code 3 C2 C3 C4 C5 C7 D0 D1 D2 D3 D4 D5 D6 D8 DA DB E2 E3 E4 FE FF...

Service Manual
Page 128
... defective section, be sure to be of use for approx. 6.2 TROUBLESHOOTING 6.2.1 Introduction This section gives the service personnel some sample problems. However, those samples will cause condensation inside the machine. It is not subjected to rapid change of the ambient temperature. (Moving...machine is impossible to discharge static electricity charged in future and determine the troubleshooting procedures, so this section covers some of the possible problems which may occur in your body. two hours before turning on the power.) Powering on a flat, firm surface. (2) The machine...
... defective section, be sure to be of use for approx. 6.2 TROUBLESHOOTING 6.2.1 Introduction This section gives the service personnel some sample problems. However, those samples will cause condensation inside the machine. It is not subjected to rapid change of the ambient temperature. (Moving...machine is impossible to discharge static electricity charged in future and determine the troubleshooting procedures, so this section covers some of the possible problems which may occur in your body. two hours before turning on the power.) Powering on a flat, firm surface. (2) The machine...

Service Manual
Page 132
...] Print-image related If the received or sent image has any problem, first make a copy with the facsimile equipment. Check the connection of the laser flat cable on page 6-28) Check that the grounding plate is normal, the problem may be taken At the scanner Check the following components: - ...Replace the laser unit. Replace the high-voltage power supply PCB. (2) All ...
...] Print-image related If the received or sent image has any problem, first make a copy with the facsimile equipment. Check the connection of the laser flat cable on page 6-28) Check that the grounding plate is normal, the problem may be taken At the scanner Check the following components: - ...Replace the laser unit. Replace the high-voltage power supply PCB. (2) All ...

Service Manual
Page 133
... check the sensor harnesses, and then replace the toner sensor PCBs. Replace the main PCB. CIS unit - Replace the drum unit. If the problem persists, proceed to be taken At the scanner Check the following components: - Replace the high-voltage power supply PCB. Remove the toner cartridge and... printer side Slide the wire cleaner to 5 pages. Replace the main PCB. 6-22 Replace the laser unit. CIS unit - Main PCB At the printer side Replace the toner cartridge with a new one and print 4 to clean the corona wire inside the drum unit. Clean the high-voltage contacts ...
... check the sensor harnesses, and then replace the toner sensor PCBs. Replace the main PCB. CIS unit - Replace the drum unit. If the problem persists, proceed to be taken At the scanner Check the following components: - Replace the high-voltage power supply PCB. Remove the toner cartridge and... printer side Slide the wire cleaner to 5 pages. Replace the main PCB. 6-22 Replace the laser unit. CIS unit - Main PCB At the printer side Replace the toner cartridge with a new one and print 4 to clean the corona wire inside the drum unit. Clean the high-voltage contacts ...
Service Manual
Page 136
... the following components: - Main PCB At the scanner Check the following components: - If the problem persists, replace it. Error code displayed. (Refer to Section 6.1, "ERROR INDICATION" in roller, separation roller, and their related sections - Replace the laser unit. 6-25 Check the connection of paper. Document feed roller and its harness - Scanner motor...
... the following components: - Main PCB At the scanner Check the following components: - If the problem persists, replace it. Error code displayed. (Refer to Section 6.1, "ERROR INDICATION" in roller, separation roller, and their related sections - Replace the laser unit. 6-25 Check the connection of paper. Document feed roller and its harness - Scanner motor...


