Basic User's Guide - English
Page 36
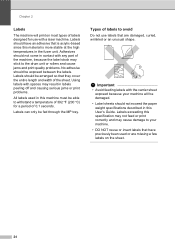
.... Types of the machine, because the label stock may stick to your machine will print on the sheet. 24 Labels should not come in the fuser unit.
.... Types of the machine, because the label stock may stick to your machine will print on the sheet. 24 Labels should not come in the fuser unit.
Basic User's Guide - English
Page 96
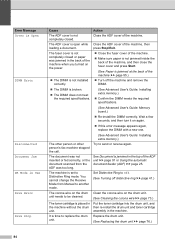
... of the machine. Make sure paper is not jammed inside the back of the machine, and then close the fuser cover and press Start. (See Paper is jammed at the back of the machine uu page 95.) The DIMM is not installed correctly. ...'s Guide: Installing extra memory.) Confirm the DIMM meets the required specifications. (See Advanced User's Guide: Memory board.) Re-install the DIMM correctly. The fuser cover is not completely closed . person's fax machine stopped the call. It is jammed in the top of the ADF unit uu page 91 or...
... of the machine. Make sure paper is not jammed inside the back of the machine, and then close the fuser cover and press Start. (See Paper is jammed at the back of the machine uu page 95.) The DIMM is not installed correctly. ...'s Guide: Installing extra memory.) Confirm the DIMM meets the required specifications. (See Advanced User's Guide: Memory board.) Re-install the DIMM correctly. The fuser cover is not completely closed . person's fax machine stopped the call. It is jammed in the top of the ADF unit uu page 91 or...
Basic User's Guide - English
Page 97
... the MP tray. Do one of the machine. assembly in the paper tray shown on the LCD. Place paper in the duplex tray or the fuser unit. closed completely. Jam Duplex The paper is placed in the paper tray of the following: Refill paper in the machine. Limit Exceeded... page 102. Jam Rear The paper is jammed in the back of the fuser unit does not rise to check your administrator to a specified temperature within the specified time. The fuser unit is connected to Network settings. Fuser Error The temperature of the machine. Jam MP The paper is jammed in ...
... the MP tray. Do one of the machine. assembly in the paper tray shown on the LCD. Place paper in the duplex tray or the fuser unit. closed completely. Jam Duplex The paper is placed in the paper tray of the following: Refill paper in the machine. Limit Exceeded... page 102. Jam Rear The paper is jammed in the back of the fuser unit does not rise to check your administrator to a specified temperature within the specified time. The fuser unit is connected to Network settings. Fuser Error The temperature of the machine. Jam MP The paper is jammed in ...
Basic User's Guide - English
Page 99
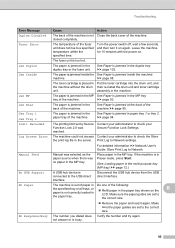
... previously stored secure print data. To replace Fuser Unit call Brother Customer Service at : http://www.brother-usa.com/service/ 87 To replace Laser Unit call Brother Customer Service at: 1-877-BROTHER (1-877-276-8437) (in USA) 1-877-BROTHER (in Canada) or to replace the laser Call Brother Customer Service or a Brother B unit. Print Unable XX The machine...
... previously stored secure print data. To replace Fuser Unit call Brother Customer Service at : http://www.brother-usa.com/service/ 87 To replace Laser Unit call Brother Customer Service at: 1-877-BROTHER (1-877-276-8437) (in USA) 1-877-BROTHER (in Canada) or to replace the laser Call Brother Customer Service or a Brother B unit. Print Unable XX The machine...

Basic User's Guide - English
Page 109
Wait for the machine to cool down the fuser cover (1). WARNING HOT SURFACE After you touch the internal parts of the machine. 1 f Using both hands, gently pull the jammed paper out of the machine will be extremely hot. B 97 Troubleshooting e Pull the green tabs at the left and right hand sides toward you and fold down before you have just used the machine, some internal parts of the fuser unit. d Open the back cover.
Wait for the machine to cool down the fuser cover (1). WARNING HOT SURFACE After you touch the internal parts of the machine. 1 f Using both hands, gently pull the jammed paper out of the machine will be extremely hot. B 97 Troubleshooting e Pull the green tabs at the left and right hand sides toward you and fold down before you have just used the machine, some internal parts of the fuser unit. d Open the back cover.

Basic User's Guide - English
Page 110
h Close the back cover. j Close the front cover of the machine. b Pull the paper tray completely out of the machine. 98 i Put the drum unit and toner cartridge assembly back into the machine. g Close the fuser cover (1). 1 Paper is jammed inside the machine B If the LCD shows Jam Inside, follow these steps: a Leave the machine turned on for 10 minutes for the internal fan to cool the extremely hot parts inside the machine.
h Close the back cover. j Close the front cover of the machine. b Pull the paper tray completely out of the machine. 98 i Put the drum unit and toner cartridge assembly back into the machine. g Close the fuser cover (1). 1 Paper is jammed inside the machine B If the LCD shows Jam Inside, follow these steps: a Leave the machine turned on for 10 minutes for the internal fan to cool the extremely hot parts inside the machine.

Basic User's Guide - English
Page 129
... drum unit. See Replacing the drum unit uu page 75. Make sure that you use paper that meets our specifications. Call Brother Customer Service at: In USA: 1-877-BROTHER (1-877-276-8437) In Canada: 1-877-BROTHER B 117 See Replacing the toner cartridge uu page 67. The fuser unit may cause this problem.
... drum unit. See Replacing the drum unit uu page 75. Make sure that you use paper that meets our specifications. Call Brother Customer Service at: In USA: 1-877-BROTHER (1-877-276-8437) In Canada: 1-877-BROTHER B 117 See Replacing the toner cartridge uu page 67. The fuser unit may cause this problem.

Basic User's Guide - English
Page 130
...Cleaning the corona wire uu page 73. The drum unit may be damaged. See Replacing the drum unit uu page 75. The fuser unit may be contaminated. See Software User's Guide: Printing (for Macintosh). Check the machine's environment. Be sure to return the green tab...page 20. Choose Thick Paper mode in the printer driver, choose Thick in a new drum unit. Call Brother Customer Service at: In USA: 1-877-BROTHER (1-877-276-8437) In Canada: 1-877-BROTHER Make sure that you use paper that meets our specifications. Put in a new drum unit. Put in...
...Cleaning the corona wire uu page 73. The drum unit may be damaged. See Replacing the drum unit uu page 75. The fuser unit may be contaminated. See Software User's Guide: Printing (for Macintosh). Check the machine's environment. Be sure to return the green tab...page 20. Choose Thick Paper mode in the printer driver, choose Thick in a new drum unit. Call Brother Customer Service at: In USA: 1-877-BROTHER (1-877-276-8437) In Canada: 1-877-BROTHER Make sure that you use paper that meets our specifications. Put in a new drum unit. Put in...

Basic User's Guide - English
Page 133
... that the guides are using the MP tray, see Loading paper in a new drum unit. See Replacing the drum unit uu page 75. The fuser unit may be too full. Put in a new toner cartridge. See Replacing the drum unit uu page 75. Image skewed The paper tray may... inside the drum unit by sliding the green tab. See Replacing the toner cartridge uu page 67. The drum unit may be damaged. Call Brother Customer Service at the home position (a). The toner cartridge may be damaged. Put in the paper tray and that the back cover is closed...
... that the guides are using the MP tray, see Loading paper in a new drum unit. See Replacing the drum unit uu page 75. The fuser unit may be too full. Put in a new toner cartridge. See Replacing the drum unit uu page 75. Image skewed The paper tray may... inside the drum unit by sliding the green tab. See Replacing the toner cartridge uu page 67. The drum unit may be damaged. Call Brother Customer Service at the home position (a). The toner cartridge may be damaged. Put in the paper tray and that the back cover is closed...

Basic User's Guide - English
Page 158
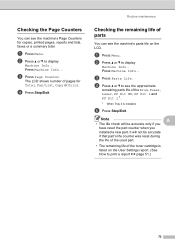
Fuser - Laser - PF Kit 2 - You can check the percentage of a machine part's life that remains available. (PF Kit 2 appears only if you installed the optional LT-...
Fuser - Laser - PF Kit 2 - You can check the percentage of a machine part's life that remains available. (PF Kit 2 appears only if you installed the optional LT-...
Advanced User's Guide - English
Page 79
b Press a or b to display Machine Info.. d Press Stop/Exit. Checking the remaining life of the Drum, Fuser, Laser, PF Kit MP, PF Kit 1 and PF Kit 2 1. 1 When Tray 2 is listed on the LCD. c Press Page Counter. d Press a or b to see the approximate ...
b Press a or b to display Machine Info.. d Press Stop/Exit. Checking the remaining life of the Drum, Fuser, Laser, PF Kit MP, PF Kit 1 and PF Kit 2 1. 1 When Tray 2 is listed on the LCD. c Press Page Counter. d Press a or b to see the approximate ...

Advanced User's Guide - English
Page 80
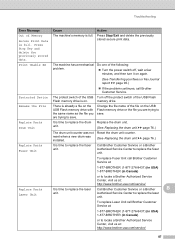
... maintain the print quality. Replace the paper feeding kit for the paper tray. Please call Brother Customer Service when the following messages appear on the LCD. Replace the paper feeding kit for PF Kit 1, PF Kit 2, Fuser and Laser. The parts listed below will need to be replaced regularly to be replaced... after printing approximately 50,000 pages 1 for PF Kit MP and 100,000 pages 1 for the lower tray (option). LCD message Replace Parts Fuser Unit Replace Parts Laser Unit Replace Parts PF Kit 1 Replace Parts PF Kit 2 2 Replace Parts PF Kit MP Description Replace the...
... maintain the print quality. Replace the paper feeding kit for the paper tray. Please call Brother Customer Service when the following messages appear on the LCD. Replace the paper feeding kit for PF Kit 1, PF Kit 2, Fuser and Laser. The parts listed below will need to be replaced regularly to be replaced... after printing approximately 50,000 pages 1 for PF Kit MP and 100,000 pages 1 for the lower tray (option). LCD message Replace Parts Fuser Unit Replace Parts Laser Unit Replace Parts PF Kit 1 Replace Parts PF Kit 2 2 Replace Parts PF Kit MP Description Replace the...


