
Network Users Manual - English
Page 8
... to configure the IP address A-3 Using ARP to configure the IP address A-3 Windows® systems ...A-3 UNIX®/Linux systems ...A-3 Using the TELNET console to configure the IP address A-4 Using the Brother Web BRAdmin server software for IIS* to configure the IP address A-5 Updating other machines through the network (Windows® only A-6 Installation when using a Network Print Queue or Share (printer driver only A-8 Appendix B Print server specifications...B-1 Ethernet wired network...B-1 Ethernet wireless network ...B-2 Function table and default factory settings B-4 Entering...
... to configure the IP address A-3 Using ARP to configure the IP address A-3 Windows® systems ...A-3 UNIX®/Linux systems ...A-3 Using the TELNET console to configure the IP address A-4 Using the Brother Web BRAdmin server software for IIS* to configure the IP address A-5 Updating other machines through the network (Windows® only A-6 Installation when using a Network Print Queue or Share (printer driver only A-8 Appendix B Print server specifications...B-1 Ethernet wired network...B-1 Ethernet wireless network ...B-2 Function table and default factory settings B-4 Entering...

Network Users Manual - English
Page 9
... The Brother machine can affect the data transfer speed of your documents. These functions include printing, scanning, PC-FAX send, PC-FAX receive, PhotoCaptureTM Center, Remote Setup and Status Monitor. Large objects and walls between the two devices as well as possible with normal every day document printing, place the Brother machine as close to the network access point (router) as interference from other electronic devices can be the best method of connection for...
... The Brother machine can affect the data transfer speed of your documents. These functions include printing, scanning, PC-FAX send, PC-FAX receive, PhotoCaptureTM Center, Remote Setup and Status Monitor. Large objects and walls between the two devices as well as possible with normal every day document printing, place the Brother machine as close to the network access point (router) as interference from other electronic devices can be the best method of connection for...

Network Users Manual - English
Page 43
... server. Control panel setup Primary WINS Server IP Address This field specifies the IP address of the secondary WINS server. Press OK. 4 - 10 If set to a non-zero value, the machine will contact this field blank. 8.DNS Server (For MFC-640CW) 1 (For Wired) Press Menu/Set, 5, 1, 8. (For Wireless) Press Menu/Set, 5, 2, 8. 2 Press ▲ or ▼ to select Primary or Secondary. 3 Press Menu/Set. 4 Enter the DNS Server address. 5 Press Menu/Set. 6 Press Stop/Exit. (For MFC-820CW) 1 Press Menu...
... server. Control panel setup Primary WINS Server IP Address This field specifies the IP address of the secondary WINS server. Press OK. 4 - 10 If set to a non-zero value, the machine will contact this field blank. 8.DNS Server (For MFC-640CW) 1 (For Wired) Press Menu/Set, 5, 1, 8. (For Wireless) Press Menu/Set, 5, 2, 8. 2 Press ▲ or ▼ to select Primary or Secondary. 3 Press Menu/Set. 4 Enter the DNS Server address. 5 Press Menu/Set. 6 Press Stop/Exit. (For MFC-820CW) 1 Press Menu...
Network Users Manual - English
Page 57
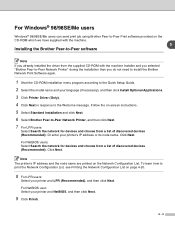
... need to install the Brother Network Print Software again. 1 Start the CD-ROM installation menu program according to the Quick Setup Guide. 2 Select the model name and your printer and LPR (Recommended), and then click Next. Or enter your printer and NetBIOS, and then click Next. 9 Click Finish. 5 - 3 For Windows® 98/98SE/Me users Windows® 98/98SE/Me users can send print job using Brother Peer-to-Peer Print software provided on -screen instructions. 5 Select Standard Installation and...
... need to install the Brother Network Print Software again. 1 Start the CD-ROM installation menu program according to the Quick Setup Guide. 2 Select the model name and your printer and LPR (Recommended), and then click Next. Or enter your printer and NetBIOS, and then click Next. 9 Click Finish. 5 - 3 For Windows® 98/98SE/Me users Windows® 98/98SE/Me users can send print job using Brother Peer-to-Peer Print software provided on -screen instructions. 5 Select Standard Installation and...

Network Users Manual - English
Page 66
... that the box next to the machine. Then, click OK. (5) Once your Firewall. In this case, you install the network drivers. is disabled, try reinstalling the Brother software package. For instructions on how to install from the CD-ROM, use the Quick Setup Guide we have provided with the Windows logo on how to re-enable your Firewall software, refer to open My Computer. (3) On the left...
... that the box next to the machine. Then, click OK. (5) Once your Firewall. In this case, you install the network drivers. is disabled, try reinstalling the Brother software package. For instructions on how to install from the CD-ROM, use the Quick Setup Guide we have provided with the Windows logo on how to re-enable your Firewall software, refer to open My Computer. (3) On the left...
Network Users Manual - English
Page 108
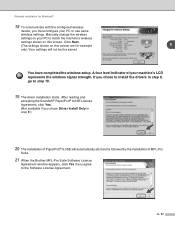
... match the machine's wireless settings shown on this screen. Manually change the wireless settings on your PC to install the drivers in step 6.) 20 The installation of PaperPort® 9.0SE will not be the same.) You have completed the wireless setup. Wireless installation for example 8 only. If you chose Driver Install Only in step 6, go to use same wireless settings. Your settings will automatically start and is followed by the installation of your...
... match the machine's wireless settings shown on this screen. Manually change the wireless settings on your PC to install the drivers in step 6.) 20 The installation of PaperPort® 9.0SE will not be the same.) You have completed the wireless setup. Wireless installation for example 8 only. If you chose Driver Install Only in step 6, go to use same wireless settings. Your settings will automatically start and is followed by the installation of your...
Network Users Manual - English
Page 141
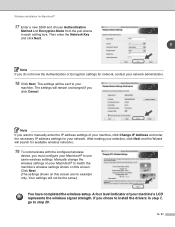
... Change IP Address and enter the necessary IP address settings for network, contact your network administrator. 18 Click Next. Wireless installation for available wireless networks. 19 To communicate with the configured wireless device, you must configure your Macintosh® to use same wireless settings. After making your selection, click Next and the Wizard will remain unchanged if you chose to install the drivers in each setting box. Manually change the wireless settings on this screen. If you click Cancel...
... Change IP Address and enter the necessary IP address settings for network, contact your network administrator. 18 Click Next. Wireless installation for available wireless networks. 19 To communicate with the configured wireless device, you must configure your Macintosh® to use same wireless settings. After making your selection, click Next and the Wizard will remain unchanged if you chose to install the drivers in each setting box. Manually change the wireless settings on this screen. If you click Cancel...
Software Users Manual - English
Page 2
... 1 Printing Using the Brother printer driver...2 Features ...2 Choosing the right type of paper...3 Simultaneous printing, scanning and faxing 3 Clearing data from the memory ...3 Checking the print quality ...3 Status Monitor...4 Monitoring the machine's status ...4 Turning off the status monitor...5 Printer driver settings...5 Accessing the printer driver settings...5 Basic tab ...6 Media Type...6 Quality ...7 Enhanced Print Settings ...8 Paper Size ...10 Page Layout ...11 Orientation ...12 Copies ...12 Advanced tab...13 Color ...14 Scaling ...16 Watermark ...17 Device Options ...19 Support...
... 1 Printing Using the Brother printer driver...2 Features ...2 Choosing the right type of paper...3 Simultaneous printing, scanning and faxing 3 Clearing data from the memory ...3 Checking the print quality ...3 Status Monitor...4 Monitoring the machine's status ...4 Turning off the status monitor...5 Printer driver settings...5 Accessing the printer driver settings...5 Basic tab ...6 Media Type...6 Quality ...7 Enhanced Print Settings ...8 Paper Size ...10 Page Layout ...11 Orientation ...12 Copies ...12 Advanced tab...13 Color ...14 Scaling ...16 Watermark ...17 Device Options ...19 Support...
Software Users Manual - English
Page 6
... the Brother Solutions Center (http://solutions.brother.com) for DCP models) ...149 PhotoCapture Center™ ...150 For USB cable users ...150 For network cable users (For models with built-in network support) Before using Network Scanning ...144 Configuring network scanning ...144 Using the Scan key...146 Scan to E-mail ...146 Scan to Image ...147 Scan to OCR ...147 Scan to File...139 COPY / PC-FAX ...140 DEVICE SETTINGS ...141 Remote Setup (Not available for DCP models 141 Quick-Dial (Not available for DCP models 142 Ink Level ...143 11 Network Scanning (For models...
... the Brother Solutions Center (http://solutions.brother.com) for DCP models) ...149 PhotoCapture Center™ ...150 For USB cable users ...150 For network cable users (For models with built-in network support) Before using Network Scanning ...144 Configuring network scanning ...144 Using the Scan key...146 Scan to E-mail ...146 Scan to Image ...147 Scan to OCR ...147 Scan to File...139 COPY / PC-FAX ...140 DEVICE SETTINGS ...141 Remote Setup (Not available for DCP models 141 Quick-Dial (Not available for DCP models 142 Ink Level ...143 11 Network Scanning (For models...
Users Manual - English
Page 42
... (See page 65.) „ Overseas Mode (See page 31.) „ Scan Size (See page 27.) „ Set New Default (See page 31.) „ Factory Reset (See page 32.) When the option you want is idle the date and time appear on the LCD. Faxing from the ADF 4 a Press (Fax). When you want to send a fax, or change fax send or receive settings, press the green. (Fax) key to illuminate it in the ADF. Note • To cancel, press Stop/Exit. •...
... (See page 65.) „ Overseas Mode (See page 31.) „ Scan Size (See page 27.) „ Set New Default (See page 31.) „ Factory Reset (See page 32.) When the option you want is idle the date and time appear on the LCD. Faxing from the ADF 4 a Press (Fax). When you want to send a fax, or change fax send or receive settings, press the green. (Fax) key to illuminate it in the ADF. Note • To cancel, press Stop/Exit. •...
Users Manual - English
Page 44
... types of jobs in the memory and the number of locations used for Groups, access codes or credit card numbers, you the following message: Clear? If more than one number, so the number of the numbers for broadcasting. YesiPress 1 NoiPress 2 e Press 1 to choose Broadcasting. Chapter 4 Broadcasting (Black & White only) 4 Broadcasting is when the same fax message is automatically sent to 50 manually dialed numbers in the same broadcast. You can include Groups, Speed-Dial numbers...
... types of jobs in the memory and the number of locations used for Groups, access codes or credit card numbers, you the following message: Clear? If more than one number, so the number of the numbers for broadcasting. YesiPress 1 NoiPress 2 e Press 1 to choose Broadcasting. Chapter 4 Broadcasting (Black & White only) 4 Broadcasting is when the same fax message is automatically sent to 50 manually dialed numbers in the same broadcast. You can include Groups, Speed-Dial numbers...
Users Manual - English
Page 84
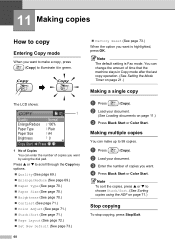
... Entering Copy mode 11 When you want is Fax mode. c Enter the number of copies you want by using the ADF on page 71.) Stop copying 11 To stop copying, press Stop/Exit. b Load your document. The LCD shows: COPY 01 1 Quality Enlarge/Reduce Paper Type Paper Size Brightness Normal 100% Plain A4 0 Copy Start Press 1 No of Copies You can make a copy, press (Copy) to illuminate it in Copy mode after the last copy operation. (See Setting the Mode Timer on page 11.) c Press Black Start or Color Start...
... Entering Copy mode 11 When you want is Fax mode. c Enter the number of copies you want by using the ADF on page 71.) Stop copying 11 To stop copying, press Stop/Exit. b Load your document. The LCD shows: COPY 01 1 Quality Enlarge/Reduce Paper Type Paper Size Brightness Normal 100% Plain A4 0 Copy Start Press 1 No of Copies You can make a copy, press (Copy) to illuminate it in Copy mode after the last copy operation. (See Setting the Mode Timer on page 11.) c Press Black Start or Color Start...
Users Manual - English
Page 122
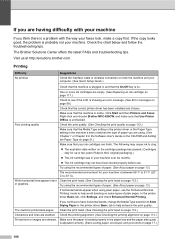
... using plain paper, use . Make sure the paper is loaded properly in and that the Media Type setting in the printer driver or the Paper Type setting in the machine's menu matches the type of paper you are using the recommended types of plain paper. Visit us at http://solutions.brother.com. One or more ink cartridges are empty. (See Replacing an ink cartridge on . Right-click and choose Brother MFC-820CW, and make a copy first. Poor printing quality Check the print quality. (See Checking...
... using plain paper, use . Make sure the paper is loaded properly in and that the Media Type setting in the printer driver or the Paper Type setting in the machine's menu matches the type of paper you are using the recommended types of plain paper. Visit us at http://solutions.brother.com. One or more ink cartridges are empty. (See Replacing an ink cartridge on . Right-click and choose Brother MFC-820CW, and make a copy first. Poor printing quality Check the print quality. (See Checking...

Users Manual - English
Page 123
... Loading paper, envelopes and post cards on page 17.) Check that the paper size setting in the application and in the Software User's Guide on the CD-ROM.) True2Life® is slower than two types of paper are cut off . Machine feeds multiple pages. Received color fax prints only in 1' printing. on Auto Reduction. (See Printing a reduced incoming fax (Auto Reduction) a single page is dry. Cannot perform '2 in 1 or 4 in black and white. Also, click the Settings tab, and make a copy to run. Printed pages...
... Loading paper, envelopes and post cards on page 17.) Check that the paper size setting in the application and in the Software User's Guide on the CD-ROM.) True2Life® is slower than two types of paper are cut off . Machine feeds multiple pages. Received color fax prints only in 1' printing. on Auto Reduction. (See Printing a reduced incoming fax (Auto Reduction) a single page is dry. Cannot perform '2 in 1 or 4 in black and white. Also, click the Settings tab, and make a copy to run. Printed pages...
Users Manual - English
Page 162
... Resolution is sending a fax from memory or receiving or printing an incoming fax. Help list A printout of your machine. LCD (liquid crystal display) The display screen on an extension or external phone. Menu mode Programming mode for small print and graphs. F/T Ring Time The length of gray available for Broadcasting. Gray scale The shades of time that shows interactive messages during fax transmission and resends the pages of Speed-Dial numbers that had an error. Fax Journal Lists information...
... Resolution is sending a fax from memory or receiving or printing an incoming fax. Help list A printout of your machine. LCD (liquid crystal display) The display screen on an extension or external phone. Menu mode Programming mode for small print and graphs. F/T Ring Time The length of gray available for Broadcasting. Gray scale The shades of time that shows interactive messages during fax transmission and resends the pages of Speed-Dial numbers that had an error. Fax Journal Lists information...
Users Manual - English
Page 166
... phone line interference 111 Real Time Transmission 30 Resolution 29 return to factory setting 32 set new default 31 Fax/Tel mode answering at extension phones 38 double-ringing (voice calls 35 F/T Ring Time 35 Fax Receive Code 38 Ring Delay 35 Telephone Answer Code 38 FCC notices 95 G Gray scale 139, 140 Groups for Broadcasting 52 H HELP LCD messages 120 using Menu keys 120 Menu Table 121 Hook key 6 I Ink cartridges checking ink volume 114 replacing 117 Ink Dot Counter...
... phone line interference 111 Real Time Transmission 30 Resolution 29 return to factory setting 32 set new default 31 Fax/Tel mode answering at extension phones 38 double-ringing (voice calls 35 F/T Ring Time 35 Fax Receive Code 38 Ring Delay 35 Telephone Answer Code 38 FCC notices 95 G Gray scale 139, 140 Groups for Broadcasting 52 H HELP LCD messages 120 using Menu keys 120 Menu Table 121 Hook key 6 I Ink cartridges checking ink volume 114 replacing 117 Ink Dot Counter...

Users Manual - English
Page 168
... T TAD (telephone answering device), external 34, 43, 45 connecting 43, 44 receive mode 34 recording OGM 44 with two-line jack 45 Text, entering 133 special characters 133 Troubleshooting 99 checking ink volume 114 document jam 103 error messages on LCD 99 if you are having difficulty copying 109 incoming calls 109 Network 110 phone line or connections 108 PhotoCapture Center 110 printing 106 printing received faxes 107 receiving faxes 108 scanning 109 sending faxes 108 software 109 paper jam 104
... T TAD (telephone answering device), external 34, 43, 45 connecting 43, 44 receive mode 34 recording OGM 44 with two-line jack 45 Text, entering 133 special characters 133 Troubleshooting 99 checking ink volume 114 document jam 103 error messages on LCD 99 if you are having difficulty copying 109 incoming calls 109 Network 110 phone line or connections 108 PhotoCapture Center 110 printing 106 printing received faxes 107 receiving faxes 108 scanning 109 sending faxes 108 software 109 paper jam 104

Quick Setup Guide - English
Page 16
... installation of the Windows® updates. 2 When instructed, click OK to restart your machine. Windows® USB STEP 2 Installing the Driver & Software Windows® For USB Interface Users (For Windows® 98/98SE/Me/2000 Professional/XP) Important Make sure that you have finished the instructions from your computer you may have not installed service pack 3 (SP3) or greater: To access the PhotoCapture Center™ features from Step 1 Setting Up the Machine...
... installation of the Windows® updates. 2 When instructed, click OK to restart your machine. Windows® USB STEP 2 Installing the Driver & Software Windows® For USB Interface Users (For Windows® 98/98SE/Me/2000 Professional/XP) Important Make sure that you have finished the instructions from your computer you may have not installed service pack 3 (SP3) or greater: To access the PhotoCapture Center™ features from Step 1 Setting Up the Machine...

Quick Setup Guide - English
Page 22
..., you may not be entered in the Network User's Guide on page 4 - 11. The CD-ROM main menu will guide you through the configuration and installation process. 20 1 Write down the wireless network settings of documents and applications. To use Windows® Explorer to run the setup.exe program from other wireless environment you can contain both numbers and letters. SSID (Service Set ID or Network name) WEP Key (if needed) WPA-PSK...
..., you may not be entered in the Network User's Guide on page 4 - 11. The CD-ROM main menu will guide you through the configuration and installation process. 20 1 Write down the wireless network settings of documents and applications. To use Windows® Explorer to run the setup.exe program from other wireless environment you can contain both numbers and letters. SSID (Service Set ID or Network name) WEP Key (if needed) WPA-PSK...

Quick Setup Guide - English
Page 25
... to cancel any of the screens during this installation. • If your wireless settings fail, an error message will appear during the installation of MFL-Pro Suite and the installation will be chosen automatically. 21 When the Brother and ScanSoft on with Administrator rights.) 19 The installation of this Brother model connected on the network as it into your selection and follow the on-screen instruction or read on -screen instructions...
... to cancel any of the screens during this installation. • If your wireless settings fail, an error message will appear during the installation of MFL-Pro Suite and the installation will be chosen automatically. 21 When the Brother and ScanSoft on with Administrator rights.) 19 The installation of this Brother model connected on the network as it into your selection and follow the on-screen instruction or read on -screen instructions...


