Users Manual - English
Page 4
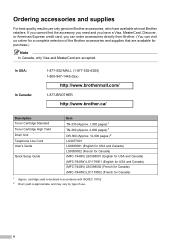
... USA and Canada) LS0389002 (French for Canada) (MFC-7440N) LS0398001 (English for USA and Canada) (MFC-7840W) LS1179001 (English for USA and Canada) (MFC-7440N) LS0398002 (French for Canada) (MFC-7840W) LS1179002 (French for purchase.) Note In Canada, only Visa and MasterCard are available at most Brother retailers. ii cartridge yield is declared in accordance with ISO/IEC...
... USA and Canada) LS0389002 (French for Canada) (MFC-7440N) LS0398001 (English for USA and Canada) (MFC-7840W) LS1179001 (English for USA and Canada) (MFC-7440N) LS0398002 (French for Canada) (MFC-7840W) LS1179002 (French for purchase.) Note In Canada, only Visa and MasterCard are available at most Brother retailers. ii cartridge yield is declared in accordance with ISO/IEC...

Users Manual - English
Page 6
... charge to a Brother Authorized Service Center within the applicable warranty period. The decision as Paper Feeding Kit, Fuser and Laser Units. What is made by Brother in , but...accompanying Consumable and Accessory Items is the length of the Warranty Periods: „ Machines: one year from the original purchase date. „ Accompanying Consumable and Accessory Items: 90 days...heads, toner, drums, ink cartridges, print cartridges, cordless handset battery, refill ribbons, therma PLUS paper and thermal paper. „ Except as otherwise provided herein, Brother warrants that expired in the ...
... charge to a Brother Authorized Service Center within the applicable warranty period. The decision as Paper Feeding Kit, Fuser and Laser Units. What is made by Brother in , but...accompanying Consumable and Accessory Items is the length of the Warranty Periods: „ Machines: one year from the original purchase date. „ Accompanying Consumable and Accessory Items: 90 days...heads, toner, drums, ink cartridges, print cartridges, cordless handset battery, refill ribbons, therma PLUS paper and thermal paper. „ Except as otherwise provided herein, Brother warrants that expired in the ...

Users Manual - English
Page 8
...for labour and parts, Brother International Corporation (Canada) Ltd. ("Brother"), or its Authorized Service Centres, Distributors, Dealers, Agents or employees, shall create another warranty or modify this machine is available at Brother's sole discretion) this MFC/Fax machine free of ...cartridges installed. Since some Provinces do not allow the above limitation of . Operation of the MFC/Fax machine in Canada. When shipping or transporting your MFC/Fax machine, please refer to the Laser MFC/Fax machine and will void the warranty. If original protective parts are non-Brother...
...for labour and parts, Brother International Corporation (Canada) Ltd. ("Brother"), or its Authorized Service Centres, Distributors, Dealers, Agents or employees, shall create another warranty or modify this machine is available at Brother's sole discretion) this MFC/Fax machine free of ...cartridges installed. Since some Provinces do not allow the above limitation of . Operation of the MFC/Fax machine in Canada. When shipping or transporting your MFC/Fax machine, please refer to the Laser MFC/Fax machine and will void the warranty. If original protective parts are non-Brother...
Users Manual - English
Page 13
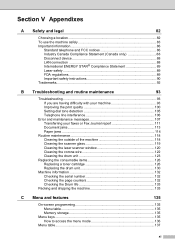
... and FCC notices 86 Industry Canada Compliance Statement (Canada only 88 Disconnect device 88 LAN connection 88 International ENERGY STAR® Compliance Statement 89 Laser safety 89 FDA regulations 89 Important safety instructions 90 Trademarks...92 B Troubleshooting and routine maintenance 93 Troubleshooting...the machine 118 Cleaning the scanner glass 119 Cleaning the laser scanner window 120 Cleaning the corona wire 122 Cleaning the drum unit 123 Replacing the consumable items 126 Replacing a toner cartridge 126 Replacing the drum unit 130 Machine information 132 Checking...
... and FCC notices 86 Industry Canada Compliance Statement (Canada only 88 Disconnect device 88 LAN connection 88 International ENERGY STAR® Compliance Statement 89 Laser safety 89 FDA regulations 89 Important safety instructions 90 Trademarks...92 B Troubleshooting and routine maintenance 93 Troubleshooting...the machine 118 Cleaning the scanner glass 119 Cleaning the laser scanner window 120 Cleaning the corona wire 122 Cleaning the drum unit 123 Replacing the consumable items 126 Replacing a toner cartridge 126 Replacing the drum unit 130 Machine information 132 Checking...
Users Manual - English
Page 109
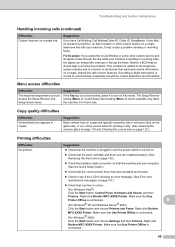
...on a single, shared line with no custom features is unchecked. 95 Right-click Brother MFC-XXXX Printer. Right-click Brother MFC-XXXX Printer. Make sure that Use Printer Offline is recommended. This condition is ...a single telephone line with your machine is turned on. „ Check that the toner cartridge and drum unit are installed properly. (See Replacing the drum unit on page 130.) „... Setup Guide.) „ Check that send and receive information on the glass strip, or one of the corona wires for printing is unchecked. (For Windows® 2000) Click the Start...
...on a single, shared line with no custom features is unchecked. 95 Right-click Brother MFC-XXXX Printer. Right-click Brother MFC-XXXX Printer. Make sure that Use Printer Offline is recommended. This condition is ...a single telephone line with your machine is turned on. „ Check that the toner cartridge and drum unit are installed properly. (See Replacing the drum unit on page 130.) „... Setup Guide.) „ Check that send and receive information on the glass strip, or one of the corona wires for printing is unchecked. (For Windows® 2000) Click the Start...

Users Manual - English
Page 114
...on page 120.) „ Make sure that a torn sheet of paper is not inside the machine covering the scanner window. „ The toner cartridge may be damaged. Conditions such as high humidity can cause the problem. (See Acceptable paper and other print media on page 14.) „ ... (See Choosing a location on page 82.) „ The toner cartridge may be damaged. Put in a new drum unit. (See Replacing the drum unit on page 130.) „ Wipe the laser scanner windows with a soft cloth. (See Cleaning the laser scanner window on page 130.) 100 Improving the print quality B Examples...
...on page 120.) „ Make sure that a torn sheet of paper is not inside the machine covering the scanner window. „ The toner cartridge may be damaged. Conditions such as high humidity can cause the problem. (See Acceptable paper and other print media on page 14.) „ ... (See Choosing a location on page 82.) „ The toner cartridge may be damaged. Put in a new drum unit. (See Replacing the drum unit on page 130.) „ Wipe the laser scanner windows with a soft cloth. (See Cleaning the laser scanner window on page 130.) 100 Improving the print quality B Examples...
Users Manual - English
Page 117
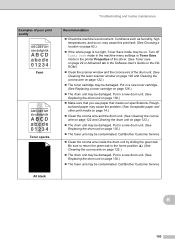
... ABCDEFGH abcdefghijk ABCD abcde 01234 Faint ABCDEFGH abcdefghijk ABCD abcde 01234 Toner specks All black Recommendation „ Check the machine's environment. Call Brother Customer Service. „ Clean the corona wire inside the drum unit by sliding the green tab. B 103 Turn off Toner Save ... be contaminated. Troubleshooting and routine maintenance Examples of the drum unit. (See Cleaning the laser scanner window on page 120 and Cleaning the corona wire on page 122.) „ The toner cartridge may be damaged. Conditions such as humidity, high temperatures, and so on, may cause...
... ABCDEFGH abcdefghijk ABCD abcde 01234 Faint ABCDEFGH abcdefghijk ABCD abcde 01234 Toner specks All black Recommendation „ Check the machine's environment. Call Brother Customer Service. „ Clean the corona wire inside the drum unit by sliding the green tab. B 103 Turn off Toner Save ... be contaminated. Troubleshooting and routine maintenance Examples of the drum unit. (See Cleaning the laser scanner window on page 120 and Cleaning the corona wire on page 122.) „ The toner cartridge may be damaged. Conditions such as humidity, high temperatures, and so on, may cause...
Users Manual - English
Page 118
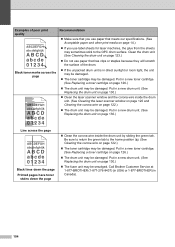
... be damaged. Put in direct sunlight or room light, the unit may be damaged. „ The toner cartridge may be damaged. Put in a new toner cartridge. (See Replacing a toner cartridge on page 126.) „ The drum unit may be damaged. Be sure to return the green tab to the OPC drum ... (See Replacing the drum unit on page 130.) „ Clean the laser scanner window and the corona wire inside the drum unit by sliding the green tab. Call Brother Customer Service at 1-877-BROTHER (1-877-276-8437) (in USA) or 1-877-BROTHER (in a new drum unit. (See Replacing the drum unit on page...
... be damaged. Put in direct sunlight or room light, the unit may be damaged. „ The toner cartridge may be damaged. Put in a new toner cartridge. (See Replacing a toner cartridge on page 126.) „ The drum unit may be damaged. Be sure to return the green tab to the OPC drum ... (See Replacing the drum unit on page 130.) „ Clean the laser scanner window and the corona wire inside the drum unit by sliding the green tab. Call Brother Customer Service at 1-877-BROTHER (1-877-276-8437) (in USA) or 1-877-BROTHER (in a new drum unit. (See Replacing the drum unit on page...
Users Manual - English
Page 121
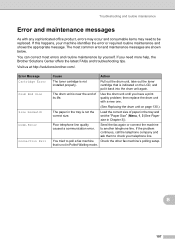
Visit us at http://solutions.brother.com/. Pull out the drum unit, take out the toner cartridge that is near the end of paper in the tray and ...that is not installed properly. Troubleshooting and routine maintenance Error and maintenance messages B As with a new one. (See Replacing the drum unit on the LCD, and put it back into the drum unit again....unit with any sophisticated office product, errors may occur and consumable items may need more help, the Brother Solutions Center offers the latest FAQs and troubleshooting tips. Poor telephone line quality caused a communication error....
Visit us at http://solutions.brother.com/. Pull out the drum unit, take out the toner cartridge that is near the end of paper in the tray and ...that is not installed properly. Troubleshooting and routine maintenance Error and maintenance messages B As with a new one. (See Replacing the drum unit on the LCD, and put it back into the drum unit again....unit with any sophisticated office product, errors may occur and consumable items may need more help, the Brother Solutions Center offers the latest FAQs and troubleshooting tips. Poor telephone line quality caused a communication error....
Users Manual - English
Page 122
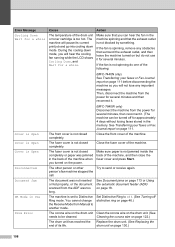
...and then reconnect it . (The machine can hear the fan in the back of the following: (MFC-7440N only) See Transferring your faxes or Fax Journal report on page 111. Disconnected Document Jam The other ...drum unit has reached the end of the drum unit or toner cartridge is too hot. Make sure that you turned on the power. (MFC-7840W only) Disconnect the machine from the power for several minutes.... any obstacles that surround the exhaust outlet, and then leave the machine turned on but do one of the machine when you can be turned off distinctive ring on page 46.) The corona wire...
...and then reconnect it . (The machine can hear the fan in the back of the following: (MFC-7440N only) See Transferring your faxes or Fax Journal report on page 111. Disconnected Document Jam The other ...drum unit has reached the end of the drum unit or toner cartridge is too hot. Make sure that you turned on the power. (MFC-7840W only) Disconnect the machine from the power for several minutes.... any obstacles that surround the exhaust outlet, and then leave the machine turned on but do one of the machine when you can be turned off distinctive ring on page 46.) The corona wire...

Users Manual - English
Page 125
... to your PC on the machine's LCD, after the faxes have been installed improperly, or the toner cartridge is used up and printing is near the end of the following: „ (MFC-7440N only) See Transferring your faxes or Fax Journal report on page 111 before disconnecting the machine so you ...XX Toner Life End Toner Low Cause Action The machine has a mechanical problem. Do one of the following: „ Re-install the toner cartridge and drum unit assembly. „ Replace the empty toner cartridge with a new one of its life and the toner will not lose any faxes you can be turned ...
... to your PC on the machine's LCD, after the faxes have been installed improperly, or the toner cartridge is used up and printing is near the end of the following: „ (MFC-7440N only) See Transferring your faxes or Fax Journal report on page 111 before disconnecting the machine so you ...XX Toner Life End Toner Low Cause Action The machine has a mechanical problem. Do one of the following: „ Re-install the toner cartridge and drum unit assembly. „ Replace the empty toner cartridge with a new one of its life and the toner will not lose any faxes you can be turned ...
Users Manual - English
Page 128
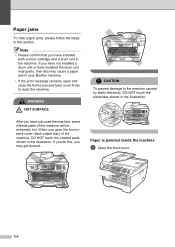
... you have just used the machine, some internal parts of the machine, DO NOT touch the shaded parts shown in the illustration. Paper jams B To clear paper jams, please follow the steps in the machine. After you may cause a paper jam in your Brother machine. • If the error message ...remains, open the front or back cover (back output tray) of the machine will be extremely hot. When you have not installed a drum unit or have installed both a toner cartridge and a drum unit in this may ...
... you have just used the machine, some internal parts of the machine, DO NOT touch the shaded parts shown in the illustration. Paper jams B To clear paper jams, please follow the steps in the machine. After you may cause a paper jam in your Brother machine. • If the error message ...remains, open the front or back cover (back output tray) of the machine will be extremely hot. When you have not installed a drum unit or have installed both a toner cartridge and a drum unit in this may ...
Users Manual - English
Page 129
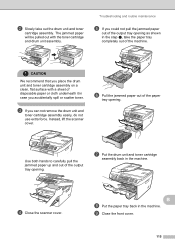
... paper will be pulled out with a sheet of the paper tray opening as shown in case you can not remove the drum unit and toner cartridge assembly easily, do not use extra force. d Close the scanner cover. B h Put the paper tray back in the machine. CAUTION We recommend that you ...place the drum unit and toner cartridge assembly on a clean, flat surface with the toner cartridge and drum unit assembly. Troubleshooting and routine maintenance e If you could not pull the jammed paper out of the output tray...
... paper will be pulled out with a sheet of the paper tray opening as shown in case you can not remove the drum unit and toner cartridge assembly easily, do not use extra force. d Close the scanner cover. B h Put the paper tray back in the machine. CAUTION We recommend that you ...place the drum unit and toner cartridge assembly on a clean, flat surface with the toner cartridge and drum unit assembly. Troubleshooting and routine maintenance e If you could not pull the jammed paper out of the output tray...
Users Manual - English
Page 130
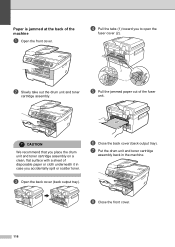
.... 2 1 e Pull the jammed paper out of the machine B a Open the front cover. g Put the drum unit and toner cartridge assembly back in case you to open the fuser cover (2). d Pull the tabs (1) toward you accidentally spill or scatter toner. h Close the front cover. ...116 CAUTION We recommend that you place the drum unit and toner cartridge assembly on a clean, flat surface with a sheet of disposable paper or cloth underneath it in the machine. c Open the back cover (back output tray). f...
.... 2 1 e Pull the jammed paper out of the machine B a Open the front cover. g Put the drum unit and toner cartridge assembly back in case you to open the fuser cover (2). d Pull the tabs (1) toward you accidentally spill or scatter toner. h Close the front cover. ...116 CAUTION We recommend that you place the drum unit and toner cartridge assembly on a clean, flat surface with a sheet of disposable paper or cloth underneath it in the machine. c Open the back cover (back output tray). f...

Users Manual - English
Page 131
..., flat surface with cold water at once. Troubleshooting and routine maintenance c Push down the green lock lever and take out the drum unit and toner cartridge assembly. CAUTION We recommend that you accidentally spill or scatter toner. To avoid print quality problems, DO NOT touch the shaded parts shown in case... you place the drum unit and toner cartridge assembly on your hands or clothes, wipe or wash it off with a sheet of the drum unit. B 117 b Slowly take the toner...
..., flat surface with cold water at once. Troubleshooting and routine maintenance c Push down the green lock lever and take out the drum unit and toner cartridge assembly. CAUTION We recommend that you accidentally spill or scatter toner. To avoid print quality problems, DO NOT touch the shaded parts shown in case... you place the drum unit and toner cartridge assembly on your hands or clothes, wipe or wash it off with a sheet of the drum unit. B 117 b Slowly take the toner...
Users Manual - English
Page 132
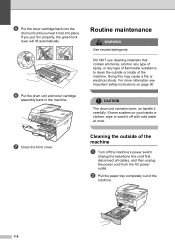
... with cold water at once. Doing this may cause a fire or electrical shock. Routine maintenance B WARNING Use neutral detergents. f Put the drum unit and toner cartridge assembly back in properly, the green lock lever will lift automatically. b Pull the paper tray completely out of the machine. Cleaning the outside or inside...
... with cold water at once. Doing this may cause a fire or electrical shock. Routine maintenance B WARNING Use neutral detergents. f Put the drum unit and toner cartridge assembly back in properly, the green lock lever will lift automatically. b Pull the paper tray completely out of the machine. Cleaning the outside or inside...
Users Manual - English
Page 134
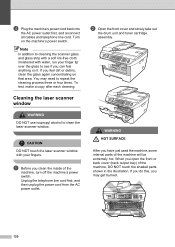
a Before you have just used the machine, some internal parts of the machine will be extremely hot. b Open the front cover and slowly take out the drum unit and toner cartridge assembly. Unplug the telephone line cord first, and then unplug the power cord from the AC power outlet. ...of the machine, turn off the machine's power switch. If you do this, you feel anything on the machine's power switch. Cleaning the laser scanner window B WARNING DO NOT use isopropyl alcohol to cleaning the scanner glass and glass strip with a soft lint-free cloth moistened with your ...
a Before you have just used the machine, some internal parts of the machine will be extremely hot. b Open the front cover and slowly take out the drum unit and toner cartridge assembly. Unplug the telephone line cord first, and then unplug the power cord from the AC power outlet. ...of the machine, turn off the machine's power switch. If you do this, you feel anything on the machine's power switch. Cleaning the laser scanner window B WARNING DO NOT use isopropyl alcohol to cleaning the scanner glass and glass strip with a soft lint-free cloth moistened with your ...
Users Manual - English
Page 135
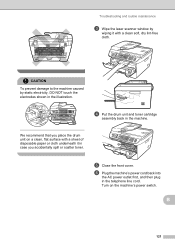
d Put the drum unit and toner cartridge assembly back in the telephone line cord. B 121 CAUTION To prevent damage to the machine caused by wiping it with a sheet of disposable paper or ... switch. f Plug the machine's power cord back into the AC power outlet first, and then plug in the machine. Troubleshooting and routine maintenance c Wipe the laser scanner window by static electricity, DO NOT touch the electrodes shown in the illustration. e Close the front cover. We recommend that you accidentally spill or...
d Put the drum unit and toner cartridge assembly back in the telephone line cord. B 121 CAUTION To prevent damage to the machine caused by wiping it with a sheet of disposable paper or ... switch. f Plug the machine's power cord back into the AC power outlet first, and then plug in the machine. Troubleshooting and routine maintenance c Wipe the laser scanner window by static electricity, DO NOT touch the electrodes shown in the illustration. e Close the front cover. We recommend that you accidentally spill or...
Users Manual - English
Page 136
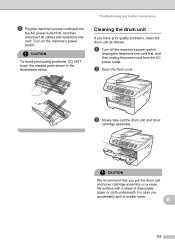
... flat surface with cold water at once. 1 CAUTION Be sure to return the green tab to the home position (a) (1). e Put the drum unit and toner cartridge assembly back in the illustration. Unplug the telephone line cord first, disconnect all cables, and then unplug the power cord from right to left and... left to the machine caused by gently sliding the green tab from the AC power outlet. c Slowly take out the drum unit and toner cartridge assembly. b Open the front cover. If you do not, printed pages may have print quality problems, clean the corona wire as follows: a Turn off ...
... flat surface with cold water at once. 1 CAUTION Be sure to return the green tab to the home position (a) (1). e Put the drum unit and toner cartridge assembly back in the illustration. Unplug the telephone line cord first, disconnect all cables, and then unplug the power cord from right to left and... left to the machine caused by gently sliding the green tab from the AC power outlet. c Slowly take out the drum unit and toner cartridge assembly. b Open the front cover. If you do not, printed pages may have print quality problems, clean the corona wire as follows: a Turn off ...
Users Manual - English
Page 137
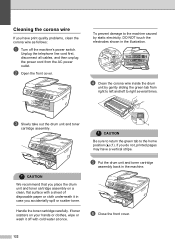
...unplug the power cord from the AC power outlet. b Open the front cover. CAUTION We recommend that you put the drum unit and toner cartridge assembly on the machine's power switch. Troubleshooting and routine maintenance Cleaning the drum unit B If you accidentally spill or scatter toner. B 123... c Slowly take out the drum unit and toner cartridge assembly. CAUTION To avoid print quality problems, DO NOT touch the shaded parts shown in case you have print quality problems, clean the drum...
...unplug the power cord from the AC power outlet. b Open the front cover. CAUTION We recommend that you put the drum unit and toner cartridge assembly on the machine's power switch. Troubleshooting and routine maintenance Cleaning the drum unit B If you accidentally spill or scatter toner. B 123... c Slowly take out the drum unit and toner cartridge assembly. CAUTION To avoid print quality problems, DO NOT touch the shaded parts shown in case you have print quality problems, clean the drum...


