Users Manual - English
Page 36
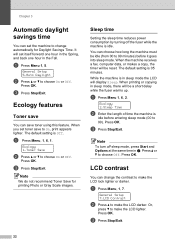
... set the machine to change the contrast to make the LCD look lighter or darker. Press OK. When you set itself forward one hour in the Spring, and back one hour in sleep mode the LCD will set toner save toner using this feature. Ecology 1.Toner Save b Press a or b to choose Off... sleep mode. Note To turn off the fuser while the machine is 05 minutes. LCD contrast 3 You can choose how long the machine must be reset. Or, press b to 99). Press OK.
... set the machine to change the contrast to make the LCD look lighter or darker. Press OK. When you set itself forward one hour in the Spring, and back one hour in sleep mode the LCD will set toner save toner using this feature. Ecology 1.Toner Save b Press a or b to choose Off... sleep mode. Note To turn off the fuser while the machine is 05 minutes. LCD contrast 3 You can choose how long the machine must be reset. Or, press b to 99). Press OK.
Users Manual - English
Page 59
...give you. Telephone services and external devices What does your telephone company's 'Distinctive Ring' do ? 7 The Brother machine has a Distinctive Ring feature that allows you to use more than one telephone number, it is cheaper than paying for an extra line. Note You must pay for availability and ...to get a new fax number, make sure you . If you will know which telephone number is not on your telephone company gives you reset this feature. If you decide to follow the directions below 7 are supported by your machine to its incoming calls. Note You can work ...
...give you. Telephone services and external devices What does your telephone company's 'Distinctive Ring' do ? 7 The Brother machine has a Distinctive Ring feature that allows you to use more than one telephone number, it is cheaper than paying for an extra line. Note You must pay for availability and ...to get a new fax number, make sure you . If you will know which telephone number is not on your telephone company gives you reset this feature. If you decide to follow the directions below 7 are supported by your machine to its incoming calls. Note You can work ...
Users Manual - English
Page 75
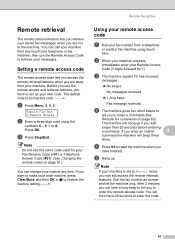
... set to enter a command (See Remote fax commands on page 51.) You can call your code inactive, press Clear/Back and then OK in b to reset the machine when you enter an invalid 9 command the machine will hang up . You can change your own code. If you have 30 seconds to...
... set to enter a command (See Remote fax commands on page 51.) You can call your code inactive, press Clear/Back and then OK in b to reset the machine when you enter an invalid 9 command the machine will hang up . You can change your own code. If you have 30 seconds to...

Users Manual - English
Page 76
... 9 0 to enter the number of your remote access code (3 digits followed by l). d Wait for a long beep, and then use the dial pad to reset the machine when you have messages. d Wait for a long beep, and then use the dial pad to enter the new number of the remote fax...b When your machine answers, immediately enter your fax forwarding number from a telephone or another telephone or fax machine using touch tone. If you hear one long beep, you hear your machine beep. b When your machine answers, enter your fax number from another fax machine using touch tone. Chapter 9 ...
... 9 0 to enter the number of your remote access code (3 digits followed by l). d Wait for a long beep, and then use the dial pad to reset the machine when you have messages. d Wait for a long beep, and then use the dial pad to enter the new number of the remote fax...b When your machine answers, immediately enter your fax forwarding number from a telephone or another telephone or fax machine using touch tone. If you hear one long beep, you hear your machine beep. b When your machine answers, enter your fax number from another fax machine using touch tone. Chapter 9 ...
Users Manual - English
Page 128
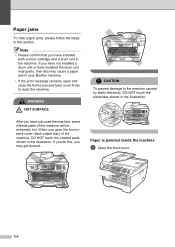
... have installed the drum unit improperly, then this may get burned. WARNING HOT SURFACE CAUTION To prevent damage to reset the machine. If you do this section. If you have not installed a drum unit or have installed both ... jams B To clear paper jams, please follow the steps in this , you may cause a paper jam in your Brother machine. • If the error message remains, open the front or back cover (back output tray) of the machine... illustration. When you have just used the machine, some internal parts of the machine, DO NOT touch the shaded parts shown in the illustration.
... have installed the drum unit improperly, then this may get burned. WARNING HOT SURFACE CAUTION To prevent damage to reset the machine. If you do this section. If you have not installed a drum unit or have installed both ... jams B To clear paper jams, please follow the steps in this , you may cause a paper jam in your Brother machine. • If the error message remains, open the front or back cover (back output tray) of the machine... illustration. When you have just used the machine, some internal parts of the machine, DO NOT touch the shaded parts shown in the illustration.
Users Manual - English
Page 147
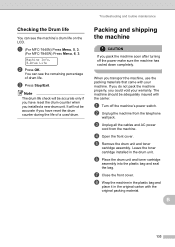
...cooled down completely. You can see the remaining percentage of a used drum. a (For MFC-7440N) Press Menu, 5, 3. (For MFC-7840W) Press Menu, 6, 3. Note The drum life check will not be accurate only if you have reset the drum counter during the life of drum life. If you do not pack the ..., use the packing materials that came with your warranty. B 133 When you could void your machine. It will be accurate if you have reset the drum counter when you pack the machine soon after turning off the machine's power switch. g Close the front cover. Troubleshooting and routine ...
...cooled down completely. You can see the remaining percentage of a used drum. a (For MFC-7440N) Press Menu, 5, 3. (For MFC-7840W) Press Menu, 6, 3. Note The drum life check will not be accurate only if you have reset the drum counter during the life of drum life. If you do not pack the ..., use the packing materials that came with your warranty. B 133 When you could void your machine. It will be accurate if you have reset the drum counter when you pack the machine soon after turning off the machine's power switch. g Close the front cover. Troubleshooting and routine ...
Users Manual - English
Page 156
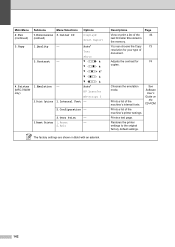
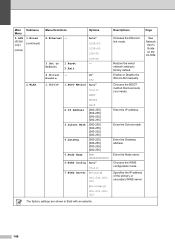
Descriptions View or print a list of the machine's internal fonts. Page 46 73 Adjusts the contrast for your type of the machine's printer settings. Restores the printer settings ...of document. See Software User's Guide on the CD-ROM. Auto* HP LaserJet BR-Script 3 1.Internal Font - 2.Configuration - 3.Test Print - 3.Reset Printer 1.Reset - 2.Exit The factory settings are shown in the memory. Photo b -nnnno+ a b -nnnon+ a b -nnonn+ a* b -nonnn+ a 4.Printer (MFC-7840W only) 1.Emulation 2.Print Options b -onnnn+ a - Chooses the emulation mode. Prints a ...
Descriptions View or print a list of the machine's internal fonts. Page 46 73 Adjusts the contrast for your type of the machine's printer settings. Restores the printer settings ...of document. See Software User's Guide on the CD-ROM. Auto* HP LaserJet BR-Script 3 1.Internal Font - 2.Configuration - 3.Test Print - 3.Reset Printer 1.Reset - 2.Exit The factory settings are shown in the memory. Photo b -nnnno+ a b -nnnon+ a b -nnonn+ a* b -nonnn+ a 4.Printer (MFC-7840W only) 1.Emulation 2.Print Options b -onnnn+ a - Chooses the emulation mode. Prints a ...
Users Manual - English
Page 158
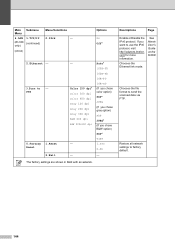
... to - Chooses the file format to use the IPv6 protocol, visit http://solutions.brother. If you chose B&W option) PDF* TIFF 1.Yes 2.No 2.Exit - - FTP 0.Factory 1.Reset Reset - Descriptions Page Enable or Disable the IPv6 protocol. Main Submenu Menu 4.LAN 1.TCP/IP (MFC-7440N (continued) only) (continued) Menu Selections 0.IPv6 - Auto* 100B-FD 100B-HD 10B...
... to - Chooses the file format to use the IPv6 protocol, visit http://solutions.brother. If you chose B&W option) PDF* TIFF 1.Yes 2.No 2.Exit - - FTP 0.Factory 1.Reset Reset - Descriptions Page Enable or Disable the IPv6 protocol. Main Submenu Menu 4.LAN 1.TCP/IP (MFC-7440N (continued) only) (continued) Menu Selections 0.IPv6 - Auto* 100B-FD 100B-HD 10B...
Users Manual - English
Page 160
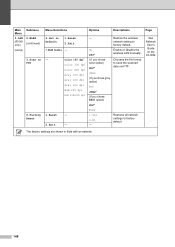
...mask. Enter the Gateway address. The factory settings are shown in Bold with an asterisk. 146 Restore the wired network setting to Default 1.Reset 2.Exit Auto* 100B-FD 100B-HD 10B-FD 10B-HD - 4.Wired Enable 1.TCP/IP - Chooses the WINS configuration mode. See Network...IP address. Chooses the BOOT method that best suits your needs. Enable or Disable the Wired LAN manually. Main Submenu Menu 5.LAN 1.Wired (MFC-7840W only) (continued) (continued) 2.WLAN Menu Selections Options Descriptions Page 2.Ethernet - 3.Set to factory default. Specifies the IP address of the...
...mask. Enter the Gateway address. The factory settings are shown in Bold with an asterisk. 146 Restore the wired network setting to Default 1.Reset 2.Exit Auto* 100B-FD 100B-HD 10B-FD 10B-HD - 4.Wired Enable 1.TCP/IP - Chooses the WINS configuration mode. See Network...IP address. Chooses the BOOT method that best suits your needs. Enable or Disable the Wired LAN manually. Main Submenu Menu 5.LAN 1.Wired (MFC-7840W only) (continued) (continued) 2.WLAN Menu Selections Options Descriptions Page 2.Ethernet - 3.Set to factory default. Specifies the IP address of the...
Users Manual - English
Page 162
Chooses the file format to 1.Reset - Main Submenu Menu 5.LAN 2.WLAN (MFC-7840W only) (continued) (continued) 3.Scan to FTP 0.Factory Reset Menu Selections Options Descriptions Page 6.Set to send the scanned data via FTP. Restores all network settings to factory default. 7.WLAN Enable - - Color 150 dpi* ... in Bold with an asterisk. 148 See Network User's Guide on the CD-ROM. Default 2.Exit Restore the wireless network setting to factory default. PDF* 1.Reset - 2.Exit - TIFF 1.Yes 2.No -
Chooses the file format to 1.Reset - Main Submenu Menu 5.LAN 2.WLAN (MFC-7840W only) (continued) (continued) 3.Scan to FTP 0.Factory Reset Menu Selections Options Descriptions Page 6.Set to send the scanned data via FTP. Restores all network settings to factory default. 7.WLAN Enable - - Color 150 dpi* ... in Bold with an asterisk. 148 See Network User's Guide on the CD-ROM. Default 2.Exit Restore the wireless network setting to factory default. PDF* 1.Reset - 2.Exit - TIFF 1.Yes 2.No -
Network Users Manual (Internet Fax and Fax to Server) - English
Page 32
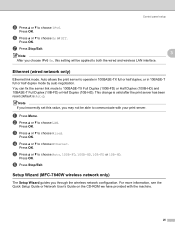
... 10B-HD. d Press a or b to choose LAN. Press OK. This change is valid after the print server has been reset (default is Auto). a Press Menu. b Press a or b to choose Ethernet. Setup Wizard (MFC-7840W wireless network only) 3 The Setup Wizard guides you incorrectly set this setting will be able to both the...
... 10B-HD. d Press a or b to choose LAN. Press OK. This change is valid after the print server has been reset (default is Auto). a Press Menu. b Press a or b to choose Ethernet. Setup Wizard (MFC-7840W wireless network only) 3 The Setup Wizard guides you incorrectly set this setting will be able to both the...
Network Users Manual (Internet Fax and Fax to Server) - English
Page 35
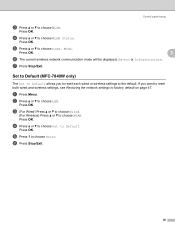
... wired or wireless settings to the default. e Press 1 to choose WLAN Status. Set to Default (MFC-7840W only) 3 The Set to Default allows you want to reset both wired and wireless settings, see Restoring the network settings to Default. a Press Menu. Press OK. f Press Stop/Exit. 28 Control panel setup c Press a or...
... wired or wireless settings to the default. e Press 1 to choose WLAN Status. Set to Default (MFC-7840W only) 3 The Set to Default allows you want to reset both wired and wireless settings, see Restoring the network settings to Default. a Press Menu. Press OK. f Press Stop/Exit. 28 Control panel setup c Press a or...
Network Users Manual (Internet Fax and Fax to Server) - English
Page 54
... re-start. Control panel setup Restoring the network settings to factory default 3 If you wish to reset the print server back to its default factory settings (resetting all information such as the password and IP address information), please follow these steps: Note This function... restores all the current network configuration including the network print server settings. c Press a or b to choose Factory Reset. The default node name ...
... re-start. Control panel setup Restoring the network settings to factory default 3 If you wish to reset the print server back to its default factory settings (resetting all information such as the password and IP address information), please follow these steps: Note This function... restores all the current network configuration including the network print server settings. c Press a or b to choose Factory Reset. The default node name ...

Network Users Manual (Internet Fax and Fax to Server) - English
Page 58
A 1 On connection to the network, the machine will automatically set the IP address and Subnet Mask to - - (continued) Server On Off* 7.Time - - Zone UTC+XX:XX UTC-XX:XX 0.Factory 1.Reset Reset 1.Yes 2.No 2.Exit - Appendix Main menu Submenu Menu selections Options 4.LAN 6.Fax to values appropriate for your network. 51
A 1 On connection to the network, the machine will automatically set the IP address and Subnet Mask to - - (continued) Server On Off* 7.Time - - Zone UTC+XX:XX UTC-XX:XX 0.Factory 1.Reset Reset 1.Yes 2.No 2.Exit - Appendix Main menu Submenu Menu selections Options 4.LAN 6.Fax to values appropriate for your network. 51

Network Users Manual (Internet Fax and Fax to Server) - English
Page 60
... RARP BOOTP DHCP (If you choose Auto, RARP, BOOTP or DHCP, you will be asked to enter how many times the machine tries to Default 1.Reset 2.Exit 4.Wired Enable - 1.TCP/IP 1.BOOT Method 2.IP Address 3.Subnet Mask Options (Primary) [000-255].[000-255]. [000-255].[000-255] [000].[000].[000].[000...
... RARP BOOTP DHCP (If you choose Auto, RARP, BOOTP or DHCP, you will be asked to enter how many times the machine tries to Default 1.Reset 2.Exit 4.Wired Enable - 1.TCP/IP 1.BOOT Method 2.IP Address 3.Subnet Mask Options (Primary) [000-255].[000-255]. [000-255].[000-255] [000].[000].[000].[000...

Network Users Manual (Internet Fax and Fax to Server) - English
Page 62
... Pwd (Up to 64 characters) IP Address [000-255].[000-255]. [000-255].[000-255] [00001-65535] 4.Auth. Mode Ad-hoc A Infrastructure 6.Set to Default 1.Reset - 2.Exit - 3.Setup IFAX 7.WLAN Enable - 1.Setup Internet 1.Mail Address 2.SMTP Server 3.SMTP Port On Off* -
... Pwd (Up to 64 characters) IP Address [000-255].[000-255]. [000-255].[000-255] [00001-65535] 4.Auth. Mode Ad-hoc A Infrastructure 6.Set to Default 1.Reset - 2.Exit - 3.Setup IFAX 7.WLAN Enable - 1.Setup Internet 1.Mail Address 2.SMTP Server 3.SMTP Port On Off* -
Network Users Manual (Internet Fax and Fax to Server) - English
Page 64
TIFF On Off* UTC+XX:XX 0.Factory 1.Reset - Reset 2.Exit - UTC-XX:XX 1.Yes 2.No - 1 On connection to the network, the machine will automatically set the IP address and Subnet Mask to - - Server 7.Time ...
TIFF On Off* UTC+XX:XX 0.Factory 1.Reset - Reset 2.Exit - UTC-XX:XX 1.Yes 2.No - 1 On connection to the network, the machine will automatically set the IP address and Subnet Mask to - - Server 7.Time ...

Network Users Manual - English
Page 34
Press OK. Scan to FTP (for MFC-7440N) 3 You can fix the server link mode to choose Color 150 dpi, Color 300 dpi, Color 600 dpi, Gray 100 dpi, Gray 200 dpi, Gray ..., 100B-FD, 100B-HD, 10B-FD or 10B-HD. d Press a or b to FTP. Press OK. This change is valid after the print server has been reset (default is Auto). 3 Note If you incorrectly set this value, you chose B&W 200 dpi or B&W 200x100 dpi in 10BASE-T full or half duplex mode by...
Press OK. Scan to FTP (for MFC-7440N) 3 You can fix the server link mode to choose Color 150 dpi, Color 300 dpi, Color 600 dpi, Gray 100 dpi, Gray 200 dpi, Gray ..., 100B-FD, 100B-HD, 10B-FD or 10B-HD. d Press a or b to FTP. Press OK. This change is valid after the print server has been reset (default is Auto). 3 Note If you incorrectly set this value, you chose B&W 200 dpi or B&W 200x100 dpi in 10BASE-T full or half duplex mode by...

Network Users Manual - English
Page 35
... network settings to choose Yes for reboot. (For DCP-7045N) Press a to the factory default. 3 a Press Menu. e (For MFC-7440N) Press 1 to choose Yes for reboot. Press OK. Press OK. d (For MFC-7440N) Press 1 to choose Reset. (For DCP-7045N) Press a to work with your network. 27 You can now reconnect the network cable and...
... network settings to choose Yes for reboot. (For DCP-7045N) Press a to the factory default. 3 a Press Menu. e (For MFC-7440N) Press 1 to choose Yes for reboot. Press OK. Press OK. d (For MFC-7440N) Press 1 to choose Reset. (For DCP-7045N) Press a to work with your network. 27 You can now reconnect the network cable and...

Network Users Manual - English
Page 70
...The Link/Activity LED will need to the default factory settings, see Printing the Network Configuration List on page 28. For information on how to reset to disable the Firewall on your software or contact the software manufacturer. 62 In this IP address. The problem may be the result of ... settings are using personal Firewall software, see General problems on the network have tried a to d above and it does not work, then reset the print server back to the default factory settings and try from the Terminal window: ping ipaddress Where ipaddress is the print server IP address...
...The Link/Activity LED will need to the default factory settings, see Printing the Network Configuration List on page 28. For information on how to reset to disable the Firewall on your software or contact the software manufacturer. 62 In this IP address. The problem may be the result of ... settings are using personal Firewall software, see General problems on the network have tried a to d above and it does not work, then reset the print server back to the default factory settings and try from the Terminal window: ping ipaddress Where ipaddress is the print server IP address...


