Users Manual - English
Page 89
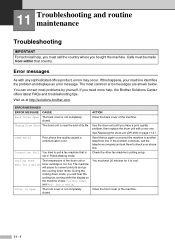
...for it to another telephone line. Cover is Open The front cover is not completely closed . Check the other fax machine's polling setup. Close the front cover of the machine. 11 Troubleshooting and routine maintenance Troubleshooting IMPORTANT For technical help , the Brother Solutions Center offers latest FAQs and ...unit or toner cartridge is not completely closed . Change Drum Soon The drum unit is not in Polled Waiting mode. ERROR MESSAGES ERROR MESSAGE CAUSE Back Cover Open The back cover is too hot. Error messages As with a new one. You can correct most common error...
...for it to another telephone line. Cover is Open The front cover is not completely closed . Check the other fax machine's polling setup. Close the front cover of the machine. 11 Troubleshooting and routine maintenance Troubleshooting IMPORTANT For technical help , the Brother Solutions Center offers latest FAQs and ...unit or toner cartridge is not completely closed . Change Drum Soon The drum unit is not in Polled Waiting mode. ERROR MESSAGES ERROR MESSAGE CAUSE Back Cover Open The back cover is too hot. Error messages As with a new one. You can correct most common error...

Users Manual - English
Page 95
Document was not inserted or fed properly, or was too long 1 Open the control panel cover. Paper jams To clear paper jams, please follow the steps below. WARNING After you open the front cover or back cover of the machine, never touch the shaded parts shown in this section. When you have just .../Exit. 11 - 7 Paper is jammed, follow the steps in the following diagram. 2 Carefully pull the jammed document toward the front of the paper tray opening. 3 Close the control panel cover. Chapter 11 Document jams If the document is jammed inside the machine are extremely hot.
Document was not inserted or fed properly, or was too long 1 Open the control panel cover. Paper jams To clear paper jams, please follow the steps below. WARNING After you open the front cover or back cover of the machine, never touch the shaded parts shown in this section. When you have just .../Exit. 11 - 7 Paper is jammed, follow the steps in the following diagram. 2 Carefully pull the jammed document toward the front of the paper tray opening. 3 Close the control panel cover. Chapter 11 Document jams If the document is jammed inside the machine are extremely hot.
Users Manual - English
Page 96
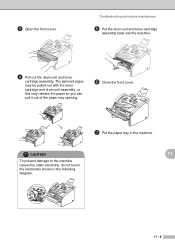
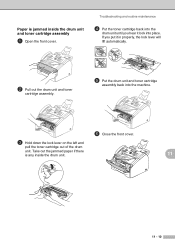
CAUTION 11 To prevent damage to the machine caused by static electricity, do not touch the electrodes shown in the machine. Troubleshooting and routine maintenance 5 Put the drum unit and toner cartridge assembly back into the machine. 4 Pull out the drum unit and toner cartridge assembly. The jammed paper may be pulled out with the toner cartridge and drum unit assembly, or this may release the paper so you can pull it out of the paper tray opening. 6 Close the front cover. 7 Put the paper tray in the following diagram. 11 - 8 3 Open the front cover.
CAUTION 11 To prevent damage to the machine caused by static electricity, do not touch the electrodes shown in the machine. Troubleshooting and routine maintenance 5 Put the drum unit and toner cartridge assembly back into the machine. 4 Pull out the drum unit and toner cartridge assembly. The jammed paper may be pulled out with the toner cartridge and drum unit assembly, or this may release the paper so you can pull it out of the paper tray opening. 6 Close the front cover. 7 Put the paper tray in the following diagram. 11 - 8 3 Open the front cover.
Users Manual - English
Page 97
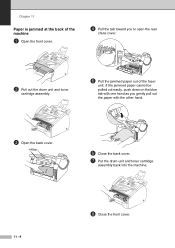
Chapter 11 Paper is jammed at the back of the fuser unit. If the jammed paper cannot be pulled out easily, push down on the blue tab with one hand as you to open the rear chute cover. 2 Pull out the drum unit and toner cartridge assembly. 5 Pull the jammed paper out of the machine 1 Open the front cover. 4 Pull the tab toward you gently pull out the paper with the other hand. 3 Open the back cover. 6 Close the back cover. 7 Put the drum unit and toner cartridge assembly back into the machine. 11 - 9 8 Close the front cover.
Chapter 11 Paper is jammed at the back of the fuser unit. If the jammed paper cannot be pulled out easily, push down on the blue tab with one hand as you to open the rear chute cover. 2 Pull out the drum unit and toner cartridge assembly. 5 Pull the jammed paper out of the machine 1 Open the front cover. 4 Pull the tab toward you gently pull out the paper with the other hand. 3 Open the back cover. 6 Close the back cover. 7 Put the drum unit and toner cartridge assembly back into the machine. 11 - 9 8 Close the front cover.
Users Manual - English
Page 98
.... 11 11 - 10 Troubleshooting and routine maintenance 4 Put the toner cartridge back into the drum unit until you put it lock into the machine. 6 Close the front cover. 3 Hold down the lock lever on the left and pull the toner cartridge out of the drum unit. If you hear it in properly.... 5 Put the drum unit and toner cartridge assembly back into place. Paper is any inside the drum unit and toner cartridge assembly 1 Open the front cover.
.... 11 11 - 10 Troubleshooting and routine maintenance 4 Put the toner cartridge back into the drum unit until you put it lock into the machine. 6 Close the front cover. 3 Hold down the lock lever on the left and pull the toner cartridge out of the drum unit. If you hear it in properly.... 5 Put the drum unit and toner cartridge assembly back into place. Paper is any inside the drum unit and toner cartridge assembly 1 Open the front cover.

Users Manual - English
Page 108
... drum unit. 7 Place the drum unit and toner cartridge assembly into the plastic bag and seal the bag. 8 Close the front cover. 11 Remove the telephone line cord, ADF document output support, handset and handset curled cord. 9 Wrap the machine... 3 Unplug the machine from the AC power outlet. 4 Unplug all the cables from the machine. 5 Open the front cover. 6 Remove the drum unit and toner cartridge assembly. Troubleshooting and routine maintenance Compatibility If you are having difficulty sending or receiving...for compatibility to reduce the modem speed for FAX-2910, FAX-2920 and MFC-7225 only.
... drum unit. 7 Place the drum unit and toner cartridge assembly into the plastic bag and seal the bag. 8 Close the front cover. 11 Remove the telephone line cord, ADF document output support, handset and handset curled cord. 9 Wrap the machine... 3 Unplug the machine from the AC power outlet. 4 Unplug all the cables from the machine. 5 Open the front cover. 6 Remove the drum unit and toner cartridge assembly. Troubleshooting and routine maintenance Compatibility If you are having difficulty sending or receiving...for compatibility to reduce the modem speed for FAX-2910, FAX-2920 and MFC-7225 only.
Users Manual - English
Page 110
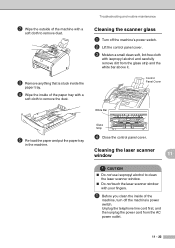
...white bar above it. I Cleaning the laser scanner window 11 CAUTION ■ Do not use isopropyl alcohol to remove the dust. Control Panel Cover White Bar Glass Strip 5 Re-load the paper and put the paper tray in the machine. 4 Close the control panel cover. 2 Wipe the outside of the machine...of the machine, turn off the machine's power switch. 2 Lift the control panel cover. 3 Moisten a small clean soft, lint-free cloth with a soft cloth to clean the laser scanner window. ■ Do not touch the laser scanner window with your fingers. 1 Before you clean the inside of the paper ...
...white bar above it. I Cleaning the laser scanner window 11 CAUTION ■ Do not use isopropyl alcohol to remove the dust. Control Panel Cover White Bar Glass Strip 5 Re-load the paper and put the paper tray in the machine. 4 Close the control panel cover. 2 Wipe the outside of the machine...of the machine, turn off the machine's power switch. 2 Lift the control panel cover. 3 Moisten a small clean soft, lint-free cloth with a soft cloth to clean the laser scanner window. ■ Do not touch the laser scanner window with your fingers. 1 Before you clean the inside of the paper ...

Users Manual - English
Page 111
... the machine, some internal parts of the machine, never touch the shaded parts shown in the telephone line cord. Laser Scanner Window 4 Put the drum unit and toner cartridge assembly back into the AC power outlet first, and then plug in the diagram below . 5 Close the front cover. 6 Plug the ... touch the electrodes shown below . WARNING Just after you open the front cover of the machine are extremely HOT! Chapter 11 2 Open the front cover and pull out the drum unit and toner cartridge assembly. 3 Gently clean the laser scanner window by wiping it with a clean soft, dry cloth.
... the machine, some internal parts of the machine, never touch the shaded parts shown in the telephone line cord. Laser Scanner Window 4 Put the drum unit and toner cartridge assembly back into the AC power outlet first, and then plug in the diagram below . 5 Close the front cover. 6 Plug the ... touch the electrodes shown below . WARNING Just after you open the front cover of the machine are extremely HOT! Chapter 11 2 Open the front cover and pull out the drum unit and toner cartridge assembly. 3 Gently clean the laser scanner window by wiping it with a clean soft, dry cloth.
Users Manual - English
Page 112
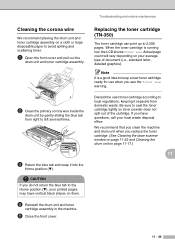
Discard the used toner cartridge according to keep a new toner cartridge ready for use when you replace the toner cartridge. (See Cleaning the laser scanner window on page 11-22 and Cleaning the drum unit on your average type of the cartridge. When the toner cartridge is a good idea ... wire We recommend placing the drum unit and toner cartridge assembly on them. 4 Reinstall the drum unit and toner cartridge assembly in the machine. 5 Close the front cover. If you do not return the blue tab to left several times. 3 Return the blue tab and snap it separate from right to the...
Discard the used toner cartridge according to keep a new toner cartridge ready for use when you replace the toner cartridge. (See Cleaning the laser scanner window on page 11-22 and Cleaning the drum unit on your average type of the cartridge. When the toner cartridge is a good idea ... wire We recommend placing the drum unit and toner cartridge assembly on them. 4 Reinstall the drum unit and toner cartridge assembly in the machine. 5 Close the front cover. If you do not return the blue tab to left several times. 3 Return the blue tab and snap it separate from right to the...
Users Manual - English
Page 114
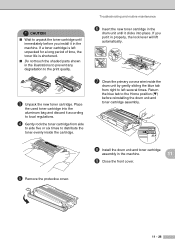
If you install it in the machine. 11 9 Close the front cover. 5 Remove the protective cover. 11 - 26 Troubleshooting and routine maintenance 6 Insert the new toner cartridge in the drum unit until immediately before reinstalling the drum unit and toner cartridge ...
If you install it in the machine. 11 9 Close the front cover. 5 Remove the protective cover. 11 - 26 Troubleshooting and routine maintenance 6 Insert the new toner cartridge in the drum unit until immediately before reinstalling the drum unit and toner cartridge ...
Users Manual - English
Page 116
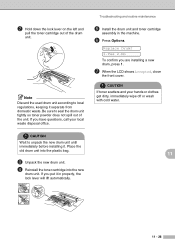
... unit. CAUTION Wait to local regulations, keeping it separate from domestic waste. If you are installing a new drum, press 1. 7 When the LCD shows Accepted, close the front cover. Replace Drum? 1.Yes 2.No To confirm you put it . Be sure to seal the drum unit tightly so toner powder does not spill out...
... unit. CAUTION Wait to local regulations, keeping it separate from domestic waste. If you are installing a new drum, press 1. 7 When the LCD shows Accepted, close the front cover. Replace Drum? 1.Yes 2.No To confirm you put it . Be sure to seal the drum unit tightly so toner powder does not spill out...

Quick Setup Guide - English
Page 6
Connecting the interface cable is done during the software installation process. 1 Pull out the ADF Document Support. ADF Document Output Support 4 Close the control panel cover. 2 Install the Handset 1 Connect the curled handset cord to the MFC and the other end to the handset. 2 Open the control panel cover by lifting it toward the back. Control Panel Cover 4 Do NOT connect the interface cable. Step 1 Setting Up the MFC Attach the ADF 1 Document Output Support 3 Attach the ADF Document Output Support.
Connecting the interface cable is done during the software installation process. 1 Pull out the ADF Document Support. ADF Document Output Support 4 Close the control panel cover. 2 Install the Handset 1 Connect the curled handset cord to the MFC and the other end to the handset. 2 Open the control panel cover by lifting it toward the back. Control Panel Cover 4 Do NOT connect the interface cable. Step 1 Setting Up the MFC Attach the ADF 1 Document Output Support 3 Attach the ADF Document Output Support.

Quick Setup Guide - English
Page 7
Windows NT® 4.0 Parallel Windows® Network Macintosh® USB Macintosh® Network For Network Users 5 Front Cover 5 Close the front cover of the MFC. 4 Put the drum unit assembly into the MFC. Setting Up the MFC Windows® USB Windows® Parallel 3 Install the Drum Unit Assembly 1 Open the front cover of the MFC. 2 Unpack the drum unit assembly. 3 Gently rock it from side to side several times to distribute the toner evenly inside the assembly.
Windows NT® 4.0 Parallel Windows® Network Macintosh® USB Macintosh® Network For Network Users 5 Front Cover 5 Close the front cover of the MFC. 4 Put the drum unit assembly into the MFC. Setting Up the MFC Windows® USB Windows® Parallel 3 Install the Drum Unit Assembly 1 Open the front cover of the MFC. 2 Unpack the drum unit assembly. 3 Gently rock it from side to side several times to distribute the toner evenly inside the assembly.

Windows VISTA Installation Guide - English
Page 8
...close the scanner cover ( ). 2 Connect the USB cable to cancel any of the screens during this installation. 6 The installation of the Brother drivers will find the USB socket inside the machine on the right as shown below . 5 Turn on a keyboard or a non-powered USB hub. The installation screens appear one... after another. Windows® USB STEP 2 Installing the Driver & Software Windows® How to connect the machine to your computer For DCP-130C, MFC-240C, MFC-440CN, MFC-5460CN and MFC-5860CN users (The illustrations are based on MFC-5460CN.) 1 Lift the scanner cover until...
...close the scanner cover ( ). 2 Connect the USB cable to cancel any of the screens during this installation. 6 The installation of the Brother drivers will find the USB socket inside the machine on the right as shown below . 5 Turn on a keyboard or a non-powered USB hub. The installation screens appear one... after another. Windows® USB STEP 2 Installing the Driver & Software Windows® How to connect the machine to your computer For DCP-130C, MFC-240C, MFC-440CN, MFC-5460CN and MFC-5860CN users (The illustrations are based on MFC-5460CN.) 1 Lift the scanner cover until...

Windows VISTA Installation Guide - English
Page 10
... cable to the USB port marked with Administrator rights. Brother recommends that you connect the machine directly to your computer. For MFC-3360C users 1 Insert the USB cable to your computer.... • Make sure that is unsuccessful, the installation results window will be logged on a keyboard or a non-powered USB hub. The installation screens appear one... the computer, you use a USB 2.0 cable that the cable does not restrict the cover from closing, or an error may occur. • Make sure you must be shown. If the...
... cable to the USB port marked with Administrator rights. Brother recommends that you connect the machine directly to your computer. For MFC-3360C users 1 Insert the USB cable to your computer.... • Make sure that is unsuccessful, the installation results window will be logged on a keyboard or a non-powered USB hub. The installation screens appear one... the computer, you use a USB 2.0 cable that the cable does not restrict the cover from closing, or an error may occur. • Make sure you must be shown. If the...

Windows VISTA Installation Guide - English
Page 12
....) 1 Turn off and unplug the machine from the AC outlet and from your network, if you have finished the instructions from closing, or an error may occur. Windows® Network STEP 2 Installing the Driver & Software Windows® For Network Interface Users 2 The installation steps ...MFC-5860CN users Important Make sure that the cable does not restrict the cover from STEP 1 Setting Up the Machine in the media drive of the machine. (The illustrations are being used, guide both sides of the machine to lift the scanner cover until it locks securely into the LAN socket marked with one...
....) 1 Turn off and unplug the machine from the AC outlet and from your network, if you have finished the instructions from closing, or an error may occur. Windows® Network STEP 2 Installing the Driver & Software Windows® For Network Interface Users 2 The installation steps ...MFC-5860CN users Important Make sure that the cable does not restrict the cover from STEP 1 Setting Up the Machine in the media drive of the machine. (The illustrations are being used, guide both sides of the machine to lift the scanner cover until it locks securely into the LAN socket marked with one...

Windows VISTA Installation Guide - English
Page 13
...After the installation, restart your personal firewall software. 8 Put the supplied CD-ROM into your machine. Gently push the scanner cover support down ( ) and close the scanner cover ( ). 9 The CD-ROM main menu will automatically start .exe program from the root folder of MFL-Pro Suite. ... ( ). Note When the User Account Control screen appears, click Allow. 7 Turn on the machine by the installation of the Brother CD-ROM. Close any applications running before installing the MFL-Pro Suite. If the language screen appears, choose your computer. Note Before installation, if ...
...After the installation, restart your personal firewall software. 8 Put the supplied CD-ROM into your machine. Gently push the scanner cover support down ( ) and close the scanner cover ( ). 9 The CD-ROM main menu will automatically start .exe program from the root folder of MFL-Pro Suite. ... ( ). Note When the User Account Control screen appears, click Allow. 7 Turn on the machine by the installation of the Brother CD-ROM. Close any applications running before installing the MFL-Pro Suite. If the language screen appears, choose your computer. Note Before installation, if ...


