

Users Manual - English
Page 1
Computerized Embroidery and Sewing Machine Operation Manual Product Code 885-V31/V33 GETTING READY SEWING BASICS UTILITY STITCHES EMBROIDERY APPENDIX
Computerized Embroidery and Sewing Machine Operation Manual Product Code 885-V31/V33 GETTING READY SEWING BASICS UTILITY STITCHES EMBROIDERY APPENDIX

Users Manual - English
Page 3
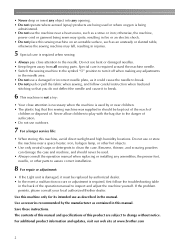
... the sewing machine, be careful not to persons. 2 Always unplug the machine from the electrical outlet immediately after you have finished reading this manual, or if you notice anything unusual, such as an odor, heat, discoloration or deformation, stop using , when cleaning, when making any user... nearest authorized dealer or service center for examination, repair, electrical or mechanical adjustment. • While the machine is stored or in this manual, store it where it out of burns, fire, electric shock, or injury to make any sudden or careless movements, otherwise you may ...
... the sewing machine, be careful not to persons. 2 Always unplug the machine from the electrical outlet immediately after you have finished reading this manual, or if you notice anything unusual, such as an odor, heat, discoloration or deformation, stop using , when cleaning, when making any user... nearest authorized dealer or service center for examination, repair, electrical or mechanical adjustment. • While the machine is stored or in this manual, store it where it out of burns, fire, electric shock, or injury to make any sudden or careless movements, otherwise you may ...
Users Manual - English
Page 4
... back of suffocation. • Do not use outdoors. 7 For a longer service life: • When storing this manual. If the problem persists, please consult your local authorized Brother dealer. Save these instructions. Use this machine only for its intended use or store the machine near children. • ...only neutral soaps or detergents to break. 6 This machine is not a toy: • Your close attention to the danger of the operation manual to change without notice. Do not use the machine near a heat source, such as described in this machine, avoid direct sunlight and high ...
... back of suffocation. • Do not use outdoors. 7 For a longer service life: • When storing this manual. If the problem persists, please consult your local authorized Brother dealer. Save these instructions. Use this machine only for its intended use or store the machine near children. • ...only neutral soaps or detergents to break. 6 This machine is not a toy: • Your close attention to the danger of the operation manual to change without notice. Do not use the machine near a heat source, such as described in this machine, avoid direct sunlight and high ...
Users Manual - English
Page 11
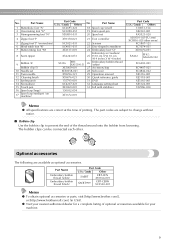
... Embroidery foot "Q" Embroidery set (medium) 25 H 10 cm X W 10 cm (H 4 inches X W 4 inches) 26 Embroidery bobbin thread (white) 27 Accessory bag 28 Soft cover 29 Operation manual 30 Quick reference guide 31 DVD 32 Language setting sheet 33 Felt with stabilizer XE1372-001 Part Code U.S.A. / Canada Others 130013-154 XE2241-001 XA5523... (black) Part Code U.S.A. / Canada Other SAEBT EBT-CEN X81164-001 SAEBT999 EBT-CEBN XC5520-001 Memo z To obtain optional accessories or parts, visit [http://www.brother.com/], or [http://www.brothermall.com] (in USA).
... Embroidery foot "Q" Embroidery set (medium) 25 H 10 cm X W 10 cm (H 4 inches X W 4 inches) 26 Embroidery bobbin thread (white) 27 Accessory bag 28 Soft cover 29 Operation manual 30 Quick reference guide 31 DVD 32 Language setting sheet 33 Felt with stabilizer XE1372-001 Part Code U.S.A. / Canada Others 130013-154 XE2241-001 XA5523... (black) Part Code U.S.A. / Canada Other SAEBT EBT-CEN X81164-001 SAEBT999 EBT-CEBN XC5520-001 Memo z To obtain optional accessories or parts, visit [http://www.brother.com/], or [http://www.brothermall.com] (in USA).

Users Manual - English
Page 23
... . X The initial stitch screen appears again. Simple explanations can be displayed. Turn on the LCD. Press the item to the corresponding page in this Operation Manual. c a b cd After you return to the previous page. Memo z For details on each topic, refer to be referred on the LCD display for the selected...
... . X The initial stitch screen appears again. Simple explanations can be displayed. Turn on the LCD. Press the item to the corresponding page in this Operation Manual. c a b cd After you return to the previous page. Memo z For details on each topic, refer to be referred on the LCD display for the selected...
Users Manual - English
Page 33
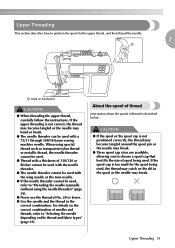
... a thickness of 130/120 or thicker cannot be used with the needle threader. ● The needle threader cannot be used, refer to "Threading the needle manually (without using the needle threader)" (page 36). ● Never use the thread of spool being used, the thread may catch on the correct combination of...
... a thickness of 130/120 or thicker cannot be used with the needle threader. ● The needle threader cannot be used, refer to "Threading the needle manually (without using the needle threader)" (page 36). ● Never use the thread of spool being used, the thread may catch on the correct combination of...
Users Manual - English
Page 38
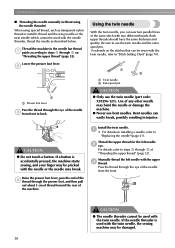
...: X59296-121). Lower the presser foot lever. Be sure to back. Use of the same stitch with the twin needle, the sewing machine may break. Manually thread the left needle b eye. Thread the upper thread for the left needle with the needle threader, thread the needle as transparent nylon thread or... injuries. Bent needles can sew two parallel lines of any other needle may be used with the upper c thread. GETTING READY ■ Threading the needle manually (without using the needle threader) When using special thread, such as described below.
...: X59296-121). Lower the presser foot lever. Be sure to back. Use of the same stitch with the twin needle, the sewing machine may break. Manually thread the left needle b eye. Thread the upper thread for the left needle with the needle threader, thread the needle as transparent nylon thread or... injuries. Bent needles can sew two parallel lines of any other needle may be used with the upper c thread. GETTING READY ■ Threading the needle manually (without using the needle threader) When using special thread, such as described below.

Users Manual - English
Page 39
.... 1 a Bobbin winder shaft b Extra spool pin c Thread spool Memo z When setting the thread spool, set it . Pass the thread through the needle f bar thread guide, manually thread the right needle. CAUTION ● When using the twin needle, be sure to select an appropriate stitch, otherwise the needle may break or the...
.... 1 a Bobbin winder shaft b Extra spool pin c Thread spool Memo z When setting the thread spool, set it . Pass the thread through the needle f bar thread guide, manually thread the right needle. CAUTION ● When using the twin needle, be sure to select an appropriate stitch, otherwise the needle may break or the...
Users Manual - English
Page 72
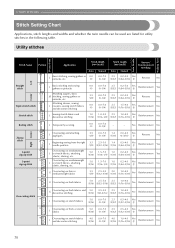
..., darning, etc. Utility stitches Twin Needle Walking Foot Presser Foot Stitch Name Pattern Application Stitch Width [mm (inch)] Auto Manual 1 J Basic stitching, sewing gathers or pintucks, etc. 0.0 (0) 0.0-7.0 (0-1/4) Stitch Length [mm (inch)] Auto Manual Reverse/ Reinforcement Stitching 2.5 0.2-5.0 Yes (3/32) (1/64-3/16) (J) Reverse No Left Straight stitch 2 J Basic stitching and sewing gathers or pintucks...
..., darning, etc. Utility stitches Twin Needle Walking Foot Presser Foot Stitch Name Pattern Application Stitch Width [mm (inch)] Auto Manual 1 J Basic stitching, sewing gathers or pintucks, etc. 0.0 (0) 0.0-7.0 (0-1/4) Stitch Length [mm (inch)] Auto Manual Reverse/ Reinforcement Stitching 2.5 0.2-5.0 Yes (3/32) (1/64-3/16) (J) Reverse No Left Straight stitch 2 J Basic stitching and sewing gathers or pintucks...
Users Manual - English
Page 73
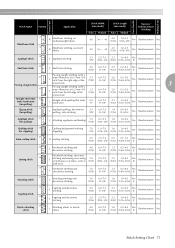
... Blind hem stitch 18 R Blind hem stitching on mediumweight fabrics R Blind hem stitching on stretch fabrics Stitch Width [mm (inch)] Stitch Length [mm (inch)] Auto Manual Auto Manual Reverse/ Reinforcement Stitching 00 3← - →3 2.0 (1/16) 1.0-3.5 (1/16-1/8) No Reinforcement No 00 3← - →3 2.0 (1/16) 1.0-3.5 (1/16-1/8) No Reinforcement No 19 Appliqué stitch J Appliqu...
... Blind hem stitch 18 R Blind hem stitching on mediumweight fabrics R Blind hem stitching on stretch fabrics Stitch Width [mm (inch)] Stitch Length [mm (inch)] Auto Manual Auto Manual Reverse/ Reinforcement Stitching 00 3← - →3 2.0 (1/16) 1.0-3.5 (1/16-1/8) No Reinforcement No 00 3← - →3 2.0 (1/16) 1.0-3.5 (1/16-1/8) No Reinforcement No 19 Appliqué stitch J Appliqu...
Users Manual - English
Page 74
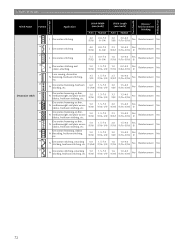
UTILITY STITCHES Presser Foot Twin Needle Walking Foot Stitch Name Pattern Application 35 J Decorative stitching Stitch Width [mm (inch)] Auto 4.0 (3/16) Manual 0.0-7.0 (0-1/4) Stitch Length [mm (inch)] Auto Manual Reverse/ Reinforcement Stitching 3.0 (1/8) 2.0-4.0 (1/16-3/16) No Reinforcement No 36 J Decorative stitching 4.0 (3/16) 0.0-7.0 (0-1/4) 2.5 1.0-4.0 Yes (3/32) (1/16-3/16) (J) Reinforcement No 37 J Decorative stitching 5.5 (7/32) 0.0-7.0 (0-1/4) 1.6 1.0-4.0 Yes (1/16) (1/16...
UTILITY STITCHES Presser Foot Twin Needle Walking Foot Stitch Name Pattern Application 35 J Decorative stitching Stitch Width [mm (inch)] Auto 4.0 (3/16) Manual 0.0-7.0 (0-1/4) Stitch Length [mm (inch)] Auto Manual Reverse/ Reinforcement Stitching 3.0 (1/8) 2.0-4.0 (1/16-3/16) No Reinforcement No 36 J Decorative stitching 4.0 (3/16) 0.0-7.0 (0-1/4) 2.5 1.0-4.0 Yes (3/32) (1/16-3/16) (J) Reinforcement No 37 J Decorative stitching 5.5 (7/32) 0.0-7.0 (0-1/4) 1.6 1.0-4.0 Yes (1/16) (1/16...
Users Manual - English
Page 75
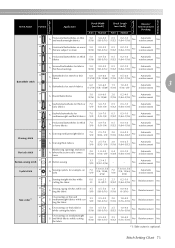
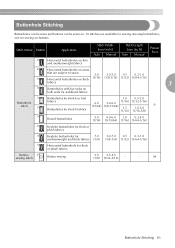
... Twin Needle Walking Foot Stitch Name Pattern Application 48 A Horizontal buttonholes on thin and mediumweight fabrics Stitch Width [mm (inch)] Stitch Length [mm (inch)] Auto Manual Auto Manual Reverse/ Reinforcement Stitching 5.0 (3/16) 3.0-5.0 (1/8-3/16) 0.5 (1/32) 0.2-1.0 (1/64-1/16) No Automatic reinforcement No 49 A Horizontal buttonholes on areas that are subject to strain 5.0 (3/16) 3.0-5.0 (1/8-3/16...
... Twin Needle Walking Foot Stitch Name Pattern Application 48 A Horizontal buttonholes on thin and mediumweight fabrics Stitch Width [mm (inch)] Stitch Length [mm (inch)] Auto Manual Auto Manual Reverse/ Reinforcement Stitching 5.0 (3/16) 3.0-5.0 (1/8-3/16) 0.5 (1/32) 0.2-1.0 (1/64-1/16) No Automatic reinforcement No 49 A Horizontal buttonholes on areas that are subject to strain 5.0 (3/16) 3.0-5.0 (1/8-3/16...
Users Manual - English
Page 76
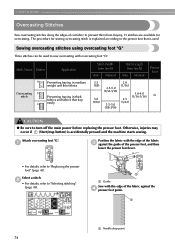
... Overcasting Stitches Sew overcasting stitches along the edges of cut fabric to the presser foot that fray easily Stitch Width [mm (inch)] Auto Manual Stitch Length [mm (inch)] Auto Manual Presser Foot 3.5 2.0 (1/8) (1/16) 2.5-5.0 (3/32-3/16) 1.0-4.0 (1/16-3/16) G 5.0 2.5 (3/16) (3/32) 3.5-5.0 (1/8-3/16) CAUTION ● Be sure to "Replacing the presser foot" (page 43). a a Needle...
... Overcasting Stitches Sew overcasting stitches along the edges of cut fabric to the presser foot that fray easily Stitch Width [mm (inch)] Auto Manual Stitch Length [mm (inch)] Auto Manual Presser Foot 3.5 2.0 (1/8) (1/16) 2.5-5.0 (3/32-3/16) 1.0-4.0 (1/16-3/16) G 5.0 2.5 (3/16) (3/32) 3.5-5.0 (1/8-3/16) CAUTION ● Be sure to "Replacing the presser foot" (page 43). a a Needle...
Users Manual - English
Page 77
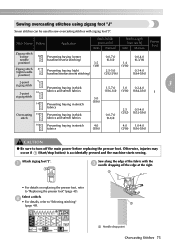
a • For details on replacing the presser foot, refer to "Selecting stitching" a (page 49). Stitch Name Pattern Application Stitch Width [mm (inch)] Auto Manual Stitch Length [mm (inch)] Auto Manual Presser Foot Zigzag stitch (center 7 needle position) Zigzag stitch 8 (right needle position) Preventing fraying (center baseline/reverse stitching) 3.5 (1/8) Preventing fraying (right baseline/reinforcement...
a • For details on replacing the presser foot, refer to "Selecting stitching" a (page 49). Stitch Name Pattern Application Stitch Width [mm (inch)] Auto Manual Stitch Length [mm (inch)] Auto Manual Presser Foot Zigzag stitch (center 7 needle position) Zigzag stitch 8 (right needle position) Preventing fraying (center baseline/reverse stitching) 3.5 (1/8) Preventing fraying (right baseline/reinforcement...

Users Manual - English
Page 78
a b a a Notch in thick fabrics while cutting the fabric Stitch Width [mm (inch)] Auto Manual 0.0 0.0-2.5 (0) (0-3/32) 3.5 (1/8) 3.5-5.0 (1/8-3/16) 5.0 (3/16) Stitch Length [mm (inch)] Auto Manual 2.5 0.2-5.0 (3/32) (1/64-3/16) Presser Foot 1.4 0.0-4.0 (1/16) (0-3/16) 2.0 (1/16) S 2.5 (3/32) 1.0-4.0 (1/16-3/16) CAUTION ● Be sure ... Pin X The side cutter is cut off the main power before replacing the pressor foot. Note z Thread the needle manually when using the side cutter, or only attach the side cutter after threading the needle using the optional side cutter Using...
a b a a Notch in thick fabrics while cutting the fabric Stitch Width [mm (inch)] Auto Manual 0.0 0.0-2.5 (0) (0-3/32) 3.5 (1/8) 3.5-5.0 (1/8-3/16) 5.0 (3/16) Stitch Length [mm (inch)] Auto Manual 2.5 0.2-5.0 (3/32) (1/64-3/16) Presser Foot 1.4 0.0-4.0 (1/16) (0-3/16) 2.0 (1/16) S 2.5 (3/32) 1.0-4.0 (1/16-3/16) CAUTION ● Be sure ... Pin X The side cutter is cut off the main power before replacing the pressor foot. Note z Thread the needle manually when using the side cutter, or only attach the side cutter after threading the needle using the optional side cutter Using...
Users Manual - English
Page 80
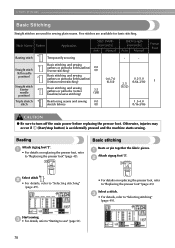
...) is accidentally pressed and the machine starts sewing. b J Select stitch 6 . Stitch Name Pattern Application 6 Basting stitch Temporarily securing Stitch Width [mm (inch)] Auto Manual Stitch Length [mm (inch)] Auto Manual - - Select a stitch. a Attach zigzag foot "J". c • For details, refer to "Replacing the presser foot" (page 43). b • For details, refer to "Selecting...
...) is accidentally pressed and the machine starts sewing. b J Select stitch 6 . Stitch Name Pattern Application 6 Basting stitch Temporarily securing Stitch Width [mm (inch)] Auto Manual Stitch Length [mm (inch)] Auto Manual - - Select a stitch. a Attach zigzag foot "J". c • For details, refer to "Replacing the presser foot" (page 43). b • For details, refer to "Selecting...

Users Manual - English
Page 82
... side of fabric c Edge of skirts and pants with a blind hem. a a b Use a chalk to mark on stretch fabrics Stitch Width [mm (inch)] Auto Manual Stitch Length [mm (inch)] Auto Manual Presser Foot 00 3← - →3 2.0 (1/16) 1.0-3.5 (1/16-1/8) R CAUTION ● Be sure to the following procedure. UTILITY STITCHES Blind Hem Stitching Secure the...
... side of fabric c Edge of skirts and pants with a blind hem. a a b Use a chalk to mark on stretch fabrics Stitch Width [mm (inch)] Auto Manual Stitch Length [mm (inch)] Auto Manual Presser Foot 00 3← - →3 2.0 (1/16) 1.0-3.5 (1/16-1/8) R CAUTION ● Be sure to the following procedure. UTILITY STITCHES Blind Hem Stitching Secure the...
Users Manual - English
Page 85
... with bar tacks on buttons. Stitch Name Pattern Application 48 Horizontal buttonholes on thin and mediumweight fabrics Stitch Width [mm (inch)] Auto Manual Stitch Length [mm (inch)] Auto Manual Presser Foot 49 Horizontal buttonholes on areas that are available for sewing one-step buttonholes, one for sewing on both ends for stabilized...
... with bar tacks on buttons. Stitch Name Pattern Application 48 Horizontal buttonholes on thin and mediumweight fabrics Stitch Width [mm (inch)] Auto Manual Stitch Length [mm (inch)] Auto Manual Presser Foot 49 Horizontal buttonholes on areas that are available for sewing one-step buttonholes, one for sewing on both ends for stabilized...

Users Manual - English
Page 92
... opening Attach zigzag foot "J". Stitch Name Pattern Application Straight stitch (center 3 needle position) Attaching zippers Sewing concealed seams and pintucks Stitch Width [mm (inch)] Auto Manual Stitch Length [mm (inch)] Auto Manual Presser Foot 3.5 0.0-7.0 2.5 0.2-5.0 (1/8) (0-1/4) (3/32) (1/64-3/16) I CAUTION ● Be sure to "Basic stitching" (page 78). 90 a Wrong side of the fabric...
... opening Attach zigzag foot "J". Stitch Name Pattern Application Straight stitch (center 3 needle position) Attaching zippers Sewing concealed seams and pintucks Stitch Width [mm (inch)] Auto Manual Stitch Length [mm (inch)] Auto Manual Presser Foot 3.5 0.0-7.0 2.5 0.2-5.0 (1/8) (0-1/4) (3/32) (1/64-3/16) I CAUTION ● Be sure to "Basic stitching" (page 78). 90 a Wrong side of the fabric...

Users Manual - English
Page 97
... to turn off the main power before replacing the pressor foot. b • For details, refer to stretch fabrics Stitch Width [mm (inch)] Auto Manual 0.0 0.0-7.0 (0) (0-1/4) Stitch Length [mm (inch)] Auto Manual Presser Foot 2.5 1.5-4.0 (3/32) (1/16-3/16) 1.0 1.0-3.0 2.5 1.0-4.0 (1/16) (1/16-1/8) (3/32) (1/16-3/16) J 5.0 1.5-7.0 (3/16) (1/16-1/4) 3 1.0 0.2-4.0 (1/16) (1/64-3/16) 4.0 0.0-7.0 (3/16) (0-1/4) Observe the corresponding precautions when performing...
... to turn off the main power before replacing the pressor foot. b • For details, refer to stretch fabrics Stitch Width [mm (inch)] Auto Manual 0.0 0.0-7.0 (0) (0-1/4) Stitch Length [mm (inch)] Auto Manual Presser Foot 2.5 1.5-4.0 (3/32) (1/16-3/16) 1.0 1.0-3.0 2.5 1.0-4.0 (1/16) (1/16-1/8) (3/32) (1/16-3/16) J 5.0 1.5-7.0 (3/16) (1/16-1/4) 3 1.0 0.2-4.0 (1/16) (1/64-3/16) 4.0 0.0-7.0 (3/16) (0-1/4) Observe the corresponding precautions when performing...


