

Users Manual - English
Page 1
Computerized Embroidery and Sewing Machine Operation Manual Product Code 885-V31/V33 GETTING READY SEWING BASICS UTILITY STITCHES EMBROIDERY APPENDIX
Computerized Embroidery and Sewing Machine Operation Manual Product Code 885-V31/V33 GETTING READY SEWING BASICS UTILITY STITCHES EMBROIDERY APPENDIX

Users Manual - English
Page 3
..., when making any adjustments mentioned in the instruction manual • To unplug the machine, switch the machine to the symbol "O" position to make any sudden or careless movements, otherwise you may damage the machine or result in use if you notice anything unusual, such as an odor, heat...risk of lint, dust, and loose cloth. • Do not store objects on the cord. • Plug the machine directly into the electrical outlet. 1 Plug the machine directly into the electrical outlet. Introduction Thank you for purchasing this manual, store it where it can quickly be accessed ...
..., when making any adjustments mentioned in the instruction manual • To unplug the machine, switch the machine to the symbol "O" position to make any sudden or careless movements, otherwise you may damage the machine or result in use if you notice anything unusual, such as an odor, heat...risk of lint, dust, and loose cloth. • Do not store objects on the cord. • Plug the machine directly into the electrical outlet. 1 Plug the machine directly into the electrical outlet. Introduction Thank you for purchasing this manual, store it where it can quickly be accessed ...
Users Manual - English
Page 4
...the operation manual when replacing or installing any adjustments in the manual. For additional product information and updates, visit our web site at www.brother.com 2 • Never drop or insert any object into any opening. • Do not operate where aerosol (spray) products are... Do not use a damaged or incorrect needle plate, as a stove or iron; If the problem persists, please consult your local authorized Brother dealer. otherwise, the machine, power cord or garment being administered. • Do not use bent or damaged needles. • Keep fingers away from all moving ...
...the operation manual when replacing or installing any adjustments in the manual. For additional product information and updates, visit our web site at www.brother.com 2 • Never drop or insert any object into any opening. • Do not operate where aerosol (spray) products are... Do not use a damaged or incorrect needle plate, as a stove or iron; If the problem persists, please consult your local authorized Brother dealer. otherwise, the machine, power cord or garment being administered. • Do not use bent or damaged needles. • Keep fingers away from all moving ...
Users Manual - English
Page 5
FOR USERS IN AUSTRALIA AND NEW ZEALAND This sewing machine is not suitable for the plug supplied with a disability. 3 Never use a fuse approved by a person with this equipment, you should contact your authorized dealer to ...
FOR USERS IN AUSTRALIA AND NEW ZEALAND This sewing machine is not suitable for the plug supplied with a disability. 3 Never use a fuse approved by a person with this equipment, you should contact your authorized dealer to ...
Users Manual - English
Page 6
... buttons ...12 Operation panel ...13 GETTING READY 15 Turning the Machine On/Off 16 Power supply precautions ...16 Turning on the machine ...17 Turning off the machine ...17 LCD (Liquid Crystal Display) Operation 18 Viewing the LCD ...18 Changing the machine settings ...19 Checking machine operating procedures ...21 Winding/Installing the Bobbin 22 Bobbin precautions...
... buttons ...12 Operation panel ...13 GETTING READY 15 Turning the Machine On/Off 16 Power supply precautions ...16 Turning on the machine ...17 Turning off the machine ...17 LCD (Liquid Crystal Display) Operation 18 Viewing the LCD ...18 Changing the machine settings ...19 Checking machine operating procedures ...21 Winding/Installing the Bobbin 22 Bobbin precautions...
Users Manual - English
Page 8
... ...146 Resewing ...147 Thread runs out partway through a design...148 Stopping while embroidering ...148 Saving patterns...150 APPENDIX 151 Care and Maintenance ...152 Cleaning the machine surface ...152 Cleaning the race ...152 Troubleshooting ...154 Error messages ...159 Adjusting the LCD ...163 Operation beep...163 Index ...165 6
... ...146 Resewing ...147 Thread runs out partway through a design...148 Stopping while embroidering ...148 Saving patterns...150 APPENDIX 151 Care and Maintenance ...152 Cleaning the machine surface ...152 Cleaning the race ...152 Troubleshooting ...154 Error messages ...159 Adjusting the LCD ...163 Operation beep...163 Index ...165 6
Users Manual - English
Page 9
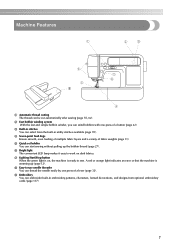
...-set bobbin You can wind bobbins with one press of a lever (page 32). g Lighting Start/Stop button When the green light is on dark fabrics. Machine Features 9 a Automatic thread cutting The thread can thread the needle easily by one press of a button (page 22). c Built-in stitches You can embroider built... built-in embroidery patterns, characters, framed decorations, and designs from optional embroidery cards (page 117). 7 A red or orange light indicates an error or that the machine is ready to sew. h Easy-to work on , the machine is warming up the bobbin thread (page 27).
...-set bobbin You can wind bobbins with one press of a lever (page 32). g Lighting Start/Stop button When the green light is on dark fabrics. Machine Features 9 a Automatic thread cutting The thread can thread the needle easily by one press of a button (page 22). c Built-in stitches You can embroider built... built-in embroidery patterns, characters, framed decorations, and designs from optional embroidery cards (page 117). 7 A red or orange light indicates an error or that the machine is ready to sew. h Easy-to work on , the machine is warming up the bobbin thread (page 27).
Users Manual - English
Page 10
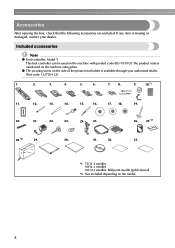
... opening the box, check that the following accessories are included. z The securing screw on the side of the presser foot holder is mentioned on the machine with product code 885-V31/V33.The product code is available through your dealer. Included accessories Note z Foot controller: Model T This foot controller can be...
... opening the box, check that the following accessories are included. z The securing screw on the side of the presser foot holder is mentioned on the machine with product code 885-V31/V33.The product code is available through your dealer. Included accessories Note z Foot controller: Model T This foot controller can be...
Users Manual - English
Page 11
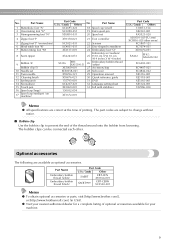
.... Part Name 18 Spool cap (small) 19 Extra spool pin 20 Spool net 4 Zipper foot "I" X59370-021 21 Foot controller 5 Zigzag foot "J" (on machine) 6 Blind stitch foot "R" 7 Button fitting foot "M" 8 Seam ripper 9 Bobbin (4) Bobbin clip (3) 10 Needle set 11 Twin needle 12 Cleaning brush 13... U.S.A. / Canada Other SAEBT EBT-CEN X81164-001 SAEBT999 EBT-CEBN XC5520-001 Memo z To obtain optional accessories or parts, visit [http://www.brother.com/], or [http://www.brothermall.com] (in USA). z Visit your nearest authorized dealer for a complete listing of the thread wound onto the...
.... Part Name 18 Spool cap (small) 19 Extra spool pin 20 Spool net 4 Zipper foot "I" X59370-021 21 Foot controller 5 Zigzag foot "J" (on machine) 6 Blind stitch foot "R" 7 Button fitting foot "M" 8 Seam ripper 9 Bobbin (4) Bobbin clip (3) 10 Needle set 11 Twin needle 12 Cleaning brush 13... U.S.A. / Canada Other SAEBT EBT-CEN X81164-001 SAEBT999 EBT-CEBN XC5520-001 Memo z To obtain optional accessories or parts, visit [http://www.brother.com/], or [http://www.brothermall.com] (in USA). z Visit your nearest authorized dealer for a complete listing of the thread wound onto the...

Users Manual - English
Page 12
... thread. 10 Front view a Thread guide cover (page 24, 33) Pass the thread under this thread guide when winding the bobbin thread and threading the machine. e LCD (liquid crystal display) (touch panel) (page 18) Setting for the embroidery unit. f Operation panel (page 13) Use the keys on the spool ... winder when winding the bobbin. h Presser foot lever (page 50) Raise and lower the presser foot lever to learn the names of the sewing machine and their functions are described below. n Thread take-up lever (page 34) o Bobbin-winding thread guide and pretension disc (page 24) Pass ...
... thread. 10 Front view a Thread guide cover (page 24, 33) Pass the thread under this thread guide when winding the bobbin thread and threading the machine. e LCD (liquid crystal display) (touch panel) (page 18) Setting for the embroidery unit. f Operation panel (page 13) Use the keys on the spool ... winder when winding the bobbin. h Presser foot lever (page 50) Raise and lower the presser foot lever to learn the names of the sewing machine and their functions are described below. n Thread take-up lever (page 34) o Bobbin-winding thread guide and pretension disc (page 24) Pass ...

Users Manual - English
Page 13
...the sewing takes place. h Drop feed lever (page 88) Use the drop feed lever to be exchanged. a Handle Carry the sewing machine by its handle when transporting the machine. c Embroidery card slot (page 138) Insert the embroidery card. Memo z Refer to clean the bobbin case and race. h Presser ... plate (page 67) The needle plate is being used. b Handwheel (page 50) Turn the handwheel toward you are learning to turn the sewing machine on the end of the foot controller cable into the bobbin case. c Needle bar thread guide (page 34) Pass the upper thread through 13 ...
...the sewing takes place. h Drop feed lever (page 88) Use the drop feed lever to be exchanged. a Handle Carry the sewing machine by its handle when transporting the machine. c Embroidery card slot (page 138) Insert the embroidery card. Memo z Refer to clean the bobbin case and race. h Presser ... plate (page 67) The needle plate is being used. b Handwheel (page 50) Turn the handwheel toward you are learning to turn the sewing machine on the end of the foot controller cable into the bobbin case. c Needle bar thread guide (page 34) Pass the upper thread through 13 ...
Users Manual - English
Page 14
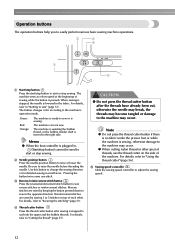
...to "Cutting the thread" (page 55). For details, refer to raise or lower the needle. For details, refer to easily perform various basic sewing machine operations. Operation buttons The operation buttons help you to "Using the thread cutter" (page 56). a Start/stop button Press the start/stop button)... cannot be used to adjust the sewing speed. 12 The machine can not sew. When sewing is stopped, the needle is sewing, otherwise damage to 5 stitches on the side of sewing while the button is ...
...to "Cutting the thread" (page 55). For details, refer to raise or lower the needle. For details, refer to easily perform various basic sewing machine operations. Operation buttons The operation buttons help you to "Using the thread cutter" (page 56). a Start/stop button Press the start/stop button)... cannot be used to adjust the sewing speed. 12 The machine can not sew. When sewing is stopped, the needle is sewing, otherwise damage to 5 stitches on the side of sewing while the button is ...

Users Manual - English
Page 15
b Back key Press to return to "LCD (Liquid Crystal Display) Operation" (page 18). i Sewing machine help key Press to get help on the LCD with your finger or the touch pen to perform operations. Displays simple explanations of setting upper ... key Press to enter alphabet character embroidery or embroidery patterns you have edited or adjusted, etc. Touch the keys displayed on using the sewing machine. into the sewing machine memory. e Memory key Press to set the needle stop position, the buzzer sound, and more. Operation panel The front operation panel has an...
b Back key Press to return to "LCD (Liquid Crystal Display) Operation" (page 18). i Sewing machine help key Press to get help on the LCD with your finger or the touch pen to perform operations. Displays simple explanations of setting upper ... key Press to enter alphabet character embroidery or embroidery patterns you have edited or adjusted, etc. Touch the keys displayed on using the sewing machine. into the sewing machine memory. e Memory key Press to set the needle stop position, the buzzer sound, and more. Operation panel The front operation panel has an...

Users Manual - English
Page 17
Turning the Machine On/Off 16 LCD (Liquid Crystal Display) Operation 18 Winding/Installing the Bobbin 22 Upper Threading ...31 Replacing the Needle 39 Replacing the Presser Foot 43 Sewing Cylindrical Pieces 46 1 GETTING READY The various preparations required before starting to sew are described in this chapter.
Turning the Machine On/Off 16 LCD (Liquid Crystal Display) Operation 18 Winding/Installing the Bobbin 22 Upper Threading ...31 Replacing the Needle 39 Replacing the Presser Foot 43 Sewing Cylindrical Pieces 46 1 GETTING READY The various preparations required before starting to sew are described in this chapter.
Users Manual - English
Page 18
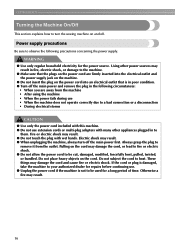
.... These things may result. ● Do not touch the plug with many other power sources may result. ● When unplugging the machine, always turn the sewing machine on the cord may result. 16 Do not subject the cord to be cut, damaged, modified, forcefully bent, pulled, twisted, or ...bundled. WARNING ● Use only regular household electricity for a long period of time. Using other appliances plugged in to the machine. ● Make sure that the plugs on the power cord are away from the outlet. Electric shock may result in fire, electric shock, or...
.... These things may result. ● Do not touch the plug with many other power sources may result. ● When unplugging the machine, always turn the sewing machine on the cord may result. 16 Do not subject the cord to be cut, damaged, modified, forcefully bent, pulled, twisted, or ...bundled. WARNING ● Use only regular household electricity for a long period of time. Using other appliances plugged in to the machine. ● Make sure that the plugs on the power cord are away from the outlet. Electric shock may result in fire, electric shock, or...
Users Manual - English
Page 19
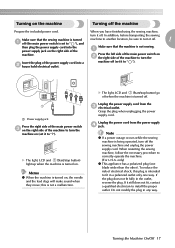
... does not fit fully in any way. Unplug the power supply cord from the power supply d jack. Note z If a power outage occurs while the sewing machine is turned machine to another location, be sure to fit in a polarized outlet only one blade wider than the other). Memo z When the... machine is turned off the sewing machine and unplug the power supply cord. Turning on the machine Turning off when the machine is turned on, the needle and the feed dogs will make sound when they move; In...
... does not fit fully in any way. Unplug the power supply cord from the power supply d jack. Note z If a power outage occurs while the sewing machine is turned machine to another location, be sure to fit in a polarized outlet only one blade wider than the other). Memo z When the... machine is turned off the sewing machine and unplug the power supply cord. Turning on the machine Turning off when the machine is turned on, the needle and the feed dogs will make sound when they move; In...

Users Manual - English
Page 20
... details, refer to be used c Stitches d Stitch settings and twin needle sewing e Stitch width f Stitch length g Number of the selected stitch h Number of the sewing machine. The details are displayed on the LCD (liquid crystal display) on the front of stitches contained i Horizontal mirror image j Automatic thread cutting k Automatic reverse/reinforcement...
... details, refer to be used c Stitches d Stitch settings and twin needle sewing e Stitch width f Stitch length g Number of the selected stitch h Number of the sewing machine. The details are displayed on the LCD (liquid crystal display) on the front of stitches contained i Horizontal mirror image j Automatic thread cutting k Automatic reverse/reinforcement...
Users Manual - English
Page 21
... Needle position Stitch width control Thread color display Icon Details Settings Specifies where the needle is positioned when the sewing machine is selected) Embroidery/Country/Madeira poly/Madeira rayon/Sulky/ Robison Anton Display unit Selects the measurement units that can ...Initial needle position Language Selects whether "1 Straight stitch (left)" or "3 Straight stitch (middle)" that is automatically selected when the machine is the number for embroidering) (page 134). English/German/French/ Italian/Dutch/Spanish/ Japanese/Danish/Norwegian/ Finnish/Swedish/Portuguese/ Russian...
... Needle position Stitch width control Thread color display Icon Details Settings Specifies where the needle is positioned when the sewing machine is selected) Embroidery/Country/Madeira poly/Madeira rayon/Sulky/ Robison Anton Display unit Selects the measurement units that can ...Initial needle position Language Selects whether "1 Straight stitch (left)" or "3 Straight stitch (middle)" that is automatically selected when the machine is the number for embroidering) (page 134). English/German/French/ Italian/Dutch/Spanish/ Japanese/Danish/Norwegian/ Finnish/Swedish/Portuguese/ Russian...

Users Manual - English
Page 22
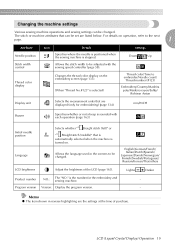
... are complete, press d (Back key). a The highlighted display is the individual number for the sewing machine. Press b panel. (Settings key) on the sewing machine. When settings are saved even if the power is installed in the sewing machine. X The initial stitch screen appears again. X The LCD comes on. c Switch the screen using (Previous...
... are complete, press d (Back key). a The highlighted display is the individual number for the sewing machine. Press b panel. (Settings key) on the sewing machine. When settings are saved even if the power is installed in the sewing machine. X The initial stitch screen appears again. X The LCD comes on. c Switch the screen using (Previous...

Users Manual - English
Page 23
... Press (Next page key) to switch to be referred on . X The initial stitch screen appears again. Press (Sewing machine help screen appears. procedures If you press (Previous page key), you finish viewing, press e key) two times. (Back h g fe a Upper ... key) to return to the item 1 selection screen. Turn on b the display panel. Simple explanations can be displayed. X The sewing machine help key) on the sewing machine. Press the item to the d next page. c a b cd After you return to the corresponding page in this Operation Manual. bobbin...
... Press (Next page key) to switch to be referred on . X The initial stitch screen appears again. Press (Sewing machine help screen appears. procedures If you press (Previous page key), you finish viewing, press e key) two times. (Back h g fe a Upper ... key) to return to the item 1 selection screen. Turn on b the display panel. Simple explanations can be displayed. X The sewing machine help key) on the sewing machine. Press the item to the d next page. c a b cd After you return to the corresponding page in this Operation Manual. bobbin...

