

Users Manual - English
Page 1
Computerized Embroidery and Sewing Machine Operation Manual Product Code 885-V31/V33 GETTING READY SEWING BASICS UTILITY STITCHES EMBROIDERY APPENDIX
Computerized Embroidery and Sewing Machine Operation Manual Product Code 885-V31/V33 GETTING READY SEWING BASICS UTILITY STITCHES EMBROIDERY APPENDIX

Users Manual - English
Page 3
...of the various functions. Do not use the machine. Lifting the sewing machine by its handle. Before using this machine, carefully read these safety instructions before attempting to persons. 2 Always unplug the machine from the electrical outlet immediately after you for ...user servicing adjustments mentioned in the machine falling, which could cause injuries. • When lifting the sewing machine, be accessed for purchasing this manual, or if you may damage the machine or result in this embroidery and sewing machine. This machine is spilled on the foot controller...
...of the various functions. Do not use the machine. Lifting the sewing machine by its handle. Before using this machine, carefully read these safety instructions before attempting to persons. 2 Always unplug the machine from the electrical outlet immediately after you for ...user servicing adjustments mentioned in the machine falling, which could cause injuries. • When lifting the sewing machine, be accessed for purchasing this manual, or if you may damage the machine or result in this embroidery and sewing machine. This machine is spilled on the foot controller...
Users Manual - English
Page 9
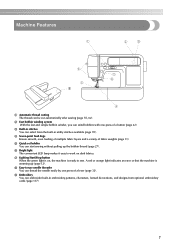
...g Lighting Start/Stop button When the green light is on, the machine is warming up the bobbin thread (page 27). f Bright light The convenient LED lamp makes it easy to sew. Machine Features 9 a Automatic thread cutting The thread can thread the needle ...easily by one press of fabric weights (page 11). h Easy-to-use needle threader You can be cut automatically after sewing (page 55, 62). b Fast bobbin winding system With the fast and simple bobbin winder, you can embroider built-in embroidery...
...g Lighting Start/Stop button When the green light is on, the machine is warming up the bobbin thread (page 27). f Bright light The convenient LED lamp makes it easy to sew. Machine Features 9 a Automatic thread cutting The thread can thread the needle ...easily by one press of fabric weights (page 11). h Easy-to-use needle threader You can be cut automatically after sewing (page 55, 62). b Fast bobbin winding system With the fast and simple bobbin winder, you can embroider built-in embroidery...

Users Manual - English
Page 12
... thread under this thread guide when winding the bobbin thread and threading the machine. b Thread guide (page 24, 33) Pass the thread under this panel to select stitches or embroidery patterns, or check how to operate the machine. i Operation buttons (page 12) Use these descriptions to raise and lower... when winding the bobbin thread. 10 h Presser foot lever (page 50) Raise and lower the presser foot lever to learn the names of the sewing machine and their functions are described below. f Operation panel (page 13) Use the keys on the spool pin. j Flat bed attachment (page 46)...
... thread under this thread guide when winding the bobbin thread and threading the machine. b Thread guide (page 24, 33) Pass the thread under this panel to select stitches or embroidery patterns, or check how to operate the machine. i Operation buttons (page 12) Use these descriptions to raise and lower... when winding the bobbin thread. 10 h Presser foot lever (page 50) Raise and lower the presser foot lever to learn the names of the sewing machine and their functions are described below. f Operation panel (page 13) Use the keys on the spool pin. j Flat bed attachment (page 46)...

Users Manual - English
Page 13
... seams. e Needle plate cover (page 152) Remove the needle plate cover to use your machine. 11 a Handle Carry the sewing machine by its handle when transporting the machine. c Embroidery card slot (page 138) Insert the embroidery card. h Drop feed lever (page 88) Use the drop feed lever to be exchanged. b ...b Thread guide disk (page 34) Pass the thread through the thread guide disk when using the needle threader to turn the sewing machine on the fabric as the sewing takes place. e Main power switch (page 17) Use the main power switch to thread the needle. f Foot controller jack ...
... seams. e Needle plate cover (page 152) Remove the needle plate cover to use your machine. 11 a Handle Carry the sewing machine by its handle when transporting the machine. c Embroidery card slot (page 138) Insert the embroidery card. h Drop feed lever (page 88) Use the drop feed lever to be exchanged. b ...b Thread guide disk (page 34) Pass the thread through the thread guide disk when using the needle threader to turn the sewing machine on the fabric as the sewing takes place. e Main power switch (page 17) Use the main power switch to thread the needle. f Foot controller jack ...

Users Manual - English
Page 15
... Press to return to sew embroidery. e Memory key Press to get help key Press to enter alphabet character embroidery or embroidery patterns you have edited or adjusted, etc. a LCD (liquid crystal display) (touch panel) Setting for the selected stitch or pattern and error messages appear in the LCD. into the sewing machine memory. i Sewing machine help on the...
... Press to return to sew embroidery. e Memory key Press to get help key Press to enter alphabet character embroidery or embroidery patterns you have edited or adjusted, etc. a LCD (liquid crystal display) (touch panel) Setting for the selected stitch or pattern and error messages appear in the LCD. into the sewing machine memory. i Sewing machine help on the...

Users Manual - English
Page 20
...settings and messages are explained in "Selecting an embroidery pattern" (page 137). When you touch the LCD screen according to be used c Stitches d Stitch settings and twin needle sewing e Stitch width f Stitch length g Number of the selected stitch h Number of the sewing machine. Viewing the LCD When the power is ...Horizontal mirror image j Automatic thread cutting k Automatic reverse/reinforcement l Single/twin needle sewing and needle stop position Memo z A different screen is displayed when the embroidery unit is attached. z Refer to "Operation panel" (page 13). The details...
...settings and messages are explained in "Selecting an embroidery pattern" (page 137). When you touch the LCD screen according to be used c Stitches d Stitch settings and twin needle sewing e Stitch width f Stitch length g Number of the selected stitch h Number of the sewing machine. Viewing the LCD When the power is ...Horizontal mirror image j Automatic thread cutting k Automatic reverse/reinforcement l Single/twin needle sewing and needle stop position Memo z A different screen is displayed when the embroidery unit is attached. z Refer to "Operation panel" (page 13). The details...
Users Manual - English
Page 21
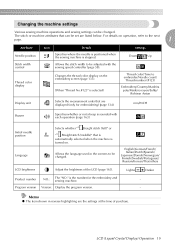
...Crystal Display) Operation 19 Changes the thread color display on operation, refer to be set are displayed (only for the embroidery and sewing machine. - mm/INCH Buzzer Specifies whether or not a beep is turned on. Allows the language used in reverse highlighting ...Attribute Needle position Stitch width control Thread color display Icon Details Settings Specifies where the needle is positioned when the sewing machine is selected) Embroidery/Country/Madeira poly/Madeira rayon/Sulky/ Robison Anton Display unit Selects the measurement units that can be changed . ...
...Crystal Display) Operation 19 Changes the thread color display on operation, refer to be set are displayed (only for the embroidery and sewing machine. - mm/INCH Buzzer Specifies whether or not a beep is turned on. Allows the language used in reverse highlighting ...Attribute Needle position Stitch width control Thread color display Icon Details Settings Specifies where the needle is positioned when the sewing machine is selected) Embroidery/Country/Madeira poly/Madeira rayon/Sulky/ Robison Anton Display unit Selects the measurement units that can be changed . ...

Users Manual - English
Page 23
... / Press (Back key) to return to be referred on . bobbin winding / setting bobbin thread / needle replacement / embroidery unit attachment / Example: Upper threading embroidery frame attachment / embroidery foot attachment / presser foot replacement on b the display panel. X The sewing machine help key) on the LCD. a X The LCD comes on the LCD display for the selected topic appears...
... / Press (Back key) to return to be referred on . bobbin winding / setting bobbin thread / needle replacement / embroidery unit attachment / Example: Upper threading embroidery frame attachment / embroidery foot attachment / presser foot replacement on b the display panel. X The sewing machine help key) on the LCD. a X The LCD comes on the LCD display for the selected topic appears...
Users Manual - English
Page 25
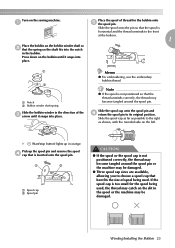
... cap that the spring on the bobbin until it snaps into the notch in the direction of spool being used . Memo z For embroidering, use the embroidery bobbin thread. If the spool cap is inserted onto the spool pin. a b a Notch b Bobbin winder shaft spring Slide the bobbin winder in the ...bobbin. Slide the spool cap as far as shown, with the rounded side on the sewing machine. Note z If the spool is not positioned so that is too small for the bobbin onto e the spool pin. X (Start/stop button) lights ...
... cap that the spring on the bobbin until it snaps into the notch in the direction of spool being used . Memo z For embroidering, use the embroidery bobbin thread. If the spool cap is inserted onto the spool pin. a b a Notch b Bobbin winder shaft spring Slide the bobbin winder in the ...bobbin. Slide the spool cap as far as shown, with the rounded side on the sewing machine. Note z If the spool is not positioned so that is too small for the bobbin onto e the spool pin. X (Start/stop button) lights ...
Users Manual - English
Page 42
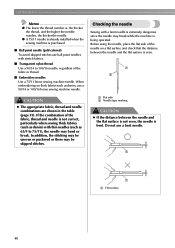
...thread and needle combinations are shown in the table (page 39). Checking the needle Sewing with thin needles (such as 65/9 to 100/16 needle, regardless of the fabric or thread. ■ Embroidery needles Use a 75/11 home sewing machine needle. a a a Flat surface 40 If the combination of the needle on...using the needle, place the flat side of the fabric, thread and needle is not correct, particularly when sewing thick fabrics (such as denim, use a 90/14 or 100/16 home sewing machine needle. Do not use ball point needles with stretch fabrics. ■ Transparent nylon thread Use a 90/...
...thread and needle combinations are shown in the table (page 39). Checking the needle Sewing with thin needles (such as 65/9 to 100/16 needle, regardless of the fabric or thread. ■ Embroidery needles Use a 75/11 home sewing machine needle. a a a Flat surface 40 If the combination of the needle on...using the needle, place the flat side of the fabric, thread and needle is not correct, particularly when sewing thick fabrics (such as denim, use a 90/14 or 100/16 home sewing machine needle. Do not use ball point needles with stretch fabrics. ■ Transparent nylon thread Use a 90/...
Users Manual - English
Page 45
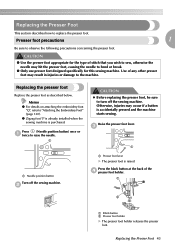
... that you wish to bend or break. ● Only use presser feet designed specifically for this sewing machine. Memo z For details on attaching the embroidery foot "Q", refer to observe the following precautions concerning the presser foot. Otherwise, injuries may hit the... presser foot, causing the needle to sew, otherwise the needle may occur if a button is accidentally pressed and the machine starts sewing. c a a Needle position button Turn off the sewing machine. Presser foot precautions 1 Be sure to "Attaching the Embroidery Foot" (page 120). Replacing the Presser ...
... that you wish to bend or break. ● Only use presser feet designed specifically for this sewing machine. Memo z For details on attaching the embroidery foot "Q", refer to observe the following precautions concerning the presser foot. Otherwise, injuries may hit the... presser foot, causing the needle to sew, otherwise the needle may occur if a button is accidentally pressed and the machine starts sewing. c a a Needle position button Turn off the sewing machine. Presser foot precautions 1 Be sure to "Attaching the Embroidery Foot" (page 120). Replacing the Presser ...
Users Manual - English
Page 47
... z Before attaching/removing the presser foot, be sure to loosen the presser foot b holder screw. Use the screwdriver to turn off the sewing machine. Replacing the Presser Foot 45 Otherwise, injuries may break or cause injury. The needle may occur if a button is loose, the needle may... hit the presser foot and break or bend. a X The presser foot is removed from the presser bar. embroidery foot, optional free-motion open toe quilting foot "O" and optional walking foot. a b Remove the presser foot. a Presser bar b Presser foot holder Hold ...
... z Before attaching/removing the presser foot, be sure to loosen the presser foot b holder screw. Use the screwdriver to turn off the sewing machine. Replacing the Presser Foot 45 Otherwise, injuries may break or cause injury. The needle may occur if a button is loose, the needle may... hit the presser foot and break or bend. a X The presser foot is removed from the presser bar. embroidery foot, optional free-motion open toe quilting foot "O" and optional walking foot. a b Remove the presser foot. a Presser bar b Presser foot holder Hold ...
Users Manual - English
Page 120
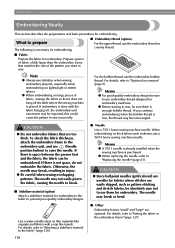
... or country thread. ■ Fabric Prepare the fabric for embroidery. Memo z A 75/11 needle is already installed when the sewing machine is not space, do not embroider the fabric. Memo z For good quality embroidery designs be sure to the embroidery unit, and use stabilizer when sewing embroidery projects, especially when embroidering on large pieces of the pattern...
... or country thread. ■ Fabric Prepare the fabric for embroidery. Memo z A 75/11 needle is already installed when the sewing machine is not space, do not embroider the fabric. Memo z For good quality embroidery designs be sure to the embroidery unit, and use stabilizer when sewing embroidery projects, especially when embroidering on large pieces of the pattern...
Users Manual - English
Page 122
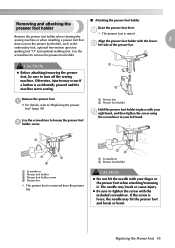
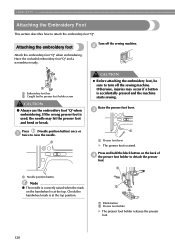
... Check the handwheel mark is at the top. Press (Needle position button) once or a twice to turn off the sewing machine. a CAUTION z Before attaching the embroidery foot, be sure to raise the needle. b a Black button b Presser foot holder X The presser foot holder releases ...the presser foot. 120 Have the included embroidery foot "Q" and a screwdriver ready. c a a Presser foot lever X The presser foot is accidentally pressed and the machine starts sewing. If the wrong presser foot is at the top position. Raise the presser foot...
... Check the handwheel mark is at the top. Press (Needle position button) once or a twice to turn off the sewing machine. a CAUTION z Before attaching the embroidery foot, be sure to raise the needle. b a Black button b Presser foot holder X The presser foot holder releases ...the presser foot. 120 Have the included embroidery foot "Q" and a screwdriver ready. c a a Presser foot lever X The presser foot is accidentally pressed and the machine starts sewing. If the wrong presser foot is at the top position. Raise the presser foot...
Users Manual - English
Page 126
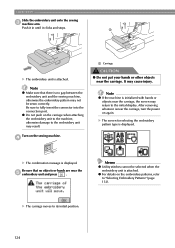
... are near the carriage, the screen may not be selected when the embroidery unit is displayed. X The confirmation message is attached. Be sure to "Selecting Embroidery Patterns" (page 132). z Do not push on the sewing machine. It may result. X The carriage moves to the embroidery unit may cause injury. EMBROIDERY Slide the embroidery unit onto the sewing c machine arm.
... are near the carriage, the screen may not be selected when the embroidery unit is displayed. X The confirmation message is attached. Be sure to "Selecting Embroidery Patterns" (page 132). z Do not push on the sewing machine. It may result. X The carriage moves to the embroidery unit may cause injury. EMBROIDERY Slide the embroidery unit onto the sewing c machine arm.

Accessory Catalog
Page 3
... which the shown accessory is 900D/ SE-350/ HE-240/LB6770 Sewing & Embroidery Combination Machines Entry-level model that are easily created from the extensive Brother Embroidery Library. * Brother embroidery accessories are compatible with this state-of the Art machine with leading-edge technology Brother's new and exciting high-end sewing and embroidery machine Quattro™ 6000D is NX600, 400Q, 400, 200, PC420...
... which the shown accessory is 900D/ SE-350/ HE-240/LB6770 Sewing & Embroidery Combination Machines Entry-level model that are easily created from the extensive Brother Embroidery Library. * Brother embroidery accessories are compatible with this state-of the Art machine with leading-edge technology Brother's new and exciting high-end sewing and embroidery machine Quattro™ 6000D is NX600, 400Q, 400, 200, PC420...

Accessory Catalog
Page 17
.... - Easy to add and easy to see embroidery designs. - New Border Frame and 28 Unique Embroidery Patterns. The 4000D Premium Upgrade Package is 4000D sewing and embroidery machine. * Requires additional purchases. Character/Font Pattern Separation. Sewing Decorative Stitches as border designs. This Embroidery Card Reader is compatible with the Brother Innov-is compatible only with the entire library...
.... - Easy to add and easy to see embroidery designs. - New Border Frame and 28 Unique Embroidery Patterns. The 4000D Premium Upgrade Package is 4000D sewing and embroidery machine. * Requires additional purchases. Character/Font Pattern Separation. Sewing Decorative Stitches as border designs. This Embroidery Card Reader is compatible with the Brother Innov-is compatible only with the entire library...

Accessory Catalog
Page 33
...-240, LB6770, Innov-is 4000D/2500D/1500D SA560 QuattroTM 6000D Embroidery Machine Hoops Select hoops appropriate for your spool thread tails by placing them in place on to your machine to 10 spools of spool sizes. Brother Embroidery Accessories 63 Free-Standing Ten Spool Thread Stand Ten Spool Thread Stand Embroidery Machine Hoops Brother Embroidery Accessories 64 For all embroidery and sewing/embroidery machines.
...-240, LB6770, Innov-is 4000D/2500D/1500D SA560 QuattroTM 6000D Embroidery Machine Hoops Select hoops appropriate for your spool thread tails by placing them in place on to your machine to 10 spools of spool sizes. Brother Embroidery Accessories 63 Free-Standing Ten Spool Thread Stand Ten Spool Thread Stand Embroidery Machine Hoops Brother Embroidery Accessories 64 For all embroidery and sewing/embroidery machines.

Accessory Catalog
Page 34
...: MTPK14 Metallic Threads 14 different metallic colors, 100% polyester thread developed and made for Brother® Embroidery Machines, but compatible with other sewing and embroidery machine brands. Handles a variety of 30 cotton-wrapped polyester embroidery thread spools 300 meters (328 yards). Designed for high speed embroidery stitching, made in a fun assortment of a special and sophisticated look with other...
...: MTPK14 Metallic Threads 14 different metallic colors, 100% polyester thread developed and made for Brother® Embroidery Machines, but compatible with other sewing and embroidery machine brands. Handles a variety of 30 cotton-wrapped polyester embroidery thread spools 300 meters (328 yards). Designed for high speed embroidery stitching, made in a fun assortment of a special and sophisticated look with other...


