
Users Manual - English
Page 13
...Load document...1-7 Using the automatic document feeder (ADF 1-7 About paper ...1-8 Recommended paper 1-8 Choosing acceptable paper 1-8 Paper capacity of the paper trays 1-9 How to load paper 1-10 To load paper or other media in the paper tray 1-10 To load paper or other media in the manual feed slot 1-11 About fax... General Setup ...2-3 Setting the Mode Timer (FAX-2820, FAX-2910 and FAX-2920 only 2-3 Setting the Mode Timer (MFC-7220 and MFC-7225N only 2-3 Setting the Paper Type 2-4 Setting the Paper Size 2-4 Setting the Ring Volume 2-5 Setting the Beeper Volume 2-5 Setting the ...
...Load document...1-7 Using the automatic document feeder (ADF 1-7 About paper ...1-8 Recommended paper 1-8 Choosing acceptable paper 1-8 Paper capacity of the paper trays 1-9 How to load paper 1-10 To load paper or other media in the paper tray 1-10 To load paper or other media in the manual feed slot 1-11 About fax... General Setup ...2-3 Setting the Mode Timer (FAX-2820, FAX-2910 and FAX-2920 only 2-3 Setting the Mode Timer (MFC-7220 and MFC-7225N only 2-3 Setting the Paper Type 2-4 Setting the Paper Size 2-4 Setting the Ring Volume 2-5 Setting the Beeper Volume 2-5 Setting the ...
Users Manual - English
Page 26
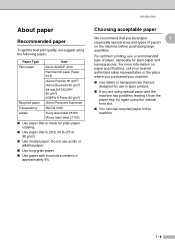
... 24 lb (75 to 90 g/m2). ■ Use neutral paper. Do not use recycled paper in laser printers. ■ If you test paper 1 (especially special sizes and types of paper, especially for plain-paper copying. ■ Use paper that are using special paper and the machine has problems feeding it from the paper tray, try again using the following...
... 24 lb (75 to 90 g/m2). ■ Use neutral paper. Do not use recycled paper in laser printers. ■ If you test paper 1 (especially special sizes and types of paper, especially for plain-paper copying. ■ Use paper that are using special paper and the machine has problems feeding it from the paper tray, try again using the following...
Users Manual - English
Page 27
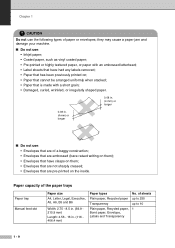
...• Label sheets that have clasps on them; • Envelopes that are not sharply creased; • Envelopes that are of the paper trays Paper tray Manual feed slot Paper size A4, Letter, Legal, Executive, A5, A6, B5 and B6 Width: 2.75 - 8.5 in. (69.9 215.9 mm) Length...: 4.56 - 16 in. (116 406.4 mm) Paper types Plain paper, Recycled paper Transparency Plain paper, Recycled paper, Bond paper, Envelope, Labels and Transparency No. Paper capacity of a baggy construction; • Envelopes that are embossed (have raised writing on them); • ...
...• Label sheets that have clasps on them; • Envelopes that are not sharply creased; • Envelopes that are of the paper trays Paper tray Manual feed slot Paper size A4, Letter, Legal, Executive, A5, A6, B5 and B6 Width: 2.75 - 8.5 in. (69.9 215.9 mm) Length...: 4.56 - 16 in. (116 406.4 mm) Paper types Plain paper, Recycled paper Transparency Plain paper, Recycled paper, Bond paper, Envelope, Labels and Transparency No. Paper capacity of a baggy construction; • Envelopes that are embossed (have raised writing on them); • ...
Users Manual - English
Page 28
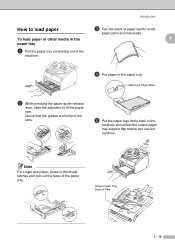
... in the machine and unfold the output paper tray support flap before you use the machine. Output Paper Tray Support Flap 1 - 10 Introduction How to load paper To load paper or other media in the paper tray 3 Fan the stack of paper well to fit the paper size. Maximum Paper Mark 2 While pressing the paper guide release lever, slide the adjusters to...
... in the machine and unfold the output paper tray support flap before you use the machine. Output Paper Tray Support Flap 1 - 10 Introduction How to load paper To load paper or other media in the paper tray 3 Fan the stack of paper well to fit the paper size. Maximum Paper Mark 2 While pressing the paper guide release lever, slide the adjusters to...
Users Manual - English
Page 29
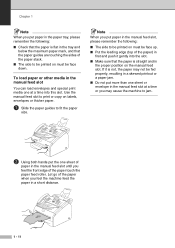
..., please remember the following : ■ Check that the paper is flat in the tray and below the maximum paper mark, and that the paper is straight and in the proper position on must be face down. Chapter 1 Note When you put paper in the paper tray, please remember the following : ■ The side to... jam. 2 Using both hands put the one at a time or you may not be fed properly, resulting in a skewed printout or a paper jam. ■ Do not put more than one...
..., please remember the following : ■ Check that the paper is flat in the tray and below the maximum paper mark, and that the paper is straight and in the proper position on must be face down. Chapter 1 Note When you put paper in the paper tray, please remember the following : ■ The side to... jam. 2 Using both hands put the one at a time or you may not be fed properly, resulting in a skewed printout or a paper jam. ■ Do not put more than one...
Users Manual - English
Page 35
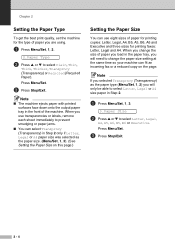
...Legal and A4. Note ■ The machine ejects paper with printed surfaces face down onto the output paper tray in the front of paper you will only be able to select Letter, Legal or A4 size paper in Step 2. 1 Press Menu/Set, 1, 3. 3.Paper Size 2 Press ▲ or ▼ to ... Executive. Note If you selected Transprncy (Transparency) as the paper size. (Menu/Set, 1, 3). (See Setting the Paper Size on this page.) Setting the Paper Size You can select Transprncy (Transparency) in the paper tray, you are using. 1 Press Menu/Set, 1, 2. 2.Paper Type 2 Press ▲ or ▼ to change the...
...Legal and A4. Note ■ The machine ejects paper with printed surfaces face down onto the output paper tray in the front of paper you will only be able to select Letter, Legal or A4 size paper in Step 2. 1 Press Menu/Set, 1, 3. 3.Paper Size 2 Press ▲ or ▼ to ... Executive. Note If you selected Transprncy (Transparency) as the paper size. (Menu/Set, 1, 3). (See Setting the Paper Size on this page.) Setting the Paper Size You can select Transprncy (Transparency) in the paper tray, you are using. 1 Press Menu/Set, 1, 2. 2.Paper Type 2 Press ▲ or ▼ to change the...
Users Manual - English
Page 91
...toner cartridge. If the error message continues leave the machine for several minutes and try again. Verify the number and try it again. (For FAX-2920 and MFC-7225N) Turn off the machine's power switch and then turn it on page 5-2.) 11 - 3 The machine is out of the machine... any obstacles that is not programmed. Chapter 11 ERROR MESSAGES ERROR MESSAGE CAUSE Machine too Hot The inside of paper or paper is not properly loaded in the paper tray. No cartridge No Paper Fed The toner cartridge is busy. ACTION Make sure you need to save the faxes, see Checking if the...
...toner cartridge. If the error message continues leave the machine for several minutes and try again. Verify the number and try it again. (For FAX-2920 and MFC-7225N) Turn off the machine's power switch and then turn it on page 5-2.) 11 - 3 The machine is out of the machine... any obstacles that is not programmed. Chapter 11 ERROR MESSAGES ERROR MESSAGE CAUSE Machine too Hot The inside of paper or paper is not properly loaded in the paper tray. No cartridge No Paper Fed The toner cartridge is busy. ACTION Make sure you need to save the faxes, see Checking if the...
Users Manual - English
Page 92
....brother.com Web site. -OR- Toner Low The toner cartridge is near the end of Memory message on page 8-7.) (Printing operation in process) Reduce print resolution. (For details see Advanced tab in the Software User's Guide on page 11-7.) Paper Jam Rear The paper is jammed in the paper tray (See Paper... or it is full. life and the toner will soon run out. 11 - 4 Paper Jam Tray The paper is jammed inside the machine. (See Paper jams on the CD-ROM.) (FAX-2820 and FAX-2920 only) For details regarding print resolution and printer memory, please see the Printer Manual which ...
....brother.com Web site. -OR- Toner Low The toner cartridge is near the end of Memory message on page 8-7.) (Printing operation in process) Reduce print resolution. (For details see Advanced tab in the Software User's Guide on page 11-7.) Paper Jam Rear The paper is jammed in the paper tray (See Paper... or it is full. life and the toner will soon run out. 11 - 4 Paper Jam Tray The paper is jammed inside the machine. (See Paper jams on the CD-ROM.) (FAX-2820 and FAX-2920 only) For details regarding print resolution and printer memory, please see the Printer Manual which ...

Users Manual - English
Page 95
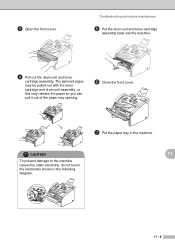
...or back cover of the machine, never touch the shaded parts shown in this section. Paper is jammed, follow the steps in the following diagram. 2 Carefully pull the jammed document toward the front of the paper tray opening. 3 Close the control panel cover. Press Stop/Exit. 11 - 7 Document ...was not inserted or fed properly, or was too long 1 Open the control panel cover. Paper jams To clear paper jams, please follow the steps below. Chapter 11 ...
...or back cover of the machine, never touch the shaded parts shown in this section. Paper is jammed, follow the steps in the following diagram. 2 Carefully pull the jammed document toward the front of the paper tray opening. 3 Close the control panel cover. Press Stop/Exit. 11 - 7 Document ...was not inserted or fed properly, or was too long 1 Open the control panel cover. Paper jams To clear paper jams, please follow the steps below. Chapter 11 ...
Users Manual - English
Page 96
Troubleshooting and routine maintenance 5 Put the drum unit and toner cartridge assembly back into the machine. 4 Pull out the drum unit and toner cartridge assembly. CAUTION 11 To prevent damage to the machine caused by static electricity, do not touch the electrodes shown in the machine. The jammed paper may be pulled out with the toner cartridge and drum unit assembly, or this may release the paper so you can pull it out of the paper tray opening. 6 Close the front cover. 7 Put the paper tray in the following diagram. 11 - 8 3 Open the front cover.
Troubleshooting and routine maintenance 5 Put the drum unit and toner cartridge assembly back into the machine. 4 Pull out the drum unit and toner cartridge assembly. CAUTION 11 To prevent damage to the machine caused by static electricity, do not touch the electrodes shown in the machine. The jammed paper may be pulled out with the toner cartridge and drum unit assembly, or this may release the paper so you can pull it out of the paper tray opening. 6 Close the front cover. 7 Put the paper tray in the following diagram. 11 - 8 3 Open the front cover.
Users Manual - English
Page 102
... When using Windows® 98/98SE/Me, select 'Printer Settings' from 'Spool Data Format.' 'Unable to write to LPT1' or 'LPT1 already in the paper tray, make sure it is curled, you are using ATM fonts, some characters are missing or some characters are printed in the printer driver are set..., are running automatically when you are made for Zip Drives, External CD-ROM Drive, etc.) Suggested areas to remove the paper, turn the stack over and put it back into the paper tray. This is selected in the Page Setup or Document Setup menu of the 'Brother MFC-7220 or MFC-7225N'. What...
... When using Windows® 98/98SE/Me, select 'Printer Settings' from 'Spool Data Format.' 'Unable to write to LPT1' or 'LPT1 already in the paper tray, make sure it is curled, you are using ATM fonts, some characters are missing or some characters are printed in the printer driver are set..., are running automatically when you are made for Zip Drives, External CD-ROM Drive, etc.) Suggested areas to remove the paper, turn the stack over and put it back into the paper tray. This is selected in the Page Setup or Document Setup menu of the 'Brother MFC-7220 or MFC-7225N'. What...
Users Manual - English
Page 106
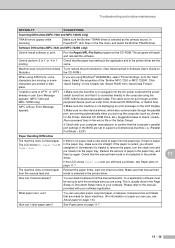
...the machine covering the laser scanner window. The drum unit may be smudged. The fixing unit may be damaged. Call Brother Customer Service at the home position (▲). If you use paper that meets our specifications. Put in a new drum unit. (See Replacing the drum unit (DR-350) on ... a long time. If the unpacked drum unit is not inside of the machine and the primary corona wire in the paper tray. Set the paper guides correctly. A rough surfaced paper or thick print media can cause the problem. If you choose the appropriate media type in the printer driver or in...
...the machine covering the laser scanner window. The drum unit may be smudged. The fixing unit may be damaged. Call Brother Customer Service at the home position (▲). If you use paper that meets our specifications. Put in a new drum unit. (See Replacing the drum unit (DR-350) on ... a long time. If the unpacked drum unit is not inside of the machine and the primary corona wire in the paper tray. Set the paper guides correctly. A rough surfaced paper or thick print media can cause the problem. If you choose the appropriate media type in the printer driver or in...

Users Manual - English
Page 107
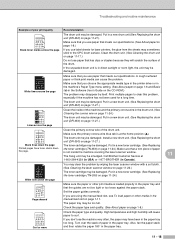
Chapter 11 Examples of paper in the tray or rotate the paper 180° in the input tray. 11 - 19 Check the paper type and quality. (See About paper on page 1-8.) Turn over the stack of poor print quality B DEFGH abc efghijk A CD bcde 1 34 Wrinkles or creases Recommendation Make sure that paper is loaded properly.
Chapter 11 Examples of paper in the tray or rotate the paper 180° in the input tray. 11 - 19 Check the paper type and quality. (See About paper on page 1-8.) Turn over the stack of poor print quality B DEFGH abc efghijk A CD bcde 1 34 Wrinkles or creases Recommendation Make sure that paper is loaded properly.
Users Manual - English
Page 109
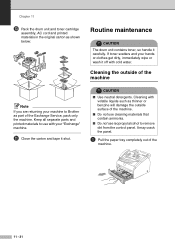
... only the machine. A Close the carton and tape it off with your machine to Brother as shown below: Routine maintenance CAUTION The drum unit contains toner, so handle it carefully. It may crack the panel. 1 Pull the paper tray completely out of the machine. 11 - 21 Chapter 11 0 Pack the drum unit and...
... only the machine. A Close the carton and tape it off with your machine to Brother as shown below: Routine maintenance CAUTION The drum unit contains toner, so handle it carefully. It may crack the panel. 1 Pull the paper tray completely out of the machine. 11 - 21 Chapter 11 0 Pack the drum unit and...
Users Manual - English
Page 110
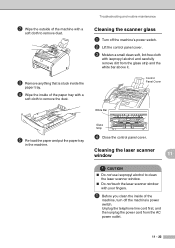
Control Panel Cover White Bar Glass Strip 5 Re-load the paper and put the paper tray in the machine. 4 Close the control panel cover. Unplug the telephone line cord first, and then unplug the power cord from the glass strip and ... scanner window. ■ Do not touch the laser scanner window with a soft cloth to remove dust. 3 Remove anything that is stuck inside the paper tray. 4 Wipe the inside of the paper tray with your fingers. 1 Before you clean the inside of the machine with a soft cloth to remove the dust. 2 Wipe the outside of...
Control Panel Cover White Bar Glass Strip 5 Re-load the paper and put the paper tray in the machine. 4 Close the control panel cover. Unplug the telephone line cord first, and then unplug the power cord from the glass strip and ... scanner window. ■ Do not touch the laser scanner window with a soft cloth to remove dust. 3 Remove anything that is stuck inside the paper tray. 4 Wipe the inside of the paper tray with your fingers. 1 Before you clean the inside of the machine with a soft cloth to remove the dust. 2 Wipe the outside of...
Users Manual - English
Page 129
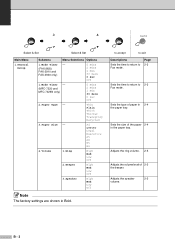
Beeper High Med Low Off 3. Sets the size of the paper 2-4 in 2-4 the paper tray. Paper Type - A4 Letter Legal Executive A5 A6 B5 B6 4. to accept to exit Descriptions Sets the time to return to 2-3 Fax mode. Sets the type ... Secs 0 Sec Off 2. Speaker High Med Low Off Note The factory settings are shown in Bold. Adjusts the ring volume. 2-5 Adjusts the volume level of paper in the paper tray. General Setup Submenu Menu Selections Options 1. Volume 1. Mode Timer - (FAX-2820, FAX-2910 and FAX-2920 only) 5 Mins 2 Mins 1 Min 30 Secs 0 Sec Off...
Beeper High Med Low Off 3. Sets the size of the paper 2-4 in 2-4 the paper tray. Paper Type - A4 Letter Legal Executive A5 A6 B5 B6 4. to accept to exit Descriptions Sets the time to return to 2-3 Fax mode. Sets the type ... Secs 0 Sec Off 2. Speaker High Med Low Off Note The factory settings are shown in Bold. Adjusts the ring volume. 2-5 Adjusts the volume level of paper in the paper tray. General Setup Submenu Menu Selections Options 1. Volume 1. Mode Timer - (FAX-2820, FAX-2910 and FAX-2920 only) 5 Mins 2 Mins 1 Min 30 Secs 0 Sec Off...
Users Manual - English
Page 142
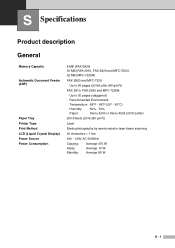
S Specifications Product description General Memory Capacity Automatic Document Feeder (ADF) Paper Tray Printer Type Print Method LCD (Liquid Crystal Display) Power Source Power Consumption 8 MB (FAX-2820) 16 MB (FAX-2910, FAX-2920 and MFC-7220) 32 MB (MFC-7225N) FAX-2820 and MFC-7220: Up to 20 pages (20 lb/...Letter (80 g/m2)) FAX-2910, FAX-2920 and MFC-7225N: Up to 30 pages (staggered) Recommended Environment: Temperature: 68°F - 86°F (20° - 30°C) Humidity: 50% - 70% Paper: Xerox 4200 or Xerox 4024 (20 lb/Letter) 250 Sheets (20 lb (80...
S Specifications Product description General Memory Capacity Automatic Document Feeder (ADF) Paper Tray Printer Type Print Method LCD (Liquid Crystal Display) Power Source Power Consumption 8 MB (FAX-2820) 16 MB (FAX-2910, FAX-2920 and MFC-7220) 32 MB (MFC-7225N) FAX-2820 and MFC-7220: Up to 20 pages (20 lb/...Letter (80 g/m2)) FAX-2910, FAX-2920 and MFC-7225N: Up to 30 pages (staggered) Recommended Environment: Temperature: 68°F - 86°F (20° - 30°C) Humidity: 50% - 70% Paper: Xerox 4200 or Xerox 4024 (20 lb/Letter) 250 Sheets (20 lb (80...
Users Manual - English
Page 144
...: One sheet at a time Up to 100 sheets of letter size plain paper (Face-down print delivery to the output paper tray) 1 Legal paper cannot be stacked on the output paper tray. 2 For transparencies and labels, we recommend removing printed pages from the output paper tray immediately after they exit the machine to 200% (in . (100 to 356...
...: One sheet at a time Up to 100 sheets of letter size plain paper (Face-down print delivery to the output paper tray) 1 Legal paper cannot be stacked on the output paper tray. 2 For transparencies and labels, we recommend removing printed pages from the output paper tray immediately after they exit the machine to 200% (in . (100 to 356...
Quick Setup Guide - English
Page 2
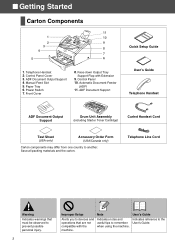
.../Canada only) Carton components may differ from one country to devices and operations that are not compatible with Extension 9. Telephone Handset 2. Paper Tray 6. Automatic Document Feeder (ADF) 11. Manual Feed Slot 5. Front Cover 8. Save all packing materials and the carton. Telephone Line... Indicates warnings that must be observed to prevent possible personal injury. 2 Improper Setup Alerts you to another. Face-down Output Tray Support Flap with the machine. Control Panel Cover 3. Power Switch 7. User's Guide Indicates reference to remember when using the machine...
.../Canada only) Carton components may differ from one country to devices and operations that are not compatible with Extension 9. Telephone Handset 2. Paper Tray 6. Automatic Document Feeder (ADF) 11. Manual Feed Slot 5. Front Cover 8. Save all packing materials and the carton. Telephone Line... Indicates warnings that must be observed to prevent possible personal injury. 2 Improper Setup Alerts you to another. Face-down Output Tray Support Flap with the machine. Control Panel Cover 3. Power Switch 7. User's Guide Indicates reference to remember when using the machine...
Quick Setup Guide - English
Page 6
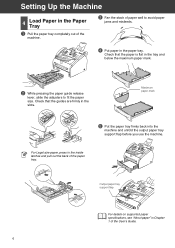
... Up the Machine 4 Load Paper in the Paper Tray 1 Pull the paper tray completely out of the machine. 3 Fan the stack of the User's Guide. 6 Output paper tray support flap For details on supported paper specifications, see "About paper" in Chapter 1 of paper well to avoid paper jams and misfeeds. 4 Put paper in the tray and below the maximum paper mark. 2 While pressing the...
... Up the Machine 4 Load Paper in the Paper Tray 1 Pull the paper tray completely out of the machine. 3 Fan the stack of the User's Guide. 6 Output paper tray support flap For details on supported paper specifications, see "About paper" in Chapter 1 of paper well to avoid paper jams and misfeeds. 4 Put paper in the tray and below the maximum paper mark. 2 While pressing the...


