Users Manual - English
Page 17
... ...3-8 Using control panel button 3-8 Using the printer driver ...3-8 Printer Settings ...3-9 Using the control panel button 3-9 Using the printer driver ...3-9 Print fonts (For HL-5040, HL-5050 and HL-5070N 3-10 Using the control panel button 3-10 Using the printer driver (For HL-5040, HL-5050 and HL-5070N 3-10 Network factory default setting (For HL-5070N 3-11 4 Options ...4-1 DIMM ...4-1 Installing additional...
... ...3-8 Using control panel button 3-8 Using the printer driver ...3-8 Printer Settings ...3-9 Using the control panel button 3-9 Using the printer driver ...3-9 Print fonts (For HL-5040, HL-5050 and HL-5070N 3-10 Using the control panel button 3-10 Using the printer driver (For HL-5040, HL-5050 and HL-5070N 3-10 Network factory default setting (For HL-5070N 3-11 4 Options ...4-1 DIMM ...4-1 Installing additional...
Users Manual - English
Page 18
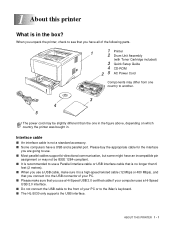
...certified cable if your computer uses a Hi-Speed USB 2.0 interface. ■ Do not connect the USB cable to the front of the following parts. 1 1 Printer 2 Drum Unit Assembly (with Toner Cartridge included) 3 Quick Setup Guide 4 CD-ROM 2 5 AC Power Cord Components may differ from one country to another. 3 4 ... one in the figure above, depending on which country the printer was bought in the box? When you unpack the printer, check to the iMac's keyboard. ■ The HL-5030 only supports the USB interface. 1 About this printer What is a high-speed twisted cable (12 Mbps or 480...
...certified cable if your computer uses a Hi-Speed USB 2.0 interface. ■ Do not connect the USB cable to the front of the following parts. 1 1 Printer 2 Drum Unit Assembly (with Toner Cartridge included) 3 Quick Setup Guide 4 CD-ROM 2 5 AC Power Cord Components may differ from one country to another. 3 4 ... one in the figure above, depending on which country the printer was bought in the box? When you unpack the printer, check to the iMac's keyboard. ■ The HL-5030 only supports the USB interface. 1 About this printer What is a high-speed twisted cable (12 Mbps or 480...
Users Manual - English
Page 29
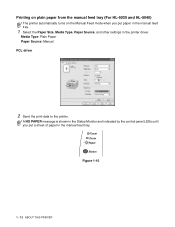
A NO PAPER message is shown in the Status Monitor and indicated by the control panel LEDs until you put a sheet of paper in the printer driver. Toner Drum Paper Status Figure 1-10 1 - 12 ABOUT THIS PRINTER Media Type: Plain Paper Paper Source: Manual PCL driver 2 Send the print data to the printer. Printing on plain paper from the manual feed tray (For HL-5030 and HL-5040) The printer automatically turns on the Manual Feed mode when you put paper in the manual feed tray. 1 Select the Paper Size, Media Type, Paper Source, and other settings in the manual feed tray.
A NO PAPER message is shown in the Status Monitor and indicated by the control panel LEDs until you put a sheet of paper in the printer driver. Toner Drum Paper Status Figure 1-10 1 - 12 ABOUT THIS PRINTER Media Type: Plain Paper Paper Source: Manual PCL driver 2 Send the print data to the printer. Printing on plain paper from the manual feed tray (For HL-5030 and HL-5040) The printer automatically turns on the Manual Feed mode when you put paper in the manual feed tray. 1 Select the Paper Size, Media Type, Paper Source, and other settings in the manual feed tray.

Users Manual - English
Page 92
Print fonts (For HL-5040, HL-5050 and HL-5070N) You can print a list of the internal fonts by clicking the Print Fonts button in . 3 Hold down until the Drum LED comes on. 5 When the Drum LED comes on the power switch. The printer will print a list of the internal fonts using Brother's Windows® PCL printer driver, you can print...
Print fonts (For HL-5040, HL-5050 and HL-5070N) You can print a list of the internal fonts by clicking the Print Fonts button in . 3 Hold down until the Drum LED comes on. 5 When the Drum LED comes on the power switch. The printer will print a list of the internal fonts using Brother's Windows® PCL printer driver, you can print...
Users Manual - English
Page 121
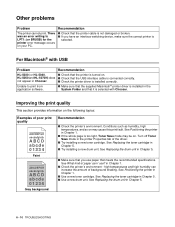
... 1. ■ Use a new toner cartridge. See Positioning the printer in Chapter 5. ■ Try installing a new drum unit. See Replacing the toner cartridge in Chapter 5. 6 - 10 TROUBLESHOOTING See Replacing the drum unit in Chapter 5. ■ Use a new drum unit. HL-5050 and HL-5070N) does ■ Check that the printer is selected. See What kind of paper can...
... 1. ■ Use a new toner cartridge. See Positioning the printer in Chapter 5. ■ Try installing a new drum unit. See Replacing the toner cartridge in Chapter 5. 6 - 10 TROUBLESHOOTING See Replacing the drum unit in Chapter 5. ■ Use a new drum unit. HL-5050 and HL-5070N) does ■ Check that the printer is selected. See What kind of paper can...
Users Manual - English
Page 132
...pages (1 page / job) Dimensions / Weights HL-5070N Model Dimensions (W × D × H) Weights HL-5030 HL-5040 382 × 383 × 252 mm (15.0 × 15.1 × 9.9 in.) Approx.10.6 kg (23.4 lb) including the drum unit and toner cartridge Other HL-5050 HL-5070N 382 × 401 × 252...× 15.8 × 9.9 in.) Approx. 11.6 kg (25.6 lb) including the drum unit and toner cartridge Model Power Printing consumption Standby Sleep Noise level Printing Standby Ecology Power save Toner save HL-5030 HL-5040 Less than 460 W at 25 °C (77 °F) Less than 75 W at...
...pages (1 page / job) Dimensions / Weights HL-5070N Model Dimensions (W × D × H) Weights HL-5030 HL-5040 382 × 383 × 252 mm (15.0 × 15.1 × 9.9 in.) Approx.10.6 kg (23.4 lb) including the drum unit and toner cartridge Other HL-5050 HL-5070N 382 × 401 × 252...× 15.8 × 9.9 in.) Approx. 11.6 kg (25.6 lb) including the drum unit and toner cartridge Model Power Printing consumption Standby Sleep Noise level Printing Standby Ecology Power save Toner save HL-5030 HL-5040 Less than 460 W at 25 °C (77 °F) Less than 75 W at...

Quick Setup Guide - English
Page 3
... ...2 ■ Getting Started Carton Components 4 Control Panel ...5 Supplied CD-ROM 6 Step 1 Setting Up Your Printer Step 2 ■ Insert the CD-ROM into the CD-ROM Drive 7 ■ Install the Drum Unit Assembly 8 ■ Load Paper in the Paper Tray 9 ■ Print a Test Page 10 Installing...USB Interface Cable Users 12 1. Connecting the Printer to Your PC 2. Setting your Printer as the Default Printer (For Windows® 2000/XP Users Only) For Parallel Interface Cable Users (For HL-5040/5050 Users Only) ..... 14 Connecting the Printer to Your PC and Installing the Driver For...
... ...2 ■ Getting Started Carton Components 4 Control Panel ...5 Supplied CD-ROM 6 Step 1 Setting Up Your Printer Step 2 ■ Insert the CD-ROM into the CD-ROM Drive 7 ■ Install the Drum Unit Assembly 8 ■ Load Paper in the Paper Tray 9 ■ Print a Test Page 10 Installing...USB Interface Cable Users 12 1. Connecting the Printer to Your PC 2. Setting your Printer as the Default Printer (For Windows® 2000/XP Users Only) For Parallel Interface Cable Users (For HL-5040/5050 Users Only) ..... 14 Connecting the Printer to Your PC and Installing the Driver For...
Quick Setup Guide - English
Page 6
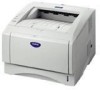
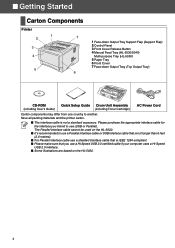
... Printer 1 2 7 3 4 5 6 1 Face-down Output Tray Support Flap (Support Flap) 2 Control Panel 3 Front Cover Release Button 4 Manual Feed Tray (HL-5030/5040) Multi-purpose Tray (HL-5050) 5 Paper Tray 6 Front Cover 7 Face-down Output Tray (Top Output Tray) CD-ROM (including User's Guide) Quick Setup Guide Drum .... The Parallel interface cable cannot be used on the HL-5030. ■ It's recommended to use a Parallel interface cable or USB interface cable that you intend to another. Save all packing materials and the printer carton. ■ The interface cable is IEEE 1284-compliant...
... Printer 1 2 7 3 4 5 6 1 Face-down Output Tray Support Flap (Support Flap) 2 Control Panel 3 Front Cover Release Button 4 Manual Feed Tray (HL-5030/5040) Multi-purpose Tray (HL-5050) 5 Paper Tray 6 Front Cover 7 Face-down Output Tray (Top Output Tray) CD-ROM (including User's Guide) Quick Setup Guide Drum .... The Parallel interface cable cannot be used on the HL-5030. ■ It's recommended to use a Parallel interface cable or USB interface cable that you intend to another. Save all packing materials and the printer carton. ■ The interface cable is IEEE 1284-compliant...


