
Users Manual - English
Page 3
... inside the printer will be extremely hot. WARNING Do not handle the plug with wet hands - Inside the printer ii Open the face-up output tray
... inside the printer will be extremely hot. WARNING Do not handle the plug with wet hands - Inside the printer ii Open the face-up output tray

Users Manual - English
Page 7
...Bridgewater, NJ 08807-0911 USA Telephone: (908) 704-1700 declares, that the products Product name: Laser Printer Model number: HL-7050 and HL-7050N Product options: Lower Tray Unit LT-7000, Duplex Unit DX-7000, Network Card NC-4100h, Mailbox Unit MX-7000, MX7010 complies with the limits ...This equipment generates, uses, and can be used in order to comply with Part 15 of Conformity (For USA) Responsible Party: Brother International Corporation 100 Somerset Corporate Boulevard P.O. vi Operation is no guarantee that to which can radiate radio frequency energy and, if not ...
...Bridgewater, NJ 08807-0911 USA Telephone: (908) 704-1700 declares, that the products Product name: Laser Printer Model number: HL-7050 and HL-7050N Product options: Lower Tray Unit LT-7000, Duplex Unit DX-7000, Network Card NC-4100h, Mailbox Unit MX-7000, MX7010 complies with the limits ...This equipment generates, uses, and can be used in order to comply with Part 15 of Conformity (For USA) Responsible Party: Brother International Corporation 100 Somerset Corporate Boulevard P.O. vi Operation is no guarantee that to which can radiate radio frequency energy and, if not ...
Users Manual - English
Page 15
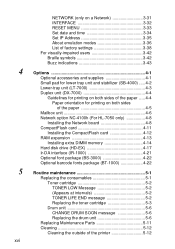
...Recommended paper 1-16 Printable area 1-17 Printing methods 1-19 Printing from the paper tray (Face-down printing) ... 1-19 Tray ID setting (If the lower tray unit is installed) . 1-23 Printing from the multi-purpose tray 1-24 Printing on envelopes (Face-up printing 1-28 Printing on labels, transparencies... and other special paper 1-35 Printing to the face-up output tray (Face-up printing 1-40 Manual feed 1-41 Driver and software 2-1 Printer driver 2-1 Features in the PCL printer driver (For Windows®)...
...Recommended paper 1-16 Printable area 1-17 Printing methods 1-19 Printing from the paper tray (Face-down printing) ... 1-19 Tray ID setting (If the lower tray unit is installed) . 1-23 Printing from the multi-purpose tray 1-24 Printing on envelopes (Face-up printing 1-28 Printing on labels, transparencies... and other special paper 1-35 Printing to the face-up output tray (Face-up printing 1-40 Manual feed 1-41 Driver and software 2-1 Printer driver 2-1 Features in the PCL printer driver (For Windows®)...
Users Manual - English
Page 17
...-impaired users 3-42 Braille symbols 3-42 Buzz indications 3-43 Options 4-1 Optional accessories and supplies 4-1 Small pad for lower tray unit and stabilizer (SB-4000) ..... 4-2 Lower-tray unit (LT-7000 4-3 Duplex unit (DX-7000 4-4 Guidelines for printing on both sides of the paper ..... 4-4 Paper... orientation for printing on both sides of the paper 4-5 Mailbox unit 4-6 Network option NC-4100h (For HL-7050 only 4-8 Installing the Network board...
...-impaired users 3-42 Braille symbols 3-42 Buzz indications 3-43 Options 4-1 Optional accessories and supplies 4-1 Small pad for lower tray unit and stabilizer (SB-4000) ..... 4-2 Lower-tray unit (LT-7000 4-3 Duplex unit (DX-7000 4-4 Guidelines for printing on both sides of the paper ..... 4-4 Paper... orientation for printing on both sides of the paper 4-5 Mailbox unit 4-6 Network option NC-4100h (For HL-7050 only 4-8 Installing the Network board...

Users Manual - English
Page 18
...service messages 6-5 Troubleshooting paper handling 6-6 Paper jams and how to clear them 6-8 JAM A1 (paper jam in the multi-purpose tray) ......... 6-10 JAM A2 / A3 / A4 / A5 (Paper jam inside the Paper tray 6-11 JAM B (paper jam inside the printer 6-14 JAM C (paper jam where the paper comes out / paper jam... in the face-up output tray 6-17 JAM D (paper jam in the Duplex unit 6-19 JAM E (paper jam inside the mailbox unit 6-22 Improving the print quality 6-23 Solving print ...
...service messages 6-5 Troubleshooting paper handling 6-6 Paper jams and how to clear them 6-8 JAM A1 (paper jam in the multi-purpose tray) ......... 6-10 JAM A2 / A3 / A4 / A5 (Paper jam inside the Paper tray 6-11 JAM B (paper jam inside the printer 6-14 JAM C (paper jam where the paper comes out / paper jam... in the face-up output tray 6-17 JAM D (paper jam in the Duplex unit 6-19 JAM E (paper jam inside the mailbox unit 6-22 Improving the print quality 6-23 Solving print ...
Users Manual - English
Page 20
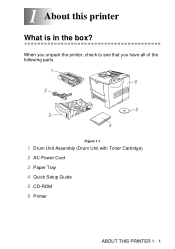
When you unpack the printer, check to see that you have all of the following parts. 1 6 2 5 3 4 Figure 1-1 1 Drum Unit Assembly (Drum Unit with Toner Cartridge) 2 AC Power Cord 3 Paper Tray 4 Quick Setup Guide 5 CD-ROM 6 Printer ABOUT THIS PRINTER 1 - 1 1 About this printer 1 What is in the box?
When you unpack the printer, check to see that you have all of the following parts. 1 6 2 5 3 4 Figure 1-1 1 Drum Unit Assembly (Drum Unit with Toner Cartridge) 2 AC Power Cord 3 Paper Tray 4 Quick Setup Guide 5 CD-ROM 6 Printer ABOUT THIS PRINTER 1 - 1 1 About this printer 1 What is in the box?

Users Manual - English
Page 25
General view 2 3 1 4 5 6 7 1 Control Panel Figure 1-2 2 Face-down Output Tray 3 Support Flap 4 Top Cover 5 Multi-purpose Tray 6 Multi-purpose Extension Support 7 Paper Tray (Tray 1) 1 - 6 ABOUT THIS PRINTER
General view 2 3 1 4 5 6 7 1 Control Panel Figure 1-2 2 Face-down Output Tray 3 Support Flap 4 Top Cover 5 Multi-purpose Tray 6 Multi-purpose Extension Support 7 Paper Tray (Tray 1) 1 - 6 ABOUT THIS PRINTER

Users Manual - English
Page 26
1 2 3 4 5 6 7 8 9 1 Face-up Output Tray Figure 1-3 2 Parallel Interface Connector 3 USB Connector 4 Serial Interface Connector 5 Network Board Slot 6 Card Slot (For optional CompactFlashTM card) 7 Duplex Unit Connector 8 AC Power Connector 9 Power Switch ABOUT THIS PRINTER 1 - 7
1 2 3 4 5 6 7 8 9 1 Face-up Output Tray Figure 1-3 2 Parallel Interface Connector 3 USB Connector 4 Serial Interface Connector 5 Network Board Slot 6 Card Slot (For optional CompactFlashTM card) 7 Duplex Unit Connector 8 AC Power Connector 9 Power Switch ABOUT THIS PRINTER 1 - 7

Users Manual - English
Page 29
The recommended (or minimum) space requirements are as follows. Figure 1-4 Figure 1-5 1 - 10 ABOUT THIS PRINTER Space needed to use the printer properly. No Options Install Optional Duplex Unit, Lower Tray and Mailbox. 100 mm 3.94 inches 500 mm 19.7 in. 400 mm 15.8 in. 600 mm 23.6 in. 100 mm 3.94 in. 600 mm 23.6 in. 150 mm 5.9 in. You will need this space to install your printer Leave enough space around the printer.
The recommended (or minimum) space requirements are as follows. Figure 1-4 Figure 1-5 1 - 10 ABOUT THIS PRINTER Space needed to use the printer properly. No Options Install Optional Duplex Unit, Lower Tray and Mailbox. 100 mm 3.94 inches 500 mm 19.7 in. 400 mm 15.8 in. 600 mm 23.6 in. 100 mm 3.94 in. 600 mm 23.6 in. 150 mm 5.9 in. You will need this space to install your printer Leave enough space around the printer.
Users Manual - English
Page 31
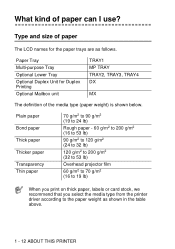
... MX The definition of the media type (paper weight) is shown below. Type and size of paper can I use? Paper Tray Multi-purpose Tray Optional Lower Tray Optional Duplex Unit for the paper trays are as shown in the table above. 1 - 12 ABOUT THIS PRINTER Plain paper Bond paper Thick paper Thicker paper Transparency...
... MX The definition of the media type (paper weight) is shown below. Type and size of paper can I use? Paper Tray Multi-purpose Tray Optional Lower Tray Optional Duplex Unit for the paper trays are as shown in the table above. 1 - 12 ABOUT THIS PRINTER Plain paper Bond paper Thick paper Thicker paper Transparency...
Users Manual - English
Page 32
ABOUT THIS PRINTER 1 - 13 Media type (Type of paper) Tray 1 60 - 105 g/m2 (16 - 28 lb) MP tray 60 - 200 g/m2 (16 - 53 lb) Tray 2/3/4 60 - 105 g/m2 (16 - 28 lb) DX 60 - 105 g/m2 (16 - 28 lb) MX 60 - 105 g/m2 (16 - 28 lbs.) Select the Media type from ...
ABOUT THIS PRINTER 1 - 13 Media type (Type of paper) Tray 1 60 - 105 g/m2 (16 - 28 lb) MP tray 60 - 200 g/m2 (16 - 53 lb) Tray 2/3/4 60 - 105 g/m2 (16 - 28 lb) DX 60 - 105 g/m2 (16 - 28 lb) MX 60 - 105 g/m2 (16 - 28 lbs.) Select the Media type from ...

Users Manual - English
Page 33
Paper size Number of Sheets Tray 1 MP tray Tray 2/3/4 A4, Letter, Legal, B5 (JIS), B5 (ISO), Executive, A5, A6, B6 A4, Letter, Legal, B5 (JIS), B5 (ISO), Executive, A5, A6, B6 COM-10, Monarch, ...
Paper size Number of Sheets Tray 1 MP tray Tray 2/3/4 A4, Letter, Legal, B5 (JIS), B5 (ISO), Executive, A5, A6, B6 A4, Letter, Legal, B5 (JIS), B5 (ISO), Executive, A5, A6, B6 COM-10, Monarch, ...

Users Manual - English
Page 34
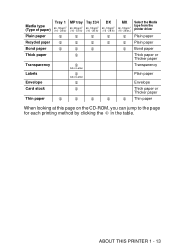
For more information about this page on the CD-ROM, you use face-up i i i i i i i i i i When looking at the bottom of the paper tray. ABOUT THIS PRINTER 1 - 15 Media type Plain paper Recycled paper Bond paper Thick paper Thicker paper Transparency Labels Envelope Card stock Thin paper Face-down i i i i i i i ... in the table. For more than 150 g/m2 (40 lb), use face-up printing. ■ We recommend that you can use the face-up output tray for each printing method by clicking the i in the PAPER menu. You must use the control panel Menu buttons to the page for certain print...
For more information about this page on the CD-ROM, you use face-up i i i i i i i i i i When looking at the bottom of the paper tray. ABOUT THIS PRINTER 1 - 15 Media type Plain paper Recycled paper Bond paper Thick paper Thicker paper Transparency Labels Envelope Card stock Thin paper Face-down i i i i i i i ... in the table. For more than 150 g/m2 (40 lb), use face-up printing. ■ We recommend that you can use the face-up output tray for each printing method by clicking the i in the PAPER menu. You must use the control panel Menu buttons to the page for certain print...

Users Manual - English
Page 38
Press the blue lever and slide the paper guides. Figure 1-8 ABOUT THIS PRINTER 1 - 19 Check that the guides are firmly in the slots. Printing methods Printing from the paper tray (Face-down printing) 1 Pull the paper tray out of the printer. 2 While pressing the [blue] paper-guide release lever, slide the paper guides to fit the paper size.
Press the blue lever and slide the paper guides. Figure 1-8 ABOUT THIS PRINTER 1 - 19 Check that the guides are firmly in the slots. Printing methods Printing from the paper tray (Face-down printing) 1 Pull the paper tray out of the printer. 2 While pressing the [blue] paper-guide release lever, slide the paper guides to fit the paper size.

Users Manual - English
Page 39
Check that the paper is flat and below the maximum paper mark ( ). Figure 1-9 3 Put paper in the printer. 1 - 20 ABOUT THIS PRINTER Up to Maximum Paper Mark ( ) Figure 1-10 4 Put the paper tray back in the paper tray. For Legal size paper, press the [blue] universal guide release button and pull out the rear of the paper tray.
Check that the paper is flat and below the maximum paper mark ( ). Figure 1-9 3 Put paper in the printer. 1 - 20 ABOUT THIS PRINTER Up to Maximum Paper Mark ( ) Figure 1-10 4 Put the paper tray back in the paper tray. For Legal size paper, press the [blue] universal guide release button and pull out the rear of the paper tray.
Users Manual - English
Page 40
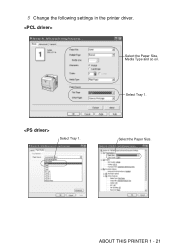
Select Tray 1. Select Tray 1. Select the Paper Size. 5 Change the following settings in the printer driver. Select the Paper Size, Media Type and so on. ABOUT THIS PRINTER 1 - 21
Select Tray 1. Select Tray 1. Select the Paper Size. 5 Change the following settings in the printer driver. Select the Paper Size, Media Type and so on. ABOUT THIS PRINTER 1 - 21

Users Manual - English
Page 41
Figure 1-11 The switches shown in the preset position (default setting). If the paper is misfeeding or a lot of pages are in this figure are going through at the same time when you print on small or thick paper, change the paper thickness switches at the bottom of the paper tray as follows. A6 A4 100 g/m2 (27 lb) Letter 105 g/m2 (28 lb) Legal 105 g/m2 (28 lb) Executive, A5, B6 Other (Default setting) Switch 1: OFF Switch 2: OFF Switch 1: ON Switch 2: ON Switch 1: OFF Switch 2: ON Switch 1: ON Switch 2: OFF 1 - 22 ABOUT THIS PRINTER
Figure 1-11 The switches shown in the preset position (default setting). If the paper is misfeeding or a lot of pages are in this figure are going through at the same time when you print on small or thick paper, change the paper thickness switches at the bottom of the paper tray as follows. A6 A4 100 g/m2 (27 lb) Letter 105 g/m2 (28 lb) Legal 105 g/m2 (28 lb) Executive, A5, B6 Other (Default setting) Switch 1: OFF Switch 2: OFF Switch 1: ON Switch 2: ON Switch 1: OFF Switch 2: ON Switch 1: ON Switch 2: OFF 1 - 22 ABOUT THIS PRINTER
Users Manual - English
Page 42
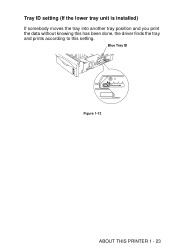
Tray ID setting (If the lower tray unit is installed) If somebody moves the tray into another tray position and you print the data without knowing this has been done, the driver finds the tray and prints according to this setting. Blue Tray ID Figure 1-12 ABOUT THIS PRINTER 1 - 23
Tray ID setting (If the lower tray unit is installed) If somebody moves the tray into another tray position and you print the data without knowing this has been done, the driver finds the tray and prints according to this setting. Blue Tray ID Figure 1-12 ABOUT THIS PRINTER 1 - 23

Users Manual - English
Page 43
For more information, see Chapter 3. 1 Open the multi-purpose tray and lower it gently. Figure 1-14 1 - 24 ABOUT THIS PRINTER Figure 1-13 2 Pull out the multi-purpose support flap. Printing from the multi-purpose tray ■ For proper printing, you must select the same paper size in your software application as the paper in the tray. ■ If your application software does not allow you to select the paper size in its Print menu, you can use the control panel Menu buttons to go to the PAPER menu to change the paper size.
For more information, see Chapter 3. 1 Open the multi-purpose tray and lower it gently. Figure 1-14 1 - 24 ABOUT THIS PRINTER Figure 1-13 2 Pull out the multi-purpose support flap. Printing from the multi-purpose tray ■ For proper printing, you must select the same paper size in your software application as the paper in the tray. ■ If your application software does not allow you to select the paper size in its Print menu, you can use the control panel Menu buttons to go to the PAPER menu to change the paper size.

Users Manual - English
Page 44
... in this chapter. Figure 1-16 When you print on special paper such as envelopes, thick paper, labels, and so on, open the face-up output tray to ( ) Figure 1-15 Make sure that the paper is not, the paper may not be fed correctly, resulting in a skewed printout or a paper jam. 4 While... pressing the [blue] paper-guide release lever, slide the paper guide to fit the paper size. See Printing on the multi-purpose tray. Up to print face up printing) or Printing on labels, transparencies and other special paper in the proper position on envelopes (Face-up . If it...
... in this chapter. Figure 1-16 When you print on special paper such as envelopes, thick paper, labels, and so on, open the face-up output tray to ( ) Figure 1-15 Make sure that the paper is not, the paper may not be fed correctly, resulting in a skewed printout or a paper jam. 4 While... pressing the [blue] paper-guide release lever, slide the paper guide to fit the paper size. See Printing on the multi-purpose tray. Up to print face up printing) or Printing on labels, transparencies and other special paper in the proper position on envelopes (Face-up . If it...


