
Users Manual - English
Page 7
... the equipment off and on a circuit different from that the products Product name: Laser Printer Model number: HL-7050 and HL-7050N Product options: Lower Tray Unit LT-7000, Duplex Unit DX-7000, Network Card NC-4100h, Mailbox Unit MX-7000, MX7010 complies with the limits for help... into an outlet on , the user is no guarantee that may cause harmful interference to correct the interference by Brother Industries, Ltd. could void the user's authority to Part 15 of Conformity (For USA) Responsible Party: Brother International Corporation 100 Somerset Corporate Boulevard P.O.
... the equipment off and on a circuit different from that the products Product name: Laser Printer Model number: HL-7050 and HL-7050N Product options: Lower Tray Unit LT-7000, Duplex Unit DX-7000, Network Card NC-4100h, Mailbox Unit MX-7000, MX7010 complies with the limits for help... into an outlet on , the user is no guarantee that may cause harmful interference to correct the interference by Brother Industries, Ltd. could void the user's authority to Part 15 of Conformity (For USA) Responsible Party: Brother International Corporation 100 Somerset Corporate Boulevard P.O.
Users Manual - English
Page 17
...43 Options 4-1 Optional accessories and supplies 4-1 Small pad for lower tray unit and stabilizer (SB-4000) ..... 4-2 Lower-tray unit (LT-7000 4-3 Duplex unit (DX-7000 4-4 Guidelines for printing on both sides of the paper ..... 4-4 Paper orientation for printing on both sides of the paper 4-5 ...Mailbox unit 4-6 Network option NC-4100h (For HL-7050 only 4-8 Installing the Network board 4-8 CompactFlash card 4-11 Installing the CompactFlash card 4-12 RAM expansion 4-13 Installing extra DIMM memory ...
...43 Options 4-1 Optional accessories and supplies 4-1 Small pad for lower tray unit and stabilizer (SB-4000) ..... 4-2 Lower-tray unit (LT-7000 4-3 Duplex unit (DX-7000 4-4 Guidelines for printing on both sides of the paper ..... 4-4 Paper orientation for printing on both sides of the paper 4-5 ...Mailbox unit 4-6 Network option NC-4100h (For HL-7050 only 4-8 Installing the Network board 4-8 CompactFlash card 4-11 Installing the CompactFlash card 4-12 RAM expansion 4-13 Installing extra DIMM memory ...

Users Manual - English
Page 18
... the printer 6-14 JAM C (paper jam where the paper comes out / paper jam in the face-up output tray 6-17 JAM D (paper jam in the Duplex unit 6-19 JAM E (paper jam inside the mailbox unit 6-22 Improving the print quality 6-23 Solving print problems 6-27 Other problems 6-28 Printing with the...
... the printer 6-14 JAM C (paper jam where the paper comes out / paper jam in the face-up output tray 6-17 JAM D (paper jam in the Duplex unit 6-19 JAM E (paper jam inside the mailbox unit 6-22 Improving the print quality 6-23 Solving print problems 6-27 Other problems 6-28 Printing with the...

Users Manual - English
Page 26
1 2 3 4 5 6 7 8 9 1 Face-up Output Tray Figure 1-3 2 Parallel Interface Connector 3 USB Connector 4 Serial Interface Connector 5 Network Board Slot 6 Card Slot (For optional CompactFlashTM card) 7 Duplex Unit Connector 8 AC Power Connector 9 Power Switch ABOUT THIS PRINTER 1 - 7
1 2 3 4 5 6 7 8 9 1 Face-up Output Tray Figure 1-3 2 Parallel Interface Connector 3 USB Connector 4 Serial Interface Connector 5 Network Board Slot 6 Card Slot (For optional CompactFlashTM card) 7 Duplex Unit Connector 8 AC Power Connector 9 Power Switch ABOUT THIS PRINTER 1 - 7

Users Manual - English
Page 29
You will need this space to install your printer Leave enough space around the printer. Space needed to use the printer properly. The recommended (or minimum) space requirements are as follows. No Options Install Optional Duplex Unit, Lower Tray and Mailbox. 100 mm 3.94 inches 500 mm 19.7 in. 400 mm 15.8 in. 600 mm 23.6 in. 100 mm 3.94 in. 600 mm 23.6 in. 150 mm 5.9 in. Figure 1-4 Figure 1-5 1 - 10 ABOUT THIS PRINTER
You will need this space to install your printer Leave enough space around the printer. Space needed to use the printer properly. The recommended (or minimum) space requirements are as follows. No Options Install Optional Duplex Unit, Lower Tray and Mailbox. 100 mm 3.94 inches 500 mm 19.7 in. 400 mm 15.8 in. 600 mm 23.6 in. 100 mm 3.94 in. 600 mm 23.6 in. 150 mm 5.9 in. Figure 1-4 Figure 1-5 1 - 10 ABOUT THIS PRINTER
Users Manual - English
Page 31
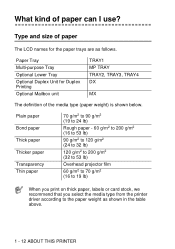
... for the paper trays are as shown in the table above. 1 - 12 ABOUT THIS PRINTER Type and size of paper The LCD names for Duplex Printing Optional Mailbox unit TRAY1 MP TRAY TRAY2, TRAY3, TRAY4 DX MX The definition of paper can I use? Plain paper Bond paper Thick paper Thicker ...
... for the paper trays are as shown in the table above. 1 - 12 ABOUT THIS PRINTER Type and size of paper The LCD names for Duplex Printing Optional Mailbox unit TRAY1 MP TRAY TRAY2, TRAY3, TRAY4 DX MX The definition of paper can I use? Plain paper Bond paper Thick paper Thicker ...

Users Manual - English
Page 48
... For more information, see Chapter 3. 1 Open the multi-purpose tray and lower it may cause paper jams or misfeeds. ■ Do not print envelopes using duplex printing. ■ For proper printing, you must 'fan' the stack to change the paper size. Figure 1-18 ■ Do not load different types of paper...
... For more information, see Chapter 3. 1 Open the multi-purpose tray and lower it may cause paper jams or misfeeds. ■ Do not print envelopes using duplex printing. ■ For proper printing, you must 'fan' the stack to change the paper size. Figure 1-18 ■ Do not load different types of paper...
Users Manual - English
Page 63
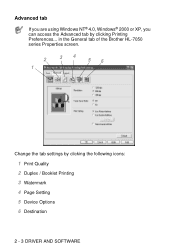
in the General tab of the Brother HL-7050 series Properties screen. 2 1 34 56 Change the tab settings by clicking Printing Preferences... Advanced tab If you are using Windows NT® 4.0, Windows® 2000 or XP, you can access the Advanced tab by clicking the following icons: 1 Print Quality 2 Duplex / Booklet Printing 3 Watermark 4 Page Setting 5 Device Options 6 Destination 2 - 3 DRIVER AND SOFTWARE
in the General tab of the Brother HL-7050 series Properties screen. 2 1 34 56 Change the tab settings by clicking Printing Preferences... Advanced tab If you are using Windows NT® 4.0, Windows® 2000 or XP, you can access the Advanced tab by clicking the following icons: 1 Print Quality 2 Duplex / Booklet Printing 3 Watermark 4 Page Setting 5 Device Options 6 Destination 2 - 3 DRIVER AND SOFTWARE

Users Manual - English
Page 64
... Setting set to install the optional Duplex unit onto your printer. If you select the Duplex icon, the dialog box for duplex settings will appear so you can select from 2 types of duplex print options available. DRIVER AND SOFTWARE 2 - 4 If you click the Duplex icon, the dialog box for duplex settings will appear. There are six...
... Setting set to install the optional Duplex unit onto your printer. If you select the Duplex icon, the dialog box for duplex settings will appear so you can select from 2 types of duplex print options available. DRIVER AND SOFTWARE 2 - 4 If you click the Duplex icon, the dialog box for duplex settings will appear. There are six...
Users Manual - English
Page 67
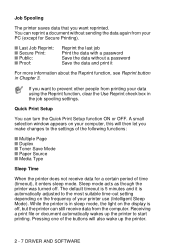
... will also wake up the printer to the most suitable time-out setting depending on the frequency of the following functions: ■ Multiple Page ■ Duplex ■ Toner Save Mode ■ Paper Source ■ Media Type Sleep Time When the printer does not receive data for Secure Printing). ■ Last Job...
... will also wake up the printer to the most suitable time-out setting depending on the frequency of the following functions: ■ Multiple Page ■ Duplex ■ Toner Save Mode ■ Paper Source ■ Media Type Sleep Time When the printer does not receive data for Secure Printing). ■ Last Job...

Users Manual - English
Page 106
... 3-32. ■ RESET MENU For more information, see page 3-33. Paper tray TRAY 1 Multi-purpose tray MP TRAY Optional lower tray TRAY 2, TRAY 3, TRAY 4 Optional Duplex unit for the paper trays are eight menus. CONTROL PANEL 3 - 22 Control Panel LCD menu The control panel LCD names for...
... 3-32. ■ RESET MENU For more information, see page 3-33. Paper tray TRAY 1 Multi-purpose tray MP TRAY Optional lower tray TRAY 2, TRAY 3, TRAY 4 Optional Duplex unit for the paper trays are eight menus. CONTROL PANEL 3 - 22 Control Panel LCD menu The control panel LCD names for...

Users Manual - English
Page 108
PAPER Display Shows SOURCE PRIORITY MP FIRST MP SIZE MANUAL FEED DUPLEX OUTPUT Description =AUTO/MP/TRAY 1/TRAY 2/TRAY 3/TRAY 4 Select which paper tray the paper will be fed from the MP tray as a priority. =ANY/LETTER/...
PAPER Display Shows SOURCE PRIORITY MP FIRST MP SIZE MANUAL FEED DUPLEX OUTPUT Description =AUTO/MP/TRAY 1/TRAY 2/TRAY 3/TRAY 4 Select which paper tray the paper will be fed from the MP tray as a priority. =ANY/LETTER/...

Users Manual - English
Page 122
... print server to reset the network settings using the control panel. Display Shows PAPER QUALITY SETUP Submenu SOURCE PRIORITY MP FIRST MP SIZE MANUAL FEED DUPLEX OUTPUT RESOLUTION HRC TONER SAVE DENSITY LANGUAGE PANEL CONTROL POWER SAVE TIME Factory setting =AUTO =MP>T1>T2>T3>T4 =OFF =ANY/A4/LETTER =OFF...
... print server to reset the network settings using the control panel. Display Shows PAPER QUALITY SETUP Submenu SOURCE PRIORITY MP FIRST MP SIZE MANUAL FEED DUPLEX OUTPUT RESOLUTION HRC TONER SAVE DENSITY LANGUAGE PANEL CONTROL POWER SAVE TIME Factory setting =AUTO =MP>T1>T2>T3>T4 =OFF =ANY/A4/LETTER =OFF...

Users Manual - English
Page 128
You can increase the capabilities of the printer with these items. Options Lower tray unit (Three paper trays) LT-7000 Duplex unit DX-7000 Mailbox unit MX-7000 series Network board (For HL-7050 only) NC-4100h see 4-3 see 4-4 see 4-6 CompactFlash card DIMM memory HDD HD-EX see 4-8 Ir-DA interface IR-1000 see 4-11 see 4-13 see 4-17 see 4-21 Optional font package BS-3000 Optional Barcode Font BT-1000 Optional stabilizer SB-4000 see 4-22 see 4-22 4 - 1 OPTIONS see 4-2 4 Options 4 Optional accessories and supplies This printer has the following optional accessories.
You can increase the capabilities of the printer with these items. Options Lower tray unit (Three paper trays) LT-7000 Duplex unit DX-7000 Mailbox unit MX-7000 series Network board (For HL-7050 only) NC-4100h see 4-3 see 4-4 see 4-6 CompactFlash card DIMM memory HDD HD-EX see 4-8 Ir-DA interface IR-1000 see 4-11 see 4-13 see 4-17 see 4-21 Optional font package BS-3000 Optional Barcode Font BT-1000 Optional stabilizer SB-4000 see 4-22 see 4-22 4 - 1 OPTIONS see 4-2 4 Options 4 Optional accessories and supplies This printer has the following optional accessories.

Users Manual - English
Page 131
... or simplex printing on both sides of paper. When it is installed, you to print on the control panel or with the Duplex unit. To install the duplex unit, please see PAPER menu in the paper tray. ■ If the paper is an optional device that we have supplied with a software... command. Remove the paper and straighten it. 4 - 4 OPTIONS Duplex unit (DX-7000) The Duplex unit is not feeding correctly, it may wrinkle. ■ If paper is curled, straighten it, and then place it in Chapter 3.
... or simplex printing on both sides of paper. When it is installed, you to print on the control panel or with the Duplex unit. To install the duplex unit, please see PAPER menu in the paper tray. ■ If the paper is an optional device that we have supplied with a software... command. Remove the paper and straighten it. 4 - 4 OPTIONS Duplex unit (DX-7000) The Duplex unit is not feeding correctly, it may wrinkle. ■ If paper is curled, straighten it, and then place it in Chapter 3.

Users Manual - English
Page 132
... onto 5 piece of paper, it will print page 4 then page 3 on both sides of the paper The printer prints the second page first. When doing duplex printing, the paper must be printed on first, facedown, with the heading facedown, and the furthest away from the printer. OPTIONS 4 - 5 It will print page...
... onto 5 piece of paper, it will print page 4 then page 3 on both sides of the paper The printer prints the second page first. When doing duplex printing, the paper must be printed on first, facedown, with the heading facedown, and the furthest away from the printer. OPTIONS 4 - 5 It will print page...
Users Manual - English
Page 169
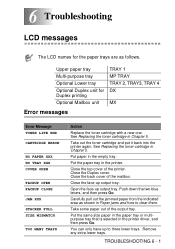
.... Close the back cover of the output tray. Put the paper tray in Chapter 5. Upper paper tray Multi-purpose tray Optional Lower tray Optional Duplex unit for the paper trays are as shown in the printer driver, and then press Go. Take out the toner cartridge and put it back...to three lower trays. Take some paper out of the mailbox. Close the top cover of the printer. 6 Troubleshooting 6 LCD messages The LCD names for Duplex printing Optional Mailbox unit TRAY 1 MP TRAY TRAY 2, TRAY3, TRAY 4 DX MX Error messages Error Message TONER LIFE END CARTRIDGE ERROR NO PAPER XXX NO...
.... Close the back cover of the output tray. Put the paper tray in Chapter 5. Upper paper tray Multi-purpose tray Optional Lower tray Optional Duplex unit for the paper trays are as shown in the printer driver, and then press Go. Take out the toner cartridge and put it back...to three lower trays. Take some paper out of the mailbox. Close the top cover of the printer. 6 Troubleshooting 6 LCD messages The LCD names for Duplex printing Optional Mailbox unit TRAY 1 MP TRAY TRAY 2, TRAY3, TRAY 4 DX MX Error messages Error Message TONER LIFE END CARTRIDGE ERROR NO PAPER XXX NO...
Users Manual - English
Page 170
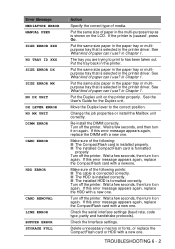
...points: ■ The cable is connected correctly. ■ The HDD is installed correctly. ■ The installed HDD is formatted correctly. Put the Duplex unit on again. Put the same size paper in the printer driver. Put the tray back in Chapter 1. If this error message appears again, ... new one . See What kind of paper can I use ? Wait a few seconds, then turn it on the printer properly. TROUBLESHOOTING 6 - 2 Move the Duplex lever to has been taken out. If the printer is selected in the paper tray or multipurpose tray that is selected in the multi-purpose...
...points: ■ The cable is connected correctly. ■ The HDD is installed correctly. ■ The installed HDD is formatted correctly. Put the Duplex unit on again. Put the same size paper in the printer driver. Put the tray back in Chapter 1. If this error message appears again, ... new one . See What kind of paper can I use ? Wait a few seconds, then turn it on the printer properly. TROUBLESHOOTING 6 - 2 Move the Duplex lever to has been taken out. If the printer is selected in the paper tray or multipurpose tray that is selected in the multi-purpose...
Users Manual - English
Page 171
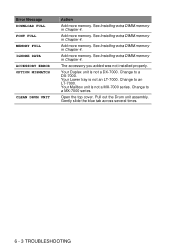
... Installing extra DIMM memory in Chapter 4. Change to a DX-7000. Pull out the Drum unit assembly. The accessory you added was not installed properly. Your Duplex unit is not an LT-7000. Add more memory. Your Lower tray is not a DX-7000. Your Mailbox unit is not a MX-7000 series. See...
... Installing extra DIMM memory in Chapter 4. Change to a DX-7000. Pull out the Drum unit assembly. The accessory you added was not installed properly. Your Duplex unit is not an LT-7000. Add more memory. Your Lower tray is not a DX-7000. Your Mailbox unit is not a MX-7000 series. See...

Users Manual - English
Page 176
... If paper jams inside the printer Paper jam where the paper comes out Paper jam in the face-up output tray Paper jam in the Duplex unit Paper jam in the lower tray (TRAY 4) Paper jam inside the printer, the printer will stop.
... If paper jams inside the printer Paper jam where the paper comes out Paper jam in the face-up output tray Paper jam in the Duplex unit Paper jam in the lower tray (TRAY 4) Paper jam inside the printer, the printer will stop.

