Users Manual - English
Page 8
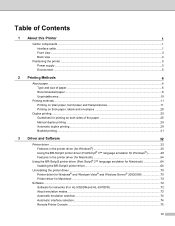
......3 Back view ...4 Positioning the printer ...5 Power supply ...5 Environment ...5 2 Printing Methods 6 About paper ...6 Type and size of paper ...6 Recommended paper ...8 Unprintable area ...10 Printing methods...11 Printing on plain paper, bond paper and transparencies 11 Printing on thick paper, labels and envelopes 20 Duplex ...Script3 printer driver 64 Uninstalling the printer driver ...70 Printer driver for Windows® and Windows Vista® and Windows Server® 2003/2008 70 Printer driver for Macintosh ...70 Software ...72 Software for networks (For HL-5350DN and HL-5370DW ...
......3 Back view ...4 Positioning the printer ...5 Power supply ...5 Environment ...5 2 Printing Methods 6 About paper ...6 Type and size of paper ...6 Recommended paper ...8 Unprintable area ...10 Printing methods...11 Printing on plain paper, bond paper and transparencies 11 Printing on thick paper, labels and envelopes 20 Duplex ...Script3 printer driver 64 Uninstalling the printer driver ...70 Printer driver for Windows® and Windows Vista® and Windows Server® 2003/2008 70 Printer driver for Macintosh ...70 Software ...72 Software for networks (For HL-5350DN and HL-5370DW ...
Users Manual - English
Page 9
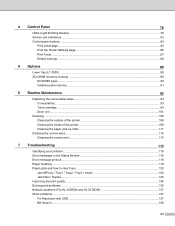
......93 Consumables...93 Toner cartridge ...94 Drum unit ...101 Cleaning ...106 Cleaning the outside of the printer 106 Cleaning the inside of the printer...108 Cleaning the paper pick-up roller...111 Cleaning the corona wires ...113 Cleaning the corona wire...113 7 Troubleshooting 115 Identifying...Error message printout ...118 Paper handling ...119 Paper jams and how to clear them ...120 Jam MP tray / Tray1 / Tray2 / Tray3 / Inside 120 Jam Rear / Duplex...125 Improving the print quality...129 Solving print problems ...136 Network problems (For HL-5350DN and HL-5370DW 137 Other problems ......
......93 Consumables...93 Toner cartridge ...94 Drum unit ...101 Cleaning ...106 Cleaning the outside of the printer 106 Cleaning the inside of the printer...108 Cleaning the paper pick-up roller...111 Cleaning the corona wires ...113 Cleaning the corona wire...113 7 Troubleshooting 115 Identifying...Error message printout ...118 Paper handling ...119 Paper jams and how to clear them ...120 Jam MP tray / Tray1 / Tray2 / Tray3 / Inside 120 Jam Rear / Duplex...125 Improving the print quality...129 Solving print problems ...136 Network problems (For HL-5350DN and HL-5370DW 137 Other problems ......
Users Manual - English
Page 54
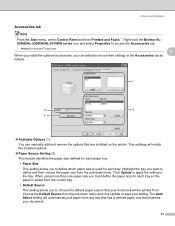
... your document. 44 Right-click the Brother HL5340D/HL-5350DN/HL-5370DW series icon and select Properties to choose the default paper source that your setting. Choose the Default Source from the pull-down menu. Driver and Software Accessories tab 3 Note From the Start menu, select Control Panel and then Printers and Faxes 1. Tray settings will...
... your document. 44 Right-click the Brother HL5340D/HL-5350DN/HL-5370DW series icon and select Properties to choose the default paper source that your setting. Choose the Default Source from the pull-down menu. Driver and Software Accessories tab 3 Note From the Start menu, select Control Panel and then Printers and Faxes 1. Tray settings will...
Users Manual - English
Page 59
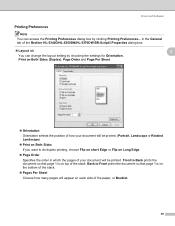
in the General tab of the Brother HL-5340D/HL-5350DN/HL-5370DW BR-Script3 Properties dialog box. „ Layout tab 3 You can access the Printing Preferences dialog box by choosing the settings for Orientation, Print on Both ... of your document will appear on each side of the stack. Front to Back prints the document so that page 1 is on top of the paper, or Booklet. 49 Back to Front prints the document so that page 1 is on the bottom of the stack. „ Pages Per Sheet Choose how...
in the General tab of the Brother HL-5340D/HL-5350DN/HL-5370DW BR-Script3 Properties dialog box. „ Layout tab 3 You can access the Printing Preferences dialog box by choosing the settings for Orientation, Print on Both ... of your document will appear on each side of the stack. Front to Back prints the document so that page 1 is on top of the paper, or Booklet. 49 Back to Front prints the document so that page 1 is on the bottom of the stack. „ Pages Per Sheet Choose how...

Users Manual - English
Page 149
AppendixA A Appendix A Printer specifications 0 Engine 0 Model HL-5340D HL-5350DN HL-5370DW Technology Electrophotographic Print speed 1 2 Standard (A4/Letter) (A4 size/ Letter Auto Duplex (A4/Letter) size) Up to 30 ppm (A4 size) 3, Up to 32 ppm (... dpi 300 dpi 1 The printing speed may change depending on the type of document you print. 2 Print speed may be slower when the printer is connected by wireless LAN. 3 From standard paper tray. 4 If you use the high quality 1200 dpi setting (1200 x 1200 dpi) the print speed will be slower. 139
AppendixA A Appendix A Printer specifications 0 Engine 0 Model HL-5340D HL-5350DN HL-5370DW Technology Electrophotographic Print speed 1 2 Standard (A4/Letter) (A4 size/ Letter Auto Duplex (A4/Letter) size) Up to 30 ppm (A4 size) 3, Up to 32 ppm (... dpi 300 dpi 1 The printing speed may change depending on the type of document you print. 2 Print speed may be slower when the printer is connected by wireless LAN. 3 From standard paper tray. 4 If you use the high quality 1200 dpi setting (1200 x 1200 dpi) the print speed will be slower. 139

Users Manual - English
Page 151
...://solutions.brother.com/. A 3 Depending on Linux distributions, the driver may not be available. 4 The Driver Deployment Wizard automates the installation of printers in a peer-to-peer network (Windows® only). Control panel 0 Model LED Button HL-5340D HL-5350DN 5 LEDs: Back Cover, Toner, Drum, Paper and Status 2 buttons: Job Cancel and Go HL-5370DW Paper handling 0 Paper Input 1 Paper Output...
...://solutions.brother.com/. A 3 Depending on Linux distributions, the driver may not be available. 4 The Driver Deployment Wizard automates the installation of printers in a peer-to-peer network (Windows® only). Control panel 0 Model LED Button HL-5340D HL-5350DN 5 LEDs: Back Cover, Toner, Drum, Paper and Status 2 buttons: Job Cancel and Go HL-5370DW Paper handling 0 Paper Input 1 Paper Output...
Users Manual - English
Page 152
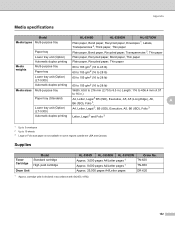
... No. Appendix Media specifications 0 Model HL-5340D HL-5350DN HL-5370DW Media types Multi-purpose tray Plain paper, Bond paper, Recycled paper, Envelopes 1, Labels, Transparencies 2, Thick paper, Thin paper Paper tray Plain paper, Bond paper, Recycled paper, Transparencies 2, Thin paper Lower tray unit (Option) Plain paper, Recycled paper, Bond paper, Thin paper Automatic duplex printing Plain paper, Recycled paper, Thin paper Media weights Multi-purpose tray Paper tray 60 to 163 g/m2...
... No. Appendix Media specifications 0 Model HL-5340D HL-5350DN HL-5370DW Media types Multi-purpose tray Plain paper, Bond paper, Recycled paper, Envelopes 1, Labels, Transparencies 2, Thick paper, Thin paper Paper tray Plain paper, Bond paper, Recycled paper, Transparencies 2, Thin paper Lower tray unit (Option) Plain paper, Recycled paper, Bond paper, Thin paper Automatic duplex printing Plain paper, Recycled paper, Thin paper Media weights Multi-purpose tray Paper tray 60 to 163 g/m2...
Network Users Manual - English
Page 54
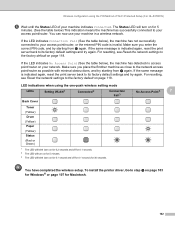
...from j again. For resetting, see Reset the network settings to your machine indicates Connected. LED indications when using the Brother automatic installer application (For HL-5370DW) m Wait until the Status LED of your access point/router. If the LED indicates No Access Point (See the... has successfully connected to the factory default on your network that only one -push wireless setting mode LEDs Back Cover Toner (Yellow) Drum (Yellow) Paper (Yellow) Status (Red / Green) Setting WLAN 1 Connecting SES/WPS/ Connected 2 AOSS 1 Connection Fail 3 No Access Point 3 1 The ...
...from j again. For resetting, see Reset the network settings to your machine indicates Connected. LED indications when using the Brother automatic installer application (For HL-5370DW) m Wait until the Status LED of your access point/router. If the LED indicates No Access Point (See the... has successfully connected to the factory default on your network that only one -push wireless setting mode LEDs Back Cover Toner (Yellow) Drum (Yellow) Paper (Yellow) Status (Red / Green) Setting WLAN 1 Connecting SES/WPS/ Connected 2 AOSS 1 Connection Fail 3 No Access Point 3 1 The ...

Network Users Manual - English
Page 85
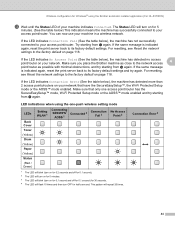
Try starting from j again. Make sure you place the Brother machine as close to the network access point/router as possible with minimal obstructions, and try again. If the same message is indicated again, reset ... has successfully connected to your access point/router. LED indications when using the Brother installer application (For HL-5370DW) m Wait until the Status LED of your network that only one -push wireless setting mode LEDs Back Cover Toner (Yellow) Drum (Yellow) Paper (Yellow) Status (Red / Green) Setting WLAN 1 Connecting SES/WPS/ Connected 2 AOSS 1 Connection...
Try starting from j again. Make sure you place the Brother machine as close to the network access point/router as possible with minimal obstructions, and try again. If the same message is indicated again, reset ... has successfully connected to your access point/router. LED indications when using the Brother installer application (For HL-5370DW) m Wait until the Status LED of your network that only one -push wireless setting mode LEDs Back Cover Toner (Yellow) Drum (Yellow) Paper (Yellow) Status (Red / Green) Setting WLAN 1 Connecting SES/WPS/ Connected 2 AOSS 1 Connection...

Network Users Manual - English
Page 102
... on page 118. LED indications when using the one-push wireless setting mode (For HL-5370DW) f Wait until the Status LED of your machine indicates Connected. Wireless configuration using ...the one-push wireless setting mode LEDs Back Cover Toner (Yellow) Drum (Yellow) Paper (Yellow) Status (Red / Green) Setting WLAN 1 Connecting Connected 2 SES/WPS/ AOSS 1 Connection Fail... from c again. Make sure you place the Brother machine as possible with minimal obstructions, and try again. To install the printer driver, Go to its factory default settings and ...
... on page 118. LED indications when using the one-push wireless setting mode (For HL-5370DW) f Wait until the Status LED of your machine indicates Connected. Wireless configuration using ...the one-push wireless setting mode LEDs Back Cover Toner (Yellow) Drum (Yellow) Paper (Yellow) Status (Red / Green) Setting WLAN 1 Connecting Connected 2 SES/WPS/ AOSS 1 Connection Fail... from c again. Make sure you place the Brother machine as possible with minimal obstructions, and try again. To install the printer driver, Go to its factory default settings and ...
Network Users Manual - English
Page 111
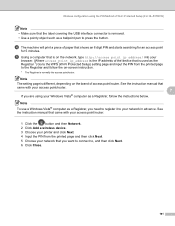
...See the instruction manual that came with your access point/router. 1 Click the button and then Network. 2 Click Add a wireless device. 3 Choose your printer and click Next. 4 Input the PIN from the printed page to , and then click Next. 6 Click Close. 101 Note The setting page is different... ballpoint pen to your network in advance. d The machine will print a piece of paper that came with your access point/router. 7 If you are using the PIN Method of Wi-Fi Protected Setup (For HL-5370DW) Note • Make sure that the label covering the USB interface connector is normally ...
...See the instruction manual that came with your access point/router. 1 Click the button and then Network. 2 Click Add a wireless device. 3 Choose your printer and click Next. 4 Input the PIN from the printed page to , and then click Next. 6 Click Close. 101 Note The setting page is different... ballpoint pen to your network in advance. d The machine will print a piece of paper that came with your access point/router. 7 If you are using the PIN Method of Wi-Fi Protected Setup (For HL-5370DW) Note • Make sure that the label covering the USB interface connector is normally ...
Network Users Manual - English
Page 112
...WLAN 1 Connected 2 Connection Fail 3 Back Cover Toner (Yellow) Drum (Yellow) Paper (Yellow) Status (Red or Green) 1 The LED will blink (turn on ...and off for 0.1 second) for Macintosh. 102 Make sure you place the Brother machine as close to your machine in a wireless network. If the LED ...indications when using the PIN Method of Wi-Fi Protected Setup (For HL-5370DW) f Wait until the Status LED of your machine indicates Connected. Make... Reset the network settings to step a on page 118. To install the printer driver, Go to the factory default on page 103 for Windows® or...
...WLAN 1 Connected 2 Connection Fail 3 Back Cover Toner (Yellow) Drum (Yellow) Paper (Yellow) Status (Red or Green) 1 The LED will blink (turn on ...and off for 0.1 second) for Macintosh. 102 Make sure you place the Brother machine as close to your machine in a wireless network. If the LED ...indications when using the PIN Method of Wi-Fi Protected Setup (For HL-5370DW) f Wait until the Status LED of your machine indicates Connected. Make... Reset the network settings to step a on page 118. To install the printer driver, Go to the factory default on page 103 for Windows® or...
Network Users Manual - English
Page 120
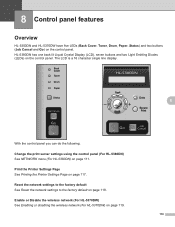
...on page 119. 110 Enable or Disable the wireless network (For HL-5370DW) See Enabling or disabling the wireless network (For HL-5370DW) on page 118. Print the Printer Settings Page See Printing the Printer Settings Page on page 111. The LCD is a 16 character ...HL-5380DN) See NETWORK menu (For HL-5380DN) on page 117. HL-5380DN has one back lit Liquid Crystal Display (LCD), seven buttons and two Light Emitting Diodes (LEDs) on the control panel. Control panel features8 8 Control panel features 8 Overview 8 HL-5350DN and HL-5370DW have five LEDs (Back Cover, Toner, Drum, Paper...
...on page 119. 110 Enable or Disable the wireless network (For HL-5370DW) See Enabling or disabling the wireless network (For HL-5370DW) on page 118. Print the Printer Settings Page See Printing the Printer Settings Page on page 111. The LCD is a 16 character ...HL-5380DN) See NETWORK menu (For HL-5380DN) on page 117. HL-5380DN has one back lit Liquid Crystal Display (LCD), seven buttons and two Light Emitting Diodes (LEDs) on the control panel. Control panel features8 8 Control panel features 8 Overview 8 HL-5350DN and HL-5370DW have five LEDs (Back Cover, Toner, Drum, Paper...
Quick Setup Guide - English
Page 1
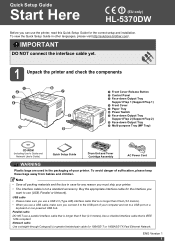
...(EU only) HL-5370DW Before you can use (USB, Parallel or Network). IMPORTANT DO NOT connect the interface cable yet. 1 Unpack the printer and check the components 11 2 3 4 5 8 7 6 9 a Front Cover Release Button b Control Panel c Face-down Output Tray Support Flap 1 (Support Flap 1) d Front Cover e Paper Tray f Power... used in other languages, please visit http://solutions.brother.com/. USB cable • Please make sure you connect it to the USB port of your printer. Buy the appropriate interface cable for any reason you must ship your printer. • The interface cable is no longer...
...(EU only) HL-5370DW Before you can use (USB, Parallel or Network). IMPORTANT DO NOT connect the interface cable yet. 1 Unpack the printer and check the components 11 2 3 4 5 8 7 6 9 a Front Cover Release Button b Control Panel c Face-down Output Tray Support Flap 1 (Support Flap 1) d Front Cover e Paper Tray f Power... used in other languages, please visit http://solutions.brother.com/. USB cable • Please make sure you connect it to the USB port of your printer. Buy the appropriate interface cable for any reason you must ship your printer. • The interface cable is no longer...


