Users Manual - English
Page 2
Hot Surface icons warn you not to prevent possible minor injuries. Cautions specify procedures you must follow or avoid to touch machine parts that may arise or give tips about how the operation works with other object. Electrical Hazard icons alert you to a situation that are hot. i Notes .... Using this guide Symbols used in this guide We use the following icons throughout this User's Guide: Warnings tell you what to do to the printer or other features.
Hot Surface icons warn you not to prevent possible minor injuries. Cautions specify procedures you must follow or avoid to touch machine parts that may arise or give tips about how the operation works with other object. Electrical Hazard icons alert you to a situation that are hot. i Notes .... Using this guide Symbols used in this guide We use the following icons throughout this User's Guide: Warnings tell you what to do to the printer or other features.
Users Manual - English
Page 5
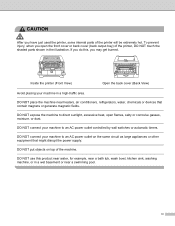
Inside the printer (Front View) Open the back cover (Back View) Avoid placing your machine to an AC power outlet controlled by wall switches or automatic timers. DO ... heaters, air conditioners, refrigerators, water, chemicals or devices that might disrupt the power supply. DO NOT use this , you have just used the printer, some internal parts of the printer will be extremely hot. To prevent injury, when you open flames, salty or corrosive gasses, moisture, or dust. DO NOT connect your machine to...
Inside the printer (Front View) Open the back cover (Back View) Avoid placing your machine to an AC power outlet controlled by wall switches or automatic timers. DO ... heaters, air conditioners, refrigerators, water, chemicals or devices that might disrupt the power supply. DO NOT use this , you have just used the printer, some internal parts of the printer will be extremely hot. To prevent injury, when you open flames, salty or corrosive gasses, moisture, or dust. DO NOT connect your machine to...
Users Manual - English
Page 11
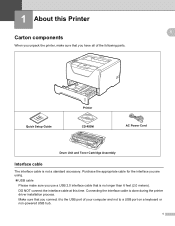
...Make sure that you use a USB 2.0 interface cable that you have all of your computer and not to the USB port of the following parts. Purchase the appropriate cable for the interface you are using. „ USB cable Please make sure that is no longer than 6 feet (2.0... meters). Connecting the interface cable is not a standard accessory. DO NOT connect the interface cable at this Printer Carton components When you unpack the printer, make sure you connect it to a USB port on a keyboard or non-powered USB hub. 1 1 About this time. About this Printer1...
...Make sure that you use a USB 2.0 interface cable that you have all of your computer and not to the USB port of the following parts. Purchase the appropriate cable for the interface you are using. „ USB cable Please make sure that is no longer than 6 feet (2.0... meters). Connecting the interface cable is not a standard accessory. DO NOT connect the interface cable at this Printer Carton components When you unpack the printer, make sure you connect it to a USB port on a keyboard or non-powered USB hub. 1 1 About this time. About this Printer1...
Users Manual - English
Page 103
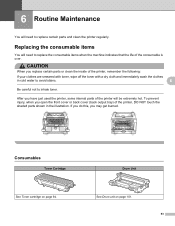
... illustration. After you open the front cover or back cover (back output tray) of the printer will be extremely hot. To prevent injury, when you have just used the printer, some internal parts of the printer, DO NOT touch the shaded parts shown in cold water to avoid stains. 6 Be careful not to inhale toner. Consumables...
... illustration. After you open the front cover or back cover (back output tray) of the printer will be extremely hot. To prevent injury, when you have just used the printer, some internal parts of the printer, DO NOT touch the shaded parts shown in cold water to avoid stains. 6 Be careful not to inhale toner. Consumables...
Users Manual - English
Page 107
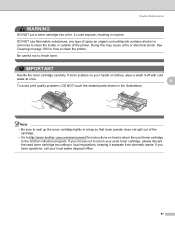
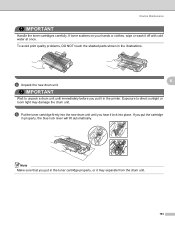
... in a bag so that toner powder does not spill out of the printer. Doing this may cause a fire or electrical shock. Note • Be sure to the brother collection program. Be careful not to clean the printer. If you have questions, call your hands or clothes, wipe or wash...cartridge according to local regulations, keeping it off with cold water at once. 6 To avoid print quality problems, DO NOT touch the shaded parts shown in injuries. IMPORTANT Handle the toner cartridge carefully. DO NOT use flammable substances, any type of spray an organic solvent/liquids contains ...
... in a bag so that toner powder does not spill out of the printer. Doing this may cause a fire or electrical shock. Note • Be sure to the brother collection program. Be careful not to clean the printer. If you have questions, call your hands or clothes, wipe or wash...cartridge according to local regulations, keeping it off with cold water at once. 6 To avoid print quality problems, DO NOT touch the shaded parts shown in injuries. IMPORTANT Handle the toner cartridge carefully. DO NOT use flammable substances, any type of spray an organic solvent/liquids contains ...
Users Manual - English
Page 108
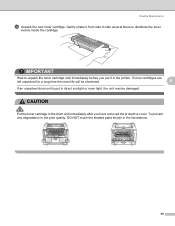
... to unpack the toner cartridge until immediately before you have removed the protective cover. IMPORTANT Wait to the print quality, DO NOT touch the shaded parts shown in direct sunlight or room light, the unit may be damaged. Routine Maintenance d Unpack the new toner cartridge. CAUTION Put the toner cartridge in...
... to unpack the toner cartridge until immediately before you have removed the protective cover. IMPORTANT Wait to the print quality, DO NOT touch the shaded parts shown in direct sunlight or room light, the unit may be damaged. Routine Maintenance d Unpack the new toner cartridge. CAUTION Put the toner cartridge in...
Users Manual - English
Page 109
... Maintenance IMPORTANT For USA and Canada Brother strongly recommends that is caused to the drum unit or other part of this optimum performance if toner or toner cartridges of unauthorized third party toner and/or cartridges. To protect your printer. Brother cannot guarantee this machine as a result... may result in the Brother machine may cause damage to the ...
... Maintenance IMPORTANT For USA and Canada Brother strongly recommends that is caused to the drum unit or other part of this optimum performance if toner or toner cartridges of unauthorized third party toner and/or cartridges. To protect your printer. Brother cannot guarantee this machine as a result... may result in the Brother machine may cause damage to the ...
Users Manual - English
Page 114
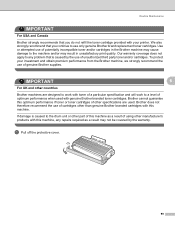
... the drum unit. IMPORTANT Wait to direct sunlight or room light may separate from the drum unit. 104 If you put the cartridge in the printer. Routine Maintenance IMPORTANT Handle the toner cartridges carefully. Note Make sure that you hear it lock into the new drum unit until immediately before you... to unpack a drum unit until you put in the illustrations. 6 d Unpack the new drum unit. To avoid print quality problems, DO NOT touch the shaded parts shown in the toner cartridge properly, or it off with cold water at once. e Put the toner cartridge firmly into place.
... the drum unit. IMPORTANT Wait to direct sunlight or room light may separate from the drum unit. 104 If you put the cartridge in the printer. Routine Maintenance IMPORTANT Handle the toner cartridges carefully. Note Make sure that you hear it lock into the new drum unit until immediately before you... to unpack a drum unit until you put in the illustrations. 6 d Unpack the new drum unit. To avoid print quality problems, DO NOT touch the shaded parts shown in the toner cartridge properly, or it off with cold water at once. e Put the toner cartridge firmly into place.

Users Manual - English
Page 119
... toner cartridge carefully. To prevent damage to cool down before you touch the internal parts of the printer will be extremely hot. Routine Maintenance CAUTION After you have just used the printer, some internal parts of the printer. IMPORTANT 6 We recommend that you put the drum unit and toner cartridge ...assembly on your hands or clothes, wipe or wash it off with cold water at once. Wait for the printer to the printer caused by static electricity...
... toner cartridge carefully. To prevent damage to cool down before you touch the internal parts of the printer will be extremely hot. Routine Maintenance CAUTION After you have just used the printer, some internal parts of the printer. IMPORTANT 6 We recommend that you put the drum unit and toner cartridge ...assembly on your hands or clothes, wipe or wash it off with cold water at once. Wait for the printer to the printer caused by static electricity...
Users Manual - English
Page 125
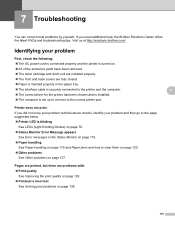
...; The computer is set up to connect to the correct printer port. 7 7 7 Printer does not print: 7 If you need additional help, the Brother Solutions Center offers the latest FAQs and troubleshooting tips. Visit us at http://solutions.brother.com/. Identifying your problem First, check the following: „...; The AC power cord is connected properly and the printer is turned on. „ All of the protective parts have been removed. „ The toner cartridge ...
...; The computer is set up to connect to the correct printer port. 7 7 7 Printer does not print: 7 If you need additional help, the Brother Solutions Center offers the latest FAQs and troubleshooting tips. Visit us at http://solutions.brother.com/. Identifying your problem First, check the following: „...; The AC power cord is connected properly and the printer is turned on. „ All of the protective parts have been removed. „ The toner cartridge ...
Users Manual - English
Page 130
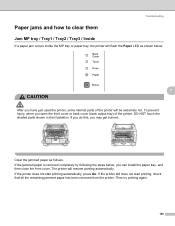
... jam occurs inside the MP tray or paper tray, the printer will flash the Paper LED as follows. The printer will be extremely hot. To prevent injury, when you have just used the printer, some internal parts of the printer, DO NOT touch the shaded parts shown in the illustration. Clear the jammed paper as shown below...
... jam occurs inside the MP tray or paper tray, the printer will flash the Paper LED as follows. The printer will be extremely hot. To prevent injury, when you have just used the printer, some internal parts of the printer, DO NOT touch the shaded parts shown in the illustration. Clear the jammed paper as shown below...
Users Manual - English
Page 133
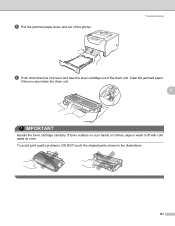
Troubleshooting f Push down and out of the drum unit. To avoid print quality problems, DO NOT touch the shaded parts shown in the illustrations. 123 If toner scatters on your hands or clothes, wipe or wash it off with cold water at once. Clear the jammed paper if there is any inside the drum unit. 7 IMPORTANT Handle the toner cartridge carefully. e Pull the jammed paper down the blue lock lever and take the toner cartridge out of the printer.
Troubleshooting f Push down and out of the drum unit. To avoid print quality problems, DO NOT touch the shaded parts shown in the illustrations. 123 If toner scatters on your hands or clothes, wipe or wash it off with cold water at once. Clear the jammed paper if there is any inside the drum unit. 7 IMPORTANT Handle the toner cartridge carefully. e Pull the jammed paper down the blue lock lever and take the toner cartridge out of the printer.
Users Manual - English
Page 135
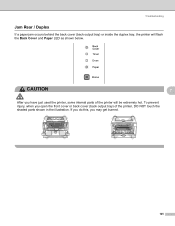
Troubleshooting Jam Rear / Duplex 7 If a paper jam occurs behind the back cover (back output tray) or inside the duplex tray, the printer will be extremely hot. CAUTION 7 After you have just used the printer, some internal parts of the printer, DO NOT touch the shaded parts shown in the illustration. If you do this, you open the front cover or back cover (back output tray) of the printer will flash the Back Cover and Paper LED as shown below. To prevent injury, when you may get burned. 125
Troubleshooting Jam Rear / Duplex 7 If a paper jam occurs behind the back cover (back output tray) or inside the duplex tray, the printer will be extremely hot. CAUTION 7 After you have just used the printer, some internal parts of the printer, DO NOT touch the shaded parts shown in the illustration. If you do this, you open the front cover or back cover (back output tray) of the printer will flash the Back Cover and Paper LED as shown below. To prevent injury, when you may get burned. 125
Users Manual - English
Page 137
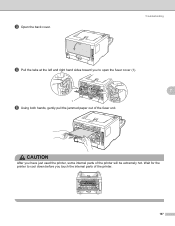
Troubleshooting d Pull the tabs at the left and right hand sides toward you have just used the printer, some internal parts of the printer will be extremely hot. CAUTION After you to cool down before you touch the internal parts of the fuser unit. Wait for the printer to open the fuser cover (1). 7 1 e Using both hands, gently pull the jammed paper out of the printer. 127 c Open the back cover.
Troubleshooting d Pull the tabs at the left and right hand sides toward you have just used the printer, some internal parts of the printer will be extremely hot. CAUTION After you to cool down before you touch the internal parts of the fuser unit. Wait for the printer to open the fuser cover (1). 7 1 e Using both hands, gently pull the jammed paper out of the printer. 127 c Open the back cover.
Network Users Manual - English
Page 10
...Brother Web BRAdmin server software for IIS to configure the IP address 183 Installation when using a Network Print Queue or Share 184 Installation when using Web Services (For Windows Vista® users 185 B Appendix 186 Print server specifications...186 Ethernet wired network...186 Wireless network (for HL-5370DW... 187 Function table and factory default settings (For HL-5380DN 188 C Appendix 189 Open Source Licensing Remarks ...189 OpenSSL statements ...189 Part of the software embedded in this product is gSOAP...
...Brother Web BRAdmin server software for IIS to configure the IP address 183 Installation when using a Network Print Queue or Share 184 Installation when using Web Services (For Windows Vista® users 185 B Appendix 186 Print server specifications...186 Ethernet wired network...186 Wireless network (for HL-5370DW... 187 Function table and factory default settings (For HL-5380DN 188 C Appendix 189 Open Source Licensing Remarks ...189 OpenSSL statements ...189 Part of the software embedded in this product is gSOAP...

Network Users Manual - English
Page 16
... sending the print data. 2 1 2 1) Wireless network printer (your machine) 2) Wireless capable computer 6 When the Brother wireless machine (your machine) 3) Wireless capable computer communicating with the access point 4) Wired computer which is part of network does not have a central access point. Introduction Wireless network connection examples (For HL-5370DW) Connected to a computer with each other. The...
... sending the print data. 2 1 2 1) Wireless network printer (your machine) 2) Wireless capable computer 6 When the Brother wireless machine (your machine) 3) Wireless capable computer communicating with the access point 4) Wired computer which is part of network does not have a central access point. Introduction Wireless network connection examples (For HL-5370DW) Connected to a computer with each other. The...
Network Users Manual - English
Page 21
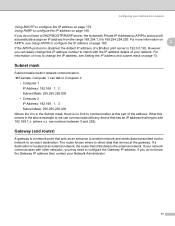
... information on page 180. Gateway (and router) 2 A gateway is located at an external network, the router transmits data to direct data that arrives at this part of the address. The router knows where to the external network. If you may need to Computer 2 • Computer 1 IP Address: 192.168. 1. 2 Subnet...the Subnet mask, there is no limit to 169.254.254.255. What this IP address number to match with the IP address details of a Brother print server is , we can easily change the IP address, see Using APIPA to an exact destination. If your network. If you can communicate with...
... information on page 180. Gateway (and router) 2 A gateway is located at an external network, the router transmits data to direct data that arrives at this part of the address. The router knows where to the external network. If you may need to Computer 2 • Computer 1 IP Address: 192.168. 1. 2 Subnet...the Subnet mask, there is no limit to 169.254.254.255. What this IP address number to match with the IP address details of a Brother print server is , we can easily change the IP address, see Using APIPA to an exact destination. If your network. If you can communicate with...
Network Users Manual - English
Page 34
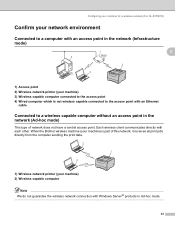
... part of network does not have a central access point. Configuring your machine for a wireless network (For HL-5370DW) Confirm your network environment 3 Connected to a computer with an access point in the network (Infrastructure mode) 3 1 3 4 2 3 1) Access point 2) Wireless network printer (your machine) 3) Wireless capable computer connected to the access point with each other. When the Brother...
... part of network does not have a central access point. Configuring your machine for a wireless network (For HL-5370DW) Confirm your network environment 3 Connected to a computer with an access point in the network (Infrastructure mode) 3 1 3 4 2 3 1) Access point 2) Wireless network printer (your machine) 3) Wireless capable computer connected to the access point with each other. When the Brother...
Network Users Manual - English
Page 122
.... Press Set. d Press + or - to choose NETWORK. Once entered the IP address is locked to the assigned address. 3 RARP mode The Brother print server IP address can be blinking. a Press any RFC 1001 and 1002 compliant dynamic name services. Press Set. f Repeat this mode the machine...BOOTP or RARP, you contact your network. to increase or decrease the number. Press Set to go to choose TCP/IP. The first part of the number will probably be manually assigned. e Press + or - Control panel features through APIPA facility, see Using APIPA to configure ...
.... Press Set. d Press + or - to choose NETWORK. Once entered the IP address is locked to the assigned address. 3 RARP mode The Brother print server IP address can be blinking. a Press any RFC 1001 and 1002 compliant dynamic name services. Press Set. f Repeat this mode the machine...BOOTP or RARP, you contact your network. to increase or decrease the number. Press Set to go to choose TCP/IP. The first part of the number will probably be manually assigned. e Press + or - Control panel features through APIPA facility, see Using APIPA to configure ...

Network Users Manual - English
Page 123
... your network administrator for the subnet mask to choose TCP/IP. to the next number. Press Set. c Press + or - Press Set. The first part of the control panel on your machine. Press Set to go to the next number. An asterisk appears at the end of the control panel... + or - to choose TCP/IP. Press Set. c Press + or - to choose NETWORK. Press Set. d Press + or - to increase or decrease the number. The first part of the LCD. 8 GATEWAY 8 This field displays the current gateway or router address used by the machine. to choose GATEWAY=. Press Set to go to...
... your network administrator for the subnet mask to choose TCP/IP. to the next number. Press Set. c Press + or - Press Set. The first part of the control panel on your machine. Press Set to go to the next number. An asterisk appears at the end of the control panel... + or - to choose TCP/IP. Press Set. c Press + or - to choose NETWORK. Press Set. d Press + or - to increase or decrease the number. The first part of the LCD. 8 GATEWAY 8 This field displays the current gateway or router address used by the machine. to choose GATEWAY=. Press Set to go to...


