Users Manual - English
Page 115
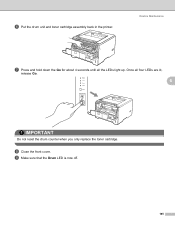
f Put the drum unit and toner cartridge assembly back in the printer. Routine Maintenance g Press and hold down the Go for about 4 seconds until all four LEDs are lit, release Go. 6 IMPORTANT Do not reset the drum counter when you only replace the toner cartridge. Once all the LEDs light up. h Close the front cover. i Make sure that the Drum LED is now off. 105
f Put the drum unit and toner cartridge assembly back in the printer. Routine Maintenance g Press and hold down the Go for about 4 seconds until all four LEDs are lit, release Go. 6 IMPORTANT Do not reset the drum counter when you only replace the toner cartridge. Once all the LEDs light up. h Close the front cover. i Make sure that the Drum LED is now off. 105
Network Users Manual - English
Page 120
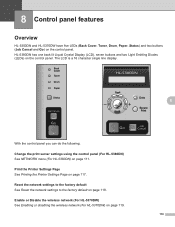
...See Reset the network settings to the factory default on page 119. 110 HL-5380DN has one back lit Liquid Crystal Display (LCD), seven buttons and two Light Emitting Diodes (LEDs) on the control panel. Control panel features8 8 Control panel features 8 Overview 8 HL-5350DN and HL-5370DW have five LEDs (Back Cover, Toner,...line display. 8 With the control panel you can do the following: Change the print server settings using the control panel (For HL-5380DN) See NETWORK menu (For HL-5380DN) on page 117. Print the Printer Settings Page See Printing the Printer Settings Page on page 111.
...See Reset the network settings to the factory default on page 119. 110 HL-5380DN has one back lit Liquid Crystal Display (LCD), seven buttons and two Light Emitting Diodes (LEDs) on the control panel. Control panel features8 8 Control panel features 8 Overview 8 HL-5350DN and HL-5370DW have five LEDs (Back Cover, Toner,...line display. 8 With the control panel you can do the following: Change the print server settings using the control panel (For HL-5380DN) See NETWORK menu (For HL-5380DN) on page 117. Print the Printer Settings Page See Printing the Printer Settings Page on page 111.


