
Users Manual - English
Page 59
... Now Initializing PAUSE PRESS SET TO PRINT PRINTING PROCESSING RAM SIZE=XX MB READY RESET TO FACTORY SETTINGS RESET TO USER SETTINGS RESOLUTION ADAPT SELF TEST SLEEP WARMING UP COOLING DOWN Meaning Printer is warming up . The printer settings return to start the printer again. Ready to print. Cancelling the job. Busy processing data. The...
... Now Initializing PAUSE PRESS SET TO PRINT PRINTING PROCESSING RAM SIZE=XX MB READY RESET TO FACTORY SETTINGS RESET TO USER SETTINGS RESOLUTION ADAPT SELF TEST SLEEP WARMING UP COOLING DOWN Meaning Printer is warming up . The printer settings return to start the printer again. Ready to print. Cancelling the job. Busy processing data. The...
Users Manual - English
Page 60
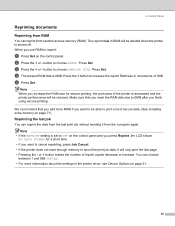
... a short time. • If you want to cancel reprinting, press Job Cancel. • If the printer does not have enough memory to be reduced. button to choose SETUP. Press Set. e Press Set. We recommend that you reset the RAM disk size to 0MB after you use RAM to increase the reprint RAM... page. • Pressing the - Note • If the REPRINT setting is turned off. button to choose RAMDISK SIZE. or + button makes the number of the printer is 0MB. Press Set. c Press the + or - Press the + button to reprint: a Press Set on page 31. 52 The reprint data in the...
... a short time. • If you want to cancel reprinting, press Job Cancel. • If the printer does not have enough memory to be reduced. button to choose SETUP. Press Set. e Press Set. We recommend that you reset the RAM disk size to 0MB after you use RAM to increase the reprint RAM... page. • Pressing the - Note • If the REPRINT setting is turned off. button to choose RAMDISK SIZE. or + button makes the number of the printer is 0MB. Press Set. c Press the + or - Press the + button to reprint: a Press Set on page 31. 52 The reprint data in the...
Users Manual - English
Page 71
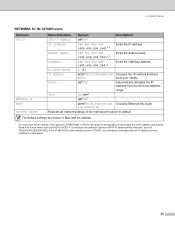
... IP METHOD AUTO*/STATIC/RARP/BOOTP Chooses the IP method that best /DHCP suits your needs. Control Panel NETWORK for HL-5270DN users Submenu TCP/IP NETBIOS/IP ENET FACTORY RESET Menu Selections Options Descriptions TCP/IP ENABLE ON*/OFF IP ADDRESS= 000.000.000.000)* 1 Enter the IP address.... If a boot server cannot be allocated, such as DHCP or BOOTP. SUBNET MASK= 000.000.000.000)* 1 Enter the Subnet mask. If the 'IP METHOD' of the internal...
... IP METHOD AUTO*/STATIC/RARP/BOOTP Chooses the IP method that best /DHCP suits your needs. Control Panel NETWORK for HL-5270DN users Submenu TCP/IP NETBIOS/IP ENET FACTORY RESET Menu Selections Options Descriptions TCP/IP ENABLE ON*/OFF IP ADDRESS= 000.000.000.000)* 1 Enter the IP address.... If a boot server cannot be allocated, such as DHCP or BOOTP. SUBNET MASK= 000.000.000.000)* 1 Enter the Subnet mask. If the 'IP METHOD' of the internal...

Users Manual - English
Page 73
... the input type of WEP key1. If the 'IP METHOD' of available names for HL-5280DW users (Continued) Submenu 1 Submenu 2 Menu Selections Options Descriptions WLAN WIRELESS COMM.MODE (Continued...13 digits and characters 0-9, a-z and A-Z in ASCII values, or uses a maximum of the internal print server to default. DEFAULT Restores all network settings of 10 or 26 digits and characters 0-9 ...]) CHANNEL 1........11*..14 Chooses the channel you use . NETBIOS/IP ON*/OFF FACTORY RESET SET Restores wireless network settings of 32 digits and characters 0-9, a-z and A-Z in HEX...
... the input type of WEP key1. If the 'IP METHOD' of available names for HL-5280DW users (Continued) Submenu 1 Submenu 2 Menu Selections Options Descriptions WLAN WIRELESS COMM.MODE (Continued...13 digits and characters 0-9, a-z and A-Z in ASCII values, or uses a maximum of the internal print server to default. DEFAULT Restores all network settings of 10 or 26 digits and characters 0-9 ...]) CHANNEL 1........11*..14 Chooses the channel you use . NETBIOS/IP ON*/OFF FACTORY RESET SET Restores wireless network settings of 32 digits and characters 0-9, a-z and A-Z in HEX...

Users Manual - English
Page 74
... (including command settings) to settings you have previously made with an asterisk. ON*/OFF Turns bi-directional parallel communications ON or OFF. Resets the printer and restores all printer settings (including command settings) to the default settings. 66 ON*/OFF Turns High-Speed USB 2.0 communications ON or OFF. The default settings are shown...
... (including command settings) to settings you have previously made with an asterisk. ON*/OFF Turns bi-directional parallel communications ON or OFF. Resets the printer and restores all printer settings (including command settings) to the default settings. 66 ON*/OFF Turns High-Speed USB 2.0 communications ON or OFF. The default settings are shown...

Users Manual - English
Page 76
...mode affects the setting. • The following settings cannot be restored to the default setting when the printer is always restored to the default settings with FACTORY RESET in the RESET MENU: INTERFACE, PAGE PROTECTION, SCALABLE FONT, LOCK PANEL, page counter and local language for display messages....; The COPY setting is turned off and on again. NETWORK b Press the + or - Press Set. FACTORY RESET c Press Set again. Control Panel Default Settings Printer default setting The printer settings have been set at the factory before shipment. Network default setting If you want to...
...mode affects the setting. • The following settings cannot be restored to the default setting when the printer is always restored to the default settings with FACTORY RESET in the RESET MENU: INTERFACE, PAGE PROTECTION, SCALABLE FONT, LOCK PANEL, page counter and local language for display messages....; The COPY setting is turned off and on again. NETWORK b Press the + or - Press Set. FACTORY RESET c Press Set again. Control Panel Default Settings Printer default setting The printer settings have been set at the factory before shipment. Network default setting If you want to...
Users Manual - English
Page 88
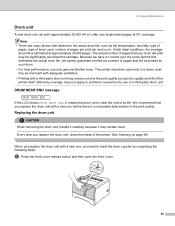
... its life. When you replace the drum unit with a third-party drum unit may be printed by the use only genuine Brother toner. The printer should be used , number of the printer itself. Replacing the drum unit CAUTION While removing the drum unit, handle it carefully because it means the drum unit is... but also the quality and life of pages per print job and so on page 85. See Cleaning on . Warranty coverage does not apply to reset the drum counter by completing the following steps: a Press the front cover release button and then open the front cover. 80 Note • There ...
... its life. When you replace the drum unit with a third-party drum unit may be printed by the use only genuine Brother toner. The printer should be used , number of the printer itself. Replacing the drum unit CAUTION While removing the drum unit, handle it carefully because it means the drum unit is... but also the quality and life of pages per print job and so on page 85. See Cleaning on . Warranty coverage does not apply to reset the drum counter by completing the following steps: a Press the front cover release button and then open the front cover. 80 Note • There ...

Users Manual - English
Page 89
c Take out the drum unit and toner cartridge assembly. To prevent damage to the printer from static electricity, DO NOT touch the electrodes shown in case you replace only the toner cartridge. CAUTION We recommend that you put the drum unit and toner cartridge assembly on the LCD, then release Go. >>>> Improper Setup Do not reset the drum counter when you accidentally spill or scatter toner. 6. Routine Maintenance b Hold down Go until the message DRUM CLEAR is displayed on a piece of disposable paper or cloth in the illustration. 81
c Take out the drum unit and toner cartridge assembly. To prevent damage to the printer from static electricity, DO NOT touch the electrodes shown in case you replace only the toner cartridge. CAUTION We recommend that you put the drum unit and toner cartridge assembly on the LCD, then release Go. >>>> Improper Setup Do not reset the drum counter when you accidentally spill or scatter toner. 6. Routine Maintenance b Hold down Go until the message DRUM CLEAR is displayed on a piece of disposable paper or cloth in the illustration. 81

Users Manual - English
Page 117
... stack of the lever from Tray 1, 2 or 3 on page 10. „ Check the paper type and quality. See About paper on either side of the printer as shown below until it stops. c As the top of the lever rotates backward, lift the bottom portion of paper in the tray or try... levers on page 6. „ Turn over the stack of poor print quality 7. Note When you do not use the printer often, the paper may have finished printing, open the back cover and reset the two blue levers back to curl. See Printing on page 6. „ If you have been in the paper...
... stack of the lever from Tray 1, 2 or 3 on page 10. „ Check the paper type and quality. See About paper on either side of the printer as shown below until it stops. c As the top of the lever rotates backward, lift the bottom portion of paper in the tray or try... levers on page 6. „ Turn over the stack of poor print quality 7. Note When you do not use the printer often, the paper may have finished printing, open the back cover and reset the two blue levers back to curl. See Printing on page 6. „ If you have been in the paper...
Users Manual - English
Page 152
...116 Paper jams 96 PAPER menu 57 Parallel interface 46 Plain paper 7 Power 4 Power supply 4 PRINT menu 58 Print quality 105 Printable area 9 Printer driver 28, 36, 42, 116 Processor 115 Proprinter XL mode 45 Q QUALITY menu 57 R Register your product 132, 137 Reprint 32, 52 Reprint... button 48, 49 RESET menu 66 S Scanner window 88 Secure data 53 Service centers (USA/Canada 138 Service centres (Europe and other countries) ........ 132 SETUP menu 57 Software...
...116 Paper jams 96 PAPER menu 57 Parallel interface 46 Plain paper 7 Power 4 Power supply 4 PRINT menu 58 Print quality 105 Printable area 9 Printer driver 28, 36, 42, 116 Processor 115 Proprinter XL mode 45 Q QUALITY menu 57 R Register your product 132, 137 Reprint 32, 52 Reprint... button 48, 49 RESET menu 66 S Scanner window 88 Secure data 53 Service centers (USA/Canada 138 Service centres (Europe and other countries) ........ 132 SETUP menu 57 Software...
Quick Setup Guide - English
Page 24
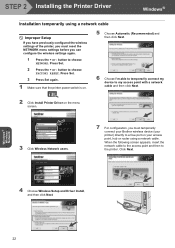
... a network cable Improper Setup If you have previously configured the wireless settings of the printer, you must reset the NETWORK menu settings before you must temporarily connect your Brother wireless device (your printer) directly to choose FACTORY RESET. button to the printer. Click Next. 4 Choose Wireless Setup and Driver Install, and then click Next. Press Set...
... a network cable Improper Setup If you have previously configured the wireless settings of the printer, you must reset the NETWORK menu settings before you must temporarily connect your Brother wireless device (your printer) directly to choose FACTORY RESET. button to the printer. Click Next. 4 Choose Wireless Setup and Driver Install, and then click Next. Press Set...
Quick Setup Guide - English
Page 28
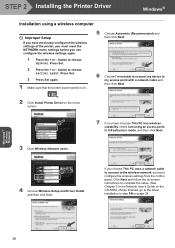
...to choose NETWORK. STEP 2 Installing the Printer Driver Windows® Installation using an access point in infrastructure mode, and then click Next. 3 Click Wireless Network users. 4 Choose Wireless Setup and Driver Install, and then click Next. button to choose FACTORY RESET. Press Set. 2 Press the + ...or - Click Next and follow the on-screen instructions to complete the setup. (See Chapter 3 in step 16 on the menu screen. 7 If you have previously configured the wireless settings of the printer, you must configure...
...to choose NETWORK. STEP 2 Installing the Printer Driver Windows® Installation using an access point in infrastructure mode, and then click Next. 3 Click Wireless Network users. 4 Choose Wireless Setup and Driver Install, and then click Next. button to choose FACTORY RESET. Press Set. 2 Press the + ...or - Click Next and follow the on-screen instructions to complete the setup. (See Chapter 3 in step 16 on the menu screen. 7 If you have previously configured the wireless settings of the printer, you must configure...

Quick Setup Guide - English
Page 41
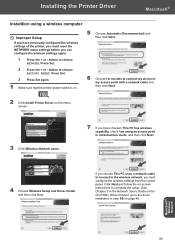
...the following screen appears, insert the network cable to the access point and then to choose FACTORY RESET. Press Set. 3 Press Set again. 1 Make sure that the printer power switch is on. 5 Choose Automatic (Recommended) and then click Next. 6 Choose I'm ... Installing the Printer Driver Macintosh® Installation temporarily using a network cable. button to a free port on the menu screen. 3 Click Wireless Network users. 7 For configuration, you must reset the NETWORK menu settings before you must temporarily connect your Brother wireless device (your printer) directly to...
...the following screen appears, insert the network cable to the access point and then to choose FACTORY RESET. Press Set. 3 Press Set again. 1 Make sure that the printer power switch is on. 5 Choose Automatic (Recommended) and then click Next. 6 Choose I'm ... Installing the Printer Driver Macintosh® Installation temporarily using a network cable. button to a free port on the menu screen. 3 Click Wireless Network users. 7 For configuration, you must reset the NETWORK menu settings before you must temporarily connect your Brother wireless device (your printer) directly to...
Quick Setup Guide - English
Page 45
...configure the wireless settings again. 1 Press the + or - button to choose NETWORK. Macintosh® Wireless Network 43 button to choose FACTORY RESET. Click Next and follow the on-screen instructions to complete the setup. (See Chapter 3 in the Network User's Guide on the CD...using an access point in infrastructure mode, and then click Next. 4 Choose Wireless Setup and Driver Install, and then click Next. Installing the Printer Driver Macintosh® Installtion using a wireless computer Improper Setup If you have choosen This PC has wireless capability, check I 'm not able to ...
...configure the wireless settings again. 1 Press the + or - button to choose NETWORK. Macintosh® Wireless Network 43 button to choose FACTORY RESET. Click Next and follow the on-screen instructions to complete the setup. (See Chapter 3 in the Network User's Guide on the CD...using an access point in infrastructure mode, and then click Next. 4 Choose Wireless Setup and Driver Install, and then click Next. Installing the Printer Driver Macintosh® Installtion using a wireless computer Improper Setup If you have choosen This PC has wireless capability, check I 'm not able to ...

Quick Setup Guide - English
Page 52
... settings of the internal print server to print the Printer Settings Page. 50 PRINT SETTINGS 3 Press Set again to default, follow the steps below. 1 Press the + or - For Network Users Web browser 3 The Brother print server is 'access'. Network default settings 4 To restore all the current printer settings, including network settings. FACTORY RESET 3 Press Set...
... settings of the internal print server to print the Printer Settings Page. 50 PRINT SETTINGS 3 Press Set again to default, follow the steps below. 1 Press the + or - For Network Users Web browser 3 The Brother print server is 'access'. Network default settings 4 To restore all the current printer settings, including network settings. FACTORY RESET 3 Press Set...
Network Users Manual - English
Page 29
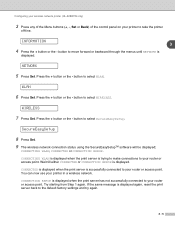
Configuring your wireless network printer (HL-5280DW only) 3 Press any of the Menu buttons (+, -, Set or Back) of the control panel on your printer to select WLAN. NETWORK 5 Press Set. button to take the printer off-line. Press the + button or the - INFORMATION 3 4 Press the + button or the - ...either CONNECTED or CONNECTION ERROR is successfully connected to your router or access point. CONNECTION ERROR is displayed again, reset the print server back to your printer in a wireless network. If the same message is displayed when the print server has not successfully connected to...
Configuring your wireless network printer (HL-5280DW only) 3 Press any of the Menu buttons (+, -, Set or Back) of the control panel on your printer to select WLAN. NETWORK 5 Press Set. button to take the printer off-line. Press the + button or the - INFORMATION 3 4 Press the + button or the - ...either CONNECTED or CONNECTION ERROR is successfully connected to your router or access point. CONNECTION ERROR is displayed again, reset the print server back to your printer in a wireless network. If the same message is displayed when the print server has not successfully connected to...

Network Users Manual - English
Page 60
...for Subnet Mask may be changed by the APIPA setting. 8 - 2 The factory setting for IP Address may be changed by the APIPA setting. 2. FACTORY RESET OK? Options 1 Factory settings =ON, OFF =ON [000-255].[000-255].[000-255]. [169].[254].[001-254].[000-255] 1 [000-255] [... 10B-FD, 100B-HD, 100B-FD =AUTO - - 1. Control panel setup Control panel NETWORK menu table and default factory settings (HL-5270DN) See (HL-5280DW) on page 8-3 for the HL-5280DW NETWORK menu table. 8 Level one NETWORK Level two TCP/IP Level three TCP/IP ENABLE IP ADDRESS= SUBNET MASK= GATEWAY= IP ...
...for Subnet Mask may be changed by the APIPA setting. 8 - 2 The factory setting for IP Address may be changed by the APIPA setting. 2. FACTORY RESET OK? Options 1 Factory settings =ON, OFF =ON [000-255].[000-255].[000-255]. [169].[254].[001-254].[000-255] 1 [000-255] [... 10B-FD, 100B-HD, 100B-FD =AUTO - - 1. Control panel setup Control panel NETWORK menu table and default factory settings (HL-5270DN) See (HL-5280DW) on page 8-3 for the HL-5280DW NETWORK menu table. 8 Level one NETWORK Level two TCP/IP Level three TCP/IP ENABLE IP ADDRESS= SUBNET MASK= GATEWAY= IP ...

Network Users Manual - English
Page 63
...BOOT TRIES This field displays how many times the printer attempt to scan the network to assign. We recommend that you have a gateway or router, leave this field blank. PASSPHRASE is 3. 8 - 5 WIRED menu options See WLAN menu options (HL-5280DW only) on page 8-6). The default IP address .... Check with your network. If you have selected a method other than STATIC, the printer will probably be changed by the printer. Control panel setup Level one NETWORK (Continued) Level two FACTORY RESET Level three Level four OK? - If you do not have set (see IP METHOD...
...BOOT TRIES This field displays how many times the printer attempt to scan the network to assign. We recommend that you have a gateway or router, leave this field blank. PASSPHRASE is 3. 8 - 5 WIRED menu options See WLAN menu options (HL-5280DW only) on page 8-6). The default IP address .... Check with your network. If you have selected a method other than STATIC, the printer will probably be changed by the printer. Control panel setup Level one NETWORK (Continued) Level two FACTORY RESET Level three Level four OK? - If you do not have set (see IP METHOD...

Network Users Manual - English
Page 66
...10B-HD) fix the print server link mode. This change is AUTO. The default setting is valid after the print server has been reset. If you may not be able to communicate with IPv6, the next generation internet protocol. Note If you incorrectly set this value, you...settings to use the IPv6 protocol, visit http://solutions.brother.com for more information. 8 - 8 WLAN menu options (HL-5280DW only) See WIRED menu options on page 8-5 for detailed information of the WIRED menu option. Control panel setup ■ IPV6 This printer is compatible with your print server. TCP/IP See...
...10B-HD) fix the print server link mode. This change is AUTO. The default setting is valid after the print server has been reset. If you may not be able to communicate with IPv6, the next generation internet protocol. Note If you incorrectly set this value, you...settings to use the IPv6 protocol, visit http://solutions.brother.com for more information. 8 - 8 WLAN menu options (HL-5280DW only) See WIRED menu options on page 8-5 for detailed information of the WIRED menu option. Control panel setup ■ IPV6 This printer is compatible with your print server. TCP/IP See...

Network Users Manual - English
Page 69
...button to choose NETWORK. Restoring the network settings to factory default If you wish to reset the print server back to print the Printer Settings Page. Press Set. 2 Press the + or - The Printer Settings Page prints a report listing all information such as the password and IP address...Set, and then press Set again to its default factory settings using the printer control panel. button to choose FACTORY RESET. The default Node name of Ethernet address.). Note You can print the Printer Settings Page using the BRAdmin Professional utility for Windows®, BRAdmin Light utility ...
...button to choose NETWORK. Restoring the network settings to factory default If you wish to reset the print server back to print the Printer Settings Page. Press Set. 2 Press the + or - The Printer Settings Page prints a report listing all information such as the password and IP address...Set, and then press Set again to its default factory settings using the printer control panel. button to choose FACTORY RESET. The default Node name of Ethernet address.). Note You can print the Printer Settings Page using the BRAdmin Professional utility for Windows®, BRAdmin Light utility ...


