
Users Manual - English
Page 2
Improper Setup icons alert you to a situation that may arise or give tips about how the operation works with the printer. i Hot Surface icons warn you not to a possible electrical shock. Notes tell you how you should respond to devices and operations that are ...not compatible with other objects. Electrical Hazard icons alert you to touch machine parts that are hot. Cautions specify procedures you must follow or avoid to prevent possible damage to prevent possible personal injury. Using this guide Symbols...
Improper Setup icons alert you to a situation that may arise or give tips about how the operation works with the printer. i Hot Surface icons warn you not to a possible electrical shock. Notes tell you how you should respond to devices and operations that are ...not compatible with other objects. Electrical Hazard icons alert you to touch machine parts that are hot. Cautions specify procedures you must follow or avoid to prevent possible damage to prevent possible personal injury. Using this guide Symbols...

Users Manual - English
Page 3
DO NOT handle the plug with wet hands. After you have just used the printer, some internal parts of the printer, make sure that you have turned off the power switch and unplugged the printer from the AC power outlet. Inside the printer (Front View) Open the back cover (Back View) ii Doing this might cause an...
DO NOT handle the plug with wet hands. After you have just used the printer, some internal parts of the printer, make sure that you have turned off the power switch and unplugged the printer from the AC power outlet. Inside the printer (Front View) Open the back cover (Back View) ii Doing this might cause an...
Users Manual - English
Page 7
...50 Back light ...50 LCD messages ...51 Reprinting documents...52 Using the control panel LCD menu...55 Menu table...56 Default Settings ...68 Printer default setting...68 Network default setting ...68 5 Options Lower tray unit (LT-5300) ...69 DIMM ...70 DIMM types ...70 Installing ...the consumable items...73 Consumables...74 Toner cartridge ...74 Drum unit ...80 Replacing periodic maintenance parts...84 Cleaning ...85 Cleaning the outside of the printer...85 Cleaning the inside of the printer...86 Cleaning the corona wire...89 7 Troubleshooting Identifying your problem ...91 LCD messages ...92...
...50 Back light ...50 LCD messages ...51 Reprinting documents...52 Using the control panel LCD menu...55 Menu table...56 Default Settings ...68 Printer default setting...68 Network default setting ...68 5 Options Lower tray unit (LT-5300) ...69 DIMM ...70 DIMM types ...70 Installing ...the consumable items...73 Consumables...74 Toner cartridge ...74 Drum unit ...80 Replacing periodic maintenance parts...84 Cleaning ...85 Cleaning the outside of the printer...85 Cleaning the inside of the printer...86 Cleaning the corona wire...89 7 Troubleshooting Identifying your problem ...91 LCD messages ...92...
Users Manual - English
Page 9
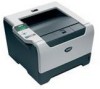
...cable Use a straight-through Category5 (or greater) twisted-pair cable for the interface you connect it to the USB connector of the following parts. When you unpack the printer, make sure that is longer than 6 feet (2.0 meters). USB is not supported under Windows® 95 or Windows NT® ... (USB, parallel or network). „ USB cable Do not use a parallel interface cable that you have all of your PC. 1 About this Printer What is not a standard accessory. Buy the proper interface cable for 10BASE-T or 100BASE-TX Fast Ethernet Network. 1 Make sure that is longer than...
...cable Use a straight-through Category5 (or greater) twisted-pair cable for the interface you connect it to the USB connector of the following parts. When you unpack the printer, make sure that is longer than 6 feet (2.0 meters). USB is not supported under Windows® 95 or Windows NT® ... (USB, parallel or network). „ USB cable Do not use a parallel interface cable that you have all of your PC. 1 About this Printer What is not a standard accessory. Buy the proper interface cable for 10BASE-T or 100BASE-TX Fast Ethernet Network. 1 Make sure that is longer than...

Users Manual - English
Page 64
... Prints the Printer Settings page. Shows the pages left to print with laser unit. 56 Shows the pages left to print with PF kit MP. 4. Prints the list of memory in each menu, see the tables below. See Replacing periodic maintenance parts on page 84. Prints the test page. Prints the demonstration sheet...
... Prints the Printer Settings page. Shows the pages left to print with laser unit. 56 Shows the pages left to print with PF kit MP. 4. Prints the list of memory in each menu, see the tables below. See Replacing periodic maintenance parts on page 84. Prints the test page. Prints the demonstration sheet...

Users Manual - English
Page 75
... until you have set your IP address. 123. 45. 67. 89 h Press Set to increase or decrease the number. The last digit in the first part of changing the menu setting Setting IP Address a Press the + or - An asterisk appears at the end of the LCD. 123. 45. 67. 89* 67...
... until you have set your IP address. 123. 45. 67. 89 h Press Set to increase or decrease the number. The last digit in the first part of changing the menu setting Setting IP Address a Press the + or - An asterisk appears at the end of the LCD. 123. 45. 67. 89* 67...

Users Manual - English
Page 81
... the consumable items regularly. When you replace certain parts or clean the inside of the printer, DO NOT touch the shaded parts shown in cold water to avoid stains. • Be careful not to inhale toner. • After you have just used the printer, some internal parts of the printer will be extremely hot. WARNING When you...
... the consumable items regularly. When you replace certain parts or clean the inside of the printer, DO NOT touch the shaded parts shown in cold water to avoid stains. • Be careful not to inhale toner. • After you have just used the printer, some internal parts of the printer will be extremely hot. WARNING When you...

Users Manual - English
Page 84
To avoid print quality problems, DO NOT touch the shaded parts shown in injuries. Note • Be sure to seal up the toner cartridge tightly in a bag so that toner powder does not spill out of ...
To avoid print quality problems, DO NOT touch the shaded parts shown in injuries. Note • Be sure to seal up the toner cartridge tightly in a bag so that toner powder does not spill out of ...

Users Manual - English
Page 85
... toner cartridge in the printer. To protect your printer. CAUTION For USA and Canada Brother strongly recommends that you continue to a level of other manufacturer's products with this machine as a result of potentially incompatible toner and/or cartridges in the Brother machine may cause damage ... do not refill the toner cartridge provided with your investment and obtain premium performance from the Brother machine, we strongly recommend the use of cartridges other part of this machine. Our warranty coverage does not apply to unpack the toner cartridge until immediately...
... toner cartridge in the printer. To protect your printer. CAUTION For USA and Canada Brother strongly recommends that you continue to a level of other manufacturer's products with this machine as a result of potentially incompatible toner and/or cartridges in the Brother machine may cause damage ... do not refill the toner cartridge provided with your investment and obtain premium performance from the Brother machine, we strongly recommend the use of cartridges other part of this machine. Our warranty coverage does not apply to unpack the toner cartridge until immediately...

Users Manual - English
Page 90
.... CAUTION Wait to direct sunlight or room light may damage the drum unit. 82 To avoid print quality problems, DO NOT touch the shaded parts shown in the printer. If toner scatters on your local waste disposal office. CAUTION Handle the toner cartridge carefully. Exposure to unpack a drum unit until immediately before...
.... CAUTION Wait to direct sunlight or room light may damage the drum unit. 82 To avoid print quality problems, DO NOT touch the shaded parts shown in the printer. If toner scatters on your local waste disposal office. CAUTION Handle the toner cartridge carefully. Exposure to unpack a drum unit until immediately before...
Users Manual - English
Page 92
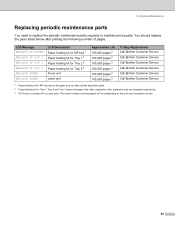
...Laser unit Approximate Life 100,000 pages 3 100,000 pages 3 100,000 pages 3 100,000 pages 3 100,000 pages 3 100,000 pages 3 To Buy Replacement Call Brother Customer Service Call Brother Customer Service Call Brother Customer Service Call Brother Customer Service Call Brother Customer Service Call Brother... should replace the parts listed below after printing the following number of printed pages will vary depending on the print jobs and paper you use. 84 Routine Maintenance Replacing periodic maintenance parts You need to replace the periodic maintenance parts regularly to maintain ...
...Laser unit Approximate Life 100,000 pages 3 100,000 pages 3 100,000 pages 3 100,000 pages 3 100,000 pages 3 100,000 pages 3 To Buy Replacement Call Brother Customer Service Call Brother Customer Service Call Brother Customer Service Call Brother Customer Service Call Brother Customer Service Call Brother... should replace the parts listed below after printing the following number of printed pages will vary depending on the print jobs and paper you use. 84 Routine Maintenance Replacing periodic maintenance parts You need to replace the periodic maintenance parts regularly to maintain ...

Users Manual - English
Page 95
HOT SURFACE After you accidentally spill or scatter toner. 87 b Press the front cover release button and then open the front cover. 6. CAUTION We recommend that you put the drum unit and toner cartridge assembly on a piece of disposable paper or cloth in case you have just used the printer, some internal parts of the printer. Routine Maintenance c Take out the drum unit and toner cartridge assembly. Wait for the printer to cool down before you touch the internal parts of the printer will be extremely hot.
HOT SURFACE After you accidentally spill or scatter toner. 87 b Press the front cover release button and then open the front cover. 6. CAUTION We recommend that you put the drum unit and toner cartridge assembly on a piece of disposable paper or cloth in case you have just used the printer, some internal parts of the printer. Routine Maintenance c Take out the drum unit and toner cartridge assembly. Wait for the printer to cool down before you touch the internal parts of the printer will be extremely hot.
Users Manual - English
Page 99
...page 94. „ Paper handling See Paper handling on page 95 and Paper jams and how to the correct printer port. Printer does not print: If you need additional help, the Brother Solutions Center offers the latest FAQs and troubleshooting tips. Pages are printed, but there are fully closed. „... above checks, identify your problem First, check the following: „ The AC power cord is connected properly and the printer is turned on. „ All of the protective parts have been removed. „ The toner cartridge and drum unit are installed properly. „ The front and back covers...
...page 94. „ Paper handling See Paper handling on page 95 and Paper jams and how to the correct printer port. Printer does not print: If you need additional help, the Brother Solutions Center offers the latest FAQs and troubleshooting tips. Pages are printed, but there are fully closed. „... above checks, identify your problem First, check the following: „ The AC power cord is connected properly and the printer is turned on. „ All of the protective parts have been removed. „ The toner cartridge and drum unit are installed properly. „ The front and back covers...

Users Manual - English
Page 107
... cover of the printer will be extremely hot. b Slowly take out the drum unit and toner cartridge assembly. The jammed paper will be pulled out with the drum unit and toner cartridge assembly. 99 7. When you have just used the printer, some internal parts of the printer, DO NOT touch the shaded parts shown in the...
... cover of the printer will be extremely hot. b Slowly take out the drum unit and toner cartridge assembly. The jammed paper will be pulled out with the drum unit and toner cartridge assembly. 99 7. When you have just used the printer, some internal parts of the printer, DO NOT touch the shaded parts shown in the...

Users Manual - English
Page 108
.... Take care not to stain your hands or clothes, wipe or wash it off with toner. Clear the jammed paper if there is to the printer caused by static electricity, DO NOT touch the electrodes shown in the illustration. To prevent damage to make sure that you put the drum unit... have removed the jammed paper, print a few test pages. CAUTION Handle the toner cartridge carefully. To avoid print quality problems, DO NOT touch the shaded parts shown in case you do not spread toner. 7. This is any inside the drum unit. Troubleshooting CAUTION After you restart the print job.
.... Take care not to stain your hands or clothes, wipe or wash it off with toner. Clear the jammed paper if there is to the printer caused by static electricity, DO NOT touch the electrodes shown in the illustration. To prevent damage to make sure that you put the drum unit... have removed the jammed paper, print a few test pages. CAUTION Handle the toner cartridge carefully. To avoid print quality problems, DO NOT touch the shaded parts shown in case you do not spread toner. 7. This is any inside the drum unit. Troubleshooting CAUTION After you restart the print job.

Users Manual - English
Page 109
...-up output tray, follow these steps: a Press the cover release button and then open the front cover or back cover of the printer will lift automatically. If you have just used the printer, some internal parts of the printer, DO NOT touch the shaded parts shown in properly, the blue lock lever will be extremely hot. 7.
...-up output tray, follow these steps: a Press the cover release button and then open the front cover or back cover of the printer will lift automatically. If you have just used the printer, some internal parts of the printer, DO NOT touch the shaded parts shown in properly, the blue lock lever will be extremely hot. 7.

Users Manual - English
Page 111
HOT SURFACE After you touch the internal parts of the printer. Wait for the printer to open the fuser cover (1). 1 e Using both hands, gently pull the jammed paper out of the printer will be extremely hot. f Put the drum unit and toner cartridge assembly back in the printer (press firmly). g Fully close the front and back covers. 103 Troubleshooting d Pull the tabs at the left and right hand sides toward you to cool down before you have just used the printer, some internal parts of the fuser unit. 7.
HOT SURFACE After you touch the internal parts of the printer. Wait for the printer to open the fuser cover (1). 1 e Using both hands, gently pull the jammed paper out of the printer will be extremely hot. f Put the drum unit and toner cartridge assembly back in the printer (press firmly). g Fully close the front and back covers. 103 Troubleshooting d Pull the tabs at the left and right hand sides toward you to cool down before you have just used the printer, some internal parts of the fuser unit. 7.
Users Manual - English
Page 147
... into an outlet on , the user is no guarantee that the products Product name: Model number: Product option: Laser Printer HL-5280DW HL-52 Lower Tray Unit LT-5300 complies with the limits for a Class B digital device. Appendix (For USA and...which can radiate radio frequency energy and, if not installed and used to which the receiver is subject to Part 15 of the FCC Rules. Box 6911 Bridgewater, NJ 08807-0911 USA Telephone: (908) 704-1700 declares... one or more of Conformity (For USA) Responsible Party: Brother International Corporation 100 Somerset Corporate Boulevard P.O.
... into an outlet on , the user is no guarantee that the products Product name: Model number: Product option: Laser Printer HL-5280DW HL-52 Lower Tray Unit LT-5300 complies with the limits for a Class B digital device. Appendix (For USA and...which can radiate radio frequency energy and, if not installed and used to which the receiver is subject to Part 15 of the FCC Rules. Box 6911 Bridgewater, NJ 08807-0911 USA Telephone: (908) 704-1700 declares... one or more of Conformity (For USA) Responsible Party: Brother International Corporation 100 Somerset Corporate Boulevard P.O.
Users Manual - English
Page 151
...3 Bar code control 125 Basic tab 28 Booklet printing 24 BRAdmin Light 44 BRAdmin Professional 44 Brother Numbers (USA/Canada 137, 138 BR-Script 3 113 BR-Script 3 mode 45 BR-Script menu 62 BR-Script printer driver 36 Buttons 48 C Call Service messages 93 Carbon copy printing 25 Carton contents 1 Character...H HP LaserJet mode 45 I INFORMATION menu 56 Interface 115 INTERFACE menu 66 J Jam in duplex unit 104 Jam in MP tray 97 Jam inside printer 99 Jam rear 101 Job Cancel button 48 L LCD (liquid crystal display 50 LCD menu 56 LED (light emitting diode 50 Linux 26 Lower tray...
...3 Bar code control 125 Basic tab 28 Booklet printing 24 BRAdmin Light 44 BRAdmin Professional 44 Brother Numbers (USA/Canada 137, 138 BR-Script 3 113 BR-Script 3 mode 45 BR-Script menu 62 BR-Script printer driver 36 Buttons 48 C Call Service messages 93 Carbon copy printing 25 Carton contents 1 Character...H HP LaserJet mode 45 I INFORMATION menu 56 Interface 115 INTERFACE menu 66 J Jam in duplex unit 104 Jam in MP tray 97 Jam inside printer 99 Jam rear 101 Job Cancel button 48 L LCD (liquid crystal display 50 LCD menu 56 LED (light emitting diode 50 Linux 26 Lower tray...

Quick Setup Guide - English
Page 2
...used in this guide 1 Warning Warnings tell you to a possible electrical shock. Caution Cautions specify procedures you should respond to the printer or other features. Note Notes tell you how you must follow or avoid to prevent possible damage to a situation that are hot.... Electrical Hazard Electrical Hazard icons alert you what to do to touch machine parts that are not compatible with other objects. Improper Setup Improper Setup icons alert you not to prevent possible personal injury. Hot Surface Hot...
...used in this guide 1 Warning Warnings tell you to a possible electrical shock. Caution Cautions specify procedures you should respond to the printer or other features. Note Notes tell you how you must follow or avoid to prevent possible damage to a situation that are hot.... Electrical Hazard Electrical Hazard icons alert you what to do to touch machine parts that are not compatible with other objects. Improper Setup Improper Setup icons alert you not to prevent possible personal injury. Hot Surface Hot...


