Users Manual - English
Page 7
...(NC-2100p) (For HL-5240 60 6 Routine Maintenance Replacing the consumable items...61 Consumables...61 Toner cartridge ...62 Drum unit ...68 Replacing periodic maintenance parts...72 Cleaning ...73 Cleaning the outside of the printer...73 Cleaning the inside of the printer...74 Cleaning the corona wire...problems...98 Other problems ...98 For Macintosh® with USB ...98 Printing from DOS ...98 BR-Script 3 ...99 A Appendix Printer specifications...100 Engine ...100 Controller ...101 Software ...102 Control panel ...102 Paper handling ...102 Media specifications ...103 Supplies ...103 Dimensions...
...(NC-2100p) (For HL-5240 60 6 Routine Maintenance Replacing the consumable items...61 Consumables...61 Toner cartridge ...62 Drum unit ...68 Replacing periodic maintenance parts...72 Cleaning ...73 Cleaning the outside of the printer...73 Cleaning the inside of the printer...74 Cleaning the corona wire...problems...98 Other problems ...98 For Macintosh® with USB ...98 Printing from DOS ...98 BR-Script 3 ...99 A Appendix Printer specifications...100 Engine ...100 Controller ...101 Software ...102 Control panel ...102 Paper handling ...102 Media specifications ...103 Supplies ...103 Dimensions...
Users Manual - English
Page 55
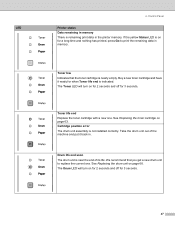
... time and nothing has printed, press Go to replace the current one . Control Panel Printer status Data remaining in the printer memory. Toner low Indicates that you get a new drum unit to print the remaining data in . Take the drum unit out of its life. The Drum LED will turn on for when Toner life end...
... time and nothing has printed, press Go to replace the current one . Control Panel Printer status Data remaining in the printer memory. Toner low Indicates that you get a new drum unit to print the remaining data in . Take the drum unit out of its life. The Drum LED will turn on for when Toner life end...

Users Manual - English
Page 69
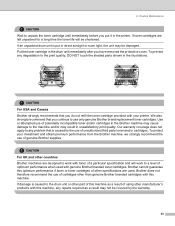
... on page 91. When you have just used the printer, some internal parts of the printer, DO NOT touch the shaded parts shown in the illustration. Consumables Toner Cartridge Drum Unit See Toner cartridge on page 68. 61 Replacing the consumable items You will need to replace the consumable items regularly. 6 Routine Maintenance You will need...
... on page 91. When you have just used the printer, some internal parts of the printer, DO NOT touch the shaded parts shown in the illustration. Consumables Toner Cartridge Drum Unit See Toner cartridge on page 68. 61 Replacing the consumable items You will need to replace the consumable items regularly. 6 Routine Maintenance You will need...

Users Manual - English
Page 71
... in case you put the drum unit and toner cartridge assembly on page 73. 6. CAUTION We recommend that you accidentally spill or scatter toner. When you want to the printer from or Brother Customer Service. • We recommend that you replace the toner cartridge. See Cleaning... on a piece of disposable paper or cloth in the illustration. 63 Routine Maintenance Replacing the toner cartridge Note • To ensure...
... in case you put the drum unit and toner cartridge assembly on page 73. 6. CAUTION We recommend that you accidentally spill or scatter toner. When you want to the printer from or Brother Customer Service. • We recommend that you replace the toner cartridge. See Cleaning... on a piece of disposable paper or cloth in the illustration. 63 Routine Maintenance Replacing the toner cartridge Note • To ensure...
Users Manual - English
Page 73
Use or attempted use only genuine Brother brand replacement toner cartridges. To protect your printer. CAUTION For UK and other countries Brother machines are designed to work to the machine and/or may be covered by the use of cartridges other part of this machine as a...level of potentially incompatible toner and/or cartridges in direct sunlight or room light, the unit may result in the printer. Put the toner cartridge in the illustrations. If an unpacked drum unit is put it in unsatisfactory print quality. We also strongly recommend that you do not refill the toner ...
Use or attempted use only genuine Brother brand replacement toner cartridges. To protect your printer. CAUTION For UK and other countries Brother machines are designed to work to the machine and/or may be covered by the use of cartridges other part of this machine as a...level of potentially incompatible toner and/or cartridges in direct sunlight or room light, the unit may result in the printer. Put the toner cartridge in the illustrations. If an unpacked drum unit is put it in unsatisfactory print quality. We also strongly recommend that you do not refill the toner ...

Users Manual - English
Page 76
... paper, type of the printer. Because we have no control over the many factors that you replace the drum unit, clean the inside of toner used only in the print quality. Change Drum message If the LED shows the message below, it may be printed by the use only genuine Brother toner. 6. Note • There...
... paper, type of the printer. Because we have no control over the many factors that you replace the drum unit, clean the inside of toner used only in the print quality. Change Drum message If the LED shows the message below, it may be printed by the use only genuine Brother toner. 6. Note • There...

Users Manual - English
Page 77
Improper Setup Do not reset the drum counter when you need to reset the drum counter by completing the following steps: a Make sure that the printer is turned on and the Drum LED is blinking. Press the front cover release button and then open the front cover. b Press and hold down Go for about 4 seconds until all four LEDs are lit, release Go. Once all the LEDs light up. Routine Maintenance When you replace the drum unit with a new one, you only replace the toner cartridge. c Take out the drum unit and toner cartridge assembly. 69 6.
Improper Setup Do not reset the drum counter when you need to reset the drum counter by completing the following steps: a Make sure that the printer is turned on and the Drum LED is blinking. Press the front cover release button and then open the front cover. b Press and hold down Go for about 4 seconds until all four LEDs are lit, release Go. Once all the LEDs light up. Routine Maintenance When you replace the drum unit with a new one, you only replace the toner cartridge. c Take out the drum unit and toner cartridge assembly. 69 6.
Users Manual - English
Page 81
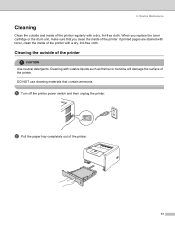
b Pull the paper tray completely out of the printer. Routine Maintenance Cleaning Clean the outside of the printer. When you replace the toner cartridge or the drum unit, make sure that contain ammonia. If printed pages are stained with toner, clean the inside of the printer CAUTION Use neutral detergents. Cleaning with volatile liquids such as...
b Pull the paper tray completely out of the printer. Routine Maintenance Cleaning Clean the outside of the printer. When you replace the toner cartridge or the drum unit, make sure that contain ammonia. If printed pages are stained with toner, clean the inside of the printer CAUTION Use neutral detergents. Cleaning with volatile liquids such as...
Users Manual - English
Page 88
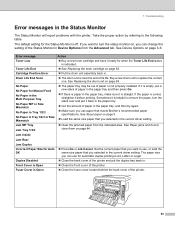
... a new toner cartridge and have it is helpful to turn the stack over and put it is Open „ Press Go or Job Cancel. See Replacing the drum unit on , you selected in the current driver setting. If the paper is curled, straighten it is near the end of paper in the... Size for the Status Monitor is paper in the Status Monitor The Status Monitor will report problems with the printer. Buy a new drum unit to the following table. Set the correct paper that meets Brother's recommended paper specifications. The paper size you can use paper that you want to remove the paper, turn...
... a new toner cartridge and have it is helpful to turn the stack over and put it is Open „ Press Go or Job Cancel. See Replacing the drum unit on , you selected in the current driver setting. If the paper is curled, straighten it is near the end of paper in the... Size for the Status Monitor is paper in the Status Monitor The Status Monitor will report problems with the printer. Buy a new drum unit to the following table. Set the correct paper that meets Brother's recommended paper specifications. The paper size you can use paper that you want to remove the paper, turn...

Users Manual - English
Page 99
... our specifications. See Positioning the printer on page 68. „ The fuser unit may be contaminated. See Replacing the drum unit on page 4. „ Put in a new drum unit. Call Brother Customer Service. 91 Turn off Toner Save Mode in a new drum unit. See Replacing the toner cartridge on page 5. „ The drum unit may be damaged. See...
... our specifications. See Positioning the printer on page 68. „ The fuser unit may be contaminated. See Replacing the drum unit on page 4. „ Put in a new drum unit. Call Brother Customer Service. 91 Turn off Toner Save Mode in a new drum unit. See Replacing the toner cartridge on page 5. „ The drum unit may be damaged. See...
Users Manual - English
Page 100
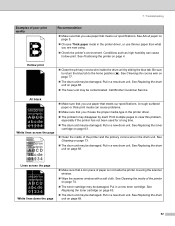
...Brother Customer Service. A rough surfaced paper or thick print media can cause hollow print. Lines across the page ABCDEFGH abcdefghijk ABCD abcde 01234 „ Make sure that meets our specifications. See Cleaning the inside of the printer on page 68. „ The fuser unit may be damaged. See Replacing the drum...this problem, especially if the printer has not been used for a long time. „ The drum unit may be damaged. Put in a new drum unit. See Replacing the drum unit on page 73. „ The drum unit may be damaged. Put in a new drum unit. Print multiple pages ...
...Brother Customer Service. A rough surfaced paper or thick print media can cause hollow print. Lines across the page ABCDEFGH abcdefghijk ABCD abcde 01234 „ Make sure that meets our specifications. See Cleaning the inside of the printer on page 68. „ The fuser unit may be damaged. See Replacing the drum...this problem, especially if the printer has not been used for a long time. „ The drum unit may be damaged. Put in a new drum unit. See Replacing the drum unit on page 73. „ The drum unit may be damaged. Put in a new drum unit. Print multiple pages ...

Users Manual - English
Page 101
... at 94 mm (3.7 in.) intervals 94 mm (3.7 in.) 94 mm (3.7 in.) Black Spots at 94 mm (3.7 in front of the drum unit, and find the exact position of the photosensitive drum with a cotton swab until the dust or paper powder on page 68. 93 CAUTION DO NOT clean the surface of the... poor print. Troubleshooting Examples of poor print quality 94 mm (3.7 in.) 94 mm (3.7 in a new drum unit. See Replacing the drum unit on the surface comes...
... at 94 mm (3.7 in.) intervals 94 mm (3.7 in.) 94 mm (3.7 in.) Black Spots at 94 mm (3.7 in front of the drum unit, and find the exact position of the photosensitive drum with a cotton swab until the dust or paper powder on page 68. 93 CAUTION DO NOT clean the surface of the... poor print. Troubleshooting Examples of poor print quality 94 mm (3.7 in.) 94 mm (3.7 in a new drum unit. See Replacing the drum unit on the surface comes...
Users Manual - English
Page 102
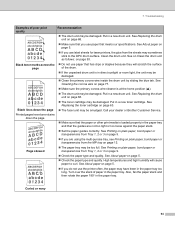
...paper tray and that meets our specifications. Curled or wavy 94 AaAa0bBbc1CBdDe2cEfCgdF3hGDie4jHk Page skewed Recommendation „ The drum unit may be smudged. Put in the paper tray. Call your dealer or Brother Customer Service. „ Make sure that the paper or other print media is in the paper tray... Replacing the toner cartridge on page 12. „ The paper tray may have toner stains down the page Printed pages have been in direct sunlight or room light, the unit may sometimes stick to curl. See About paper on page 93. „ Do not use label sheets for laser printers,...
...paper tray and that meets our specifications. Curled or wavy 94 AaAa0bBbc1CBdDe2cEfCgdF3hGDie4jHk Page skewed Recommendation „ The drum unit may be smudged. Put in the paper tray. Call your dealer or Brother Customer Service. „ Make sure that the paper or other print media is in the paper tray... Replacing the toner cartridge on page 12. „ The paper tray may have toner stains down the page Printed pages have been in direct sunlight or room light, the unit may sometimes stick to curl. See About paper on page 93. „ Do not use label sheets for laser printers,...

Quick Setup Guide - English
Page 31
... DIMM) memory module. When both trays are installed, the printer expands total input capacity up to your printer. Toner Cartridge Drum Unit 29 Lower Tray Unit LT-5300 DIMM Memory External Print Server NC-2100p (For HL-5240/5240L only) Second or third lower paper tray unit can be... interface port of paper. For more information, visit us at http://solutions.brother.com. You can expand the capabilities of the printer by the LED's on the control panel. Consumables 2 When the time comes to replace consumables, an error will be connected to 800 sheets. Consumables and Options ...
... DIMM) memory module. When both trays are installed, the printer expands total input capacity up to your printer. Toner Cartridge Drum Unit 29 Lower Tray Unit LT-5300 DIMM Memory External Print Server NC-2100p (For HL-5240/5240L only) Second or third lower paper tray unit can be... interface port of paper. For more information, visit us at http://solutions.brother.com. You can expand the capabilities of the printer by the LED's on the control panel. Consumables 2 When the time comes to replace consumables, an error will be connected to 800 sheets. Consumables and Options ...


