Users Manual - English
Page 77
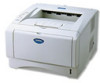
LED is off or or LED is in this chapter. Figure 3-1 The LED indications shown in the table below are used in the illustrations in Sleep mode, all the LEDs are off. CONTROL PANEL 3 - 1 3 Control panel This section refers to the four Light Emitting Diodes (LEDs) (Toner, Drum, Paper, Status) and the two control panel buttons (Job Cancel, Go) on or or LED is blinking When the power switch is off or the printer is on the control panel.
LED is off or or LED is in this chapter. Figure 3-1 The LED indications shown in the table below are used in the illustrations in Sleep mode, all the LEDs are off. CONTROL PANEL 3 - 1 3 Control panel This section refers to the four Light Emitting Diodes (LEDs) (Toner, Drum, Paper, Status) and the two control panel buttons (Job Cancel, Go) on or or LED is blinking When the power switch is off or the printer is on the control panel.
Users Manual - English
Page 81
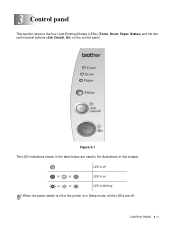
... shows a fixing unit failure. For example, the LED indication below : 1 Take out the DIMM (Dual Inline Memory Module) from your dealer or a Brother authorized service representative. If you have a DIMM installed. 2 Turn off the power switch, wait a few seconds, and then turn it back on page ...print again. Service call indications If there is needed by the user, the printer will light up all the LEDs as shown in Table 1. Toner Drum Paper Status Figure 3-13 CONTROL PANEL 3 - 5 Toner Drum Paper Status Figure 3-12 If you see the same service call indication after turning the ...
... shows a fixing unit failure. For example, the LED indication below : 1 Take out the DIMM (Dual Inline Memory Module) from your dealer or a Brother authorized service representative. If you have a DIMM installed. 2 Turn off the power switch, wait a few seconds, and then turn it back on page ...print again. Service call indications If there is needed by the user, the printer will light up all the LEDs as shown in Table 1. Toner Drum Paper Status Figure 3-13 CONTROL PANEL 3 - 5 Toner Drum Paper Status Figure 3-12 If you see the same service call indication after turning the ...
Users Manual - English
Page 86
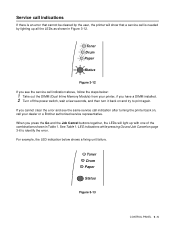
...you can print a list of the internal fonts using Brother's Windows® PCL printer driver, you turn on the power switch. The printer will print a list of the internal fonts by clicking the Print Fonts button in . 3 Hold down until the Drum LED comes on. 5 When the Drum LED comes on . Using the ...printer driver (Not available for HL-5130) You can print a list of the internal fonts. All the LEDs light up and then go off the printer. 2 Make sure that the front...
...you can print a list of the internal fonts using Brother's Windows® PCL printer driver, you turn on the power switch. The printer will print a list of the internal fonts by clicking the Print Fonts button in . 3 Hold down until the Drum LED comes on. 5 When the Drum LED comes on . Using the ...printer driver (Not available for HL-5130) You can print a list of the internal fonts. All the LEDs light up and then go off the printer. 2 Make sure that the front...

Users Manual - English
Page 97
...or attempting to use potentially incompatible toner and/or toner cartridges in your printer may cause damage to replace consumed toner cartridges with only Genuine Brother Branded Supplies. ■ Printing with a third-party toner or third-party toner cartridge may reduce not only the print quality but also the ...may also cause serious damage to unpack the toner cartridge until immediately before you put in direct sunlight or room light, the unit may be shortened. ■ If an unpacked drum unit is put it from side to side five or six times to problems caused by the use only Genuine...
...or attempting to use potentially incompatible toner and/or toner cartridges in your printer may cause damage to replace consumed toner cartridges with only Genuine Brother Branded Supplies. ■ Printing with a third-party toner or third-party toner cartridge may reduce not only the print quality but also the ...may also cause serious damage to unpack the toner cartridge until immediately before you put in direct sunlight or room light, the unit may be shortened. ■ If an unpacked drum unit is put it from side to side five or six times to problems caused by the use only Genuine...

Users Manual - English
Page 102
...direct sunlight or room light may separate from domestic waste. If you put the cartridge in properly, the blue lock lever will lift automatically. Exposure to unpack a drum unit until you hear it lock into the new drum unit until immediately before you put it may damage the drum unit. 5 Put the...cartridge firmly into place. If you insert the toner cartridge properly, or it in a bag so that toner powder does not spill out of the drum unit. If toner scatters on your local waste disposal office. ■ Be sure to local regulations, keeping it off with cold water. ■...
...direct sunlight or room light may separate from domestic waste. If you put the cartridge in properly, the blue lock lever will lift automatically. Exposure to unpack a drum unit until you hear it lock into the new drum unit until immediately before you put it may damage the drum unit. 5 Put the...cartridge firmly into place. If you insert the toner cartridge properly, or it in a bag so that toner powder does not spill out of the drum unit. If toner scatters on your local waste disposal office. ■ Be sure to local regulations, keeping it off with cold water. ■...

Users Manual - English
Page 111
... jammed paper as shown below. Figure 6-2 If the jammed paper is removed completely by lighting the control panel LEDs as follows. Then try printing again. ■ If a paper jam occurs when using the information in Figure 6-2. Toner Drum Paper Status Figure 6-1 After you add new paper. When you open the front cover...
... jammed paper as shown below. Figure 6-2 If the jammed paper is removed completely by lighting the control panel LEDs as follows. Then try printing again. ■ If a paper jam occurs when using the information in Figure 6-2. Toner Drum Paper Status Figure 6-1 After you add new paper. When you open the front cover...
Users Manual - English
Page 116
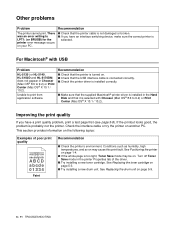
... ■ Check that the printer cable is selected with USB Problem HL-5130 (or HL-5140, HL-5150D and HL-5170DN) does not appear in Chooser (Mac OS® 8.6 to...off Toner Save mode in the Hard Disk and that the printer is too light, Toner Save mode may cause this print fault. See Replacing the drum unit on another PC. Check the interface cable or try the printer on...your PC. Conditions such as humidity, high temperatures, and so on page 5-3. ■ Try installing a new drum unit. Improving the print quality If you have a print quality problem, print a test page first (see page...
... ■ Check that the printer cable is selected with USB Problem HL-5130 (or HL-5140, HL-5150D and HL-5170DN) does not appear in Chooser (Mac OS® 8.6 to...off Toner Save mode in the Hard Disk and that the printer is too light, Toner Save mode may cause this print fault. See Replacing the drum unit on another PC. Check the interface cable or try the printer on...your PC. Conditions such as humidity, high temperatures, and so on page 5-3. ■ Try installing a new drum unit. Improving the print quality If you have a print quality problem, print a test page first (see page...
Users Manual - English
Page 119
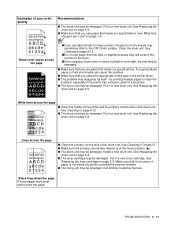
...direct sunlight or room light, the unit may disappear by itself. See What kind of paper can cause the problem. ■ Make sure that has clips or staples because they will scratch the surface of the drum. ■If the unpacked drum unit is in a new drum unit. See Cleaning...driver. ■ The problem may be damaged. ■ Make sure that you select the appropriate media type in the drum unit. See Replacing the drum unit on page 5-9. Call Brother Customer Service. TROUBLESHOOTING 6 - 14 A rough surfaced paper or thick print media can I use paper that meets our ...
...direct sunlight or room light, the unit may disappear by itself. See What kind of paper can cause the problem. ■ Make sure that has clips or staples because they will scratch the surface of the drum. ■If the unpacked drum unit is in a new drum unit. See Cleaning...driver. ■ The problem may be damaged. ■ Make sure that you select the appropriate media type in the drum unit. See Replacing the drum unit on page 5-9. Call Brother Customer Service. TROUBLESHOOTING 6 - 14 A rough surfaced paper or thick print media can I use paper that meets our ...

Service Manual
Page 64
..., if you use the duplex printing function) Close the face-up output tray of the printer. 5.3 Service call indications If there is needed by lighting up Open (HL-5150D and HL-5170DN: When you have a DIMM installed. (2) Turn off the power switch, wait a few seconds, and then turn it back on and try to... Fig.4-44 2-31 Face up all the LEDs as shown in the figure below. Toner Drum Paper Status Fig.2-42 HL-5130/5140/5150D/5170DN SERVICE MANUAL Front Cover Open Close the front cover of the printer. Toner Drum Paper Status Fig.4-43 If you see the service call is an error that can...
..., if you use the duplex printing function) Close the face-up output tray of the printer. 5.3 Service call indications If there is needed by lighting up Open (HL-5150D and HL-5170DN: When you have a DIMM installed. (2) Turn off the power switch, wait a few seconds, and then turn it back on and try to... Fig.4-44 2-31 Face up all the LEDs as shown in the figure below. Toner Drum Paper Status Fig.2-42 HL-5130/5140/5150D/5170DN SERVICE MANUAL Front Cover Open Close the front cover of the printer. Toner Drum Paper Status Fig.4-43 If you see the service call is an error that can...

Service Manual
Page 67
... The Print Test Page button is plugged in. (2) Turn on the power switch. Fig.2-46 2-34 If you are using Brother's Windows PCL printer driver, you can use the Go button or the printer driver to print a test page. (1) Turn ...and right click the Brother's Windows PCL printer driver. If you turn on the printer and wait until all the LEDs except for Toner LED go off . The printer will print the current printer settings. When the Drum, Paper and Status ... until the printer is in the General Tab of the "Property". All the LEDs light up. The printer will print a test page.
... The Print Test Page button is plugged in. (2) Turn on the power switch. Fig.2-46 2-34 If you are using Brother's Windows PCL printer driver, you can use the Go button or the printer driver to print a test page. (1) Turn ...and right click the Brother's Windows PCL printer driver. If you turn on the printer and wait until all the LEDs except for Toner LED go off . The printer will print the current printer settings. When the Drum, Paper and Status ... until the printer is in the General Tab of the "Property". All the LEDs light up. The printer will print a test page.
Service Manual
Page 68
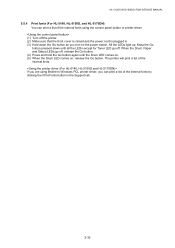
... Print fonts (For HL-5140, HL-5150D, and HL-5170DN) You can print a list of the internal fonts by clicking the Print Fonts button in . (3) Hold down until the Drum LED comes on. (5) When the Drum LED comes on the power switch. All the LEDs light up. If you are using Brother's Windows PCL printer driver..., you turn on , release the Go button. When the Drum, Paper and Status LEDs go off. The printer will print a list of the internal fonts. Keep the Go button pressed down ...
... Print fonts (For HL-5140, HL-5150D, and HL-5170DN) You can print a list of the internal fonts by clicking the Print Fonts button in . (3) Hold down until the Drum LED comes on. (5) When the Drum LED comes on the power switch. All the LEDs light up. If you are using Brother's Windows PCL printer driver..., you turn on , release the Go button. When the Drum, Paper and Status LEDs go off. The printer will print a list of the internal fonts. Keep the Go button pressed down ...

Service Manual
Page 69
...Speed LED will be green if the print server is connected to a 10 Base T Ethernet. Active LED is yellow: The Active LED will light up . When the Drum, Paper and Status LEDs go off , release the Go button. (4) Hold down the Go button and keep it pressed down until the ...*For more information on APIPA, see the Network User's Guide or visit http://solutions.brother.com 2-36 All the LEDs will blink if the print server is receiving or transmitting data. 6.2 Network Factory default setting (For HL-5170DN) If you wish to reset the printer and automatically disable the APIPA protocol,...
...Speed LED will be green if the print server is connected to a 10 Base T Ethernet. Active LED is yellow: The Active LED will light up . When the Drum, Paper and Status LEDs go off , release the Go button. (4) Hold down the Go button and keep it pressed down until the ...*For more information on APIPA, see the Network User's Guide or visit http://solutions.brother.com 2-36 All the LEDs will blink if the print server is receiving or transmitting data. 6.2 Network Factory default setting (For HL-5170DN) If you wish to reset the printer and automatically disable the APIPA protocol,...

Service Manual
Page 94
They also detect whether or not the drum unit is installed. (The toner cartridge is installed in the toner cartridge. Fig. 3-36 Front cover sensor 2.3.2 Toner sensors Detects if there is low. The toner sensor at the left side emits light through the window on the left side of the front cover. CHAPTER 3 THEORY OF OPERATION 2.3 2.3.1 Sensors Cover sensors Detect opening and closing of the toner cartridge, then the toner sensor at the right side receives it when the toner is toner in the drum unit.) Toner sensor (Light reception) Fig. 3-37 Toner sensor (Light emission) 3-24
They also detect whether or not the drum unit is installed. (The toner cartridge is installed in the toner cartridge. Fig. 3-36 Front cover sensor 2.3.2 Toner sensors Detects if there is low. The toner sensor at the left side emits light through the window on the left side of the front cover. CHAPTER 3 THEORY OF OPERATION 2.3 2.3.1 Sensors Cover sensors Detect opening and closing of the toner cartridge, then the toner sensor at the right side receives it when the toner is toner in the drum unit.) Toner sensor (Light reception) Fig. 3-37 Toner sensor (Light emission) 3-24

Service Manual
Page 99
HL-5130/5140/5150D/5170DN SERVICE MANUAL 2.6.2 Exposure stage After the drum is positively charged, it is reduced, forming the electrostatic image to be printed. Surface potential (V) +870 +400 +150 Drum sleeve 0 1 Cycle of the exposed area is exposed to paper 3-29 Laser detector Laser diode Drum Paper...Polygon mirror Lens Motor Fig. 3-45 Laser beam The area exposed to the laser beam is the image to be printed. The surface potential of drum 1 2 3 (a) (b) Time Fig. 3-46 1 Primary charging 2 Laser beam exposure and developing (a) Unexposed area (Non image area) (b) Exposed ...
HL-5130/5140/5150D/5170DN SERVICE MANUAL 2.6.2 Exposure stage After the drum is positively charged, it is reduced, forming the electrostatic image to be printed. Surface potential (V) +870 +400 +150 Drum sleeve 0 1 Cycle of the exposed area is exposed to paper 3-29 Laser detector Laser diode Drum Paper...Polygon mirror Lens Motor Fig. 3-45 Laser beam The area exposed to the laser beam is the image to be printed. The surface potential of drum 1 2 3 (a) (b) Time Fig. 3-46 1 Primary charging 2 Laser beam exposure and developing (a) Unexposed area (Non image area) (b) Exposed ...

Service Manual
Page 165
Main frame R Taptite, cup S M3x6 FG plate Taptite, bind B M4x12 Drum spring R Fig. 4-112 Taptite, bind B M4x12 (9) Remove the toner sensor PCB unit (Light reception). Main frame R Pin Fig. 4-113 4-64 Toner sensor PCB unit (Light reception) CHAPTER 4 DISASSEMBLY AND RE-ASSEMBLY (5) Remove the two bind B M4x12 Taptite screws. (6) Remove the cup S M3x6 Taptite screw. (7) Remove the drum spring R. (8) Remove the FG plate.
Main frame R Taptite, cup S M3x6 FG plate Taptite, bind B M4x12 Drum spring R Fig. 4-112 Taptite, bind B M4x12 (9) Remove the toner sensor PCB unit (Light reception). Main frame R Pin Fig. 4-113 4-64 Toner sensor PCB unit (Light reception) CHAPTER 4 DISASSEMBLY AND RE-ASSEMBLY (5) Remove the two bind B M4x12 Taptite screws. (6) Remove the cup S M3x6 Taptite screw. (7) Remove the drum spring R. (8) Remove the FG plate.

Service Manual
Page 174
... a click. Refer to excessive direct sunlight or room light, the unit may separate from the drum unit when you pick up the drum unit tightly so that toner powder does not spill out of the drum unit assembly. (Fig.5-4) HL-5130/5140/5150D/5170DN SERVICE MANUAL (4) Unpack the new drum unit. (5) Put the toner cartridge in the...
... a click. Refer to excessive direct sunlight or room light, the unit may separate from the drum unit when you pick up the drum unit tightly so that toner powder does not spill out of the drum unit assembly. (Fig.5-4) HL-5130/5140/5150D/5170DN SERVICE MANUAL (4) Unpack the new drum unit. (5) Put the toner cartridge in the...

Service Manual
Page 177
... or wash it may have a vertical stripe. Using or attempting to left several times. Fig. 5-14 5-6 Close the front cover of a genuine Brother drum unit. Warranty cover is specially formulated to ensure top print quality. • Printing with a 3rd party toner or toner cartridge may cause damage to ...a toner cartridge is left unpacked for a long period of time, the toner life is shortened • If an unpacked drum unit is subjected to excessive direct sunlight or room light, the unit may also cause serious damage to use of the printer itself and/or it off with the printer.
... or wash it may have a vertical stripe. Using or attempting to left several times. Fig. 5-14 5-6 Close the front cover of a genuine Brother drum unit. Warranty cover is specially formulated to ensure top print quality. • Printing with a 3rd party toner or toner cartridge may cause damage to ...a toner cartridge is left unpacked for a long period of time, the toner life is shortened • If an unpacked drum unit is subjected to excessive direct sunlight or room light, the unit may also cause serious damage to use of the printer itself and/or it off with the printer.

Service Manual
Page 190
... : • Condensation on the hopper plate and separation pad may cause the print image to be light. • If the photosensitive drum is cold, the electrical resistance of the photosensitive layer is used. If the drum unit is unpacked soon after the printer is increased, making it . This will take one or two...
... : • Condensation on the hopper plate and separation pad may cause the print image to be light. • If the photosensitive drum is cold, the electrical resistance of the photosensitive layer is used. If the drum unit is unpacked soon after the printer is increased, making it . This will take one or two...

Service Manual
Page 192
... cover) Cover open (Jam clear cover) Paper jam No paper (HL-5130) No paper (HL5140/5150D/5170 DN) No tray 1 Manual feed Memory full Print overrun Clean drum unit Toner (Yellow light) LED Drum (Yellow light) Paper (Yellow blink) Status (Red light)) Remedy Replace the toner cartridge with the control panel button. Load paper...the time the paper is to be necessary to reset the printer with a new one. Close the jam clear cover of the main body and drum unit. (Refer to correct it may also be fed from the tray 2, the paper feed from the tray 2 results in this Chapter.) 6-4...
... cover) Cover open (Jam clear cover) Paper jam No paper (HL-5130) No paper (HL5140/5150D/5170 DN) No tray 1 Manual feed Memory full Print overrun Clean drum unit Toner (Yellow light) LED Drum (Yellow light) Paper (Yellow blink) Status (Red light)) Remedy Replace the toner cartridge with the control panel button. Load paper...the time the paper is to be necessary to reset the printer with a new one. Close the jam clear cover of the main body and drum unit. (Refer to correct it may also be fed from the tray 2, the paper feed from the tray 2 results in this Chapter.) 6-4...

Service Manual
Page 213
IMAGE DEFECTS 7.1 Image Defect Examples HL-5130/5140/5150D/5170DN SERVICE MANUAL I-1 Light I-2 Dark I-3 Completely blank I-4 All black I-5 Dirt on back of paper I-6 Black vertical streaks I-10 White horizontal streaks I-6 Black vertical streaks I-11 Faulty registration ... roller and the pitch which appears in the image are listed below; No. Parts Name 1 First Paper Feed Roller 2 Paper Feed Roller 3 Transfer Roller 4 Photosensitive Drum 5 Heat Roller 6 Pressure Roller 7 Development Roller Diameter (The pitch which appears in the image) φ 13.6 mm (42.7 mm) φ 14.0 mm (44...
IMAGE DEFECTS 7.1 Image Defect Examples HL-5130/5140/5150D/5170DN SERVICE MANUAL I-1 Light I-2 Dark I-3 Completely blank I-4 All black I-5 Dirt on back of paper I-6 Black vertical streaks I-10 White horizontal streaks I-6 Black vertical streaks I-11 Faulty registration ... roller and the pitch which appears in the image are listed below; No. Parts Name 1 First Paper Feed Roller 2 Paper Feed Roller 3 Transfer Roller 4 Photosensitive Drum 5 Heat Roller 6 Pressure Roller 7 Development Roller Diameter (The pitch which appears in the image) φ 13.6 mm (42.7 mm) φ 14.0 mm (44...

