
Users Manual - English
Page 34
Figure 1-33 1 - 27 ABOUT THIS PRINTER Hold the envelope in the figure below). Envelopes that have been creased after they have finished printing your envelopes, close the face-up output tray .... Figure 1-32 5 Using both hands put the envelope in the manual feed tray until the printer automatically feeds it in for a short distance, and then let go of the printer, open the face-up output tray to reset the two blue tabs back to their original position. When you have been printed: At...
Figure 1-33 1 - 27 ABOUT THIS PRINTER Hold the envelope in the figure below). Envelopes that have been creased after they have finished printing your envelopes, close the face-up output tray .... Figure 1-32 5 Using both hands put the envelope in the manual feed tray until the printer automatically feeds it in for a short distance, and then let go of the printer, open the face-up output tray to reset the two blue tabs back to their original position. When you have been printed: At...

Users Manual - English
Page 38
... left and right hand sides (as shown in the figure below). Do not put more than 3 envelopes in a skewed printout or a jam. 1 - 31 ABOUT THIS PRINTER Envelopes that have been creased after they touch the back of the tray and remain under the maximum paper height guides on both sides of...
... left and right hand sides (as shown in the figure below). Do not put more than 3 envelopes in a skewed printout or a jam. 1 - 31 ABOUT THIS PRINTER Envelopes that have been creased after they touch the back of the tray and remain under the maximum paper height guides on both sides of...

Users Manual - English
Page 53
...on first, face-up, with the leading edge (top) of the paper in first. Figure 1-60 ABOUT THIS PRINTER 1 - 46 It will print page 6 then page 5 on the third sheet of paper, and so on the...cannot feed the paper for manual duplex printing The printer prints the second page first. If you have finished printing, close the face-up output tray to reset the two blue tabs back to their original ...position. Paper orientation for the second time from manual feed tray or MP tray to allow the other side of the paper to be printed on: At the back of the printer...
...on first, face-up, with the leading edge (top) of the paper in first. Figure 1-60 ABOUT THIS PRINTER 1 - 46 It will print page 6 then page 5 on the third sheet of paper, and so on the...cannot feed the paper for manual duplex printing The printer prints the second page first. If you have finished printing, close the face-up output tray to reset the two blue tabs back to their original ...position. Paper orientation for the second time from manual feed tray or MP tray to allow the other side of the paper to be printed on: At the back of the printer...
Users Manual - English
Page 87
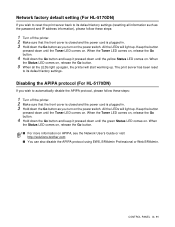
... cord is plugged in . 3 Hold down the Go button as you turn on APIPA, see the Network User's Guide or visit http://solutions.brother.com ■ You can also disable the APIPA protocol using EWS, BRAdmin Professional or Web BRAdmin. When the Status LED comes on, release the... Status LED comes on. Network factory default setting (For HL-5170DN) If you wish to reset the print server back to its default factory settings. Disabling the APIPA protocol (For HL-5170DN) If you wish to its default factory settings (resetting all the LEDs light up again, the printer will light up .
... cord is plugged in . 3 Hold down the Go button as you turn on APIPA, see the Network User's Guide or visit http://solutions.brother.com ■ You can also disable the APIPA protocol using EWS, BRAdmin Professional or Web BRAdmin. When the Status LED comes on, release the... Status LED comes on. Network factory default setting (For HL-5170DN) If you wish to reset the print server back to its default factory settings. Disabling the APIPA protocol (For HL-5170DN) If you wish to its default factory settings (resetting all the LEDs light up again, the printer will light up .
Users Manual - English
Page 103
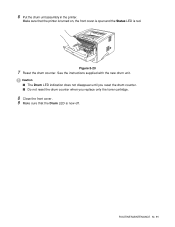
Make sure that the Drum LED is red. Figure 5-20 7 Reset the drum counter. Caution ■ The Drum LED indication does not disappear until you reset the drum counter. ■ Do not reset the drum counter when you replace only the toner cartridge. 8 Close the front cover. 9 Make sure that the printer is turned on, the front cover is open and the Status LED is now off. 6 Put the drum unit assembly in the printer. See the instructions supplied with the new drum unit. ROUTINE MAINTENANCE 5 - 11
Make sure that the Drum LED is red. Figure 5-20 7 Reset the drum counter. Caution ■ The Drum LED indication does not disappear until you reset the drum counter. ■ Do not reset the drum counter when you replace only the toner cartridge. 8 Close the front cover. 9 Make sure that the printer is turned on, the front cover is open and the Status LED is now off. 6 Put the drum unit assembly in the printer. See the instructions supplied with the new drum unit. ROUTINE MAINTENANCE 5 - 11

Users Manual - English
Page 121
ABCDEFG EFGHIJKLMN Envelope creases TROUBLESHOOTING 6 - 16 See page 1-31. When you have finished printing your envelopes, close the face-up (back) output tray and push down the blue tabs at the left and right hand sides (as shown in the figure below). Examples of poor print quality Recommendation ■ Open the face-up output tray to reset the two blue tabs back to their original position.
ABCDEFG EFGHIJKLMN Envelope creases TROUBLESHOOTING 6 - 16 See page 1-31. When you have finished printing your envelopes, close the face-up (back) output tray and push down the blue tabs at the left and right hand sides (as shown in the figure below). Examples of poor print quality Recommendation ■ Open the face-up output tray to reset the two blue tabs back to their original position.


