Users Manual - English
Page 12
Extension cords used batteries according to shut off the power completely. There is a danger of the power, call a qualified electrician.... that is easily accessible. Wanneer deze leeg zijn, moet u ze niet weggooien maar inleveren als Klein Chemisch Afval. Incorrectly wired extension cords may cause personal injury and equipment damage. Caution for Germany only) Lpa < 70 dB (A) DIN 45635-19-01-KL2 XI In...the battery. For Your Safety To ensure safe operation the supplied three-pin plug must disconnect the power cord from the power outlet to local regulations. IMPORTANT -
Extension cords used batteries according to shut off the power completely. There is a danger of the power, call a qualified electrician.... that is easily accessible. Wanneer deze leeg zijn, moet u ze niet weggooien maar inleveren als Klein Chemisch Afval. Incorrectly wired extension cords may cause personal injury and equipment damage. Caution for Germany only) Lpa < 70 dB (A) DIN 45635-19-01-KL2 XI In...the battery. For Your Safety To ensure safe operation the supplied three-pin plug must disconnect the power cord from the power outlet to local regulations. IMPORTANT -
Users Manual - English
Page 18
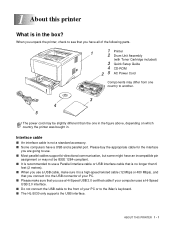
..., but some might have a USB and a parallel port. 1 About this printer What is no longer than the one country to another. 3 4 5 The power cord may not be slightly different than 6 feet (2 metres). ■ When you use a USB cable, make sure it is a high-speed twisted cable (12 Mbps...to the front of the following parts. 1 1 Printer 2 Drum Unit Assembly (with Toner Cartridge included) 3 Quick Setup Guide 4 CD-ROM 2 5 AC Power Cord Components may differ from one in the figure above, depending on which country the printer was bought in the box? Please buy the appropriate cable...
..., but some might have a USB and a parallel port. 1 About this printer What is no longer than the one country to another. 3 4 5 The power cord may not be slightly different than 6 feet (2 metres). ■ When you use a USB cable, make sure it is a high-speed twisted cable (12 Mbps...to the front of the following parts. 1 1 Printer 2 Drum Unit Assembly (with Toner Cartridge included) 3 Quick Setup Guide 4 CD-ROM 2 5 AC Power Cord Components may differ from one in the figure above, depending on which country the printer was bought in the box? Please buy the appropriate cable...

Users Manual - English
Page 21
... ranges of temperature and humidity: Temperature: 10 °C to 32.5 °C (50 °F to 90.5 °F) Humidity: 20% to 240 V, 50/60 Hz The power cord, including extensions, should be no longer than 5 metres (16½ feet). Power supply Use the printer within the following before you use a voltage transformer or...
... ranges of temperature and humidity: Temperature: 10 °C to 32.5 °C (50 °F to 90.5 °F) Humidity: 20% to 240 V, 50/60 Hz The power cord, including extensions, should be no longer than 5 metres (16½ feet). Power supply Use the printer within the following before you use a voltage transformer or...
Users Manual - English
Page 90
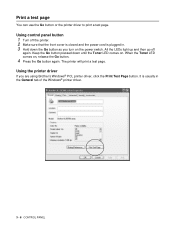
Keep the Go button pressed down the Go button as you are using Brother's Windows® PCL printer driver, click the Print Test Page button. When the Toner LED comes on . All the LEDs light up and then go ...off the printer. 2 Make sure that the front cover is closed and the power cord is usually in . 3 Hold down until the Toner LED comes on , release the Go button. 4 Press the Go button again. Using the printer driver If...
Keep the Go button pressed down the Go button as you are using Brother's Windows® PCL printer driver, click the Print Test Page button. When the Toner LED comes on . All the LEDs light up and then go ...off the printer. 2 Make sure that the front cover is closed and the power cord is usually in . 3 Hold down until the Toner LED comes on , release the Go button. 4 Press the Go button again. Using the printer driver If...
Users Manual - English
Page 91
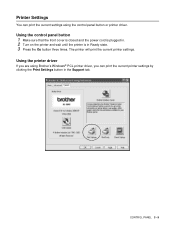
Using the printer driver If you are using Brother's Windows® PCL printer driver, you can print the current settings using the control panel button or printer driver. Using the control panel button 1 Make sure that the front cover is closed and the power cord is plugged in. 2 Turn on the printer and wait until the printer is in the Support tab. The printer will print the current printer settings. CONTROL PANEL 3 - 9 Printer Settings You can print the current printer settings by clicking the Print Settings button in Ready state. 3 Press the Go button three times.
Using the printer driver If you are using Brother's Windows® PCL printer driver, you can print the current settings using the control panel button or printer driver. Using the control panel button 1 Make sure that the front cover is closed and the power cord is plugged in. 2 Turn on the printer and wait until the printer is in the Support tab. The printer will print the current printer settings. CONTROL PANEL 3 - 9 Printer Settings You can print the current printer settings by clicking the Print Settings button in Ready state. 3 Press the Go button three times.

Users Manual - English
Page 92
...button pressed down the Go button as you can print a list of the internal fonts using Brother's Windows® PCL printer driver, you turn on the power switch. Print fonts (For HL-5040, HL-5050 and HL-5070N) You can print a list of the internal fonts by clicking the Print Fonts button in . 3 Hold down until ... Go button. The printer will print a list of the internal fonts. Using the control panel button 1 Turn off again. All the LEDs light up and then go off the printer. 2 Make sure that the front cover is closed and the power cord is plugged in the Support tab. 3 - 10 CONTROL ...
...button pressed down the Go button as you can print a list of the internal fonts using Brother's Windows® PCL printer driver, you turn on the power switch. Print fonts (For HL-5040, HL-5050 and HL-5070N) You can print a list of the internal fonts by clicking the Print Fonts button in . 3 Hold down until ... Go button. The printer will print a list of the internal fonts. Using the control panel button 1 Turn off again. All the LEDs light up and then go off the printer. 2 Make sure that the front cover is closed and the power cord is plugged in the Support tab. 3 - 10 CONTROL ...
Users Manual - English
Page 93
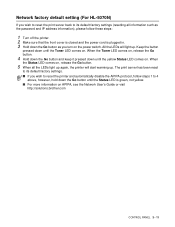
...printer and automatically disable the APIPA protocol, follow these steps: 1 Turn off the printer. 2 Make sure that the front cover is closed and the power cord is plugged in. 3 Hold down the Go button as you wish to reset the print server back to 4 above, however, hold down the Go button...LED is green, not yellow. ■ For more information on APIPA, see the Network User's Guide or visit http://solutions.brother.com CONTROL PANEL 3 - 11 Network factory default setting (For HL-5070N) If you turn on the power switch. Keep the button pressed down until the Toner LED comes on . The print...
...printer and automatically disable the APIPA protocol, follow these steps: 1 Turn off the printer. 2 Make sure that the front cover is closed and the power cord is plugged in. 3 Hold down the Go button as you wish to reset the print server back to 4 above, however, hold down the Go button...LED is green, not yellow. ■ For more information on APIPA, see the Network User's Guide or visit http://solutions.brother.com CONTROL PANEL 3 - 11 Network factory default setting (For HL-5070N) If you turn on the power switch. Keep the button pressed down until the Toner LED comes on . The print...
Quick Setup Guide - English
Page 2
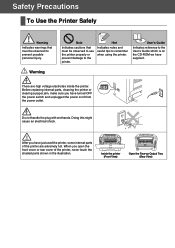
... to the User's Guide which is on the CD-ROM we have turned OFF the power switch and unplugged the power cord from the power outlet. Before replacing internal parts, cleaning the printer or clearing a paper jam, make sure you have supplied. Do not handle the plug with wet... hands. Warning Note Indicates cautions that must be observed to prevent possible personal injury. When you have just used the printer, some internal parts of the printer, never touch the shaded parts shown in the illustration. Doing this might cause an electrical shock. Inside the printer ...
... to the User's Guide which is on the CD-ROM we have turned OFF the power switch and unplugged the power cord from the power outlet. Before replacing internal parts, cleaning the printer or clearing a paper jam, make sure you have supplied. Do not handle the plug with wet... hands. Warning Note Indicates cautions that must be observed to prevent possible personal injury. When you have just used the printer, some internal parts of the printer, never touch the shaded parts shown in the illustration. Doing this might cause an electrical shock. Inside the printer ...
Quick Setup Guide - English
Page 5
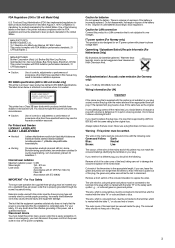
... of the coloured insulation to 120 volt Model Only) U.S. MANUFACTURED: Brother Industries, Ltd., 15-1 Naeshiro-cho Mizuho-ku Nagoya, 467-8561 Japan This product complies with the same rating as the original fuse. Internal laser radiation Maximum radiation power: 5 mW Wave length: 760 - ... fuse that the installation is a Class 1 laser product as the original. IEC 60825 specification (220 to disconnect. Incorrectly wired extension cords may result in line with IEC 60825) IMPORTANT - IT power system (For Norway only) This product is not subjected to damage the...
... of the coloured insulation to 120 volt Model Only) U.S. MANUFACTURED: Brother Industries, Ltd., 15-1 Naeshiro-cho Mizuho-ku Nagoya, 467-8561 Japan This product complies with the same rating as the original fuse. Internal laser radiation Maximum radiation power: 5 mW Wave length: 760 - ... fuse that the installation is a Class 1 laser product as the original. IEC 60825 specification (220 to disconnect. Incorrectly wired extension cords may result in line with IEC 60825) IMPORTANT - IT power system (For Norway only) This product is not subjected to damage the...
Quick Setup Guide - English
Page 6
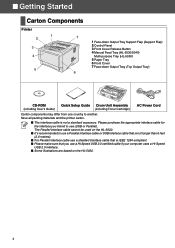
...2 7 3 4 5 6 1 Face-down Output Tray Support Flap (Support Flap) 2 Control Panel 3 Front Cover Release Button 4 Manual Feed Tray (HL-5030/5040) Multi-purpose Tray (HL-5050) 5 Paper Tray 6 Front Cover 7 Face-down Output Tray (Top Output Tray) CD-ROM (including User's Guide) Quick Setup Guide Drum Unit ...Assembly (including Toner Cartridge) AC Power Cord Carton components may differ from one country to use a Hi-Speed...
...2 7 3 4 5 6 1 Face-down Output Tray Support Flap (Support Flap) 2 Control Panel 3 Front Cover Release Button 4 Manual Feed Tray (HL-5030/5040) Multi-purpose Tray (HL-5050) 5 Paper Tray 6 Front Cover 7 Face-down Output Tray (Top Output Tray) CD-ROM (including User's Guide) Quick Setup Guide Drum Unit ...Assembly (including Toner Cartridge) AC Power Cord Carton components may differ from one country to use a Hi-Speed...

Quick Setup Guide - English
Page 12
The printer prints a test page. Connecting the interface cable is off. Go to the next page to the printer. 2 Plug the AC power cord into an AC outlet. Turn the power switch on. 4 Press the Go button. Check that the printer power switch is done when installing the driver. 3... After the printer has finished warming up, the Status LED stops blinking and stays green. Connect the AC power cord to install the driver. 10 Extend the Support flap. 1 Make sure that the test page has printed correctly. Step 1 Setting Up Your Printer 4 Print a ...
The printer prints a test page. Connecting the interface cable is off. Go to the next page to the printer. 2 Plug the AC power cord into an AC outlet. Turn the power switch on. 4 Press the Go button. Check that the printer power switch is done when installing the driver. 3... After the printer has finished warming up, the Status LED stops blinking and stays green. Connect the AC power cord to install the driver. 10 Extend the Support flap. 1 Make sure that the test page has printed correctly. Step 1 Setting Up Your Printer 4 Print a ...

Quick Setup Guide - English
Page 24
... other errors relating to the Printer and may VOID THE WARRANTY. 1 Turn off the printer power switch, and then unplug the AC power cord. 3 Re-pack the printer. 2 Remove the drum unit assembly. Failure to remove the unit and place it in the foil bag. Trademarks The... and specifications. Adobe PostScript® and PostScript3TM are subject to avoid any damage during shipping will cause severe damage to the publication. registered mark. Brother reserves the right to make changes without notice. ■ Other Information Shipment of the Printer If for any reason you save and use in a...
... other errors relating to the Printer and may VOID THE WARRANTY. 1 Turn off the printer power switch, and then unplug the AC power cord. 3 Re-pack the printer. 2 Remove the drum unit assembly. Failure to remove the unit and place it in the foil bag. Trademarks The... and specifications. Adobe PostScript® and PostScript3TM are subject to avoid any damage during shipping will cause severe damage to the publication. registered mark. Brother reserves the right to make changes without notice. ■ Other Information Shipment of the Printer If for any reason you save and use in a...