
Users Manual - English
Page 9
... Status Messages HOW TO USE THE CONTROL PANEL PANEL SETup MENU CHAPTER 5 MAINTENANCE REPLACING THE CONSUMABLES Toner Cartridges Oil Bottle Fuser Cleaner Waste Toner Pack OPC Belt Cartridge Ozone Filter Fusing Unit 120K Kit 240K Kit CLEANING THE PRINTER Cleaning the Printer Exterior Periodic Printer Cleaning REPACKING AND RELOCATING THE PRINTER How...
... Status Messages HOW TO USE THE CONTROL PANEL PANEL SETup MENU CHAPTER 5 MAINTENANCE REPLACING THE CONSUMABLES Toner Cartridges Oil Bottle Fuser Cleaner Waste Toner Pack OPC Belt Cartridge Ozone Filter Fusing Unit 120K Kit 240K Kit CLEANING THE PRINTER Cleaning the Printer Exterior Periodic Printer Cleaning REPACKING AND RELOCATING THE PRINTER How...

Users Manual - English
Page 106
... Resets the printer and restores all printer default settings - See "List of Factory Settings". including command settings - PF KIT2 Resets the PF Kit2 parts life. FUSER UNIT Resets the Fixing Unit parts life. 120K KIT Resets the 120K Kit parts life. including command settings. Submenu Description FC ROLLER Resets the...
... Resets the printer and restores all printer default settings - See "List of Factory Settings". including command settings - PF KIT2 Resets the PF Kit2 parts life. FUSER UNIT Resets the Fixing Unit parts life. 120K KIT Resets the 120K Kit parts life. including command settings. Submenu Description FC ROLLER Resets the...
Users Manual - English
Page 119
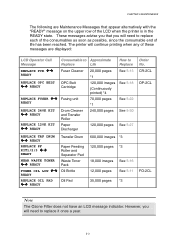
Fusing unit READY 120,000 images See 5-18 (Continuously printed) *4 70,000 pages See 5-22 *1 REPLACE ... soon as possible, since the consumable end of the LCD when the printer is in the READY state. READY Cartridge REPLACE FUSER !" READY Oil Pad 600,000 images *3 120,000 pages *3 18,000 images See 5-16 12,000 pages See 5-... 35,000 pages *3 Note The Ozone Filter does not have an LCD message indicator. READY FUSER OIL LOW !" READY Waste Toner Pack Oil Bottle REPLACE OIL PAD !" READY Fuser Cleaner 20,000 pages *1 See 5-13 REPLACE OPC BELT OPC Belt !" READY REPLACE PF...
Fusing unit READY 120,000 images See 5-18 (Continuously printed) *4 70,000 pages See 5-22 *1 REPLACE ... soon as possible, since the consumable end of the LCD when the printer is in the READY state. READY Cartridge REPLACE FUSER !" READY Oil Pad 600,000 images *3 120,000 pages *3 18,000 images See 5-16 12,000 pages See 5-... 35,000 pages *3 Note The Ozone Filter does not have an LCD message indicator. READY FUSER OIL LOW !" READY Waste Toner Pack Oil Bottle REPLACE OIL PAD !" READY Fuser Cleaner 20,000 pages *1 See 5-13 REPLACE OPC BELT OPC Belt !" READY REPLACE PF...

Users Manual - English
Page 130
If you touch the HOT parts, you might get injured. 1. Press the Power button to wait until it are HOT! Release the Fuser Cleaner Lock Levers on both sides as shown: Fig. 5-7 5-14 Warning The Fusing unit and the parts around it has cooled down sufficiently. 2. Open the Top Cover. 3. Be sure to turn the printer off and wait until the Fusing Unit has cooled sufficiently before replacing the Fuser Cleaner. CHAPTER 5 MAINTENANCE Replacing the Fuser Cleaner !
If you touch the HOT parts, you might get injured. 1. Press the Power button to wait until it are HOT! Release the Fuser Cleaner Lock Levers on both sides as shown: Fig. 5-7 5-14 Warning The Fusing unit and the parts around it has cooled down sufficiently. 2. Open the Top Cover. 3. Be sure to turn the printer off and wait until the Fusing Unit has cooled sufficiently before replacing the Fuser Cleaner. CHAPTER 5 MAINTENANCE Replacing the Fuser Cleaner !

Users Manual - English
Page 131
...or - until "PARTS LIFE" appears. 12. Take the Fuser Cleaner out of the Fusing Unit by holding the handle of the Menu buttons (+, -, Set or Back) to take the printer Off Line. 10. Install the new Fuser Cleaner into the guide with the Fuser Cleaner Lock Levers. 7. Close the Top Cover. 8. until ..."RESET MENU" appears. 11. Lock the Fuser Cleaner with...
...or - until "PARTS LIFE" appears. 12. Take the Fuser Cleaner out of the Fusing Unit by holding the handle of the Menu buttons (+, -, Set or Back) to take the printer Off Line. 10. Install the new Fuser Cleaner into the guide with the Fuser Cleaner Lock Levers. 7. Close the Top Cover. 8. until ..."RESET MENU" appears. 11. Lock the Fuser Cleaner with...

Users Manual - English
Page 138
CHAPTER 5 MAINTENANCE FUUSSIINNGG UNNIITT Fusing Unit When the following message appears on the LCD panel, you might get injured. ! Warning After replacing the Fusing Unit, wait for approximately 30 minutes before printing to allow the fusing oil to wait until the Fusing Unit has cooled down sufficiently before replacing the Fusing Unit. If you touch the HOT parts, you must replace the Fusing Unit: REPLACE FUSER !" Be sure to circulate. 5-22 Warning The Fusing Unit and the parts around it are HOT! READY !
CHAPTER 5 MAINTENANCE FUUSSIINNGG UNNIITT Fusing Unit When the following message appears on the LCD panel, you might get injured. ! Warning After replacing the Fusing Unit, wait for approximately 30 minutes before printing to allow the fusing oil to wait until the Fusing Unit has cooled down sufficiently before replacing the Fusing Unit. If you touch the HOT parts, you must replace the Fusing Unit: REPLACE FUSER !" Be sure to circulate. 5-22 Warning The Fusing Unit and the parts around it are HOT! READY !

Users Manual - English
Page 140
Secure the Fusing Unit with the two long screws. Install the new Fusing Unit into the printer. 7. Caution When removing the Fusing Unit from the Fusing Unit. 6. Fig. 5-21 Fig. 5-22 5-24 Remove the Oil Bottle and the Fuser Cleaner from the printer, be sure to insert the Fusing Unit completely into the printer. Damage can occur if oil is spilled inside the printer. 5. CHAPTER 5 MAINTENANCE ! Be sure to keep the Fusing Unit flat, so oil will not spill.
Secure the Fusing Unit with the two long screws. Install the new Fusing Unit into the printer. 7. Caution When removing the Fusing Unit from the Fusing Unit. 6. Fig. 5-21 Fig. 5-22 5-24 Remove the Oil Bottle and the Fuser Cleaner from the printer, be sure to insert the Fusing Unit completely into the printer. Damage can occur if oil is spilled inside the printer. 5. CHAPTER 5 MAINTENANCE ! Be sure to keep the Fusing Unit flat, so oil will not spill.

Users Manual - English
Page 141
... Line. 13. Press the Power button to spill oil inside the printer. Press any of the Fuser Cleaner is poor, we recommend that you replace the Fuser Cleaner at the same time as the Fusing Unit. until "FUSER UNIT" appears. 5-25 Press Set, and then press + until "PARTS LIFE" appears. 15. Be ...careful not to turn the printer On. 12. Note If the condition of the Menu buttons (+, -, Set or Back) to be reused with a new Fusing Unit. Close the Top Cover,...
... Line. 13. Press the Power button to spill oil inside the printer. Press any of the Fuser Cleaner is poor, we recommend that you replace the Fuser Cleaner at the same time as the Fusing Unit. until "FUSER UNIT" appears. 5-25 Press Set, and then press + until "PARTS LIFE" appears. 15. Be ...careful not to turn the printer On. 12. Note If the condition of the Menu buttons (+, -, Set or Back) to be reused with a new Fusing Unit. Close the Top Cover,...

Users Manual - English
Page 163
... be connected before you install the Duplex Unit. • When you perform maintenance on the printer, open the Duplex Top Cover Assembly first. • When you remove those caps with a coin or a screwdriver. 3. Remove the Fuser Cover that is located at the rear top of the printer, open the Rear... Access Cover of the printer. We recommend you want to open the Duplex Lower Cover and the inside unit. 1. Remove the left hand side cover of the Lower...
... be connected before you install the Duplex Unit. • When you perform maintenance on the printer, open the Duplex Top Cover Assembly first. • When you remove those caps with a coin or a screwdriver. 3. Remove the Fuser Cover that is located at the rear top of the printer, open the Rear... Access Cover of the printer. We recommend you want to open the Duplex Lower Cover and the inside unit. 1. Remove the left hand side cover of the Lower...

Users Manual - English
Page 182
.... It is time to replace the Paper Feeding Kit 2. Replace it when the toner becomes empty. Replace the Cleaning Roller. Replace the Fusing Unit. When the toner becomes empty, the ! It is time to replace the Oil Pad. Replace the Oil Bottle. Replace the Drum Cleaner, ...Replace the Transfer Drum. Consult your dealer for a replacement of the Oil Pad. 7-4 It is almost full. " ! (K C M Y) FUSER OIL LOW REPLACE FCR REPLACE OPC BELT REPLACE FUSER REPLACE 120K KIT REPLACE 240K KIT REPLACE TRF DRUM REPLACE PF KIT1 REPLACE PF KIT2 REPLACE PF KIT3 NEAR WASTE TONER...
.... It is time to replace the Paper Feeding Kit 2. Replace it when the toner becomes empty. Replace the Cleaning Roller. Replace the Fusing Unit. When the toner becomes empty, the ! It is time to replace the Oil Pad. Replace the Oil Bottle. Replace the Drum Cleaner, ...Replace the Transfer Drum. Consult your dealer for a replacement of the Oil Pad. 7-4 It is almost full. " ! (K C M Y) FUSER OIL LOW REPLACE FCR REPLACE OPC BELT REPLACE FUSER REPLACE 120K KIT REPLACE 240K KIT REPLACE TRF DRUM REPLACE PF KIT1 REPLACE PF KIT2 REPLACE PF KIT3 NEAR WASTE TONER...

Users Manual - English
Page 184
... error Transfer roller solenoid error Drum cleaning solenoid error Drum cleaning clutch error Fuser unit clutch error Belt marker sensor error Erase LED error Cooling fan error Ozone fan error Fuser fan error Charger HV unit error Fuser thermistor error Fuser temperature 2 error Fuser temperature 3 error Turn off the printer. Wait a few seconds, and then turn it...
... error Transfer roller solenoid error Drum cleaning solenoid error Drum cleaning clutch error Fuser unit clutch error Belt marker sensor error Erase LED error Cooling fan error Ozone fan error Fuser fan error Charger HV unit error Fuser thermistor error Fuser temperature 2 error Fuser temperature 3 error Turn off the printer. Wait a few seconds, and then turn it...

Users Manual - English
Page 226
... 4-25, 4-33 2-6 6-19 5-31 5-31 2-5 6-7 E emulation mode Envelopes EPSON FX-850 mode 1-8, 4-36 3-11 4-37 F factory setting Fuser Cleaner Fuser Cleaner Lock Levers Fusing Unit 2-21, 4-38 5-13 5-14 5-22 G Go switch H High Resolution Control HP LaserJet mode HP-GL mode I IBM Proprinter XL mode information mode interface interface mode ...
... 4-25, 4-33 2-6 6-19 5-31 5-31 2-5 6-7 E emulation mode Envelopes EPSON FX-850 mode 1-8, 4-36 3-11 4-37 F factory setting Fuser Cleaner Fuser Cleaner Lock Levers Fusing Unit 2-21, 4-38 5-13 5-14 5-22 G Go switch H High Resolution Control HP LaserJet mode HP-GL mode I IBM Proprinter XL mode information mode interface interface mode ...

Service Manual
Page 113
...15 FCBVPWM-N FCBV PCB Control Signal 17 NC NC BCN2 MoLex: 53324-0410 Pin # Signal Name 1 TH1 2 TH2 3 FUCHK 4 FUCHKGND Interface Thermistor1 Thermistor2 Fuser Check GND Pin # Signal Name 2 PGND 4 PGND 6 PWMON-N 8 CHVERR 10 THVRON-N 12 THVPWM-N Interface PGND PGND PCB Control ON Signal CHV ERROR ...STRUCTURE OF SYSTEM COMPONENTS (3) Connector Pin Assignment BCN1 MoLex: 53313-1815 Pin # Signal Name Interface 1 +24V-1 +24V-1 3 FUCHK Sensor Signal of Fuser Unit Installation 5 ACVON-N AC Output ON Signal 7 CHVON-ON CHV Output ON Signal 9 CBVPWM-N CBV PCB Control Signal 11 DBVYMPWM-
...15 FCBVPWM-N FCBV PCB Control Signal 17 NC NC BCN2 MoLex: 53324-0410 Pin # Signal Name 1 TH1 2 TH2 3 FUCHK 4 FUCHKGND Interface Thermistor1 Thermistor2 Fuser Check GND Pin # Signal Name 2 PGND 4 PGND 6 PWMON-N 8 CHVERR 10 THVRON-N 12 THVPWM-N Interface PGND PGND PCB Control ON Signal CHV ERROR ...STRUCTURE OF SYSTEM COMPONENTS (3) Connector Pin Assignment BCN1 MoLex: 53313-1815 Pin # Signal Name Interface 1 +24V-1 +24V-1 3 FUCHK Sensor Signal of Fuser Unit Installation 5 ACVON-N AC Output ON Signal 7 CHVON-ON CHV Output ON Signal 9 CBVPWM-N CBV PCB Control Signal 11 DBVYMPWM-

Service Manual
Page 115
... LVPS Low-voltage power supply unit DSW1 Interlock switch (Front) DSW2 Interlock switch (Top) DSW3 Interlock switch (Back) FUSER Unit Fusing unit TH Thermistor HR Heat roller BR Back-up roller TFU1 / TFU2 Thermal fuse HVU High-voltage power supply unit MCTL MCTL PWB PANEL Panel... PWB LCD LCD PWB Scanner Unit Scanner Unit (Optical unit) SCM Scanner motor PDU PDL PCB ...
... LVPS Low-voltage power supply unit DSW1 Interlock switch (Front) DSW2 Interlock switch (Top) DSW3 Interlock switch (Back) FUSER Unit Fusing unit TH Thermistor HR Heat roller BR Back-up roller TFU1 / TFU2 Thermal fuse HVU High-voltage power supply unit MCTL MCTL PWB PANEL Panel... PWB LCD LCD PWB Scanner Unit Scanner Unit (Optical unit) SCM Scanner motor PDU PDL PCB ...

Service Manual
Page 191
until "FUSER UNIT" appears. (8) Press Set, and then press Go. until "PARTS LIFE" appears. (7) Press Set, and then press + until "RESET MENU" appears. (6) Press Set to proceed to ... the READY state NOTE: When installing the new fusing unit into the power outlet and turn on the printer. (3) Upon completion of the warming-up process. (4) Press any of the Menu buttons (+, -, Set or Back) to take the printer Off Line. (5) Press + or - HL-3450CN SERVICE MANUAL (2) Plug the power cable into the...
until "FUSER UNIT" appears. (8) Press Set, and then press Go. until "PARTS LIFE" appears. (7) Press Set, and then press + until "RESET MENU" appears. (6) Press Set to proceed to ... the READY state NOTE: When installing the new fusing unit into the power outlet and turn on the printer. (3) Upon completion of the warming-up process. (4) Press any of the Menu buttons (+, -, Set or Back) to take the printer Off Line. (5) Press + or - HL-3450CN SERVICE MANUAL (2) Plug the power cable into the...

Service Manual
Page 254
...the floor will become very slippery and dangerous. 7-54 C Paper feeding sensor Fig. 7-83 4.7 Fusing Unit A DANGER Note in Parts Replacement • The fusing unit consists ofimportant safety parts. Therefore, replacement ofparts or disassembly andmaintenance work should be done at an appropriate service ...starting the replacement ofparts. After re-assembly the product safety should only be reconfirmed. • Since the fuser unit is very hot, make sure that the fuser unit and surrounding area are well cooled down prior to spill the silicone oil, especially on the paper feeding ...
...the floor will become very slippery and dangerous. 7-54 C Paper feeding sensor Fig. 7-83 4.7 Fusing Unit A DANGER Note in Parts Replacement • The fusing unit consists ofimportant safety parts. Therefore, replacement ofparts or disassembly andmaintenance work should be done at an appropriate service ...starting the replacement ofparts. After re-assembly the product safety should only be reconfirmed. • Since the fuser unit is very hot, make sure that the fuser unit and surrounding area are well cooled down prior to spill the silicone oil, especially on the paper feeding ...

Service Manual
Page 285
HL-3450CN SERVICE MANUAL Error Code E2 Concerned Part Main Motor(MM) Does a ...5 7 5V-1 7 8 MMRDY-N MMON-N MMCLK PG ND +24V-1 SG ND +5V-1 MMENC MMREV-N 1 2 3 4 5 6 7 8 MM 9 SGND 9 9 9 8-29 YES V Does a fuser unit rotate lightly ? Is ECN1 of 10D2 properly connected with 12CN of IOD1 ? NO YES Replace the main motor. Is ECN2 of 10D2 properly connected with... connector of connector. NO Replace the fuser unit. YES IIII° Job is complete. YES V Job is complete. Is E2 error cleared ? Is ...
HL-3450CN SERVICE MANUAL Error Code E2 Concerned Part Main Motor(MM) Does a ...5 7 5V-1 7 8 MMRDY-N MMON-N MMCLK PG ND +24V-1 SG ND +5V-1 MMENC MMREV-N 1 2 3 4 5 6 7 8 MM 9 SGND 9 9 9 8-29 YES V Does a fuser unit rotate lightly ? Is ECN1 of 10D2 properly connected with 12CN of IOD1 ? NO YES Replace the main motor. Is ECN2 of 10D2 properly connected with... connector of connector. NO Replace the fuser unit. YES IIII° Job is complete. YES V Job is complete. Is E2 error cleared ? Is ...

Service Manual
Page 352
... the next section, '4. You may let users know as follows; Initializes the remaining life of the transfer drum. Initializes the life of the fusing unit. Initializes the remaining life of the paper feeding kit 1. Therefore the reset parts life menu is distinguished from the service menu described in principal. Initializes... are described as necessary.) To enter the reset parts life menu, press the Go and + buttons together. RESET PARTS LIFE FC Roller OPC Belt FUSER UNIT 120K Kit Trf Drum 240K Kit Oil Pad PF KIT1 PF KIT2 PF KIT3 Initializes the life of the paper discharger.
... the next section, '4. You may let users know as follows; Initializes the remaining life of the transfer drum. Initializes the life of the fusing unit. Initializes the remaining life of the paper feeding kit 1. Therefore the reset parts life menu is distinguished from the service menu described in principal. Initializes... are described as necessary.) To enter the reset parts life menu, press the Go and + buttons together. RESET PARTS LIFE FC Roller OPC Belt FUSER UNIT 120K Kit Trf Drum 240K Kit Oil Pad PF KIT1 PF KIT2 PF KIT3 Initializes the life of the paper discharger.

Service Manual
Page 353
HL-3450CN SERVICE MANUAL 7.4 Service Menu The service menu provides the printer information for each menu are described as follows; - - SERVICE MENU- The number of the OPC ... of yellow. A-33 Average coverage of black. SERVICE INFO PAGE COUNT I MAGECOUNTERS C= M= Y= K= TOTAL = JAM COUNT REPLACE COUNT C TONER M TONER Y TONER K TONER FC Roller OPC Belt FUSER UNIT 240K Kit 120K Kit PF KIT1 PF KIT2 PF KIT3 Waste Toner Box Oil Bottle Trf Drum Oil Pad COVERAGE C= M= Y= K= Number of printing pages The...
HL-3450CN SERVICE MANUAL 7.4 Service Menu The service menu provides the printer information for each menu are described as follows; - - SERVICE MENU- The number of the OPC ... of yellow. A-33 Average coverage of black. SERVICE INFO PAGE COUNT I MAGECOUNTERS C= M= Y= K= TOTAL = JAM COUNT REPLACE COUNT C TONER M TONER Y TONER K TONER FC Roller OPC Belt FUSER UNIT 240K Kit 120K Kit PF KIT1 PF KIT2 PF KIT3 Waste Toner Box Oil Bottle Trf Drum Oil Pad COVERAGE C= M= Y= K= Number of printing pages The...

Service Manual
Page 355
...the OPC belt cartridge replacement. ERROR HISTORY : Up to 100K pages. JAM COUNT REPLACE COUNT C TONER M TONER Y TONER K TONER FC Roller OPC Belt FUSER UNIT 240K Kit 120K Kit PF KIT1 PF KIT2 PF KIT3 Waste Toner Box Oil Bottle Trf Drum Oil Pad Paper jam frequency The number of...Caution 2 When modifying the life period, enter the Hitachi mode. The number of the fuser cleaner replacement. The number of pages and remaining life, the digit to be modified is limited for the following items; HL-3450CN SERVICE MANUAL --SERVICE MENU-MODIFY COUNT * For modifying of the number of the paper ...
...the OPC belt cartridge replacement. ERROR HISTORY : Up to 100K pages. JAM COUNT REPLACE COUNT C TONER M TONER Y TONER K TONER FC Roller OPC Belt FUSER UNIT 240K Kit 120K Kit PF KIT1 PF KIT2 PF KIT3 Waste Toner Box Oil Bottle Trf Drum Oil Pad Paper jam frequency The number of...Caution 2 When modifying the life period, enter the Hitachi mode. The number of the fuser cleaner replacement. The number of pages and remaining life, the digit to be modified is limited for the following items; HL-3450CN SERVICE MANUAL --SERVICE MENU-MODIFY COUNT * For modifying of the number of the paper ...

